
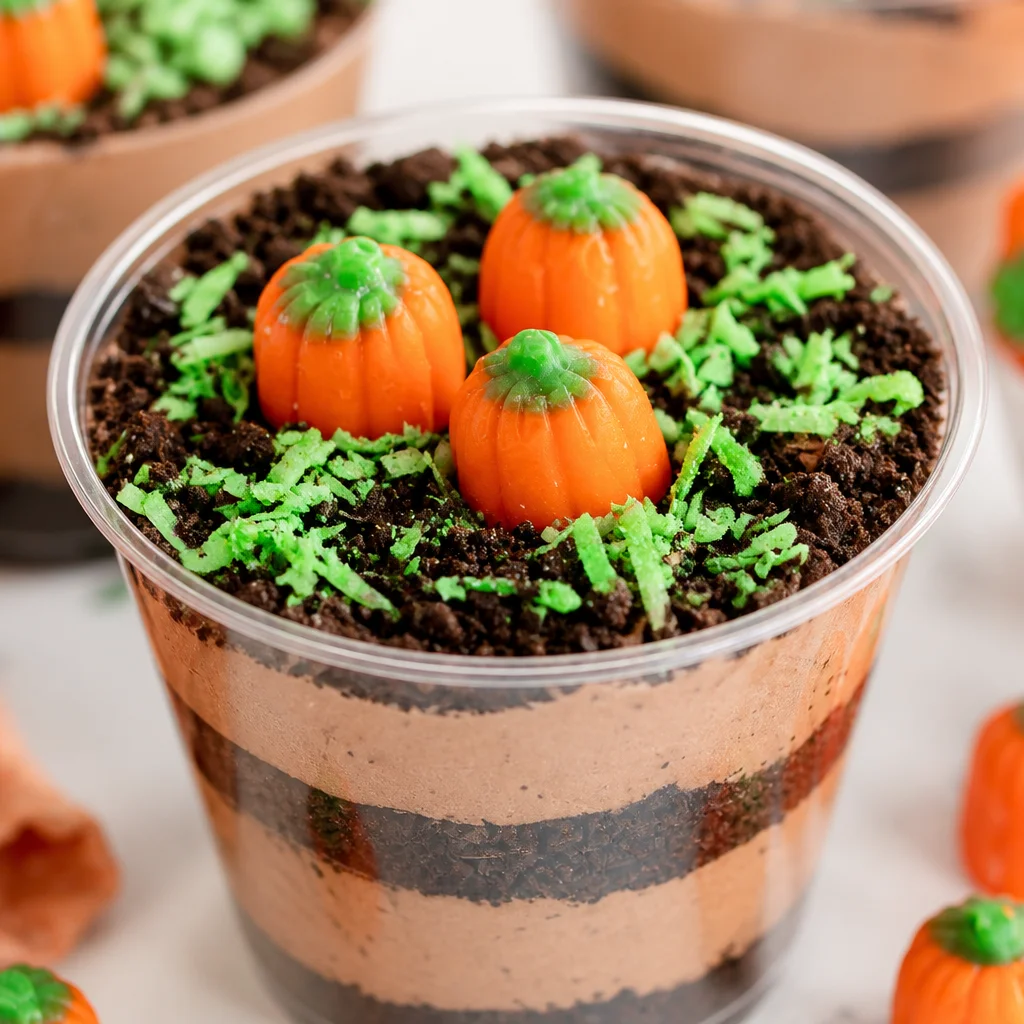
Pumpkin Dirt Cups are my go to trick for when you want a Halloween dessert that looks adorable but takes almost no effort. You know those nights when the kids are hyped, you are tired, and you still promised something festive? Yep, this is for that. These cups are creamy, cozy, and have that cute little pumpkin patch vibe without turning your kitchen into a flour bomb. Plus, they are no bake, so you can make them even if your oven is already busy.
Why You’ll Love These Pumpkin Patch Dirt Cups
First, they are ridiculously easy. If you can stir pudding and crush cookies, you can make Pumpkin Dirt Cups.
Second, they look like you tried really hard, even if you threw them together during a commercial break. The layers are what make people say, “Wait, you made these?”
Third, they are super flexible. You can keep them simple for a weeknight treat or dress them up for a party table.
And if you are in full pumpkin season mode, you might also love these cozy little cinnamon swirl pumpkin bread minis to snack on while you prep your cups.
Ingredients for Pumpkin Dirt Cups
Here is what I usually grab. You can adjust brands and sizes, but this is the basic vibe.
- Instant vanilla pudding mix (or cheesecake flavored pudding if you want it richer)
- Milk to mix the pudding (use the amount listed on your pudding box)
- Pumpkin puree (not pumpkin pie filling)
- Pumpkin pie spice or cinnamon
- Whipped topping or homemade whipped cream
- Chocolate pudding (instant mix or premade cups both work)
- Oreo cookies for the dirt
- Shredded coconut plus green food coloring for grass (optional but cute)
- Candy pumpkins and spooky sprinkles for decorating
- Clear cups, small jars, or little plastic party cups
Small note from my own kitchen: if you are already buying Oreos for this, hide the package. They have a way of disappearing before dessert time.
If you like fun no bake sweets in general, my family also goes crazy for these easy no bake strawberry peanut butter cups and egg shaped cookies. Different vibe, same low stress energy.
How to Make Pumpkin Dirt Cups Step by Step
Quick overview before you start
You are basically making four things, then layering them: pumpkin pudding, chocolate pudding, Oreo dirt, and optional coconut grass. The order is totally up to you, but I like pumpkin first, then chocolate, then dirt on top.
;
My biggest tip is to chill as you go when you can. Cold pudding layers stack better and look cleaner through the clear cups.
Also, if you are making these for a party, do yourself a favor and set out your cups on a sheet pan. It makes the whole assembly feel way less chaotic.
How to Make the Chocolate Pudding Layer
You can do this two ways:
Option 1: Instant chocolate pudding mix. Whisk it with cold milk until thick, then let it sit for about 5 minutes.
Option 2: Premade chocolate pudding cups. Just stir them to smooth them out and spoon into your cups.
I like instant mix because it tastes a bit fresher and you can control how thick it gets. If you want the layers to stay super defined, make the chocolate pudding a little thicker by whisking well and giving it time to set before layering.
How to Make Oreo Dirt for the Pumpkin Patch
This part is my favorite because it is oddly satisfying.
Put Oreos in a zip top bag and crush them with a rolling pin. Or toss them in a food processor for a finer crumb. I usually leave some slightly bigger bits, because it looks more like dirt and not cookie sand.
If you want maximum “garden soil” vibes, use the whole cookie with the filling. It sticks together nicely and makes the top look rich and dark.
How to Make Green Coconut Grass
This is optional, but if you are going for that pumpkin patch look, it really sells it.
Put shredded coconut in a small bowl or zip bag. Add 1 to 2 drops of green food coloring. Mix it around until it turns grassy. If the color is uneven, add one more drop and keep mixing. A tiny splash of water can help spread the color, but go super light.
If you do not want to use food coloring, you can skip this and just add Halloween sprinkles or a gummy worm instead.
How to Assemble Pumpkin Patch Dirt Cups
This is where it gets fun, and honestly it is hard to mess up.
My usual layering:
Start with a spoonful of pumpkin pudding layer. Then add a thinner layer of chocolate pudding. Top with Oreo dirt. Add coconut grass on one side or sprinkle it across the top. Finish with candy pumpkins and whatever spooky extras you like.
If you are making a bunch, keep a damp paper towel nearby for wiping drips off the inside of the cup. It makes them look party ready with almost no extra effort.
Best Candy Pumpkins and Halloween Decorations to Use
Let us talk toppings, because the decorations are what make Pumpkin Dirt Cups feel like a Halloween moment.
Here are the easiest wins:
Candy pumpkins are classic. The little mellowcreme ones are the most common and they scream pumpkin patch.
Gummy worms make it look like real dirt, and kids think it is hilarious.
Chocolate rocks or candy eyeballs add a spooky vibe without any extra work.
Mini cookies like a tiny Milano or a half Oreo can look like a little tombstone if you stick it in at an angle.
Also, if you are planning a holiday sweets marathon, bookmark these adorable Christmas chocolate hot cups for later. Same cute dessert cup concept, totally different season.
Tips for Making the Best Pumpkin Dirt Cups
These are the little things that make them taste better and look nicer.
Use pumpkin puree, not pumpkin pie filling. Pie filling is already sweetened and spiced and it can throw off the flavor.
Chill your layers if you have time. Even 20 to 30 minutes helps the cups set and makes them easier to transport.
Do the dirt last if making ahead. Oreos soften over time. Still tasty, just less crunchy.
Go easy on spice at first. You can always add a pinch more pumpkin pie spice, but you cannot take it out.
Make them in clear cups if you can. The layers are the whole point, and people love seeing them.
Pumpkin Dirt Cup Variations and Easy Substitutions
If you need to work with what you have, here are some easy swaps that still taste great.
Use graham crackers instead of Oreos for a lighter dirt look. It will be more like sandy soil, but still cute.
Swap vanilla pudding for butterscotch pudding if you like a deeper flavor.
Use cream cheese mixed with a little powdered sugar instead of whipped topping for a tangier, richer pumpkin layer.
Make it dairy free by using plant milk in the pudding and coconut whipped topping. Just check that your pudding mix is compatible with the milk you are using.
Want extra cozy fall vibes? Serve these with something baked like apple pumpkin streusel muffins and call it a full on dessert spread.
Fun Halloween Dirt Cup Ideas for Kids
If kids are helping, give them the decorating job. It keeps little hands busy and makes the cups feel personal.
Let them create themes like:
Pumpkin patch with candy pumpkins and green coconut grass.
Spooky graveyard with cookie tombstones and candy bones.
Worm farm with extra gummy worms and chocolate rocks.
Monster cups with candy eyeballs peeking out of the Oreo dirt.
I usually put the toppings in small bowls and let them go for it. Yes, it gets a little messy, but it is the fun kind of messy.
How to Serve Pumpkin Dirt Cups for Halloween Parties
If you are serving these at a party, think about how people will grab them.
Individual cups are perfect because there is no slicing, no serving utensils, and no awkward “who touched the cake knife” situation.
I like to set them on a tray with little spoons already placed. If you are traveling, keep the dirt topping separate and add it right before serving so it stays crunchy.
For a cute display, line the tray with faux leaves or a black tablecloth and scatter a few extra candy pumpkins around. It takes two minutes and looks like you planned it for days.
How to Store Pumpkin Dirt Cups and Make Them Ahead
These are great for making ahead, which is honestly why I love them so much.
Store Pumpkin Dirt Cups in the fridge, covered, for up to 3 days. If you want the Oreo dirt to stay crunchy, add it the day you serve them.
If you are prepping for a party, you can make the pudding layers the night before, assemble the cups, and then do the toppings right before guests arrive.
Do not freeze them. The texture of pudding and whipped topping can get weird after thawing, and you will lose that creamy, fluffy feel.
Common Questions
Can I make Pumpkin Dirt Cups without whipped topping?
Yes. You can use homemade whipped cream, or even fold in some vanilla Greek yogurt for a tangy twist.
Do Pumpkin Dirt Cups need to chill before serving?
They taste best chilled. Even 30 minutes helps the layers set and makes the flavor more “pumpkin dessert” and less “just mixed pudding.”
How do I keep the layers from mixing together?
Make sure each layer is thick and spoon it in gently. Chilling between layers also helps a lot.
Can I make this in one big trifle bowl instead of cups?
Totally. It becomes a scoop and serve dessert. Just know the dirt topping will soften faster once it is spread out.
What is the easiest Halloween topping if I am short on time?
Oreo dirt plus candy pumpkins. That combo alone gives the full pumpkin patch look.
A Sweet Little Halloween Treat You Can Actually Pull Off
If you want a fun dessert that does not require baking or fancy skills, Pumpkin Dirt Cups really are the answer. You get cozy pumpkin flavor, rich chocolate, and that crunchy Oreo top that makes everyone go back for a second bite. If you want more inspiration, check out Pumpkin Patch Dirt Pudding Cups {with a cute free printable!} for extra presentation ideas, and this classic take on Pumpkin Dirt Cups – Made To Be A Momma for another simple approach. Make a batch, pop them in the fridge, and enjoy the fact that you just nailed Halloween dessert without stressing yourself out.
Print
Pumpkin Dirt Cups
- Total Time: 20 minutes
- Yield: 6 servings 1x
Description
No-bake Pumpkin Dirt Cups that are easy to make, festive, and perfect for Halloween. Layers of creamy pumpkin and chocolate puddings, crushed Oreos, and optional coconut grass topped with candy pumpkins make a delightful treat.
Ingredients
Pudding Layers
- 1 box Instant vanilla pudding mix (Or use cheesecake flavored for a richer taste.)
- 2 cups Milk (Use the amount listed on the pudding box.)
- 1 cup Pumpkin puree (Do not use pumpkin pie filling.)
- 1 teaspoon Pumpkin pie spice (Or use cinnamon.)
- 1 cup Whipped topping (Or homemade whipped cream.)
- 1 box Instant chocolate pudding mix (Or premade chocolate pudding cups.)
Toppings and Assembly
- 12 pieces Oreo cookies (For the dirt.)
- 1 cup Shredded coconut (Optional for grass.)
- 1–2 drops Green food coloring (To color the coconut grass.)
- to taste Candy pumpkins and spooky sprinkles (For decoration.)
- as needed Clear cups or small jars (For serving.)
Instructions
Preparation of Pudding Layers
- In a bowl, whisk together the instant vanilla pudding mix with milk until thick. Let it sit for 5 minutes.
- In a separate bowl, mix the pumpkin puree and pumpkin pie spice into the vanilla pudding until well combined.
- Prepare the chocolate pudding by following the same method, or stir the premade chocolate pudding if using.
Crushing Oreos
- Place the Oreo cookies in a zip-top bag and crush them with a rolling pin or use a food processor for finer crumbs.
- Leave some larger chunks for more texture.
Make Green Coconut Grass
- In a small bowl, mix shredded coconut with 1-2 drops of green food coloring until evenly colored. Adjust color if necessary.
Assemble the Cups
- In clear cups, layer a spoonful of the pumpkin pudding first, followed by a layer of chocolate pudding.
- Next, add the crushed Oreo cookies on top. Optionally, sprinkle the colored coconut grass and top with candy pumpkins and sprinkles.
Notes
Chill layers if possible for better stacking. Assemble on a tray for easy handling, and store in the fridge for up to 3 days.
- Prep Time: 20 minutes
- Category: Dessert, Snack
- Cuisine: American
Nutrition
- Calories: 200
- Sugar: 15
- Sodium: 120
- Fat: 9
- Saturated Fat: 4
- Carbohydrates: 28
- Fiber: 1
- Protein: 3

Related posts:
 Deliciously Simple Candied Orange Slices
 Decadent Hot Cross Bun Recipe
 Irresistibly Super Moist Chocolate Chip Banana Bread Recipe
 Crispy Air Fryer Churro Bites- Sweet & Simple
 Vegan Gluten-Free Lemon Sandwich Cookies with Lemon Curd (Easy Healthy Recipe)
 Spooky Halloween Cookies with a Gooey Witches’ Brew Surprise





 Appetizers & Sides
 Main Dishes
 Drinks & Wellness
 Desserts & Baking