
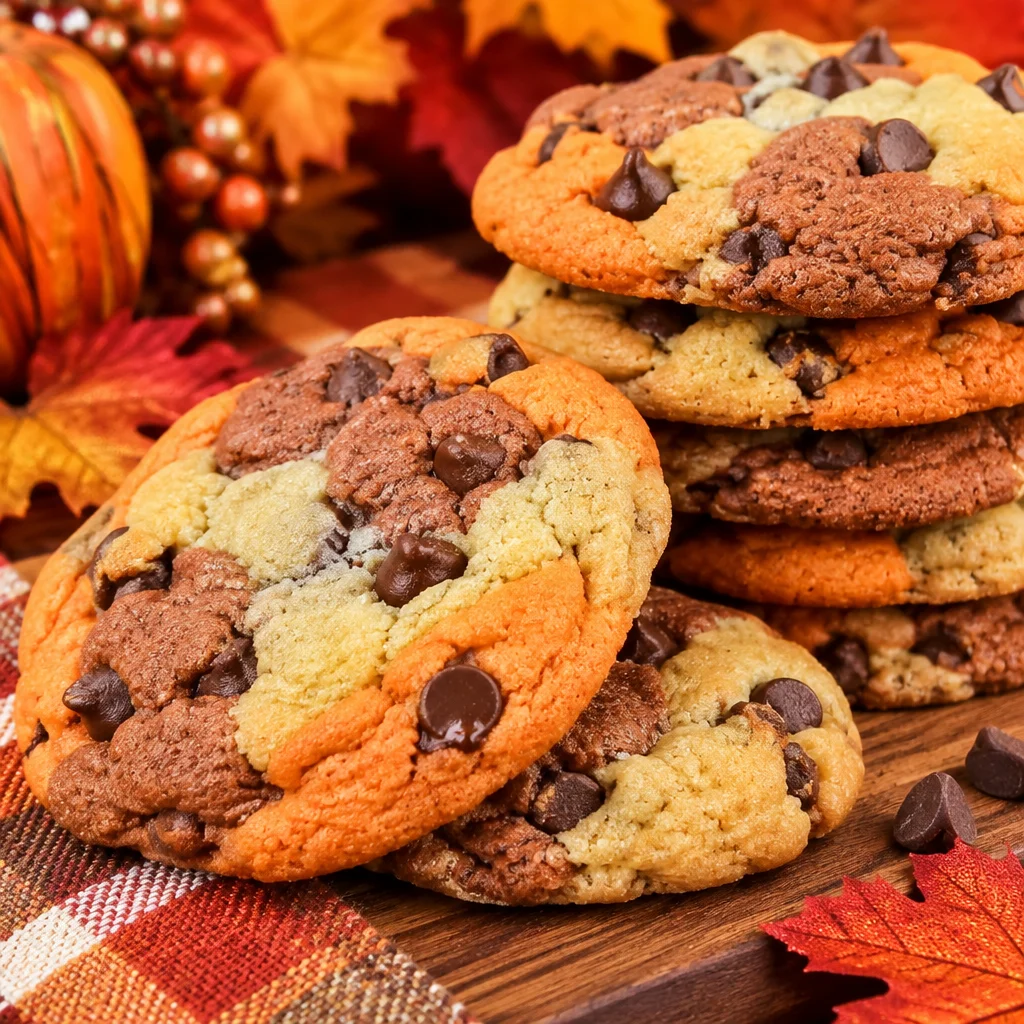
marble chocolate chip cookies are my little holiday lifesaver when I want something cute for Thanksgiving but I do not want to mess with pie crust. You know that moment when everyone is already bringing the classics, and you still want to show up with a dessert that feels festive and fun? That is exactly where these cookies come in. They look like you spent way more time than you actually did, and the marbled orange and brown colors just scream fall. Plus, they still taste like the comforting chocolate chip cookies everyone actually wants to eat after dinner.
What Are Marble Chocolate Chip Cookies?
Think of marble chocolate chip cookies as regular chocolate chip cookies that got dressed up for the season. You make one batch of dough, split it, tint part of it orange and part of it brown, then twist the colors together so every cookie has its own swirly pattern.
They are not fussy. No special tools, no advanced skills, and you still get that wow factor on the dessert table. I like them because each cookie turns out a little different, which feels homey and handmade in the best way.
If you love playful cookies like this, you might also like these Wonderland Chocolate Chip Cookies. They give the same fun, special occasion vibe.
Why These Cookies Are Perfect for Fall
Thanksgiving desserts can get heavy fast. Pie, cake, pudding, all delicious, but sometimes you want something easy to grab while you are standing around chatting. That is where marble chocolate chip cookies shine.
Here is why I always end up making them in November:
- They travel well, so they are great for potlucks and family visits.
- No utensils needed, which is honestly a big deal on a crowded holiday table.
- They look seasonal without needing sprinkles or complicated decorations.
- Kids and adults both go for them, especially with the chocolate chips.
And if you are already in a fall baking mood, these White Chocolate Maple Cookies are another cozy option that feels very Thanksgiving.
Ingredients for Classic Chocolate Chip Cookie Dough
This is just a solid, classic dough with a little extra vanilla because I cannot help myself. Use what you normally buy at the store, no specialty ingredients required. The key is using ingredients that are not expired, especially baking soda, because that affects how the cookies spread.
What you will need:
- Unsalted butter, softened
- Brown sugar and white sugar
- Eggs
- Vanilla extract
- All purpose flour
- Baking soda
- Salt
- Semi sweet chocolate chips
If you want a slightly different seasonal spin, check out these Pumpkin Chocolate Chip Cookies too. They are softer and very fall-forward.
Best Food Coloring for Bold Fall Colors
For those rich orange and brown swirls, gel food coloring is the easiest way to get bold color without adding extra liquid to the dough. Liquid coloring can work, but you usually need a lot more drops and it can make the dough a bit sticky.
My simple advice:
Use gel color if you can. For orange, I do a small dab and build up. For brown, you can use brown gel or mix a tiny bit of black into orange until it looks like a warm cocoa shade.
Little reminder: color deepens slightly as the dough sits, so do not panic if it looks a bit bright at first.
How to Divide Cookie Dough Evenly
This part is easier than it sounds. After you finish mixing the dough, scoop it out of the bowl and gently pat it into a rough ball. Then cut it in half like you are splitting pizza dough.
If you want to be exact, you can weigh it. But most of the time I just eyeball it. If one half is a little bigger, it is not the end of the world. You are going to marble it together anyway.
One quick tip: if your dough feels super soft, pop it in the fridge for 10 minutes before dividing. It makes everything less sticky.
How to Color the Dough Orange and Brown
Put one half of the dough back in the mixing bowl and add orange gel coloring. Mix on low just until the color is even. Then do the same with the other half for brown.
Try not to overmix. Overmixing cookie dough can make cookies bake up a little tougher, and we want soft centers.
If you accidentally make the brown too dark, you can lighten it by kneading in a spoonful of uncolored dough. And if you need a little inspiration for creative flavors, these Basil Lime Sugar Cookies are surprisingly fun and fresh when you want something different.
How to Create the Marbled Effect
This is the fun part. You are basically doing a gentle twist, not a full mix. I like to pinch off chunks of orange and brown dough, stack them, and then twist them together once or twice.
My rule is simple: stop while it still looks messy. If you keep kneading, the colors blend into one muddy shade, and you lose that pretty marbled look.
Also, do not worry if the first cookie looks better than the last. The marbling changes as you go, and honestly that handmade look is part of the charm of marble chocolate chip cookies.
How to Portion Cookies Without Overmixing the Colors
I portion right after I marble. Use a cookie scoop if you have one, or just pinch off golf ball sized pieces. The trick is to avoid rolling each cookie into a perfect smooth ball, because that can smear the colors together.
Instead, lightly press the dough into a rough ball with your hands. If you want more dramatic swirls, press a little extra orange on one side and brown on the other before baking.
For a thick, bakery style cookie vibe, you might also love this Crumbl Chocolate Chip Cookie Recipe Youll Want to Make Again. Big cookies are always a hit at Thanksgiving too.
Baking Time and Doneness Tips
I bake these at 350 F. For medium sized cookies, 10 to 12 minutes is usually perfect in my oven. You are looking for set edges and centers that still look slightly underdone.
Here is the thing: cookies keep baking on the hot pan after you pull them out. If you wait until the centers look fully done in the oven, you can end up with dry cookies.
Let them cool on the pan for about 5 minutes, then move to a rack. The swirl colors also look better once they cool a bit.
How to Keep the Cookies Soft and Chewy
If you want that soft bite that feels like a warm hug, a few small habits make a big difference.
My best chewy cookie tips:
First, do not overbake. Second, measure flour the gentle way. Spoon it into your measuring cup and level it off, instead of scooping straight from the bag. Too much flour can make cookies thick and dry.
And yes, chilling helps. Even 30 minutes in the fridge can make the cookies thicker and chewier, and it can also help the colors stay more defined when you bake marble chocolate chip cookies for a crowd.
Color Variations for Halloween and Other Holidays
Once you get the hang of marbling, you can switch colors for any holiday. The base cookie is the same, you just change the vibe.
Some easy combos:
Halloween: orange and black, or purple and green.
Christmas: red and green with semi sweet or white chips.
Valentines: pink and red with mini chocolate chips.
Baby showers: pastel blue and white, or lavender and cream.
For Thanksgiving, I stick with orange and brown because it looks like pumpkins and hot cocoa had a baby, in cookie form.
Common Marbling Mistakes and Fixes
I have made every mistake at least once, usually while trying to bake fast with people coming over.
Mistake 1: Colors look muddy
Fix: Twist fewer times. Two gentle twists is plenty.
Mistake 2: Dough feels greasy and spreads too much
Fix: Chill the dough 30 to 60 minutes. Also make sure your butter was softened, not melted.
Mistake 3: Colors are too pale
Fix: Use gel color, and add a tiny bit more. Let the dough sit 5 minutes to let color develop.
Mistake 4: Cookies bake up dry
Fix: Bake 1 to 2 minutes less next time and pull when centers still look soft.
The good news is even the imperfect ones still taste amazing, especially when you serve marble chocolate chip cookies warm.
Make-Ahead and Freezer Instructions
This recipe is perfect for getting ahead before Thanksgiving. You can make the dough the night before, marble it, and keep it covered in the fridge.
To freeze, I portion the marbled dough into cookie balls and set them on a tray. Once frozen solid, toss them into a freezer bag. Label it with the date because future you will thank you.
When baking from frozen, add about 1 to 2 minutes to the bake time. I usually bake one test cookie first, just to be safe.
How to Store Baked Cookies
Once they are fully cool, store them in an airtight container at room temp. They are best in the first 3 days, but they can last up to 5 days if your house is not too warm.
My favorite little trick: toss a slice of bread into the container. The bread dries out, and the cookies stay softer. It sounds odd, but it works.
If you want to warm them back up, 8 to 10 seconds in the microwave brings back that fresh baked feel.
Marble Chocolate Chip Cookies FAQs
Can I make these without food coloring?
Yes. You can marble plain dough with a cocoa dough by mixing 1 to 2 tablespoons of unsweetened cocoa powder into half the dough. Add a teaspoon of milk if it feels too dry.
Do I have to chill the dough?
No, but chilling helps the cookies hold their shape and keeps the swirl pattern sharper. If your kitchen is warm, chilling is a good idea.
Most of the time it is butter that was too warm, or a baking sheet that was hot from a previous batch. Chill the dough and use a cool pan.
Can I use mini chocolate chips?
Totally. Mini chips make the marbling stand out more since you do not get as many big dark spots.
How do I keep the orange looking bright after baking?
Gel coloring helps, and slightly underbaking helps too. If cookies bake too long, the color can dull a bit.
A sweet little Thanksgiving send off
If you want one fun, festive bake that still feels classic, marble chocolate chip cookies are it. You get that familiar chocolate chip comfort, plus the pretty fall swirls that look right at home on a Thanksgiving dessert table. If you want to compare techniques or just see other trusted versions, I have browsed both Marbled Chocolate Chip Cookies – Handle the Heat and Marbled Chocolate Chip Cookies Recipe | King Arthur Baking, and they are great resources. Bake a batch, put them on a plate, and watch how fast they disappear. And if you do make them, I hope you sneak one while they are still warm, you have earned it.
Print
Marble Chocolate Chip Cookies
- Total Time: 32 minutes
- Yield: 24 cookies 1x
Description
Creative and festive cookies featuring swirls of orange and brown perfect for Thanksgiving gatherings.
Ingredients
For the Cookie Dough
- 1 cup Unsalted butter, softened (Ensure it’s softened, not melted.)
- 3/4 cup Brown sugar
- 3/4 cup White sugar
- 2 large Eggs
- 2 teaspoons Vanilla extract (A bit extra for great flavor.)
- 2 1/4 cups All-purpose flour (Measure carefully for best results.)
- 1 teaspoon Baking soda (Check expiration for best rise.)
- 1/2 teaspoon Salt
- 2 cups Semi-sweet chocolate chips (Use mini chips for better marbling.)
For Coloring
- as needed Gel food coloring (orange and brown) (Use gel for bold colors without adding liquid.)
Instructions
Preparation
- Preheat your oven to 350°F (175°C).
- In a mixing bowl, cream together the softened butter, brown sugar, and white sugar until smooth.
- Add eggs and vanilla extract, mixing until well combined.
- In another bowl, whisk together the all-purpose flour, baking soda, and salt.
- Gradually add the dry ingredients to the wet ingredients, mixing until just combined.
- Divide the dough in half. Tint one half with orange gel coloring and the other half with brown gel coloring.
Marbling and Portioning
- Pinch off chunks of orange and brown dough, stack them, and twist them together gently.
- Form golf ball-sized pieces without overmixing the colors.
Baking
- Place cookie dough balls on a baking sheet lined with parchment paper.
- Bake for 10 to 12 minutes, until edges are set but centers look slightly underdone.
- Let cookies cool on the baking sheet for 5 minutes, then transfer to a wire rack to cool completely.
Notes
Store cookies in an airtight container at room temperature for up to 5 days. To keep them soft, place a slice of bread in the container to absorb moisture.
- Prep Time: 20 minutes
- Cook Time: 12 minutes
- Category: Dessert, Snack
- Cuisine: American, Holiday
Nutrition
- Calories: 150
- Sugar: 10
- Sodium: 75
- Fat: 7
- Saturated Fat: 4.5
- Carbohydrates: 20
- Fiber: 0.5
- Protein: 1.5






 Appetizers & Sides
 Main Dishes
 Drinks & Wellness
 Desserts & Baking