
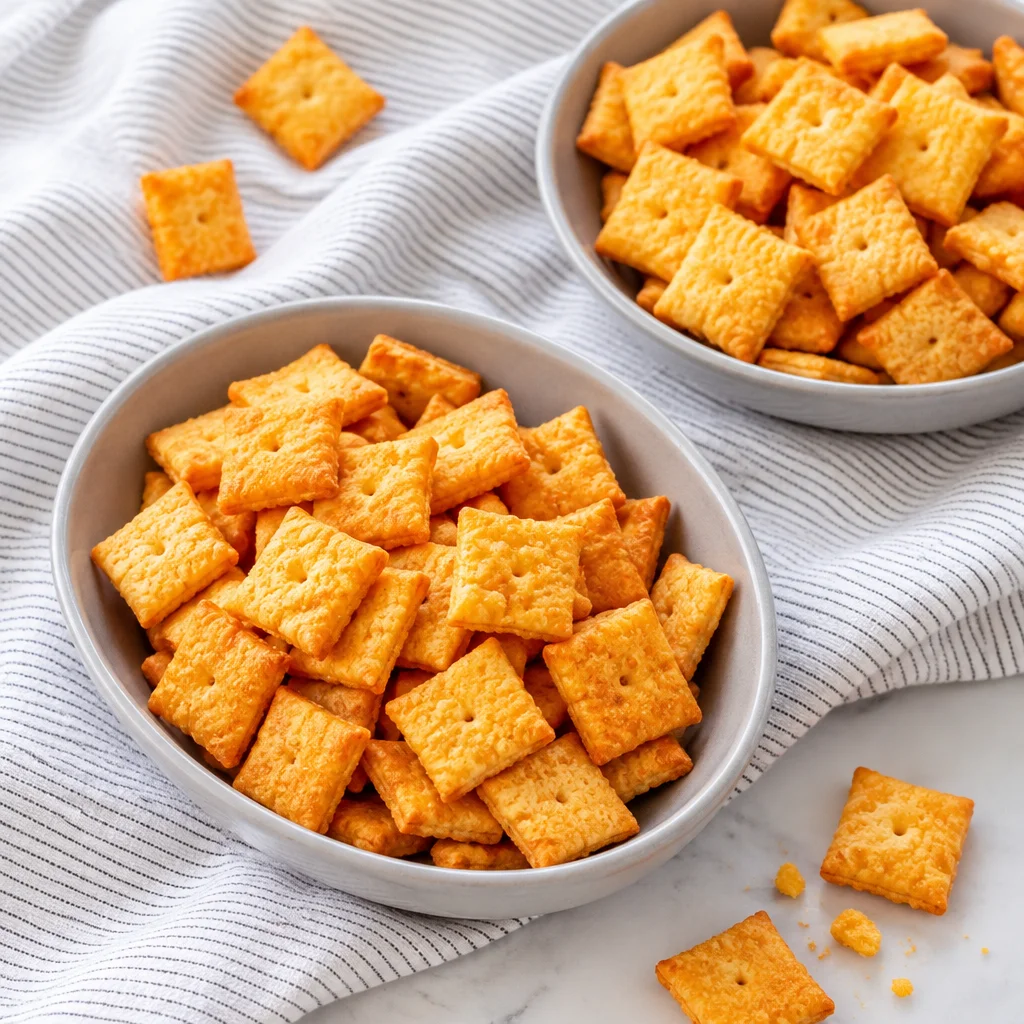
homemade Cheez-Its are basically my answer to that moment when you want something crunchy and cheesy right now, but the box in the pantry is either empty or just not hitting the spot. The store bought ones are fine, but these taste like real cheddar, not “cheese flavor.” Plus, they make your kitchen smell like a cozy snack factory in the best way. I started making them when I wanted a snack I could tweak, extra sharp, a little spicy, or more salty depending on my mood. If you have 30-ish minutes and a block of cheddar, you can totally do this.
Why Homemade Cheez-Its Turn Out Crisp and Cheesy
The secret is that you are using real cheese, and a lot of it. When you bake thin little squares of dough packed with sharp cheddar, the moisture cooks off and the fat helps the crackers brown and crisp.
Another reason they taste better is freshness. The flavor pops when the crackers are still slightly warm, and even cooled, they keep that clean cheddar bite. If you like making snacky foods at home, you might also enjoy these super cheesy homemade cheesy breadsticks for movie night.
The last thing is control. You decide the salt level, the thickness, and whether you want them lightly golden or deeply toasted. Once you dial in your bake time, you will start making homemade Cheez-Its on purpose, not just when you run out of the store version.
The Five Ingredients You Need
This is one of those recipes that feels almost too simple, but it works. Here is what you need for classic homemade Cheez-Its with sharp cheddar.
- Sharp cheddar cheese, freshly grated
- All purpose flour
- Butter, cold and cubed
- Salt
- Ice cold water
That is it. No weird powders required. I am not anti shortcut, but for this one I really recommend grating the cheese yourself. Bagged shredded cheese usually has anti caking stuff on it, and the dough does not come together as smoothly.
Best Cheddar Cheese for Homemade Crackers
Go for a block of cheddar that you already like eating, because the flavor really shows up. My favorite is sharp cheddar, and if you love a bolder bite, extra sharp is amazing too.
A few notes from my own trial and error:
Sharp cheddar gives you that classic cracker flavor that actually tastes like cheese. Mild cheddar works, but it can taste a little flat. Aged cheddar is fantastic, but some very aged cheeses can be drier, so you may need a tiny splash more water to get the dough to come together.
If you are in a bread baking phase too, this pairs so well with soups and simple dinners, and I always want something cheesy on the side like homemade Italian herb cheese sourdough bread.
Ingredient Substitutions and Salt Adjustments
If you are missing something, you can still make these work.
Butter: You can use salted butter, but then cut back on added salt. If you are using unsalted butter, start with 1/2 teaspoon salt in the dough and adjust next time if you want more punch.
Flour: All purpose is easiest. If you swap in some whole wheat flour, do half whole wheat and half all purpose so the crackers do not turn heavy.
Water: Add it slowly. Different cheeses have different moisture, and humidity can change things too. You want the dough to hold together when you squeeze it, but not feel sticky.
Salt tip that helps a lot: you can keep the dough lightly salted, then add a small sprinkle of flaky salt on top before baking. It makes the flavor pop without risking overly salty crackers.
Equipment for Mixing Rolling and Cutting
You do not need fancy tools, but a few basics make the process smoother.
Here is what I reach for:
- Food processor (nice to have) or a bowl and a sturdy spoon
- Box grater for the cheese
- Rolling pin
- Large baking sheets
- Parchment paper
- Pizza cutter or sharp knife
- Fork or skewer for docking
If you do not have a food processor, no stress. You can cut the butter into the flour with your fingers until it looks like sandy crumbs, then mix in the cheese and water. It is a little more hands on, but it works.
How to Make Homemade Cheez-Its
This is the method I use again and again. Once you do it one time, it feels super routine.
- Heat your oven to 350 F. Line two baking sheets with parchment.
- Grate your cheddar. Measure out 2 cups packed grated sharp cheddar.
- In a food processor, pulse together flour, salt, and cold butter until it looks crumbly.
- Add the grated cheese and pulse a few times until it looks like coarse sand.
- Drizzle in ice water, 1 tablespoon at a time, pulsing until the dough starts clumping. Usually 3 to 5 tablespoons is enough.
- Press the dough together into a ball. Split it in half so it is easier to roll.
- Roll, cut, dock, then bake.
Quick snack side note: if you like fun homemade comfort food, I have been obsessed with this butter chicken flatbread recipe lately. Different vibe than crackers, but the cheesy comfort factor is real.
How Thin to Roll the Cracker Dough
Thin dough equals crisp crackers. I roll mine to about 1/8 inch thick, sometimes even a hair thinner. If you roll too thick, you will get more of a biscuit texture, which is not bad, just not that snappy cracker crunch.
My best tip is to roll between two sheets of parchment. It keeps the dough from sticking, and you do not have to add extra flour that can make the crackers dusty.
If the dough cracks at the edges, just press it back together with your fingers. If it feels dry and crumbly, add a teaspoon of water and knead it in.
How to Cut Squares and Create Fluted Edges
For the classic look, cut the dough into small squares, about 1 inch by 1 inch. I use a pizza cutter and just go for it.
If you want those cute zigzag edges, use a fluted pastry wheel. Totally optional. Honestly, half the time I skip it and nobody complains, because they are too busy eating.
Try to cut similar sizes so they bake evenly. The tiny pieces will brown faster, and the bigger ones might stay a little soft in the center.
Why Docking Each Cracker Matters
Docking just means poking a little hole in the center of each square, usually with a skewer, chopstick, or the tip of a thermometer probe if that is what is clean in the drawer.
This matters because it keeps the crackers from puffing up like little pillows. You want them flat so they bake evenly and crisp all the way through. Also, it is weirdly satisfying to do the poke poke poke down the tray.
Baking Time Temperature and Browning Cues
I bake at 350 F for 12 to 16 minutes, depending on thickness and how dark I want them. Start checking around minute 11. They go from pale to perfect to too brown faster than you think.
What you are looking for:
Light golden edges for a milder flavor, or deeper golden brown for that roasty cheddar taste. If you pull them when they still look a bit soft, that is okay. They crisp up more as they cool, especially if they are rolled thin.
How to Get the Crispiest Texture
For the crispest homemade Cheez-Its, do these three things:
First, roll the dough thin. Second, bake until the edges are properly golden. Third, cool them on the pan for 5 minutes, then move to a rack so steam does not soften the bottoms.
If you want extra crisp, you can turn the oven off at the end and leave the crackers inside with the door cracked for 5 minutes. I do this when I know I rolled a little thicker than planned.
Common Cheese Cracker Problems and Fixes
Problem: Dough is crumbly and will not come together.
Fix: Add water 1 teaspoon at a time and pulse or knead. Cheese dryness varies a lot.
Problem: Crackers puffed up.
Fix: Dock them. One little hole in the center is enough.
Problem: Crackers are not crisp.
Fix: Roll thinner next time, or bake 2 to 3 minutes longer. Also make sure you cool on a rack.
Problem: Some are burnt and some are pale.
Fix: Cut more even squares, and rotate your pan halfway through baking if your oven has hot spots.
Flavor Variations and Seasoning Ideas
Once you have the base recipe, you can play around a lot. Here are a few easy add ins:
Smoked paprika for a subtle smoky vibe. Garlic powder for that snack aisle energy. Cayenne if you like heat. Everything bagel seasoning on top is also dangerously good.
You can also swap some of the cheddar for pepper jack, or add a tablespoon of grated parmesan for extra salty bite.
And if you are in the mood for sweet baking later, I will never stop recommending this homemade cinnamon swirl banana bread because it makes the whole house smell unreal.
How to Store and Re-Crisp Homemade Crackers
Let the crackers cool completely before storing. Any warmth left will create steam, and steam is the enemy of crunch.
Store in an airtight container at room temp for about 4 to 5 days. If they soften, spread them on a baking sheet and bake at 300 F for 5 to 7 minutes, then cool again.
If you made a big batch and want to keep them longer, you can freeze them in a zip top bag. Re crisp from frozen at 300 F until they are snappy again, usually 8 to 10 minutes.
Random lifestyle note: I have also been testing this homemade mounjaro recipe drink idea for my afternoon routine, and it is nice to have a salty crunchy snack option like homemade Cheez-Its around so I am not always grabbing sweets.
Homemade Cheez-Its FAQs
Can I make homemade Cheez-Its without a food processor?
Yes. Use a bowl, rub the butter into the flour with your fingertips until crumbly, then mix in the cheese and water until it holds together.
Why do my crackers taste bland?
Usually it is the cheese. Use a sharper cheddar and do not be afraid of a little salt on top right before baking.
Do I have to dock every single one?
I recommend it. If you skip docking, a bunch of them will puff and bake unevenly. It takes a couple minutes and saves frustration.
Can I make the dough ahead of time?
Yes. Wrap it tightly and chill up to 2 days. Let it sit at room temp for 10 minutes so it rolls easier.
How do I know when they are done?
Look for golden edges and a set, dry looking surface. They crisp up more as they cool, so do not panic if they are slightly tender straight out of the oven.
Your Next Cheesy Snack Night
If you try this, you will see why homemade Cheez-Its disappear so fast. Keep the dough thin, dock the little squares, and bake until you get that golden cheddar smell in your kitchen. If you want more comparison points and fun tweaks, I have also enjoyed reading Homemade Cheez-Its Recipe | Good. Food. Stories. and the super detailed testing notes in Homemade Cheez-Its Recipe – Serious Eats. Make a batch, stash some in a jar, and do not be surprised if you start planning your week around snack breaks.
Print
Homemade Cheez-Its
- Total Time: 35 minutes
- Yield: 24 crackers 1x
Description
These homemade Cheez-Its are a crunchy, cheesy snack made with real cheddar cheese, perfect for satisfying snack cravings in about 30 minutes.
Ingredients
For the Crackers
- 2 cups sharp cheddar cheese, freshly grated (Opt for a block of cheddar for best flavor.)
- 1 cup all-purpose flour (Can substitute with half whole wheat for a healthier version.)
- 1/2 cup butter, cold and cubed (Salted butter can be used, but adjust salt accordingly.)
- 1/2 teaspoon salt (Adjust based on cheese and personal preference.)
- 4–5 tablespoons ice water (Add gradually to achieve the right dough consistency.)
Instructions
Preparation
- Preheat oven to 350°F (175°C) and line two baking sheets with parchment paper.
- Grate 2 cups packed of sharp cheddar cheese and set aside.
- In a food processor, pulse together the flour, salt, and cold butter until the mixture is crumbly.
- Add the grated cheese and pulse a few times until it resembles coarse sand.
- Drizzle in ice water, 1 tablespoon at a time, pulsing until the dough begins to clump together.
- Gather the dough into a ball, then split it in half for easier rolling.
Rolling and Cutting
- Roll the dough between two sheets of parchment to about 1/8 inch thick.
- Cut into 1 inch squares, and if desired, use a fluted pastry wheel for zigzag edges.
- Dock each square by poking a hole in the center with a skewer or fork.
Baking
- Bake in the preheated oven for 12 to 16 minutes, or until the edges are golden brown.
- Remove from oven and let cool on the pan for 5 minutes before transferring to a rack to cool completely.
Notes
Store in an airtight container at room temperature for 4 to 5 days. To re-crisp, bake at 300°F for 5 to 7 minutes. Variations include adding smoked paprika, garlic powder, or cayenne for extra flavor.
- Prep Time: 20 minutes
- Cook Time: 15 minutes
- Category: Appetizer, Snack
- Cuisine: American
Nutrition
- Calories: 60
- Sodium: 100
- Fat: 4
- Saturated Fat: 2.5
- Carbohydrates: 6
- Protein: 1











 Appetizers & Sides
 Main Dishes
 Drinks & Wellness
 Desserts & Baking