
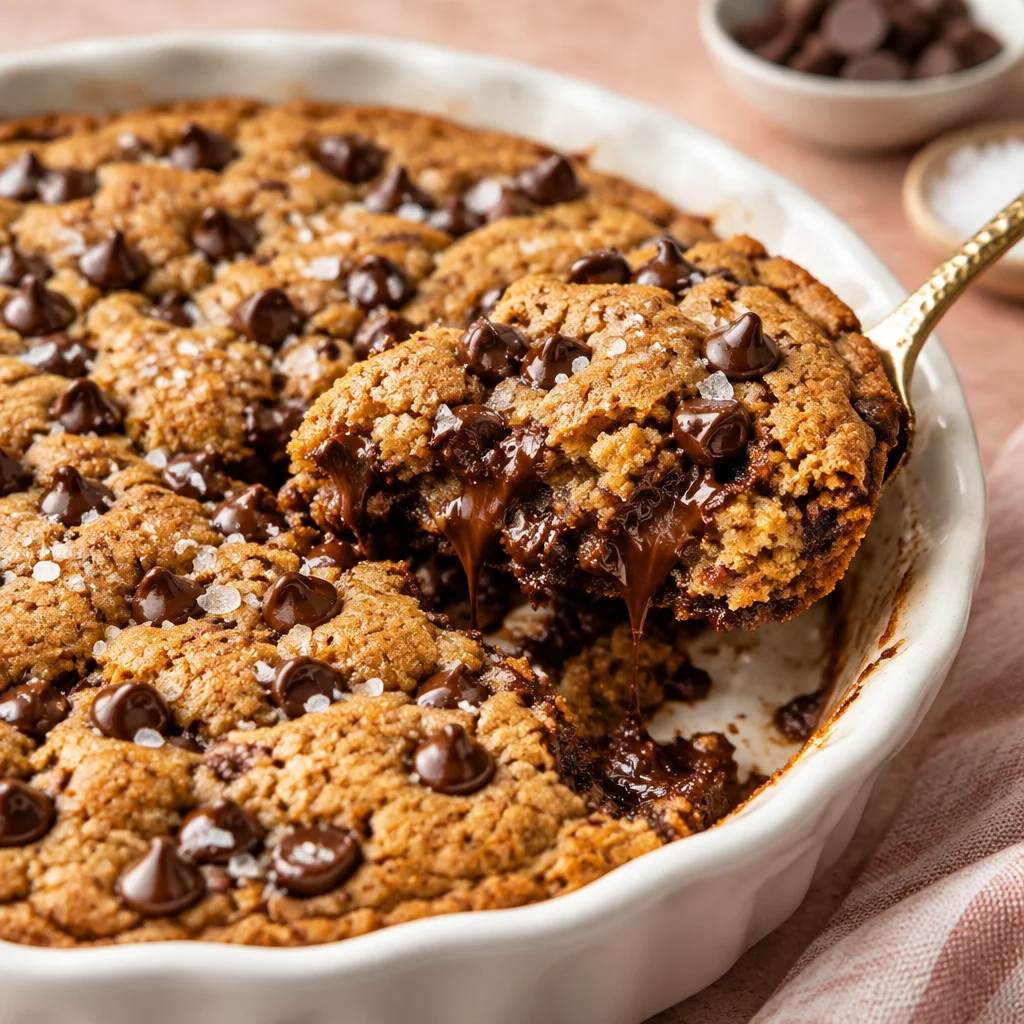
scoopable cookies are my answer to those nights when I want a warm dessert right now, but I do not feel like rolling dough, chilling trays, or doing a bunch of cleanup. You know the feeling, you want a cookie, but you also want it extra gooey in the middle and kind of crisp around the edges. This is the one I make when friends pop by, because it looks impressive but it is honestly pretty low effort. The best part is cracking into that soft center and hitting a molten chocolate pocket. If you have ever wished a chocolate chip cookie could be served like a skillet dessert, you are in the right place.
What Are Scoopable Cookies?
Think of scoopable cookies as cookies that bake in one pan instead of being shaped into separate rounds. You bake a thick layer of dough, then scoop it out with a spoon like you would with cobbler or ice cream. The texture is the fun part: edges get golden and a little crisp, while the inside stays soft, thick, and almost pudding like.
I love this style when I want something cozy and shareable. It is also forgiving, because the dough does not have to be picture perfect. If you are usually a cutout cookie person, you might get a kick out of how relaxed this is. I still make classics like Christmas sugar cookies when I want shapes and frosting, but for pure comfort, scoopable cookies win.
Why This Gooey Cookie Dessert Works
The whole trick is baking the dough in a deeper layer than a regular cookie. That protects the center from drying out before the edges finish. Also, we hide chunks of chocolate in the middle so you get those gooey chocolate centers, not just scattered chips.
Another reason it works is timing. You pull the pan when it still looks slightly underdone in the center. It keeps cooking from the heat of the dish, and that gives you the soft scoopable texture instead of a dry cookie slab.
Key Ingredients for the Best Texture
This is not a complicated ingredient list, but each one matters. Here is what I actually pay attention to when I make scoopable cookies at home.
The short list that matters most
- Butter: melted but not scorching hot. It helps the dough spread just enough and stay chewy.
- Brown sugar: adds moisture and that caramel vibe that makes the center taste rich.
- Egg plus one extra yolk: the yolk is my little “bakery style” secret for a softer middle.
- Flour: spoon it into the cup and level it. Too much flour makes it cakey.
- Cornstarch (optional but helpful): just a little keeps the cookie softer for longer.
- Salt: do not skip it. It makes the chocolate taste more chocolatey.
If you like “interesting” sugar cookies too, you should peek at basil lime sugar cookies. Different vibe, but the same idea of using simple ingredients to get big flavor.
Choosing Chocolate for Melty Pools
If you want real gooey centers, skip the tiny chips for the middle. Chips are designed to hold their shape, which is great sometimes, but here we want drama.
My go to move is this: use regular chocolate chips in the dough for classic flavor, then use chopped chocolate bars or chocolate wafers in the center. Semi sweet is the safest crowd pleaser. Dark chocolate gives you a deeper flavor and feels a little fancy. Milk chocolate is super melty, but it can taste extra sweet, so I usually mix it with semi sweet.
For the stuffed center, aim for pieces about the size of a thumbnail. Too small and they vanish, too big and the center can feel greasy.
Best Baking Dish Size and Equipment
You do not need special gear, which is part of the charm. Here is what works best in my kitchen:
- 8×8 inch baking dish for thick, extra gooey centers
- 9×9 inch dish for slightly thinner bars that scoop a bit easier
- Mixing bowl, spatula, measuring cups
- Parchment paper if you want easy lift out, but it is optional
If you use a glass dish, it may bake a touch slower than metal. I like metal for slightly crispier edges, but either is fine. Just watch the timing near the end.
How to Make Scoopable Cookies Step by Step
This is the part where you realize why I make this so often. It is basically mix, press, bake, scoop.
My simple method
1. Heat the oven to 350 F and lightly grease your dish or line with parchment.
2. Mix wet ingredients: whisk melted butter with brown sugar and white sugar. Add egg, extra yolk, and vanilla.
3. Add dry ingredients: stir in flour, baking soda, cornstarch if using, and salt. Mix until you do not see dry flour, then stop.
4. Add chocolate: fold in chips or chunks, but hold back some chunks for the top.
5. Create the gooey center: press half the dough into the dish. Scatter chopped chocolate in the middle area, leaving a little border near the edges. Add remaining dough on top and lightly press. Add the saved chocolate chunks on top.
6. Bake about 18 to 25 minutes depending on your dish and how thick you made it. Start checking at 18.
When I want something cute for a party table, I do themed cookies like Easter birds nest cookies. But when I want that warm scoop and chocolate pull, I do this.
How to Get Crisp Edges and a Gooey Center
The balance is all about heat and thickness. For crisp edges, you want the dough touching a hot pan surface and you want enough sugar to caramelize. For gooey center, you want the middle thicker and you want to avoid overbaking.
My best tips:
Use a metal pan if you can. It helps the edges brown more.
Keep the center loaded with chocolate chunks, not just chips mixed throughout.
Let it rest for 10 to 15 minutes after baking. This sounds boring, but it stops the center from being raw and lets it turn into that soft scoopable situation.
How to Tell When Scoopable Cookies Are Done
This is where people get nervous, because the center should not look fully set when you pull it. You are not baking it like a cake. You are aiming for a soft cookie center that firms up as it cools.
What I look for:
Edges: golden brown and look set.
Center: puffed up, slightly shiny, and still a bit soft if you gently tap the pan.
Smell: you can smell caramel and chocolate, not raw flour.
If you wait until the center looks totally firm, you will still get a tasty dessert, but you lose the gooey scoopable cookies magic.
Common Mistakes and Troubleshooting
I have made every mistake at least once, so here is the honest cheat sheet.
Problem: Center is raw and runny. Bake 3 to 5 minutes more, then rest longer. Also check that your oven is actually at 350 F.
Problem: It is dry and crumbly. You likely added too much flour or baked too long. Next time, spoon and level flour, and pull it earlier.
Problem: Chocolate disappeared. Chips got swallowed into the dough. Save chunks for the top and stuff more into the middle layer.
Problem: Greasy texture. Butter was too hot when mixed, or you used super oily chocolate. Let melted butter cool a few minutes before mixing.
Stuffed and Flavored Variations
Once you get the base down, you can play around without stress. Here are a few favorites:
Peanut butter center: add dollops of peanut butter with the chocolate layer.
Salted caramel: drizzle thick caramel sauce over the center chocolate before topping with dough.
Mint chocolate: add a tiny splash of peppermint extract and use dark chocolate chunks.
Toasted coconut: fold in coconut and use milk chocolate for the center.
If buttery simple cookies are your comfort zone, you might love German butter cookies too. Totally different texture, but that rich butter flavor is so good.
Gluten-Free and Ingredient Substitutions
You can absolutely adapt this recipe if you need to.
Gluten free: use a 1 to 1 gluten free flour blend. Let the dough sit 10 minutes before baking so it hydrates. The center may be slightly softer, which is not a bad thing here.
Dairy free: use a good plant based butter and dairy free chocolate. Watch the bake time since some vegan butters have more water.
Lower sugar: you can reduce sugar a little, but do not cut it in half or the texture gets bready. Sugar helps make the edges crisp and keeps the center tender.
No cornstarch: skip it. It is a bonus, not a deal breaker.
Best Toppings and Serving Ideas
This dessert is already great plain, but toppings make it feel like a restaurant skillet cookie.
- Vanilla ice cream on top while it is still warm
- Flaky sea salt to make the chocolate pop
- Hot fudge for maximum goo factor
- Chopped toasted nuts for crunch
- Fresh berries if you want something bright
Sometimes I serve this after lighter cookies at a party, like these flower sugar cookies, then bring out the warm pan of scoopable cookies as the grand finale. People always go back for seconds.
Make-Ahead and Freezer Instructions
This is a great make ahead dessert. You can mix the dough, assemble it in the baking dish, cover it, and refrigerate for up to 24 hours. Bake straight from the fridge, just add a few extra minutes.
Freezing is easy too. You can freeze the unbaked assembled dough in the dish if the dish is freezer safe, or freeze the dough in a lined pan, then lift it out and wrap it well. When ready, bake from frozen at 350 F and expect to add 8 to 12 minutes depending on thickness.
How to Store and Reheat Leftovers
Leftovers keep well, which I appreciate because sometimes I make this on Sunday and snack on it all week.
Store: cover the dish or move scoops into an airtight container. Keep at room temp for 2 days, or in the fridge up to 5 days.
Reheat: microwave a scoop for 10 to 20 seconds. You want it warm, not bubbling. If you are reheating a bigger portion, use the oven at 300 F for about 8 to 10 minutes.
Pro tip: add a tiny pinch of salt after reheating. It wakes up the flavor again.
Scoopable Cookies FAQs
Q and A from my own kitchen
Q: Can I bake this in a cast iron skillet?
Yes. A 10 inch skillet works nicely. The edges may cook faster, so start checking early.
Q: Why did my scoopable cookies turn cakey?
Usually too much flour or too much mixing. Measure flour gently and stop stirring once it comes together.
Q: Can I use only chocolate chips for the center?
You can, but you will get less of that molten pocket. Chopped chocolate bars melt into better pools.
Q: Do I have to chill the dough?
Nope. That is the beauty here. If your kitchen is very hot, a quick 15 minute chill can help, but it is optional.
Q: How do I keep the center gooey the next day?
Do not overbake on day one, and reheat gently for a few seconds before eating.
Your Next Cozy Dessert Night
If you try this, keep it simple the first time and focus on pulling it from the oven while the center still looks a little soft. That is where the gooey magic lives, and it is what makes scoopable cookies feel so special with almost zero fuss. If you want to compare notes with other bakers, I have enjoyed reading Scoopable Cookies – Every Little Crumb and also this fun take on Scoopable Brown Butter Chocolate Chip Cookies – Ambitious Kitchen for extra inspiration. Now go grab a spoon, add ice cream if you have it, and let yourself enjoy a warm, gooey scoop. You deserve that kind of dessert moment.
Print
Scoopable Cookies
- Total Time: 40 minutes
- Yield: 9 servings 1x
Description
These scoopable cookies are a warm, gooey dessert perfect for sharing, baked in one dish and served straight from the pan for a cozy treat.
Ingredients
Wet Ingredients
- 1 cup butter, melted (Make sure it’s not scorching hot.)
- 1 cup brown sugar (For moisture and rich flavor.)
- 1/2 cup white sugar
- 1 large egg
- 1 large extra egg yolk (For a softer middle.)
- 1 teaspoon vanilla extract
Dry Ingredients
- 1 1/4 cups all-purpose flour (Spoon and level to prevent cakiness.)
- 1 teaspoon baking soda
- 1 tablespoon cornstarch (Optional, keeps cookies softer.)
- 1/2 teaspoon salt (Enhances the chocolate flavor.)
Chocolate
- 1 cup chocolate chips (Use regular chips in the dough.)
- 1 cup chopped chocolate bars (For the gooey centers.)
Instructions
Preparation
- Preheat the oven to 350°F and lightly grease an 8×8 or 9×9 inch baking dish or line it with parchment paper.
- In a mixing bowl, whisk melted butter with brown sugar and white sugar. Add egg, extra yolk, and vanilla.
- Stir in flour, baking soda, cornstarch (if using), and salt until you do not see dry flour.
- Fold in chocolate chips or chunks, reserving some for the top.
- Press half the dough into the dish, scatter chopped chocolate in the middle area, leaving a border near the edges. Add remaining dough on top and lightly press. Add the reserved chocolate chunks on top.
Baking
- Bake for 18 to 25 minutes, checking at 18 minutes. The center should be puffed, slightly shiny, and still soft.
Serving
- Let it cool for 10 to 15 minutes before scooping.
Notes
Use a metal pan for crisp edges. Store any leftovers in an airtight container for up to 5 days. Reheat gently.
- Prep Time: 15 minutes
- Cook Time: 25 minutes
- Category: Dessert, Snack
- Cuisine: American
Nutrition
- Calories: 250
- Sugar: 18
- Sodium: 160
- Fat: 12
- Saturated Fat: 7
- Carbohydrates: 30
- Fiber: 1
- Protein: 3

Related posts:
 Deliciously Simple Candied Orange Slices
 Decadent Hot Cross Bun Recipe
 Irresistibly Super Moist Chocolate Chip Banana Bread Recipe
 Crispy Air Fryer Churro Bites- Sweet & Simple
 Vegan Gluten-Free Lemon Sandwich Cookies with Lemon Curd (Easy Healthy Recipe)
 Easy Blueberry Tiramisu Recipe with Mascarpone (No Bake & Creamy)





 Appetizers & Sides
 Main Dishes
 Drinks & Wellness
 Desserts & Baking