
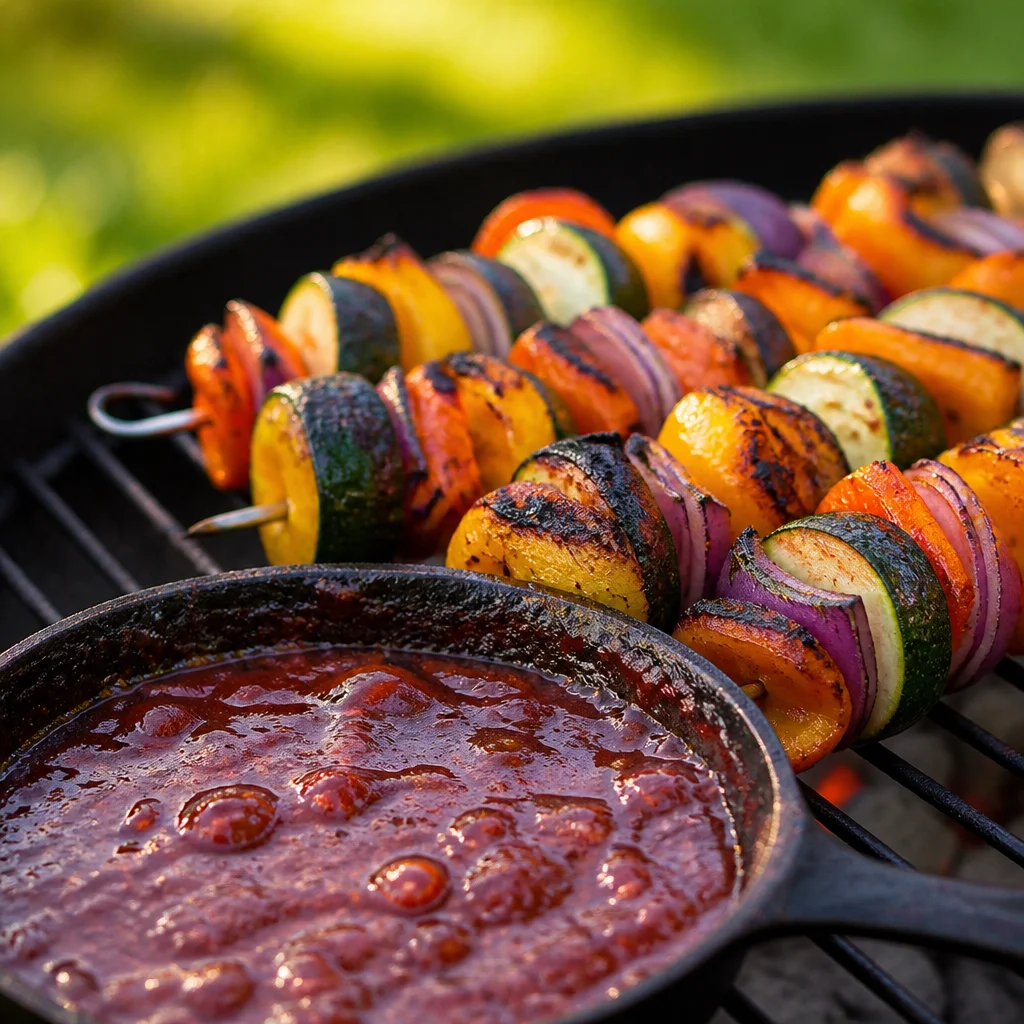
Grilled Veggie Kabobs are my go to when I want something that feels like real summer food but I do not want to babysit a complicated recipe. You know those nights when everyone is hungry, the kitchen is warm, and you just want to be outside with something sizzling on the grill? This is that meal. The veggies get a little char, the edges turn sweet, and then you dip everything into a sticky homemade plum BBQ sauce that tastes like it took way more effort than it did. It is bright, smoky, and super flexible, which is basically my favorite kind of cooking.
Why You’ll Love These Grilled Vegetable Kabobs
First, they are fast. Once the veggies are chopped, it is basically just thread, grill, eat. Second, they make everyone happy at the table because you can customize each skewer, especially if you have picky eaters or that one person who is convinced mushrooms are the enemy.
Also, these Grilled Veggie Kabobs feel special without being fussy. The homemade plum BBQ sauce is sweet and tangy with a little smoky kick, and it clings to the vegetables in the best way. I love making a big batch because it turns plain leftovers into something exciting the next day.
If you like grill friendly dinners, you might also want to check out this easy combo situation with healthy sausage veggies for a heartier option on nights when you want a little more protein on the plate.
Ingredients for Veggie Kabobs and Plum BBQ Sauce
I am keeping this simple, but you still get big flavor. Here is what I use most often. Feel free to swap based on what is in your fridge.
What you will need
- Bell peppers (any color), cut into chunky squares
- Zucchini or yellow squash, sliced thick
- Red onion, cut into wedges
- Mushrooms (optional but great), kept whole if small
- Cherry tomatoes (add near the end of grilling if they split easily)
- Olive oil
- Salt and pepper
- Garlic powder or fresh garlic
- Skewers (metal or wooden)
For the homemade plum BBQ sauce:
- Plums, pitted and chopped (fresh is great, frozen works too)
- Ketchup or tomato sauce
- Apple cider vinegar
- Brown sugar or maple syrup
- Soy sauce or tamari
- Smoked paprika
- A pinch of chili flakes (optional)
- Salt
Quick note on plums: the riper they are, the sweeter your sauce will be. If your plums are a little tart, just add a touch more sweetener. That is it.
How to Make Homemade Plum BBQ Sauce
This sauce is the reason people go back for seconds. It tastes like a backyard BBQ classic but with a fruity twist that keeps it interesting.
In a small pot, add your chopped plums, ketchup, vinegar, brown sugar, soy sauce, and spices. Bring it to a gentle simmer and let it cook until the plums soften and everything smells amazing, about 10 to 15 minutes. Stir it now and then so it does not stick.
Once the plums are totally soft, blend the sauce. You can use an immersion blender right in the pot, or carefully blend it in a regular blender. Taste and adjust. Want it tangier? Add a splash more vinegar. Want it sweeter? Add a bit more brown sugar or maple syrup. Want more smoky flavor? Another pinch of smoked paprika does the trick.
I usually make the sauce first so it has time to cool a little while I prep the veggies. It also thickens as it sits, which makes it perfect for brushing and dipping.
How to Prepare Vegetables for Grilling
The main trick is cutting everything about the same size so it cooks evenly. Big chunks are your friend here because small pieces can fall apart or cook too fast.
I toss my vegetables in a bowl with olive oil, salt, pepper, and garlic powder. Nothing complicated. You just want a light coating so they do not stick to the grill and so the seasoning actually stays on the veggies instead of falling into the flames.
If you are using wooden skewers, soak them in water for at least 20 minutes so they do not burn up. Metal skewers are easier, but I use whatever I have.
How to Assemble Vegetable Kabobs on Skewers
Thread the veggies in a pattern so you get a good mix on each skewer. I like to alternate firm and soft pieces, like pepper, onion, zucchini, mushroom, then repeat.
Do not pack them too tightly. If everything is squished together, the heat will not reach the sides and you will miss out on those delicious grilled edges. Leave a little space so the air and heat can do their thing.
If you are cooking for different preferences, make a couple skewers with no mushrooms, or keep tomatoes separate since they cook faster. It makes dinner calmer, and I am always in favor of calmer dinners.
How to Grill Veggie Kabobs
Preheat your grill to medium to medium high. Clean the grates and oil them lightly. This is one of those small steps that saves you from the tragedy of leaving half your zucchini stuck to the grill.
Place the skewers on the grill and cook for about 8 to 12 minutes total, turning every few minutes. You are looking for tender veggies with a bit of char and color. In the last couple minutes, brush the veggies with some homemade plum BBQ sauce. Do not do it too early because sugary sauces can burn fast.
When they are done, pull them off and let them rest for a minute. It helps the veggies stay juicy and not fall apart when you slide them off the skewer.
How to Serve Grilled Veggie Kabobs With Plum BBQ Sauce
I serve these hot off the grill with extra sauce for dipping. I am not shy about it. That sauce is the whole point.
You can slide everything off the skewers and serve it in a big bowl family style, or keep the skewers intact for that fun cookout vibe. Sometimes I add a sprinkle of fresh herbs like parsley or cilantro if I have them.
If you want a snacky side to go with it for a casual hangout, these mini grilled cheese Hawaiian rolls are wildly good and feel like something you would order at a fun little spot with outdoor seating.
Best Vegetables for Grilled Veggie Skewers
The best veggies are the ones that hold their shape and get sweeter with heat. Here are my favorites:
Bell peppers, onions, zucchini, mushrooms, and cherry tomatoes are the classic mix for a reason. Eggplant also works if you cut it into thicker cubes and oil it well. Corn rounds are fun too, but they take a bit longer, so I usually pre cook them for a few minutes first.
If you are making Grilled Veggie Kabobs for a crowd, stick with a mix of colors. It sounds simple, but a bright plate makes everyone more excited to eat veggies. I have seen it happen in real time.
Tips for Perfectly Grilled Vegetable Kabobs
Here are the little details that make a big difference.
Cut evenly so everything finishes at the same time. Do not over sauce early in grilling or it can burn. And turn the skewers regularly so you get color on all sides without drying anything out.
Also, do not be afraid of a little char. That is where the flavor is. If you keep the grill too low and cook forever, the veggies can get soft and sad instead of smoky and sweet.
And one more thing: keep extra homemade plum BBQ sauce on the table. People will use it on everything, even rice or bread.
Easy Veggie Kabob Variations and Substitutions
This recipe is super flexible. If you do not have plums, you can try a mix of peaches and a squeeze of lemon, or even use a spoonful of jam in a pinch to mimic that fruity sweetness. It will not be exactly the same, but it will still be tasty.
For the veggies, swap based on season. In cooler months, I have used thick slices of sweet potato, but I parboil them first so they actually cook through on the grill.
If you want more heat, add hot sauce to the plum BBQ sauce, or sprinkle cayenne over the veggies before grilling.
Vegan and Vegetarian Grilled Kabob Options
These are naturally vegetarian, and they are very easy to keep vegan. Just use maple syrup instead of honey if you are sweetening the sauce, and use tamari or soy sauce as written.
If you want to make it more filling while staying plant based, add tofu cubes. Press the tofu, cut it into thick chunks, and brush it with olive oil and a little sauce near the end. It grills up surprisingly well if you are gentle when turning.
If you have vegetarians and meat eaters at the same cookout, I like to do a separate grill item like this paleo grilled chicken Cobb salad so everyone feels taken care of without making two totally different meals.
What to Serve With Veggie Kabobs
This is where you can really make it a full dinner without stressing. Here is a simple mix and match list.
Serving ideas that always work
- Rice, quinoa, or couscous to catch extra sauce
- Warm pita or naan with a little olive oil
- A crunchy green salad with lemony dressing
- Grilled corn or grilled pineapple if you want a sweet side
- Extra sauce as a dip for basically everything
If you are in a comfort food mood, I have to mention these savory mini grilled cheese Hawaiian rolls too. They are cozy, and they balance the fresh veggie vibe in a really nice way.
How to Store and Reheat Grilled Vegetable Kabobs
If you have leftovers, pull the veggies off the skewers before storing. Put them in an airtight container in the fridge for up to 4 days. Store the homemade plum BBQ sauce separately if you can, so everything does not get too soft.
To reheat, I usually use a skillet over medium heat with a tiny splash of oil, just until warmed through. The microwave works too, but the skillet keeps the texture better. If you want to bring back some of that grilled vibe, you can reheat them on the grill for a couple minutes.
Leftover veggies are also great tossed into a wrap, added to a grain bowl, or piled onto toast with a drizzle of sauce.
Common Questions
1) Can I make the plum BBQ sauce ahead of time?
Yes. It actually gets even better after a night in the fridge. Make it up to 5 days ahead and keep it covered.
2) What if I do not have a grill?
You can use a grill pan on the stove, or roast the veggies on a sheet pan at 425 F until browned, then brush with sauce at the end.
3) How do I stop veggies from spinning when I flip the skewers?
Pack them snug enough to hold, but not smashed together. Or use two skewers per kabob for wider pieces like zucchini.
4) Should I marinate the vegetables?
You can, but you do not have to. A simple oil and seasoning toss is enough, especially since the sauce brings so much flavor.
5) Can I use other fruit besides plums in the sauce?
Definitely. Peaches, apricots, or even cherries can work. Just taste as you go and adjust the sweet and tangy balance.
A Simple Dinner You Will Want on Repeat
These Grilled Veggie Kabobs are one of those meals that make you feel like you have your life together, even if the day was chaos. The veggies are colorful and smoky, and that homemade plum BBQ sauce is the kind of thing you will want to keep in your fridge all summer. If you want more skewer inspiration, I like browsing Grilled Veggie Skewers Recipe – Allrecipes and this helpful one from Easy Grilled Veggie Skewers – The Forked Spoon when I am changing up flavors. Try these once, tweak the veggies to what you love, and do not forget extra sauce for dipping. Let me know what you put on your skewers because I am always looking for new combos.
Print
Grilled Veggie Kabobs
- Total Time: 30 minutes
- Yield: 4 servings 1x
Description
A quick and flavorful summer meal featuring grilled vegetables and a tangy plum BBQ sauce that enhances their natural sweetness.
Ingredients
For the Veggie Kabobs
- 2 medium Bell peppers, cut into chunky squares (Any color)
- 1 medium Zucchini or yellow squash, sliced thick
- 1 medium Red onion, cut into wedges
- 8–10 whole Mushrooms, kept whole if small (Optional)
- 1 cup Cherry tomatoes (Add near the end of grilling if they split easily)
- 2 tablespoons Olive oil
- 1 teaspoon Salt
- 1 teaspoon Black pepper
- 1 teaspoon Garlic powder or fresh garlic
- 8 skewers Skewers (metal or wooden) (Soak wooden skewers in water for at least 20 minutes)
For the Plum BBQ Sauce
- 4 medium Plums, pitted and chopped (Fresh is best, frozen works too)
- 1/2 cup Ketchup or tomato sauce
- 2 tablespoons Apple cider vinegar
- 2 tablespoons Brown sugar or maple syrup
- 1 tablespoon Soy sauce or tamari
- 1 teaspoon Smoked paprika
- 1 pinch Chili flakes (Optional)
- 1/2 teaspoon Salt
Instructions
Make the Plum BBQ Sauce
- In a small pot, add the chopped plums, ketchup, apple cider vinegar, brown sugar, soy sauce, and spices.
- Bring to a gentle simmer and cook for about 10 to 15 minutes until the plums soften.
- Stir occasionally to prevent sticking. Once done, blend the sauce until smooth and adjust flavors as desired.
Prepare the Vegetables
- Cut all vegetables into even-sized pieces for uniform cooking.
- Toss veggies in a bowl with olive oil, salt, pepper, and garlic powder.
Assemble the Kabobs
- Thread vegetables onto the skewers in a pattern, alternating between firm and soft pieces.
- Do not pack the skewers tightly; leave some space for heat circulation.
Grill the Kabobs
- Preheat the grill to medium to medium-high and lightly oil the grates.
- Grill the skewers for 8 to 12 minutes, turning occasionally until tender and charred.
- In the last few minutes, brush the kabobs with the plum BBQ sauce.
- Let the kabobs rest for a minute before serving.
Serve
- Serve hot with extra plum BBQ sauce for dipping.
Notes
Store leftovers in an airtight container in the fridge for up to 4 days. To reheat, use a skillet or the grill for best texture.
- Prep Time: 15 minutes
- Cook Time: 15 minutes
- Category: Grill, Main Course
- Cuisine: American, Barbecue
Nutrition
- Calories: 120
- Sugar: 8
- Sodium: 300
- Fat: 4
- Saturated Fat: 0.5
- Carbohydrates: 20
- Fiber: 3
- Protein: 3

Related posts:
 Homemade Chicken Pad Thai (Authentic Thai Stir Fry Noodles in 30 Minutes)
 Bacon Brown Sugar Chicken Tenders (Easy 5-Ingredient Recipe)
 Chicken Bubble Biscuit Bake Casserole (Easy Bubble Up Chicken Casserole Recipe)
 Best Healthy Chicken Salad Recipe (Creamy, High-Protein & Easy)
 Indian Butter Cauliflower Recipe – Easy Vegetarian Dinner
 The Best Cauliflower Mac and Cheese Recipe





 Appetizers & Sides
 Main Dishes
 Drinks & Wellness
 Desserts & Baking