
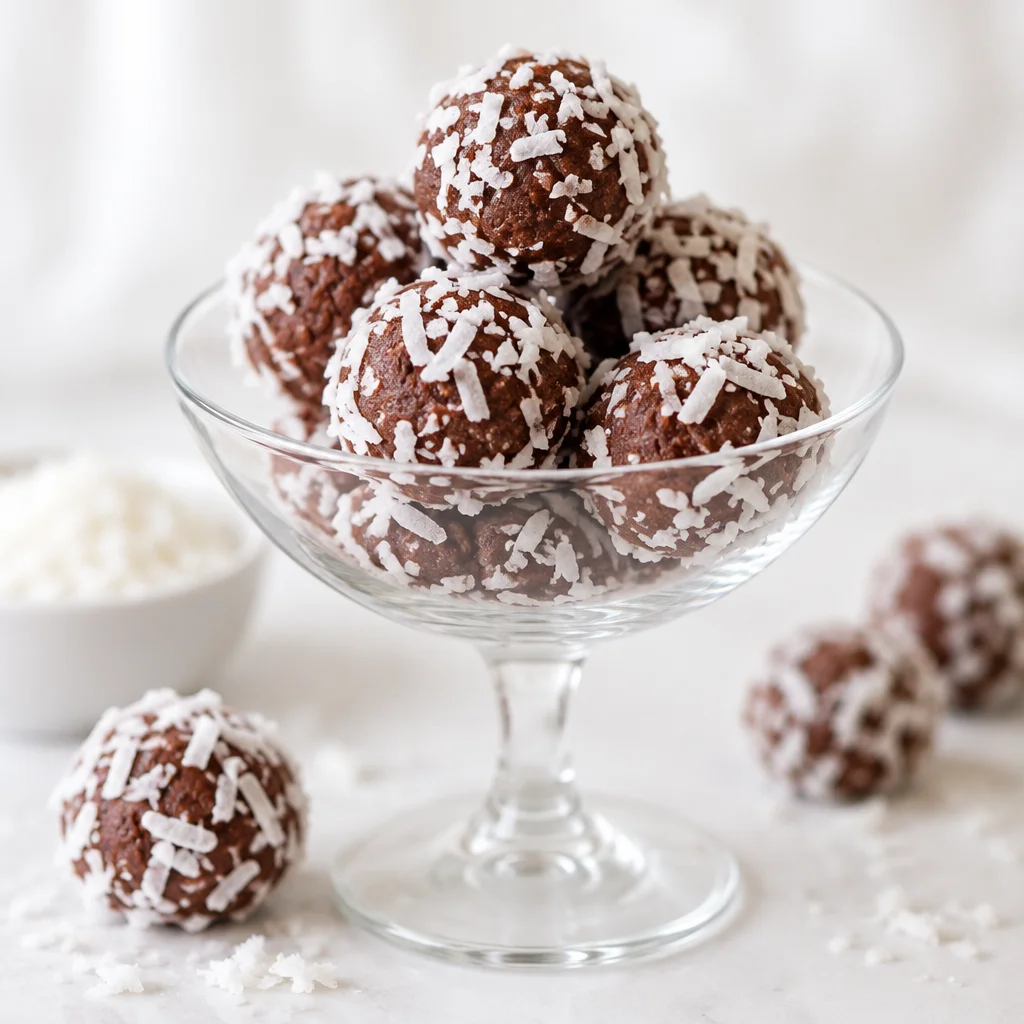
chocolate coconut balls are my go to solution when I want something sweet but I do not want to bake, fuss with layers, or wash a mountain of dishes. You know that moment when a chocolate craving hits hard, but you still want it to feel kind of wholesome and not like you inhaled a candy bar? This is exactly that vibe. These little bites have a soft coconut middle and a snappy dark chocolate shell that makes them feel fancy without any stress. I started making them for holiday trays, then suddenly I was making them on random Tuesdays. Let me walk you through my favorite way to do it.
What Makes These Dark Chocolate Coconut Balls Special
To me, the best part is the contrast. The center is sweet, creamy, and coconutty, and then the outside is deep, slightly bitter dark chocolate that keeps the whole thing from tasting too sugary.
I also love that they are portion friendly. One or two hits the spot, and you can stash the rest for later. If you have ever made something like my chocolate banana peanut butter bites, you already know I am a big fan of small treats that feel like a reward.
And yes, these are super shareable. People see the shiny shell and think you spent way more effort than you actually did. I will not tell if you do not.
Ingredients for the Coconut Center and Chocolate Shell
This is a short list recipe, which is another reason I make it so often. You can keep it classic or tweak it based on what you have.
- Shredded coconut, unsweetened or sweetened
- Greek yogurt for creaminess and a little tang
- Honey or maple syrup, or powdered sugar if you want a more candy like sweetness
- Vanilla extract
- Pinch of salt
- Dark chocolate chips or a chopped bar for the shell
- Coconut oil or neutral oil, optional, for a smoother dip
If you are building a party snack table, I like pairing sweets with something savory and fun like these baby chick cheese balls. It makes the spread feel playful and balanced.
Choosing Shredded Coconut and Greek Yogurt
The coconut you choose changes the texture a lot. Fine shredded coconut gives you a smoother, truffle like center. Larger flakes make it more chewy and rustic. Both are good, it just depends on your mood.
Greek yogurt is my little trick here. It helps the coconut mixture stick together without needing loads of butter or condensed milk. Go with plain Greek yogurt, full fat if you can. It is thicker, which means your chocolate coconut balls will hold their shape better when you roll them.
If your yogurt seems a bit watery, just stir it well first. If it is still thin, add a spoonful more coconut to firm up the mix.
Selecting Dark Chocolate for a Smooth Coating
This is where the magic happens. Use a dark chocolate you actually like eating. If you hate the taste straight from the bag, you will not love it as a shell.
I usually grab something in the 60 to 72 percent range. It is sweet enough to feel like candy, but still has that rich chocolate flavor. If you want a softer bite, add a small spoonful of coconut oil while melting. It helps the chocolate flow and keeps the coating from going on too thick.
One quick note: if you use chocolate chips, they can be thicker when melted. A chopped chocolate bar often melts smoother. Either works, just melt gently and stir patiently.
Tools and Setup for Rolling and Dipping
You do not need anything special, but having the basics ready makes everything go faster.
What I set out before I start:
- Mixing bowl and spoon
- Small cookie scoop or tablespoon
- Baking sheet
- Parchment paper
- Microwave safe bowl or a heatproof bowl for stovetop melting
- Fork or dipping tool
Line your baking sheet with parchment before you roll a single ball. That way you can place them down quickly without sticking. And clear a little fridge space, because chilling is part of the game here.
Mixing a Coconut Filling That Holds Together
This is the part where you want to trust your eyes and hands more than strict measurements. Coconut brands vary, yogurt thickness varies, and humidity is a real thing.
Start by mixing shredded coconut with Greek yogurt, sweetener, vanilla, and a pinch of salt. Stir until it looks like a thick, sticky mound. If it looks dry and crumbly, add a little more yogurt, just a teaspoon at a time. If it looks wet and loose, add more coconut.
You are aiming for a texture that you can pinch together and it stays in a clump. Not runny, not dusty. Once you get that, you are golden.
How to Roll Evenly Sized Coconut Balls
Even size matters because it helps them chill evenly and dip evenly. I use a small cookie scoop and level it off. Then I roll each scoop between my palms until smooth.
If the mixture sticks to your hands, rinse your hands in cool water and shake them off, or lightly oil your palms. Do not overdo the oil or the chocolate may have trouble sticking later.
Place each ball on the parchment lined sheet. Try not to pack them too close together, because you want airflow around them in the fridge.
Why Chilling the Filling Helps Before Dipping
Please do not skip this part. Chilling is what keeps the centers from falling apart when they hit warm chocolate.
I chill mine for at least 30 minutes. If I am in a rush, I pop them in the freezer for 10 to 15 minutes, but I keep an eye on them. You want them firm, not frozen solid. Frozen centers can cause the chocolate to crack later as they warm up and expand a bit.
While they chill, I clean up my mixing bowl and get my chocolate station ready. It makes the whole process feel less chaotic.
Melting Chocolate in the Microwave or a Double Boiler
Both methods work, so use what feels easiest.
Microwave method: Melt in 20 to 30 second bursts, stirring each time. When it looks mostly melted, stop heating and just stir until smooth. Overheating is what makes chocolate seize and get grainy.
Stovetop method: Use a bowl set over a pot with a little simmering water. Keep the heat low and make sure steam does not get into your chocolate. Water is the enemy of smooth melted chocolate.
If you want a thinner coating, stir in a small spoonful of coconut oil once the chocolate is melted and glossy.
How to Coat Each Coconut Ball Without a Thick Shell
I like a thin shell because it snaps when you bite in, instead of feeling like a jaw workout. Here is what helps:
Drop one chilled ball into the melted chocolate. Use a fork to gently roll it around. Lift it out on the fork and tap the fork lightly on the side of the bowl so extra chocolate drips off. Then slide it back onto parchment.
If you notice the chocolate pooling at the bottom, you can nudge it with a toothpick right after dipping. Work in small batches and keep the rest of the coconut balls in the fridge while you dip. Warm filling makes a mess fast.
Once dipped, let them set at cool room temperature or in the fridge. The fridge is faster, obviously, and I am not known for my patience.
Decorating With a Simple Chocolate Drizzle
This is optional, but it makes the finished candy look extra cute. I reserve a few spoonfuls of melted chocolate in a small corner of the bowl. Then I use a spoon to drizzle it back and forth over the dipped chocolate coconut balls.
If you want a little sparkle, a pinch of flaky salt or extra coconut on top looks great. Just add it before the shell fully sets so it sticks.
If you love chocolate decorations, you would probably also enjoy making chocolate strawberry greek yogurt clusters recipe sometime. Same easy dip and set energy.
Troubleshooting Loose Filling and Cracked Chocolate
This section is here because yes, I have had them fall apart, and yes, I have had chocolate crack. It happens. Here is how I fix it.
If the filling is too loose:
Add more shredded coconut and chill longer. You can also add a spoonful of almond flour if you have it, but coconut alone usually does the job.
If the filling is too dry:
Add a bit more Greek yogurt or a tiny splash of maple syrup, then remix. Let it sit for a few minutes so the coconut can absorb the moisture.
If the chocolate cracks:
This is often from balls that were too cold or actually frozen. Next time, chill in the fridge instead of freezing, or let them sit on the counter for 3 to 5 minutes before dipping. Also, avoid super thick shells, because thick chocolate is more likely to crack.
Ingredient Swaps and Flavor Variations
This is the fun part. Once you make these once, you can start playing.
Try adding:
Orange zest for a bright twist, or a drop of almond extract for a bakery vibe. You can also stir mini chocolate chips into the coconut center if you want extra texture.
For a more dessert like center, swap some of the coconut for crushed graham crackers. It gives a toasted, cookie taste.
If you are doing a full coconut themed dinner night, something like brazilian coconut chicken is a cozy main dish and these are the perfect sweet finish.
Serving Ideas and Homemade Candy Gift Packaging
If you are serving these for guests, I like them slightly chilled so the shell stays snappy. Put them on a small platter with a few strawberries or a bowl of mixed nuts. They also look great on a cookie tray.
For gifting, place 6 to 12 chocolate coconut balls in a small paper candy cup, then into a simple box or jar. Add a label with the flavor and date. People love that little detail and it helps them know how fresh they are.
If you are packing a full homemade food gift, toss in something savory too. I am a big fan of seafood with coconut flavors, like baked cod in coconut lemon for a dinner plus dessert combo when you are hosting family.
How to Store Chocolate Coconut Balls and Why Freezing Is Tricky
In the fridge, these keep really well. I store them in an airtight container for up to 7 days. Put parchment between layers so they do not stick together.
Freezing is possible, but it can be a little tricky. The main issue is texture changes. The coconut center can get slightly icy, and as they thaw, condensation can make the chocolate look spotty or cause tiny cracks. If you do freeze them, freeze on a tray first, then transfer to a container. Thaw in the fridge overnight and do not rush it on the counter.
Common Questions
Can I make chocolate coconut balls without Greek yogurt?
Yes. You can use cream cheese for a richer center, or coconut cream for a dairy free option. Just adjust coconut amount until the mix holds together.
Why is my chocolate coating lumpy?
Usually it overheated or got a tiny bit of water in it. Melt slower and stir often. If it is just thick, add a little coconut oil to smooth it out.
Do I have to use unsweetened coconut?
Nope. Sweetened coconut works, but you may want to reduce your added sweetener so they do not taste too sugary.
How far ahead can I make them for a party?
I like making them 1 to 3 days ahead and keeping them chilled. The flavor actually gets better after a night in the fridge.
Can kids help make these?
Absolutely. Kids can mix and roll the balls. Adults should handle melting and dipping the hot chocolate part.
A Sweet Little Treat You Will Want on Repeat
If you are craving a quick homemade candy moment, chocolate coconut balls are such a satisfying fix, especially with that dark chocolate snap on the outside. Keep them chilled, dip in thin layers, and do not rush the set time, and you will be so happy with the results. If you want more no bake inspiration, I have linked a couple great reads too, like No-Bake Chocolate Coconut Balls – Occasionally Eggs and Chocolate Coconut Balls {5-ingredients} – Kitchen Fun With My 3 Sons. Make a batch this week and tell me if you are a one at a time snacker or an oops I ate four person, because I have definitely been both.
Print
Dark Chocolate Coconut Balls
- Total Time: 30 minutes
- Yield: 12 pieces 1x
Description
These no-bake Dark Chocolate Coconut Balls feature a creamy coconut center surrounded by a rich dark chocolate shell, making for a healthy and delicious sweet treat.
Ingredients
Coconut Filling
- 2 cups Shredded coconut, unsweetened or sweetened (Use fine for smoother texture, larger flakes for a chewier texture.)
- 1/2 cup Greek yogurt (Use plain, full fat for better consistency.)
- 1/4 cup Honey or maple syrup (Can substitute with powdered sugar for a sweeter taste.)
- 1 tsp Vanilla extract
- 1 pinch Salt
Chocolate Coating
- 1 cup Dark chocolate chips or chopped dark chocolate (Choose chocolate in the 60-72% cocoa range for best results.)
- 1 tbsp Coconut oil (optional) (Use for a smoother chocolate coating.)
Instructions
Preparation
- Mix shredded coconut, Greek yogurt, honey (or maple syrup), vanilla, and salt in a mixing bowl until it forms a thick, sticky mound.
- Adjust consistency by adding more yogurt if too dry or more coconut if too wet.
- Use a small cookie scoop to portion the mixture, roll into balls, and place on a parchment-lined baking sheet.
- Chill the coconut balls in the refrigerator for at least 30 minutes.
Melting Chocolate
- Melt the dark chocolate using a microwave or stovetop double boiler, stirring frequently to prevent overheating.
- If desired, add a spoonful of coconut oil for a thinner coating.
Coating
- Dip each chilled coconut ball into the melted chocolate, gently rolling it to coat evenly.
- Tap the fork to remove excess chocolate and place back on the parchment-lined sheet.
- Allow the chocolate coating to set at room temperature or in the fridge.
Notes
For a decorative touch, drizzle extra melted chocolate over the set balls. Store in an airtight container in the fridge for up to 7 days. Freezing is possible but may alter texture.
- Prep Time: 30 minutes
- Category: Dessert, Snack
- Cuisine: American
Nutrition
- Calories: 120
- Sugar: 6
- Sodium: 25
- Fat: 7
- Saturated Fat: 5
- Carbohydrates: 14
- Fiber: 2
- Protein: 2








 Appetizers & Sides
 Main Dishes
 Drinks & Wellness
 Desserts & Baking