
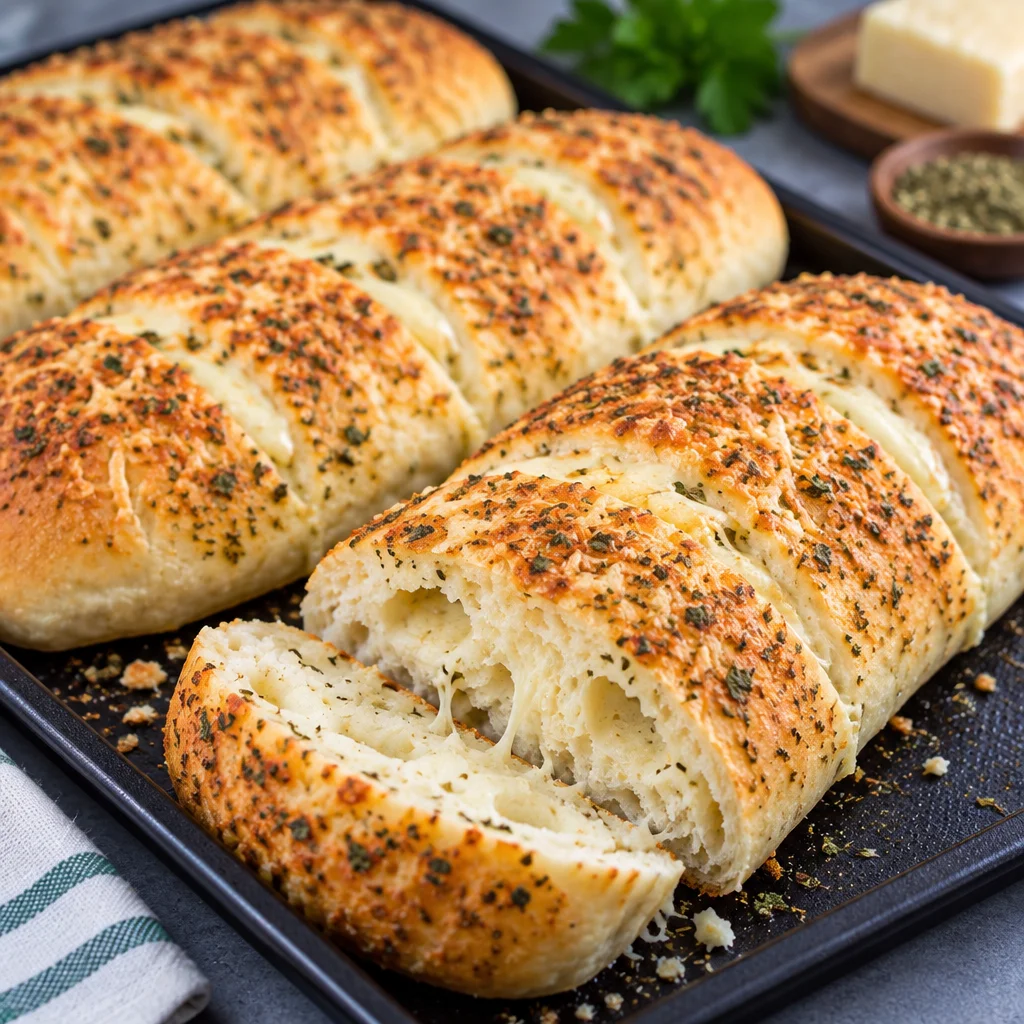
Italian herb and cheese bread is one of those things I crave at the most inconvenient times, like when I have sandwich fixings ready but the bread situation is sad. I wanted that soft, slightly sweet sub roll with the herby smell and that cheesy top that gets a little toasty in the oven. After a lot of weekend testing (and a couple of flatter-than-I-wanted rolls), I landed on this copycat that actually hits the vibe. It is cozy, reliable, and way more doable than it sounds. If you can stir, wait, and shape a few rolls, you can make this at home.
Why This Italian Herb and Cheese Bread Works
Here is the deal. The real magic is not just the herbs and cheese, it is the texture. This copycat aims for a soft interior, a thin tender crust, and that slightly sweet flavor that makes the bread taste good even before you add fillings.
Three things make that happen: a simple starter for flavor, the right balance of moisture in the dough, and baking with steam so the crust stays gentle. It is not complicated, it just asks you to follow the timing and not drown the dough in flour while kneading.
Also, if you love homemade sandwich breads, you might like my easy bread-y experiments too. I’ve been on a roll lately, like this cottage cheese pita bread that is ridiculously handy for quick lunches.
Ingredients for Soft Subway-Style Bread
I am keeping this straightforward. You do not need anything fancy to get that Subway-style bite, but a couple of ingredients really help.
- Bread flour: gives you that chewy but soft structure. All purpose works, but bread flour is better.
- Warm water: think warm bath, not hot coffee.
- Yeast: active dry or instant is fine.
- Sugar: for the mild sweetness and to help yeast wake up.
- Salt: makes it taste like real bread, not a bland roll.
- Oil: softens the crumb. Olive oil is great, neutral oil works too.
- Diastatic malt powder (optional but awesome): more on that below.
For the topping you will use shredded cheese and dried herbs. I do a mix of mozzarella and a little parmesan because it tastes closest to what I remember.
What Diastatic Malt Powder Does in Bread
If you have never bought diastatic malt powder, you are not alone. I avoided it for years, then finally tried it and went, ohhhh. It helps the dough brown nicely, gives the bread a subtle bakery flavor, and can make the crumb feel softer.
You only need a small amount. Too much can make bread gummy, so stick with about 1 teaspoon per batch of rolls. If you skip it, you can still make a great Subway Italian herb and cheese bread copycat. The malt just nudges it closer.
How to Make the Bread Starter
This is the little step that makes homemade bread taste less like plain dinner rolls. It is a quick starter, not a sourdough project.
Mix a small portion of your flour with water and a pinch of yeast, then cover and let it sit until bubbly and puffy. In a warm kitchen, that might take 30 to 60 minutes. If your house runs cold, give it a bit longer.
You are looking for a mixture that smells lightly yeasty and looks airy. If it just sits there like paste, your water may have been too hot or your yeast may be old.
How to Mix and Knead the Dough
Once the starter looks active, stir it into your dough ingredients. I usually do this in a big bowl because it feels more relaxed, but a stand mixer works too.
My biggest tip: do not keep dumping flour in just because the dough is sticky at first. Sticky dough becomes soft bread. After a few minutes of kneading, it should feel smoother and elastic. If it is still a puddle after kneading, add flour a spoonful at a time.
Knead until the dough stretches without tearing right away. You do not need perfection, just a nice springy dough that holds together.
Proofing Times and Ideal Dough Temperature
Proofing is basically letting the dough rise until it is airy. For this recipe, you will do two rises: one bulk rise after mixing, then a shorter rise after shaping.
The dough is happiest around 75 to 80 F. If your kitchen is chilly, you can let it rise in the oven with the light on (oven off). If your kitchen is warm, keep an eye on it because it can move fast.
Typical timing:
First rise: about 60 to 90 minutes, or until doubled. Second rise: about 30 to 45 minutes, until puffy.
When it is ready, the dough should look alive and soft, not tight and dense.
How to Fold Dough for Better Structure
Folding sounds fussy, but it is basically giving the dough a little strength without kneading forever. During the first rise, I like to do one or two simple folds.
Wet your hands, grab one side of the dough, stretch it up gently, and fold it over itself. Turn the bowl and repeat a few times. That is it.
This helps your Subway Italian herb and cheese bread copycat bake up with a nicer shape and a fluffier inside.
How to Shape Even Sub Rolls
If you want that classic sub roll look, it helps to weigh the dough pieces, but you can eyeball it too. Divide into equal portions, then shape each into a tight little log.
My method is simple:
Flatten the dough into a small rectangle, roll it up snug like a sleeping bag, pinch the seam, then roll gently to lengthen. Try to keep the ends rounded, not pointy.
Place the rolls seam-side down on parchment. Leave space between them so they do not fuse into one mega loaf.
How to Make the Italian Herb and Cheese Topping
This is the fun part, and honestly the part that makes your kitchen smell like a sandwich shop.
Mix dried herbs like oregano, basil, parsley, maybe a tiny pinch of garlic powder if you like. Then toss together shredded mozzarella with a little parmesan. Brush the risen rolls lightly with water or an egg wash, then sprinkle generously with the herb blend and cheese.
Do not be shy. A good Subway Italian herb and cheese bread copycat has that speckled top and visible cheese bits.
And if you are in a bread mood, you might also love this quick, high protein 2 ingredient cottage cheese flatbread for speedy wraps.
How to Bake with Steam for a Soft Interior
Steam is the trick for keeping the crust thin and soft. You have options here, nothing fancy required.
You can place a small metal pan on the bottom rack while the oven preheats. When you slide the rolls in, carefully pour hot water into that pan and close the door fast. That burst of steam keeps the surface flexible so the bread rises nicely and stays tender.
Another option is to spray the oven walls with water right when you put the bread in. I do not love this method as much, but it works in a pinch.
How to Tell When the Bread Is Done
I used to overbake rolls because I was scared of gummy bread. Now I watch for a few clear signs.
You want the tops to be lightly golden, the cheese to be melted with a few deeper toasted spots, and the rolls to feel light when you lift one. If you have a thermometer, the center should be around 190 to 200 F.
Let them cool at least 15 minutes before slicing. Warm bread is dreamy, but slicing too early can squish the crumb.
How to Make Subway-Style Italian Bread Without the Topping
If you want the plain version, just skip the herbs and cheese. Brush the tops with a little water before baking, or a light egg wash if you want more color. Everything else stays the same.
This is awesome if you are making sandwiches for picky eaters, or if you want a softer roll that will not shed cheese into your lap.
Ingredient Substitutions and Cheese Variations
Real life baking means working with what you have. Here is what swaps well:
Bread flour: all purpose works, the rolls may be slightly less chewy. Sugar: honey works, use a bit less. Oil: melted butter makes them extra cozy.
Cheese ideas: mozzarella is the closest match, but provolone is amazing here too. A little cheddar adds sharpness, just do not go too heavy or it can get oily on top.
Herb options: Italian seasoning is the easy button. You can also add a pinch of onion powder if you like that savory smell.
For a sandwich that feels like a treat, I’m obsessed with this burrata Italian focaccia sandwich. It is a different bread vibe, but still very Italian deli energy.
How to Store and Freeze Homemade Sub Rolls
These rolls keep best when you cool them fully, then store them in a bag or airtight container. They stay soft for about 2 days at room temp.
For longer storage, freeze them. I slice them first (not all the way through if you want a hinge), then wrap individually and freeze. Reheat in the oven at 325 F until warmed through, or toast straight from frozen.
If you are meal prepping, this is a great move. Homemade Subway Italian herb and cheese bread copycat on a busy weekday feels like you planned your life better than you did.
Best Sandwich Fillings for Italian Herb and Cheese Bread
This bread is built for sandwiches. The flavor is bold enough to make simple fillings taste exciting.
My favorite combos:
Turkey, provolone, lettuce, tomatoes, banana peppers, and a little oil and vinegar. Ham, salami, pepperoni, mozzarella, shredded lettuce, and a swipe of mayo. Crispy chicken cutlets with marinara and extra parmesan.
I made these for my family’s game night and everyone said they tasted like the real deal, maybe even better because they were warm and fresh. I’m making a double batch next time.
Also, if you want cozy sides for sandwich night, my chicken mac and cheese soup is basically comfort in a bowl. And if you need a sweet treat after, these carrot and zucchini bars with dreamy citrus cream cheese frosting disappear fast.
Common Questions
Can I make the dough ahead of time?
Yes. After the first rise, you can cover it and refrigerate overnight. Let it sit at room temp for 30 to 60 minutes before shaping.
Why did my rolls turn out dense?
Usually it is one of three things: old yeast, not enough rising time, or too much extra flour. The dough should feel soft, not stiff.
Do I have to use diastatic malt powder?
Nope. It helps with browning and softness, but you can still get a great result without it.
How do I keep the topping from falling off?
Brush the tops well with egg wash or water, then press the cheese and herbs on gently. Let the rolls rise after topping for a few minutes so it sticks better.
Can I make this as one big loaf instead of rolls?
You can. Shape it like a log, bake longer, and watch the color. The inside temp cue still applies.
A Cozy Little Sandwich Night Is Calling
If you follow the timing, keep the dough soft, and do not skip the steam, you will get that tender bite that makes this Subway Italian herb and cheese bread copycat so satisfying. Once you nail it once, it becomes one of those recipes you can do without overthinking. If you want to compare methods or get extra topping ideas, check out this Subway Bread Recipe (Italian Herb and Cheese Copycat) and this Copycat Subway Italian Herb & Cheese Bread | Spicedblog. Now grab your favorite fillings, crank your oven, and make your kitchen smell like the best part of a sandwich shop.
Print
Italian Herb and Cheese Bread
- Total Time: 2 hours 20 minutes
- Yield: 12 servings 1x
Description
A soft, slightly sweet sub roll topped with herbs and cheese, perfect for sandwiches and homemade meals.
Ingredients
Bread Ingredients
- 4 cups bread flour (All purpose flour can be used, but bread flour gives a better structure.)
- 1.5 cups warm water (Warm like a bath, not too hot.)
- 2.25 teaspoons active dry yeast (Or instant yeast.)
- 1 tablespoon sugar (For sweetness and to activate yeast.)
- 2 teaspoons salt (Enhances flavor.)
- 2 tablespoons olive oil (Softens the crumb.)
- 1 teaspoon diastatic malt powder (Optional but enhances flavor and texture.)
Topping Ingredients
- 1 cup shredded mozzarella cheese (Can also use provolone or cheddar.)
- 0.5 cup shredded parmesan cheese (For best taste.)
- 1 tablespoon dried oregano (Also consider basil and parsley.)
- 1 tablespoon dried basil (Mix with other herbs.)
- 1 tablespoon dried parsley (Optional.)
- 1 pinch garlic powder (Optional, for flavor.)
Instructions
Making the Starter
- Mix a small portion of bread flour with warm water and a pinch of yeast; cover and let it sit until bubbly and puffy.
Mixing and Kneading the Dough
- Stir the starter into the remaining dough ingredients.
- Knead the dough until it is smooth and elastic, adding flour only if necessary.
Proofing the Dough
- Let the dough rise in a warm spot until doubled in size, approximately 60 to 90 minutes.
- Shape the dough into rolls and let them rise again for 30 to 45 minutes.
Preparing the Topping
- Mix the herbs and cheeses for the topping.
- Brush risen rolls with water or egg wash and sprinkle with herb and cheese mixture.
Baking the Rolls
- Bake in a preheated oven, using steam by pouring water into a pan during baking, until golden and the internal temperature reaches 190 to 200°F.
Cooling and Serving
- Let the rolls cool for at least 15 minutes before slicing.
Notes
Store rolls in an airtight container. They can be frozen for longer storage.
- Prep Time: 2 hours
- Cook Time: 20 minutes
- Category: Baked Goods, Side, Snack
- Cuisine: American, Italian
Nutrition
- Calories: 180
- Sugar: 1
- Sodium: 250
- Fat: 4.5
- Saturated Fat: 1.5
- Carbohydrates: 30
- Fiber: 1
- Protein: 6

Related posts:
 Sakura Mochi: A Japanese Dessert You Can Easily Make at Home
 Deliciously Simple Candied Orange Slices
 Decadent Hot Cross Bun Recipe
 Irresistibly Super Moist Chocolate Chip Banana Bread Recipe
 Crispy Air Fryer Churro Bites- Sweet & Simple
 Vegan Gluten-Free Lemon Sandwich Cookies with Lemon Curd (Easy Healthy Recipe)





 Appetizers & Sides
 Main Dishes
 Drinks & Wellness
 Desserts & Baking