
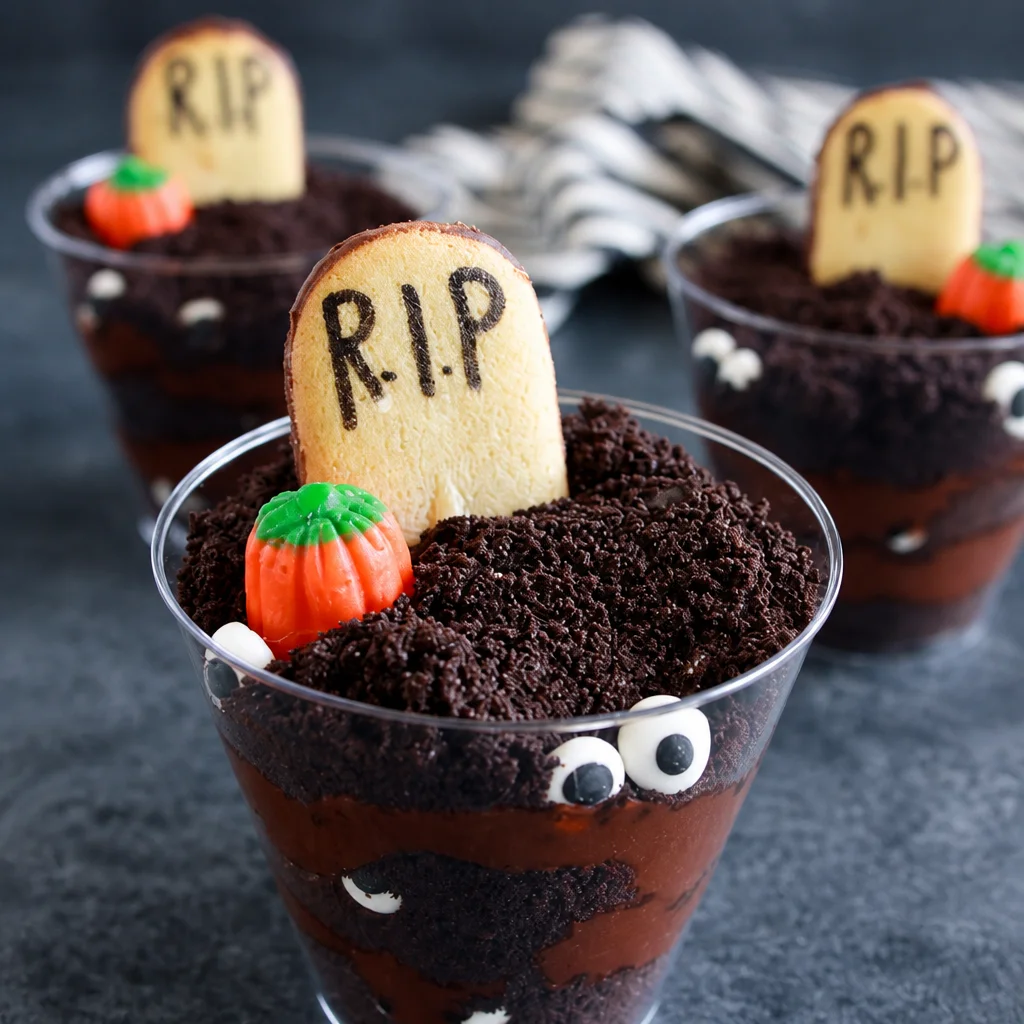
Graveyard Pudding Cups always show up right when I need a Halloween treat that looks like I tried really hard, even if I did not. You know that moment when the school party email hits your inbox and you have exactly one evening to pull something together? Yep, this is my go to. These cups are chocolatey, a little crunchy, and honestly just plain cute on a table of snacks. Plus, kids instantly understand the theme, which makes it extra fun. If you can crush cookies and stir pudding, you can make these.
What Are Graveyard Pudding Cookie Cups?
Think of these as little dessert cups that look like a tiny spooky graveyard. You have a base of chocolate pudding, a layer of crushed Oreo crumbs that looks like dirt, and then you decorate the top with “tombstones” and spooky candy. I call them Graveyard Pudding Cups because they are basically dirt cups dressed up for Halloween, but the graveyard details make them party ready.
I like making them in clear cups so everyone can see the layers. It feels fancy, but it is really just smart presentation. If you have ever made a simple pudding cup before, this is the same idea with Halloween decorations on top.
Why You’ll Love This Easy Halloween Dessert
First, it is no bake. That alone makes it a winner during a busy week. Second, it is super flexible. You can make it as simple or as extra as you want, depending on your time and what you have in the pantry.
It is also one of those desserts that gets people talking because it looks adorable on the table. And if you are doing a whole pudding themed week, you might also like this fun guide for how to make Japanese pudding purin. Totally different vibe, but it is another pudding dessert that always impresses people.
Ingredients for Halloween Pudding Cookie Cups
Here is what I usually grab. Nothing fancy, and you can swap brands easily.
- Chocolate pudding mix (instant is easiest) or your favorite homemade pudding
- Milk (whatever the pudding box calls for)
- Oreo cookies (or any chocolate sandwich cookies)
- Gummy worms, candy pumpkins, or candy corn for decorating
- Small plain cookies or graham crackers for tombstones
- Black decorating gel or melted chocolate for writing
- Whipped topping (optional, but nice for extra creaminess)
- Clear cups (plastic party cups or small dessert cups)
If you want to keep things a little lighter on some days, I also make chia puddings sometimes. This one is genuinely tasty and feels like a treat: healthy tiramisu chia pudding.
How to Make Oreo Cookie Crumbs for the Graveyard Dirt
The “dirt” is just crushed Oreos, but the trick is getting them fine enough to really look like soil. I usually scrape out the cream filling if I want the crumbs to be super dark, but you do not have to. If you are short on time, crush them whole and call it a day.
Here is how I do it:
Option 1: Put cookies in a zip top bag and crush with a rolling pin. This is also weirdly stress relieving.
Option 2: Use a food processor and pulse until they look like fine crumbs.
Try not to leave big chunks. A few are fine, but the more even the crumbs are, the more realistic your “graveyard dirt” looks.
How to Make Chocolate Pudding for the Dessert Cups
I usually use instant chocolate pudding for these Graveyard Pudding Cups because it is fast and reliable. Just whisk the pudding mix with cold milk for a couple of minutes until it thickens. Then let it sit for a few minutes to fully set up.
If I want it extra creamy, I fold in a spoonful or two of whipped topping after it thickens. It softens the texture and makes it feel more like a mousse. Also, if you are making a big Halloween spread, having a warm drink nearby is a good move. These chocolate hot cups are more of a winter thing, but the idea of an easy chocolate treat in a cup is always useful.
How to Assemble the Graveyard Pudding Cookie Cups
This is the part where everything comes together and starts looking like a Halloween dessert instead of snacks on your counter.
My simple assembly order:
1) Spoon chocolate pudding into the bottom of each clear cup.
2) Add a thick layer of Oreo crumbs on top to create the “dirt.”
3) Add your tombstone cookie, pushing it slightly into the crumbs so it stands up.
4) Finish with candy, gummy worms, or sprinkles.
These Graveyard Pudding Cups look best when the dirt layer is generous. Do not be shy with the crumbs. The contrast is what makes it cute.
How to Make Easy Cookie Tombstones
For tombstones, I keep it super simple. I use rectangular butter cookies, oval shortbread cookies, or even broken pieces of graham cracker. If you want the classic tombstone shape, you can trim the top corners with a small knife, but honestly it is optional.
To decorate them, I use black gel icing to write little messages like “RIP” or silly names. Melted chocolate also works, but you need it in a piping bag or a baggie with the tiniest corner snipped off.
Let the writing set for a few minutes before sticking them into the cups, otherwise your letters can smudge.
How to Decorate Spooky Halloween Pudding Cups
This is where you can match your crowd. For little kids, I stick to friendly cute decorations. For teens, I lean more spooky.
Some easy ideas:
Gummy worms half buried in the dirt like they are crawling out.
Candy pumpkins placed around the tombstone.
Mini chocolate chips sprinkled like little pebbles.
Green frosting piped in tiny bits to look like grass.
If you are making these for a party, set out bowls of toppings and let people decorate their own. It turns dessert into an activity, and it buys you a few minutes of peace.
Best Tips for Perfect Graveyard Pudding Cups
Here are the little things I have learned after making Graveyard Pudding Cups more times than I can count.
Use clear cups if you can. The layers look fun, and it helps with portioning.
Chill before serving so the pudding sets fully and the flavors come together.
Add tombstones close to serving time if your cookies are thin. Some cookies can soften if they sit too long in the crumbs.
Make extra dirt because someone always “taste tests” the Oreo crumbs.
Fun Variations for Halloween Pudding Cups
If you want to switch it up, you have options.
Try vanilla pudding with chocolate crumbs for a different look.
Use chocolate mousse if you want a richer base.
Swap Oreos for chocolate graham crackers if that is what you have.
Add a surprise layer like crushed brownies or a spoonful of peanut butter in the middle.
And if you love playful dessert mashups, you should check out these banana pudding Easter truffles. Not Halloween themed, but the idea of turning pudding flavors into bite sized treats is so fun.
Halloween Pudding Cup Ideas for Kids and Parties
If you are making a bunch of these at once, do yourself a favor and line everything up like a little assembly line. Cups first, then pudding, then crumbs, then decorations. It goes faster and feels way less messy.
For kids, I like using:
Short cups so they are not overloaded with sugar.
Just one or two candy pieces on top, so it stays cute but not chaotic.
For parties, I like making a mix of styles. Some cups get gummy worms, some get candy corn “fences,” and a few get extra spooky tombstones. People always pick the one that fits their personality, which is kind of funny.
What to Serve With Graveyard Pudding Cookie Cups
These are rich and chocolatey, so I like pairing them with simple snacks. If this is part of a bigger Halloween spread, here are easy ideas that work well:
- Sliced apples or fruit tray for a fresh bite in between sweets
- Pretzels or popcorn for something salty
- Hot chocolate or cider for a cozy drink option
If you are serving coffee for adults, these cups are amazing with a dark roast. The chocolate and coffee combo never fails.
How to Store Halloween Pudding Cookie Cups
Store them covered in the fridge. I usually just put them on a tray and loosely cover with plastic wrap, or use cups with lids if I am transporting them.
They keep well for about 2 days. After that, the cookie crumbs start to soften and the decorations can look a little tired. Still tasty, just not as crisp and cute.
Can You Make Graveyard Pudding Cups Ahead of Time?
Yes, and it is one of the reasons I love them. You can make the pudding and assemble the cups the night before. If you want the best look, here is my favorite plan:
Make pudding and Oreo crumbs the day before.
Fill cups with pudding and top with crumbs the day before.
Add tombstones and candy a few hours before serving, or right before you set them out.
This keeps everything looking fresh and prevents soggy tombstones. If you are packing them for a party, add the decorations at your destination if you can. It avoids the sad smashed candy situation.
Common Questions
Can I use homemade pudding instead of instant?
Absolutely. Just let it cool to room temp first, then chill until it is thick before you build the cups.
Do I have to use Oreos?
Nope. Any chocolate cookie you can crush will work. Chocolate graham crackers are great, and even chocolate animal crackers in a pinch.
What cups size works best?
I like 6 to 9 ounce clear cups. They are big enough for layers but not so big that people feel overwhelmed after dinner.
How do I keep the tombstones from falling over?
Press them down into the crumbs a bit, and make sure the crumb layer is thick. If they are still tipping, use a gummy worm behind the cookie like a little support.
Can I make these dairy free?
Yes. Use a dairy free pudding mix or make pudding with a plant milk that the brand says will set properly. Coconut whipped topping is also a good swap.
A Sweet Little Halloween Win
If you need a festive treat that is easy, cute, and actually tastes good, Graveyard Pudding Cups are the answer. You can keep them simple for a weeknight or go big with a whole topping bar for a party. If you want more inspiration, I have gotten ideas from Graveyard Pudding Cookie Cups | My Name Is Snickerdoodle and also from Spooky Graveyard Dirt Cups (Perfect For Halloween!) when I am trying to switch up decorations. Put on a spooky playlist, crush some cookies, and give these a try. I promise they will disappear fast.
Print
Graveyard Pudding Cookie Cups
- Total Time: 30 minutes
- Yield: 12 cups 1x
Description
These adorable Graveyard Pudding Cups combine chocolate pudding, crushed Oreo crumbs, and spooky decorations to create a festive Halloween treat that’s easy to make and fun to serve.
Ingredients
Pudding Base
- 1 package Chocolate pudding mix (Instant is easiest)
- 2 cups Milk (As per pudding package instructions)
Dirt Layer
- 15 cookies Oreo cookies (Can substitute with any chocolate sandwich cookies)
Decorations
- as needed Gummy worms, candy pumpkins, or candy corn (For decorating)
- as needed Small plain cookies or graham crackers (For tombstones)
- as needed Black decorating gel or melted chocolate (For writing on tombstones)
- 1 cup Whipped topping (Optional, for extra creaminess)
- 12 cups Clear cups (Plastic party cups or small dessert cups)
Instructions
Preparation
- In a bowl, whisk together the chocolate pudding mix and cold milk until it thickens, then let it sit to fully set.
- Crush the Oreo cookies in a zip-top bag with a rolling pin or in a food processor until fine crumbs are formed.
Assembly
- Spoon chocolate pudding into the bottom of each clear cup.
- Add a thick layer of crushed Oreo crumbs on top to simulate dirt.
- Insert a tombstone cookie into the crumbs, pushing it down slightly.
- Decorate the top with gummy worms, candy, or sprinkles as desired.
Notes
For best results, chill before serving to ensure the pudding sets nicely. Add tombstones right before serving to maintain their crispiness. It’s ideal to set up an assembly line when making multiple cups.
- Prep Time: 30 minutes
- Category: Dessert, Snack
- Cuisine: American, Halloween
Nutrition
- Calories: 250
- Sugar: 18
- Sodium: 200
- Fat: 12
- Saturated Fat: 6
- Carbohydrates: 32
- Fiber: 1
- Protein: 3

Related posts:
 Deliciously Simple Candied Orange Slices
 Decadent Hot Cross Bun Recipe
 Irresistibly Super Moist Chocolate Chip Banana Bread Recipe
 Crispy Air Fryer Churro Bites- Sweet & Simple
 Vegan Gluten-Free Lemon Sandwich Cookies with Lemon Curd (Easy Healthy Recipe)
 Cranberry Crumble Bars with Orange and Vanilla Glaze





 Appetizers & Sides
 Main Dishes
 Drinks & Wellness
 Desserts & Baking