
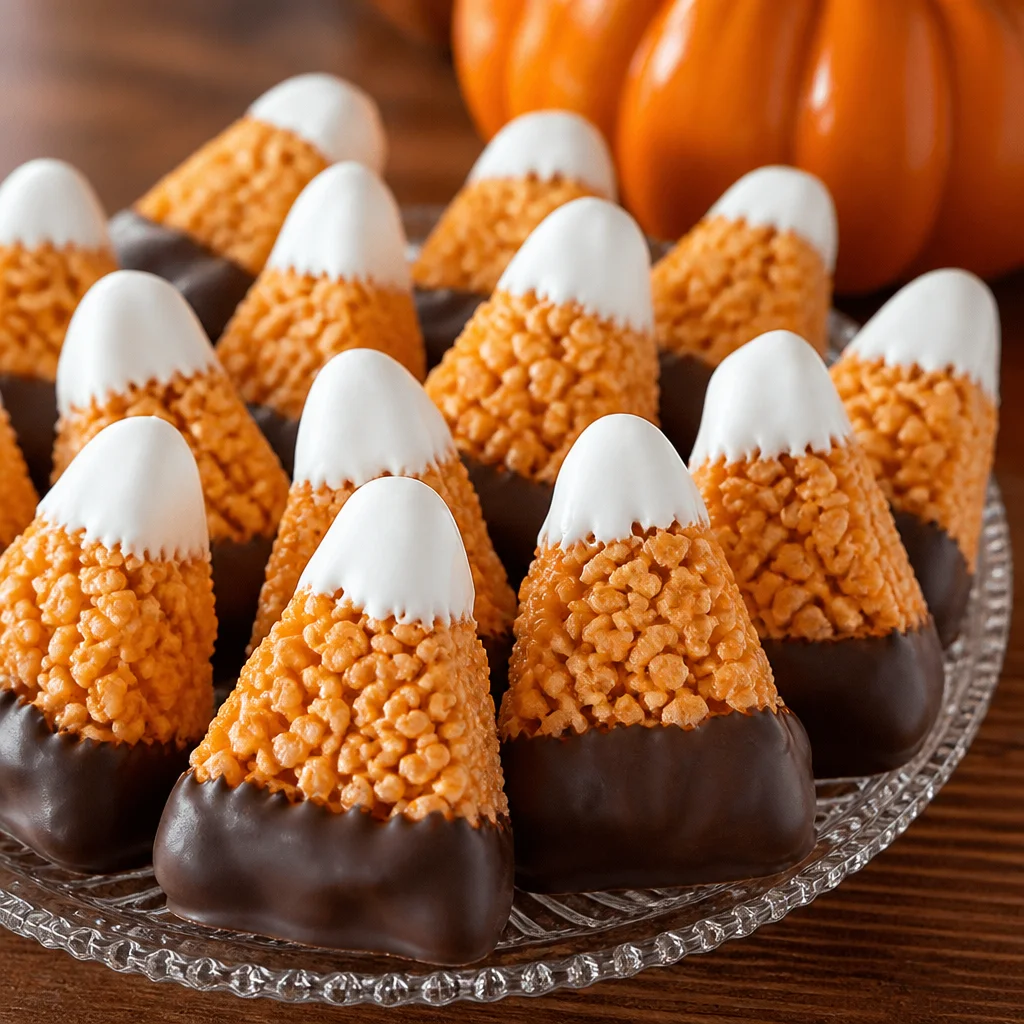
Chocolate Dipped Candy Corn Treats are my go to move when Halloween sneaks up fast and I still want something cute, sweet, and party ready. You know those weeks where you have costume pieces on the table, pumpkins on the porch, and zero time to bake? Yep, this is for that. These are basically candy corn style rice krispie treats dipped in chocolate, and they look like you spent way more effort than you did. They are no bake, kid friendly, and honestly kind of addictive. Let’s get you in and out of the kitchen with something festive.
Why You’ll Love These Chocolate Dipped Candy Corn Treats
The big win here is how quickly these come together. If you can stir cereal into marshmallows, you can make these. The candy corn look is such a Halloween classic, and the chocolate dip makes them feel extra special without turning into a whole baking project.
I also love that they travel well. I have brought these to school parties, neighbor porch hangs, and office potlucks, and they always get grabbed first. The mix of chewy cereal bar plus crisp chocolate is just really satisfying.
And if you want another easy chocolate snack for your Halloween spread, these are great alongside my Bloody Red Velvet Popcorn for Halloween. Sweet, spooky, and snacky is the best combo.
Ingredients You’ll Need for Candy Corn Rice Krispie Treats
Nothing complicated here, which is exactly what I want in October. I’m listing the basics, then you can tweak based on what you like.
- Rice Krispies cereal (or any crispy rice cereal)
- Mini marshmallows (fresh ones melt smoother)
- Butter
- Yellow food coloring
- Orange food coloring
- White chocolate or vanilla candy melts for dipping
- Orange candy melts or orange tinted white chocolate (optional for extra color)
- Sprinkles (Halloween mix, sanding sugar, or little bats)
- A pinch of salt (optional but makes the flavor pop)
If you are already in a chocolate mood, bookmark these Chocolate Banana Peanut Butter Bites too. They are another easy, no stress treat when you want something sweet in the fridge.
Best Ingredients & Substitutions for Perfect Results
Here’s what I’ve learned after making these more than once, including the time I tried to rush and ended up with a sticky mess.
Marshmallows: Fresh marshmallows melt smoother. If yours are hard or stale, they can turn your bars a bit lumpy. You can use large marshmallows, but mini melt faster and more evenly.
Butter: Salted or unsalted both work. If you use unsalted, add a small pinch of salt. It keeps the treats from tasting flat.
Cereal: Any crisp rice cereal works. Name brand is a little more consistent, but store brand is fine. Just make sure it is really crisp and not stale.
Chocolate for dipping: Candy melts are easiest because they set up nicely. If you use real white chocolate chips, add a tiny bit of coconut oil or shortening to help it melt smoother. I avoid adding milk because it can cause seizing.
Coloring: Gel food coloring gives stronger color without thinning the melted marshmallow. Liquid works too, just use a little at a time.
If you like fruity chocolate combos, you might also love these Chocolate Strawberry Greek Yogurt Clusters for something a bit lighter after all the candy.
Kitchen Tools You Need
This is a low equipment recipe, which is one more reason I keep it in my Halloween back pocket.
You’ll need: a large pot, a silicone spatula or wooden spoon, a 9×13 pan (or similar), parchment paper, a sharp knife, and a microwave safe bowl for melting chocolate. If you have a small offset spatula, it helps press the layers neatly, but it is not required.
One important thing, grease your hands or spatula lightly with butter or cooking spray when pressing the layers. It keeps everything from sticking to you like glue.
How to Make Chocolate Dipped Candy Corn Rice Krispie Treats
I do this in three layers so it looks like candy corn. White on top, orange in the middle, yellow on the bottom. The main idea is the same for each layer, melt, mix, press, repeat.
Step by step directions
1) Prep your pan: Line a 9×13 pan with parchment paper, leaving a little overhang so you can lift the bars out later. Lightly grease the parchment.
2) Make the yellow layer: Melt butter in a large pot on low heat. Add marshmallows and stir until smooth. Add yellow coloring. Turn off the heat. Stir in cereal until coated. Press into the pan as the bottom layer. Do not smash it too hard, just press until even.
3) Make the orange layer: Repeat the same melt and mix process, tint orange, then press gently over the yellow layer.
4) Make the white layer: Repeat again with no coloring. Press gently on top. Let the whole pan cool for about 20 to 30 minutes so it firms up before cutting.
5) Cut into triangles: Lift the slab out using parchment. Cut into rectangles first, then diagonally to make triangle shapes like candy corn. Don’t stress if they are not perfect. Once dipped, they look adorable anyway.
6) Dip in chocolate: Melt white chocolate or candy melts in the microwave in short bursts, stirring each time. Dip the bottoms of the triangles, let excess drip off, then place on parchment to set. Add sprinkles before the chocolate hardens.
That’s it. You just made Chocolate Dipped Candy Corn Treats that look like they belong on a Halloween dessert table.
Expert Tips for Soft, Chewy, and Perfect Rice Krispie Treats
I care a lot about texture with these. Nobody wants a rice krispie treat that feels like biting into a brick.
Keep heat low: High heat can make melted marshmallows tough, and that turns into hard bars later.
Don’t over stir after adding cereal: Mix just until coated. Over mixing can crush the cereal and make the treats dense.
Press gently: This is the secret. Use light pressure when pressing into the pan. If you pack it down hard, you get a tight, chewy bar that is less fun to eat.
Let layers cool slightly: If you try to press the next layer while the previous one is lava hot, the colors can blend a little. Not the end of the world, but if you want crisp layers, give it 5 minutes between layers.
When I want another classic cookie option on the side, I like these Chocolate Thumbprint Cookie because they look fancy but are totally doable.
Fun Variations and Halloween Decorating Ideas
You can keep these simple or go full Halloween chaos, your choice.
Try these easy twists:
Swap the white chocolate dip for milk or dark chocolate if you want a richer bite. Add a drizzle of contrasting chocolate across the top for a bakery look. You can also sprinkle crushed candy corn on the wet chocolate, it is sweet on sweet but kind of perfect for Halloween.
For decorating, I like Halloween sprinkles, candy eyeballs, or a little orange sanding sugar. If you are making these with kids, let them decorate their own pieces. It turns into a mini activity and honestly buys you a few quiet minutes.
What to Serve with Halloween Rice Krispie Treats
If you’re putting together a little spread, these bars play well with just about anything.
- Hot chocolate or warm apple cider
- Salted pretzels or popcorn for something crunchy
- Fresh fruit like strawberries or apple slices to balance the sweetness
- A bowl of mixed Halloween candy for the full effect
I love serving Chocolate Dipped Candy Corn Treats with something a bit salty nearby. It keeps people coming back for another bite, and then another.
How to Store, Freeze, and Make Ahead
These are great for making ahead, which is basically my favorite kind of Halloween recipe.
Room temperature: Store in an airtight container for up to 3 days. Put parchment between layers so the chocolate does not scuff.
Fridge: You can refrigerate them, but they get a little firmer. If you do, let them sit out 10 to 15 minutes before serving.
Freezer: Freeze in a freezer safe container for up to 6 weeks. Wrap pieces individually or separate with parchment. Thaw at room temp. The chocolate might get a tiny bit dull looking after freezing, but they still taste great.
Make ahead tip: Make and cut the bars the day before, then dip in chocolate the next day. That keeps them looking extra fresh for a party.
Common Mistakes to Avoid
I’ve made most of these mistakes so you don’t have to.
Cooking marshmallows too long: If they boil or get scorched, your treats can turn hard later. Low heat, patient stirring.
Pressing too hard: This is the number one reason rice krispie treats get dense. Gentle pressure is enough.
Cutting too soon: If the slab is still warm, you’ll get messy edges. Give it time to set.
Overheating the chocolate: Microwave in short bursts. Stir often. If it looks thick, a tiny bit of coconut oil helps.
Adding sprinkles too late: The chocolate sets fast. Sprinkle right after dipping.
More Easy Halloween Treat Recipes to Try
If you’re building a fun Halloween menu, I always suggest having a mix of textures. Something chewy, something crunchy, and something chocolatey.
These Chocolate Dipped Candy Corn Treats cover chewy and chocolatey, so add a crunchy snack mix or a popcorn recipe and you’re done. I also like having one treat that feels a little more grown up, like dark chocolate dipped fruit, just to balance out all the sugar rush vibes.
And if you want something that looks dramatic with basically no effort, Halloween popcorn is always a win.
Recipe Notes, Nutrition & Helpful Baking Tips
Even though this is a no bake recipe, a few small details make a big difference.
Quick notes before you start
Portion size: These are sweet, so smaller triangles are totally fine. You’ll get more servings and people can sample more treats.
Color control: Start with one drop of coloring and build up. You can always add more, but you can’t take it out.
Nutrition: I don’t calculate exact numbers here because brands vary a lot. Between the marshmallows, cereal, and chocolate, expect a classic sweet treat that is best enjoyed as a fun Halloween dessert, not an everyday snack.
Allergy note: Check your chocolate and sprinkles for dairy or soy if that matters for your crowd. Some candy decorations have surprise ingredients.
If you want super clean slices, wipe your knife between cuts. It sounds fussy, but it helps, especially with the chocolate dip.
Common Questions
Can I make these without food coloring?
Yes. You’ll lose the candy corn look, but they’ll still taste great. You can use Halloween sprinkles to bring back the festive vibe.
Do I have to do three layers?
Nope. You can do a single batch and cut into squares, then dip. The layered candy corn style just makes them extra cute.
Why did my treats turn out hard?
Usually it is from overheating the marshmallows or pressing the mixture too firmly into the pan. Low heat and gentle pressing fixes this.
What is the easiest chocolate to use for dipping?
Candy melts are the easiest because they melt smooth and set quickly. White chocolate chips work too, but melt them slowly and stir a lot.
Can I make Chocolate Dipped Candy Corn Treats the night before a party?
Yes, they are perfect for that. Store them airtight at room temp and keep parchment between layers so the chocolate stays pretty.
Final Thoughts: The Ultimate No-Bake Halloween Dessert
If you need a quick win for a party tray, Chocolate Dipped Candy Corn Treats are it. They are easy, they look festive, and they hit that sweet spot between cute and craveable. If you want more candy corn style inspiration, check out Candy Corn Rice Krispie Treats – Pint-sized Treasures and this version of Chocolate Dipped Candy Corn Rice Krispie Treats for extra ideas. Make a batch, dip them, toss on sprinkles, and call it a Halloween miracle. And if you do make them, I hope you have as much fun eating the “test pieces” as I always do.
Print
Chocolate Dipped Candy Corn Treats
- Total Time: 30 minutes
- Yield: 12 pieces 1x
Description
These no-bake treats combine the nostalgia of Rice Krispie treats with the festive appearance of candy corn, all dipped in chocolate for a sweet and satisfying Halloween snack.
Ingredients
For the Candy Corn Rice Krispie Layers
- 6 cups Rice Krispies cereal (or any crispy rice cereal)
- 4 cups Mini marshmallows (fresh ones melt smoother)
- 1/2 cups Butter (can be salted or unsalted)
- 4 drops Yellow food coloring (for the bottom layer)
- 4 drops Orange food coloring (for the middle layer)
- 1 cups Sprinkles (Halloween mix, sanding sugar, or little bats)
For Dipping
- 1 cup White chocolate or vanilla candy melts (for dipping)
- 1 cup Orange candy melts (optional for extra color)
Optional Ingredients
- a pinch Salt (to enhance flavor)
Instructions
Preparation
- Line a 9×13 pan with parchment paper, leaving a little overhang. Lightly grease the parchment.
- Melt butter in a large pot on low heat. Add marshmallows and stir until melted and smooth. Add yellow food coloring and stir.
- Remove from heat and mix in Rice Krispies cereal until well coated. Press the mixture gently into the pan as the bottom layer.
- Repeat the melting process with the orange food coloring for the second layer and press gently over the yellow layer.
- For the third layer, melt the marshmallows without any coloring and press gently on top. Let the pan cool for 20-30 minutes.
- Lift the slab out using the parchment. Cut into rectangles, then diagonally to form triangles.
- Melt white chocolate or candy melts in the microwave in short bursts, stirring well. Dip the bottoms of the triangles and let excess drip off.
- Place the dipped triangles on parchment to set, adding sprinkles while the chocolate is still melted.
Notes
These treats can be made ahead of time and are great for parties. Store in an airtight container at room temperature for up to 3 days.
- Prep Time: 15 minutes
- Category: Dessert, Snack
- Cuisine: American
Nutrition
- Calories: 160
- Sugar: 12
- Sodium: 50
- Fat: 7
- Saturated Fat: 4
- Carbohydrates: 21
- Protein: 1

Related posts:
 Sakura Mochi: A Japanese Dessert You Can Easily Make at Home
 Deliciously Simple Candied Orange Slices
 Decadent Hot Cross Bun Recipe
 Irresistibly Super Moist Chocolate Chip Banana Bread Recipe
 Crispy Air Fryer Churro Bites- Sweet & Simple
 Vegan Gluten-Free Lemon Sandwich Cookies with Lemon Curd (Easy Healthy Recipe)





 Appetizers & Sides
 Main Dishes
 Drinks & Wellness
 Desserts & Baking