
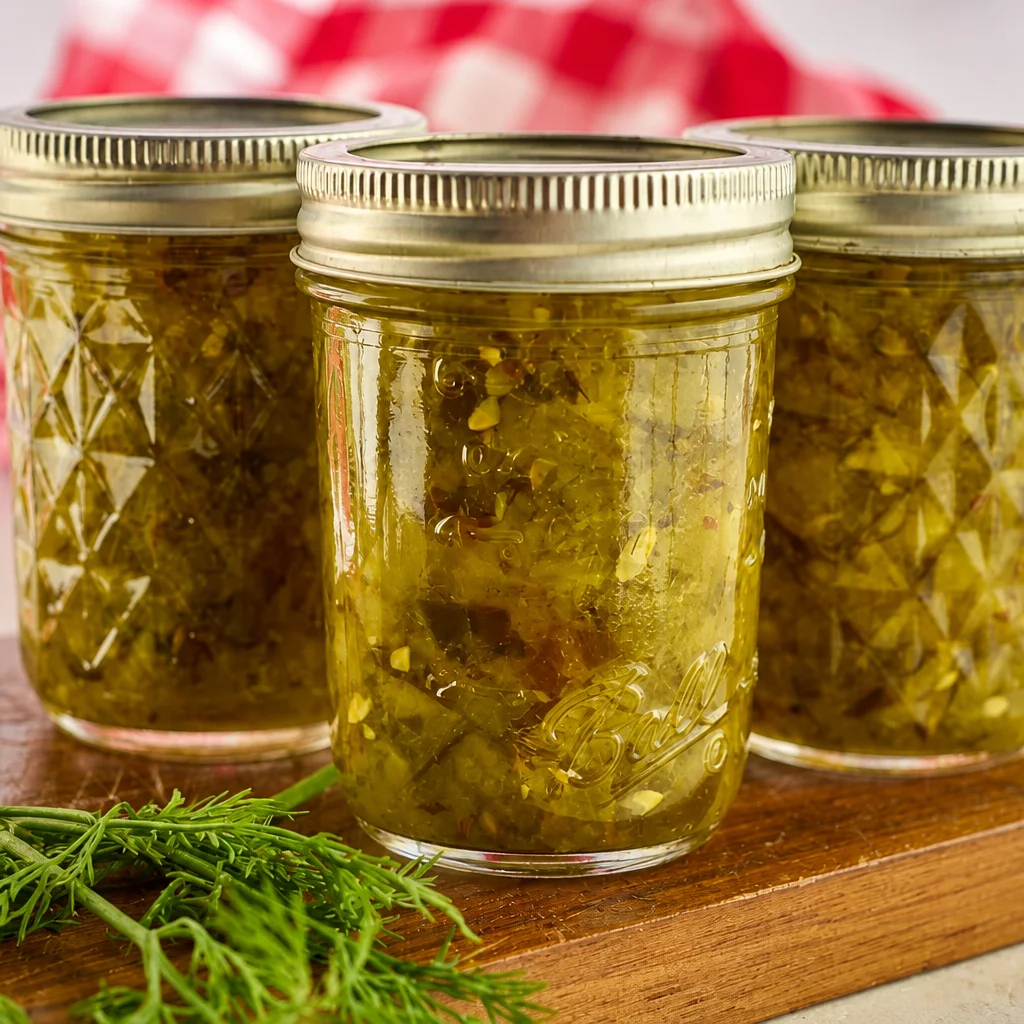
Dill Pickle Relish is one of those things you don’t think about until you really need it. Like when you’ve got burgers on the grill, hot dogs for the kids, or a sandwich that tastes a little too plain. Store bought relish works, sure, but it’s often super sweet and kind of one note. This homemade version is bright, tangy, and tastes like real cucumbers and dill, because it is. If you’ve got fresh cucumbers hanging around and you want to use them up in a way that feels honestly useful, this is my go to.
Ingredients for Homemade Dill Pickle Relish
I keep this ingredient list simple, because the cucumbers and dill do most of the heavy lifting. You can also adjust the heat and garlic depending on your mood. Here’s what you’ll need for my Easy Dill Pickle Relish Recipe with Fresh Cucumbers.
- Fresh cucumbers (about 4 pounds, pickling cucumbers are ideal)
- 1 large onion
- 1 to 2 bell peppers (green is classic, but use what you have)
- 3 tablespoons pickling salt or kosher salt
- 2 cups white vinegar (5% acidity)
- 1 cup water
- 2 tablespoons sugar (optional, just to round things out)
- 2 tablespoons dill seed or 1 bunch fresh dill, chopped
- 1 tablespoon mustard seed
- 1 teaspoon celery seed (optional but very “relish-y”)
- 2 to 3 cloves garlic, minced (optional)
- 1 teaspoon turmeric (optional for color)
- Crushed red pepper flakes, to taste (optional)
Quick note: If you love pickled flavor in general, you might also like this crunchy, colorful anti-inflammatory pickled vegetable salad. It scratches the same tangy itch.
How to Choose the Best Cucumbers for Dill Relish
The best relish starts with the right cucumbers, and it’s not just a food snob thing. If you use big, watery slicing cucumbers, you can still make relish, but it tends to come out softer and you’ll drain more liquid.
Here’s what I look for:
Pickling cucumbers (often called Kirby cucumbers) are my favorite. They’re smaller, firmer, and have thinner skin. I also like cucumbers that feel heavy for their size and don’t have soft spots.
If your cucumbers are garden fresh and a little bumpy, that’s usually a good sign. If they’re huge and glossy, they may be more watery. Not a deal breaker, just know you’ll want to be extra careful with the draining step.
How to Make Dill Pickle Relish Step by Step
This is the part that makes you feel like you’ve got your life together, even if your kitchen is a mess. The basic idea is chop, salt, drain, simmer, then jar it up. That’s it.
If you’re using a food processor, don’t turn everything into mush. Pulse it and stop when it looks like small bits. I like a relish that still has some texture, not baby food.
At a high level, this Easy Dill Pickle Relish Recipe with Fresh Cucumbers goes like this:
Chop your cucumbers, onion, and peppers. Salt them. Let them sit. Drain really well. Simmer with vinegar, water, and seasonings. Then either refrigerate or can it for the pantry.
How to Prepare and Drain the Cucumbers for Relish
This step is the difference between crisp relish and watery relish. I learned that the annoying way the first time I made it. I was impatient, didn’t drain enough, and ended up with something that tasted good but looked like relish soup.
Here’s my routine:
After chopping the cucumbers, onion, and peppers, toss everything with the salt in a big bowl. Cover and let it sit for 2 to 3 hours at room temp, or overnight in the fridge if that’s easier. You’ll see liquid pooling in the bottom. That’s exactly what you want.
Then drain it in a colander. Press it with your hands or the back of a spoon. If you want to be extra serious, wrap the mixture in a clean kitchen towel and squeeze. The drier the mixture, the better the final texture.
Also, if you’re the type who snacks while you cook, this is where I start craving something crunchy like air fryer fried pickles. Pickle people get it.
How to Cook Dill Pickle Relish for the Best Flavor and Texture
Once your veggies are drained, the cooking part is quick. You’re not trying to cook it to death, just blending flavors and making it safe for canning if you’re going that route.
Add vinegar, water, sugar (if using), and all your spices to a large pot. Bring it to a gentle boil, then stir in the drained cucumber mixture. Lower the heat and simmer for about 10 to 15 minutes. Stir a couple of times so nothing sticks.
What you’re looking for: the relish should look glossy, smell like dill heaven, and the veggies should still have a little bite. If it starts looking overly soft, you’ve gone a bit too long. Not the end of the world, but next time you’ll know.
How to Can Dill Pickle Relish Using a Water Bath Canner
If you want shelf stable jars, water bath canning is the move. If you’re new to canning, don’t stress. This is one of the more beginner friendly recipes because it’s vinegar based. Just be clean, follow timing, and use proper jars and lids.
Basic steps:
Sterilize jars, keep them hot, and simmer lids according to the package directions. Ladle hot relish into hot jars, leaving about 1/2 inch headspace. Wipe rims, apply lids and rings finger tight. Process in a boiling water bath canner for 10 minutes (adjust for altitude if needed). Let jars cool, then check seals.
If any jar doesn’t seal, just pop it in the fridge and use it first. No drama.
Tips for Making Crisp, Tangy Homemade Dill Relish
These are my little “I’ve made this enough times” tips that help it come out right.
Drain like you mean it. This is the biggest one for texture.
Use the right vinegar. Stick with 5% acidity vinegar for safe canning and classic flavor.
Don’t over process the vegetables. Tiny pieces are good, paste is not.
Let it rest. Even if you refrigerate instead of canning, it tastes better after a day or two when the flavors settle in.
One more thing: if you’re making sandwiches soon, bookmark this crispy dill chicken sandwich. A spoonful of homemade relish on that is a very good idea.
Easy Dill Pickle Relish Variations and Flavor Add-Ins
Once you’ve made the classic version, it’s fun to play around. The base of this Easy Dill Pickle Relish Recipe with Fresh Cucumbers is pretty flexible.
Try one of these:
Spicy: Add chopped jalapeno or extra red pepper flakes.
Garlicky: Add more minced garlic or a pinch of garlic powder.
Extra herby: Mix in fresh dill at the end for a brighter pop.
More tang: Swap a little of the water for extra vinegar, but keep the vinegar ratio safe if canning.
Old school color: A bit of turmeric gives it that classic yellow green relish look.
How to Use Dill Pickle Relish on Burgers, Hot Dogs, and Sandwiches
This is where the jar starts disappearing fast. I use this relish like a secret weapon. It wakes up anything rich or cheesy and gives you that bite that makes you take another bite.
My favorites:
Stir it into mayo for a quick burger sauce. Pile it on hot dogs with mustard. Add it to ham sandwiches. Or spoon it onto pulled pork. I even use it on simple turkey sandwiches when I’m bored of my own lunch habits.
And if you need an easy weeknight meal that loves a little tang on the side, these crispy vegetarian quesadillas are great with a relish spiked dipping sauce.
More Ways to Use Homemade Dill Relish in Salads and Sauces
If you only use relish on hot dogs, you’re missing out. This Easy Dill Pickle Relish Recipe with Fresh Cucumbers also works in all kinds of creamy situations.
Stir a spoonful into:
Potato salad, egg salad, tuna salad, chickpea salad, deviled egg filling, or even plain Greek yogurt for a quick dip.
My lazy sauce is just mayo plus relish plus black pepper. That’s it. It’s perfect for fries, chicken, or anything that needs a little zip.
How to Store Homemade Dill Pickle Relish
Storage depends on whether you canned it or not.
If you water bath canned it: Store sealed jars in a cool, dark place. For best flavor, use within a year. Once opened, keep it in the fridge and use within a month or so.
If you did not can it: Cool the relish, then keep it in the fridge in clean jars or containers. It’s usually best within 3 to 4 weeks.
If it ever smells “off,” looks moldy, or the jar lid bulges, toss it. I’m all for using up food, but safety comes first.
Dill Pickle Relish Recipe Card and Nutrition Information
Easy Dill Pickle Relish Recipe with Fresh Cucumbers
Yield: About 6 to 7 half pint jars (varies by how much you drain)
Time: Prep 25 minutes, drain 2 to 3 hours, cook 15 minutes
Directions:
1) Finely chop cucumbers, onion, and peppers.
2) Toss with salt in a large bowl. Let sit 2 to 3 hours.
3) Drain very well, pressing out liquid.
4) In a pot, bring vinegar, water, sugar (if using), and spices to a gentle boil.
5) Add drained vegetables. Simmer 10 to 15 minutes.
6) Ladle into jars. Refrigerate, or water bath can for long term storage.
Nutrition (rough estimate per 1 tablespoon): 5 to 15 calories, very low fat, low protein, sodium depends on how well you drain and whether you rinse. This can vary a lot, so treat it as a general ballpark.
Common Questions
Do I have to peel the cucumbers?
Nope. If you’re using thin skinned pickling cucumbers, I leave the peel on. If they’re thick skinned or waxed, peeling can make the texture nicer.
Can I rinse the salted cucumber mixture before cooking?
Yes, especially if you’re sensitive to salt. Just drain well again after rinsing so you don’t add extra water back in.
Why is my relish watery?
Almost always because it wasn’t drained enough, or the cucumbers were very watery. Next time, squeeze the mixture in a towel and simmer a touch longer.
Can I freeze dill relish?
You can, but the texture gets softer after thawing. I prefer refrigerating or canning for the best crunch.
How long until it tastes “right”?
It’s good right away, but it’s better after 24 to 48 hours. The dill and vinegar settle in and it tastes more like classic relish.
A jar you will actually use up
If you want a condiment that instantly makes simple meals taste more fun, this Easy Dill Pickle Relish Recipe with Fresh Cucumbers is it. The big wins are draining well, keeping the simmer short, and letting the flavor rest for a day before you judge it. If you like comparing methods like I do, I’ve bookmarked BEST Dill Pickle Relish – The Daring Gourmet and Easy Homemade Dill Relish Recipe – The Prairie Homestead for extra tips and old school canning notes. Now go grab those cucumbers and make a batch, because future you will be really happy when burger night rolls around.

Dill Pickle Relish
- Total Time: 2 hours 30 minutes
- Yield: 6 half pint jars 1x
Description
A bright and tangy homemade dill pickle relish made with fresh cucumbers, perfect for burgers, sandwiches, and hot dogs.
Ingredients
Main Ingredients
- 4 pounds Fresh cucumbers (pickling cucumbers are ideal) (Smaller, firmer cucumbers preferred.)
- 1 large Onion
- 1–2 pieces Bell peppers (Green is classic, but use any color you have.)
- 3 tablespoons Pickling salt or kosher salt
- 2 cups White vinegar (5% acidity) (Essential for canning.)
- 1 cup Water
- 2 tablespoons Sugar (Optional, to round out flavors.)
- 2 tablespoons Dill seed or 1 bunch fresh dill, chopped
- 1 tablespoon Mustard seed
- 1 teaspoon Celery seed (Optional but recommended for flavor.)
- 2–3 cloves Garlic, minced (Optional, adjust according to taste.)
- 1 teaspoon Turmeric (Optional for color.)
- Crushed red pepper flakes, to taste (Optional for heat.)
Instructions
Preparation
- Finely chop cucumbers, onion, and peppers.
- Toss with salt in a large bowl. Let sit for 2 to 3 hours.
- Drain very well, pressing out liquid.
Cooking
- In a pot, bring vinegar, water, sugar (if using), and spices to a gentle boil.
- Add drained vegetables. Simmer for 10 to 15 minutes.
- Ladle into jars, and either refrigerate or water bath can for long-term storage.
Notes
Drain thoroughly to ensure a crisp relish. It tastes better after 24 to 48 hours once flavors settle. Can be used in various dishes like salads and sauces.
- Prep Time: 25 minutes
- Cook Time: 15 minutes
- Category: Condiment, Side Dish
- Cuisine: American
Nutrition
- Calories: 10
- Sugar: 1
- Sodium: 200
- Carbohydrates: 2








 Appetizers & Sides
 Main Dishes
 Drinks & Wellness
 Desserts & Baking