
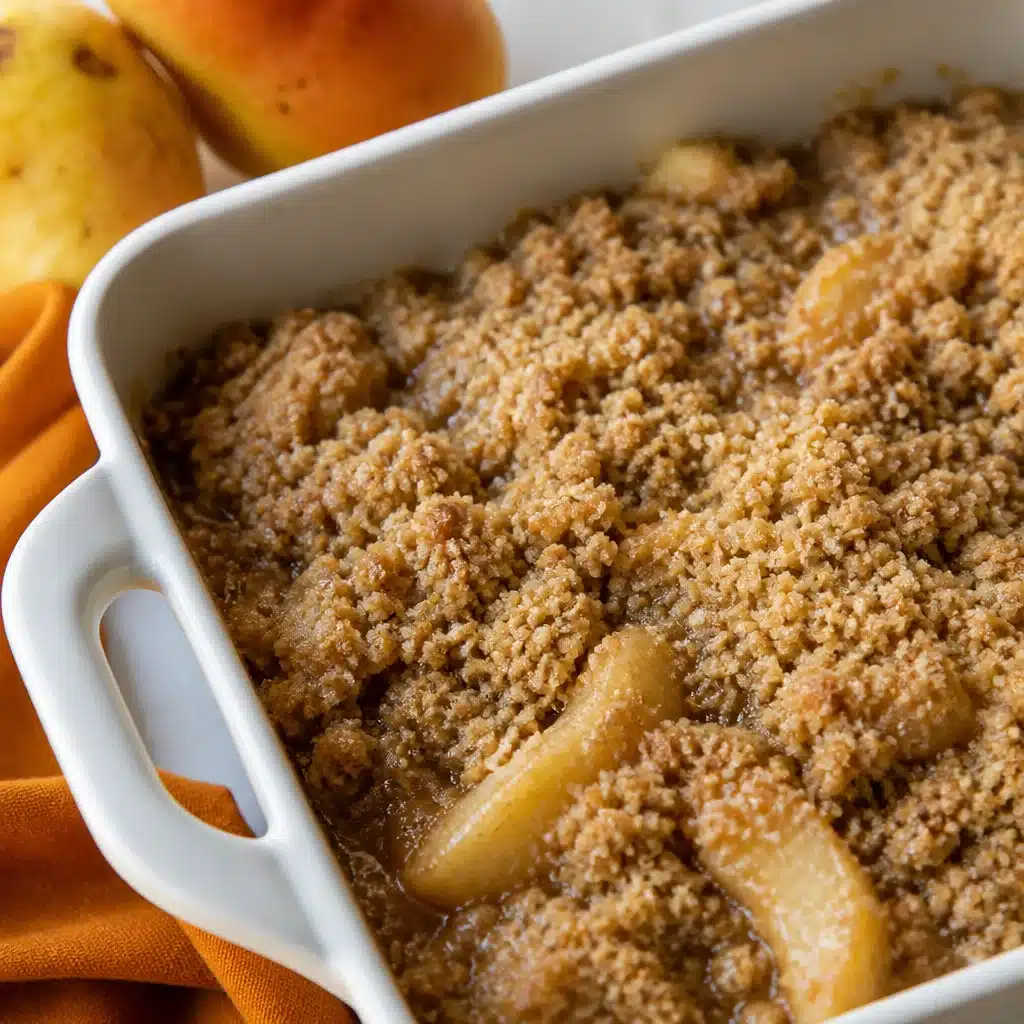
Pear Crumble is my go to dessert for those nights when I want something cozy but I do not want to babysit a complicated recipe. You know the feeling, you have a couple of ripe pears on the counter, everyone wants something sweet, and you are tempted to just grab cookies instead. This is the fix. It is warm, soft, buttery, and it makes your kitchen smell like you actually had a plan. Plus, it is forgiving, so even if you are not a confident baker, you will still look like a hero.
Why You’ll Love This Easy Homemade Pear Crumble
This homemade pear crumble recipe with fresh pears checks all the boxes for me. It is simple, it uses regular pantry ingredients, and it tastes like a hug in a bowl.
Here is what makes it a repeat recipe at my house:
It is fast to prep, like 15 minutes if you are moving at a normal human pace.
Fresh pears do the hard work, because they turn jammy and sweet all on their own in the oven.
The topping is buttery and crisp, and it hides a lot of sins if your fruit is not perfectly sliced.
If you like fruit desserts in general, you might also love this cozy peach crumble when peaches are in season.
Ingredients You Need for the Best Pear Crumble
Nothing fancy here. I am listing what I use most often, plus a couple of optional extras that make it feel special.
- Fresh pears, about 5 to 6 medium (roughly 6 cups sliced)
- Granulated sugar, 2 to 4 tablespoons (depends on how sweet your pears are)
- Brown sugar, 1/3 cup for the topping
- All purpose flour, 3/4 cup
- Old fashioned oats, 1/2 cup (optional but I love the texture)
- Butter, 6 tablespoons, cold and cut into small pieces
- Ground cinnamon, 1 teaspoon
- Salt, 1/4 teaspoon
- Lemon juice, 1 tablespoon
- Cornstarch, 1 tablespoon (helps thicken the juices)
- Vanilla extract, 1 teaspoon (optional but nice)
One quick note: if you are out of oats, you can still make a great homemade pear crumble recipe with fresh pears using just flour, sugar, butter, and a pinch of salt for the topping. It will be a little more like a sandy crumble, still delicious.
The Best Pears to Use for Pear Crumble
The best pears are the ones that hold their shape a bit while still getting tender. My favorites are Bartlett, Anjou, and Bosc.
Here is my real life rule: if the pear smells like a pear and gives slightly when you press near the stem, it is ready.
Avoid super under ripe pears unless you do not mind a firmer bite. Also, super over ripe pears can turn a little too mushy, but honestly, the crumble topping distracts from a lot.
If you want another pear moment that feels fancy but is super easy, I have been obsessed with baked pears with feta and honey. It is more of a brunch or appetizer vibe, but it is such a good combo.
How to Make Pear Crumble Step by Step
I make this in an 8×8 inch baking dish most of the time, but a 9×9 works too. You can also use a deep pie dish.
1) Heat the oven
Set your oven to 350 F. Butter your baking dish or spray it lightly.
2) Prep the pears
Peel the pears if you want a softer filling. If you like a more rustic texture, you can leave the skins on. Slice into bite size pieces.
3) Mix the filling
In a big bowl, toss the pears with lemon juice, granulated sugar, cinnamon, cornstarch, and vanilla if using. Pour into your baking dish and spread evenly.
4) Make the crumble topping
In another bowl, mix flour, oats, brown sugar, salt, and cinnamon. Add cold butter pieces. Use your fingers or a fork to pinch and mix until it looks like clumps with some sandy bits. That mix of textures is what bakes up so nice.
5) Bake
Sprinkle topping evenly over the pears. Bake 35 to 45 minutes, until the fruit is bubbling around the edges and the top is golden. Let it sit 10 minutes before serving so the juices thicken a bit.
This is the kind of dessert that makes people wander into the kitchen asking, what is that smell? If you love that vibe, you should also check out this baked apple crumble for the classic version.
Expert Tips for a Perfect Buttery Crumble Topping
The topping is the whole personality of this dessert, so here is what helps it turn out just right.
Use cold butter. Warm butter makes a paste, and you lose those crisp pockets.
Do not over mix. Stop when you see clumps. Clumps equal crunch.
Watch the edges. If it browns too fast but the fruit is not bubbling yet, lay a piece of foil loosely on top for the last 10 minutes.
Salt matters. Even a little pinch keeps it from tasting flat and overly sweet.
Easy Variations and Flavor Add-Ins for Pear Crumble
I make a basic version most of the time, but here are a few easy swaps when you want to change it up without thinking too hard.
Add ginger: A little ground ginger or a spoon of finely grated fresh ginger makes pears taste brighter.
Add nuts: Chopped pecans or walnuts in the topping add crunch. About 1/3 cup is plenty.
Add caramel vibes: Use all brown sugar in the filling instead of white sugar.
Add berries: A handful of raspberries or blackberries makes it taste a little fancy and a little tart.
If you are into that tangy sweet crumble thing, I also love this easy rhubarb bread with tangy crumble. It is more of a snack cake situation, but it hits the same cozy notes.
Serving Suggestions for Warm Pear Crumble
I will eat this straight from the dish, standing at the counter, but if you want the full experience, here are my favorite ways to serve it.
- Vanilla ice cream, the classic. The cold and warm combo is everything.
- Whipped cream with a pinch of cinnamon
- Plain Greek yogurt if you want a breakfast vibe
- Extra pear slices on top for a pretty look, especially for guests
- A drizzle of caramel sauce if you are feeling extra
This homemade pear crumble recipe with fresh pears is best about 10 to 20 minutes after baking, when the filling is still warm and the topping is crisp.
How to Store, Freeze, and Reheat Pear Crumble
If you have leftovers, you are lucky. Here is how I keep it tasting good.
Store: Cover and refrigerate for up to 4 days.
Reheat: Warm in the oven at 350 F for about 10 to 15 minutes to bring back the crisp topping. The microwave works, but the topping will soften.
Freeze: You can freeze baked crumble. Cool completely, wrap well, and freeze up to 2 months. Thaw overnight in the fridge, then reheat in the oven until hot.
If you want to freeze it unbaked, I recommend freezing the topping separately in a bag. Assemble and bake when you need it, adding a few extra minutes to bake time.
Common Mistakes to Avoid When Making Pear Crumble
I have done all of these at least once, so I am sharing to save you the trouble.
Using super juicy pears without thickener. A little cornstarch keeps the filling from turning watery.
Cutting pears too thin. They can disappear into mush. Keep slices chunky.
Overbaking the topping. Golden is great. Dark brown is bitter.
Skipping the rest time. Let it sit after baking so the filling sets up. It is hard, I know.
Pear Crumble vs. Pear Crisp vs. Pear Cobbler: What’s the Difference?
People use these names interchangeably, but there are some basic differences.
Pear crumble usually has a topping made from flour, sugar, and butter, sometimes with oats. It is crumbly and clumpy.
Pear crisp typically has more oats, and the topping bakes up a bit crunchier.
Pear cobbler has a biscuit or cake style topping, more like soft dough baked on top of fruit.
No matter what you call it, this homemade pear crumble recipe with fresh pears is the one I reach for when I want maximum comfort with minimal effort.
Make-Ahead Tips for Holidays and Special Occasions
If you are making dessert for a get together, this is a stress saver.
You can peel and slice the pears a day ahead. Toss them with lemon juice and keep them in the fridge.
You can also mix the dry topping ingredients ahead of time. Keep butter separate and cut it in right before baking, or mix the full topping and store it in the fridge for up to 2 days.
For parties, I like baking it about an hour before people arrive. It will still be warm, and it smells amazing when guests walk in.
More Cozy Fall Pear Desserts to Try
If pears have you in a fall mood, you are not alone. I start buying them and suddenly I want to bake everything.
Try adding pears to muffins, tossing them into oatmeal, or layering them into a simple yogurt parfait with granola. Also, do not sleep on roasted pears as a topping for pancakes or even as a side with cheese.
But honestly, when I have a bowl of ripe fruit and I want something everyone will actually eat, I come back to this homemade pear crumble recipe with fresh pears again and again.
Common Questions
Do I have to peel the pears?
Nope. Peeled pears give a softer filling, unpeeled pears feel more rustic. Both work.
Can I make this gluten free?
Yes. Use a 1 to 1 gluten free flour blend in the topping. Also double check your oats are certified gluten free.
How do I know when it is done?
Look for bubbling fruit around the edges and a golden brown topping. If it is not bubbling, the filling has not thickened yet.
Why is my crumble topping not crunchy?
Usually the butter was too warm or the crumble was packed down too much. Next time, use colder butter and sprinkle the topping lightly.
Can I reduce the sugar?
Yes. If your pears are sweet, you can cut the sugar in the filling by half. The topping will still give you that dessert feel.
A Sweet, Cozy Finish
If you have ripe fruit and you want an easy win, this homemade pear crumble recipe with fresh pears is it. Keep the pears chunky, keep the butter cold, and let it bake until you see those bubbly edges. If you want to compare how other home cooks do it, you can peek at Pear Crumble – The Jam Jar Kitchen and also Delicious, Easy Pear Crumble – Hot Chocolate Hits for more inspiration. Now go grab those pears and make your kitchen smell like the best kind of weekend, even if it is a random Tuesday.
Print
Pear Crumble
- Total Time: 1 hour
- Yield: 8 servings 1x
Description
This homemade pear crumble recipe is simple, cozy, and incredibly satisfying, making it the perfect dessert for any occasion with fresh, ripe pears.
Ingredients
Filling
- 6 cups Fresh pears, about 5 to 6 medium
- 2–4 tablespoons Granulated sugar (Depends on how sweet your pears are)
- 1 tablespoon Lemon juice
- 1 tablespoon Cornstarch (Helps thicken the juices)
- 1 teaspoon Ground cinnamon
- 1 teaspoon Vanilla extract (optional)
Crumble Topping
- 3/4 cup All-purpose flour
- 1/2 cup Old-fashioned oats (optional) (Can be omitted if preferred)
- 1/3 cup Brown sugar
- 6 tablespoons Cold butter, cut into small pieces (Use cold to maintain crumble texture)
- 1/4 teaspoon Salt
- 1 teaspoon Ground cinnamon
Instructions
Preparation
- Heat your oven to 350 F and butter an 8×8 inch baking dish or spray it lightly.
- Peel the pears if you prefer a softer filling or leave the skins on for a more rustic texture. Slice into bite-sized pieces.
Mix Filling
- In a big bowl, toss the pears with lemon juice, granulated sugar, cinnamon, cornstarch, and vanilla (if using). Pour this mixture into your prepared baking dish and spread evenly.
Make Crumble Topping
- In another bowl, mix flour, oats (if using), brown sugar, salt, and cinnamon. Add the cold butter pieces and use your fingers or a fork to pinch and mix until you achieve clumps with some sandy bits.
Bake
- Sprinkle the crumble topping evenly over the pears. Bake for 35 to 45 minutes until the fruit is bubbling around the edges and the top is golden brown. Let it sit for 10 minutes before serving.
Notes
For a crispier topping, ensure the butter is cold and do not over mix. Let the crumble rest after baking to allow flavors to meld.
- Prep Time: 15 minutes
- Cook Time: 45 minutes
- Category: Dessert
- Cuisine: American
Nutrition
- Calories: 300
- Sugar: 20
- Sodium: 100
- Fat: 12
- Saturated Fat: 7
- Carbohydrates: 50
- Fiber: 3
- Protein: 3

Related posts:
 Deliciously Simple Candied Orange Slices
 Decadent Hot Cross Bun Recipe
 Irresistibly Super Moist Chocolate Chip Banana Bread Recipe
 Crispy Air Fryer Churro Bites- Sweet & Simple
 Vegan Gluten-Free Lemon Sandwich Cookies with Lemon Curd (Easy Healthy Recipe)
 Fluffy Pumpkin Cinnamon Rolls with Pumpkin Spice Filling





 Appetizers & Sides
 Main Dishes
 Drinks & Wellness
 Desserts & Baking