
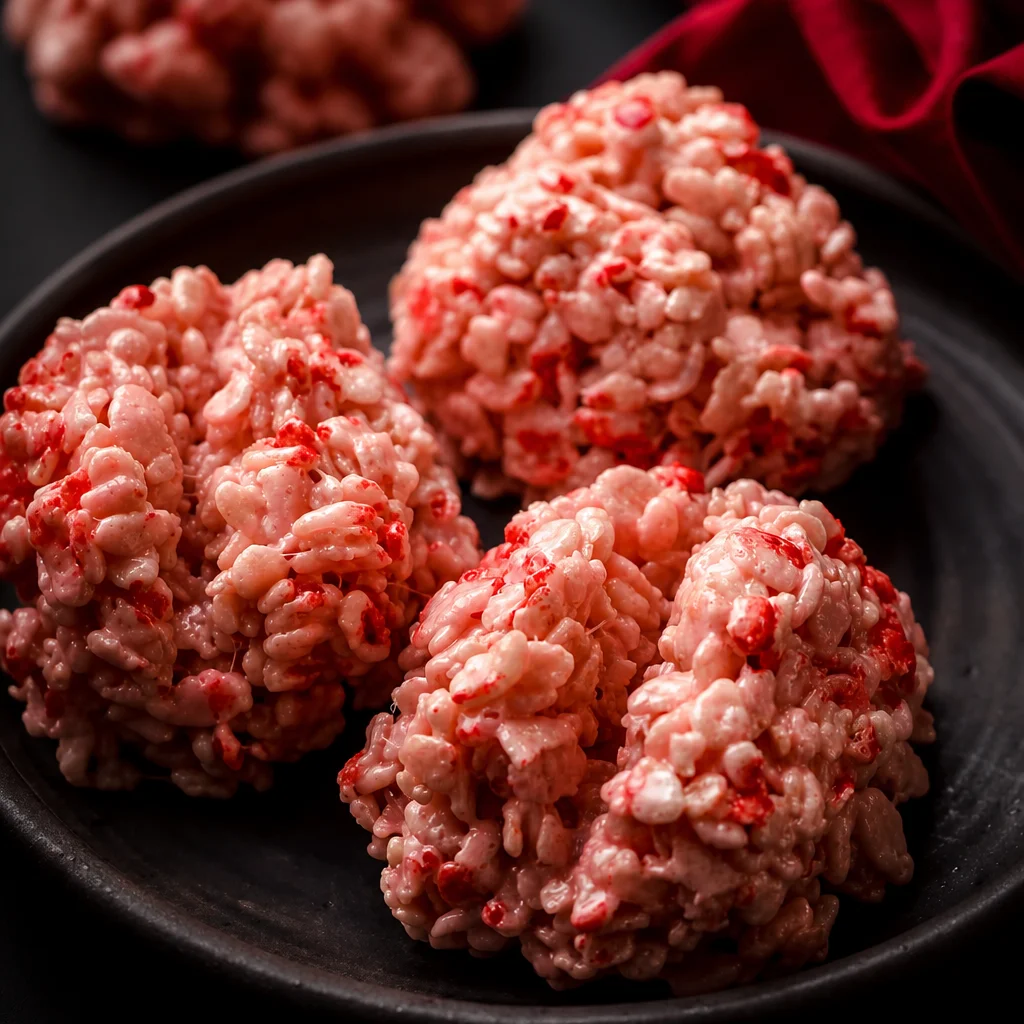
Rice Krispies Brains are my go to treat for that moment when you need something Halloween cute, a little gross, and totally lovable, but you do not want to bake a thing. You know the situation: it is the night before a party, the kids remember they need a spooky snack for school, or you just want something fun to snack on while you watch scary movies. These are fast, goofy, and honestly kind of impressive looking even if you are not crafty. They are also sweet and gooey in the best way, with that classic crispy bite. If you have ever made regular Rice Krispies treats, you can make these.
Why You’ll Love These Spooky Rice Krispies Brains
First, they get huge reactions. People see a tray of little brains and instantly want to grab one, even if they pretend to be squeamish.
Second, they are no bake, which is my favorite kind of Halloween magic. You only need the stove for a quick melt, and then it is mostly mixing, shaping, and decorating.
Third, Rice Krispies Brains are easy to make with kids because the steps are simple. The only part I manage closely is the hot marshmallow mixture. Once it cools a bit, little hands can help shape and drizzle.
And if you are planning a whole spooky menu, I love balancing sweet stuff with an easy dinner. I have made these after a quick rice dish like bacon fried rice so I am not living on sugar all night.
Ingredients You Need for the Best Halloween Rice Krispies Brains
Here is what I use. Nothing fancy, and you can find it all at a regular grocery store.
- Rice Krispies cereal (or any crispy rice cereal you like)
- Mini marshmallows or regular marshmallows
- Butter (salted is fine)
- Pink food coloring (gel works great, but liquid works too)
- Vanilla (optional, but it makes them taste more homemade)
- Red icing gel or red candy melt drizzle for the creepy brain lines
- Optional decorations: candy eyeballs, Halloween sprinkles, edible glitter
If you are making a big batch, I recommend grabbing extra marshmallows. Rice Krispies Brains are best when they are a little extra gooey, and more marshmallow helps with that.
Kitchen Tools for Making Brain-Shaped Rice Krispies Treats
You do not need special molds, but you can use them if you have them. I usually just shape them by hand.
Here is what helps:
Large pot for melting the marshmallows, rubber spatula for stirring, and a big mixing bowl if your pot is not huge. You also want parchment paper for easy cleanup.
My secret weapon is a little bowl of buttered hands. Not literally a bowl, but I lightly butter my palms so I can shape the brains without sticking to the mixture.
If you are in a holiday treat mood in general, you might also like these fun spring style treats later on, because shaping Rice Krispies is addictive once you start: creative Easter egg snacks Rice Krispies treats. Different vibe, same satisfying hands on fun.
How to Make Rice Krispies Brains Step by Step
I will walk you through exactly how I do it. This is the part where you realize it is basically regular Rice Krispies treats with a spooky makeover.
Step by step directions
- Line a baking sheet with parchment paper. Set it aside.
- In a large pot on low heat, melt the butter.
- Add marshmallows and stir until smooth. Keep the heat low so nothing scorches.
- Turn off the heat and stir in a tiny splash of vanilla if you are using it.
- Add a few drops of pink food coloring. Stir and adjust until you like the color. I aim for pale fleshy pink, not bright bubblegum.
- Pour in the Rice Krispies cereal and fold gently until coated. Try not to crush the cereal too much.
- Let the mixture sit for 2 to 3 minutes so it is warm but not lava hot.
- Butter your hands, scoop a portion, and shape it into a brain like oval mound.
- Use your fingers to press in squiggly lines and folds to mimic brain texture.
- Let them set for about 20 to 30 minutes.
- Decorate with red icing gel in wavy lines to make them look extra creepy.
That is it. Rice Krispies Brains are honestly more about the shaping than the cooking, so do not stress. The messy ones are sometimes the most realistic, which is hilarious.
Expert Tips for Perfect Gooey Rice Krispies Brains Every Time
If you want them soft and chewy instead of dry and hard, these little tips really help.
Keep the heat low when melting marshmallows. High heat can make the sugar seize up and turn your treats tough.
Do not over stir once you add the cereal. Mix until coated, then stop.
Use a little extra marshmallow if you like them gooey. I do this when I know they will sit out for a while at a party.
Let the mixture cool slightly before shaping. If you shape when it is too hot, you will burn your hands and the brains will slump.
Also, if you are making a full meal before dessert, I love something easy and cozy like angel chicken and rice. Then you can be the person who feeds everyone dinner and still shows up with the spooky treats.
Fun Variations and Halloween Decorating Ideas
You can make Rice Krispies Brains as gross or as cute as you want. Here are a few ideas I have tried or seen at parties.
Bloody brains: Use red strawberry syrup drizzled lightly right before serving.
Glow brains: Use neon food coloring and green slime icing. Not realistic, but super fun.
Chocolate brains: Add a spoonful of cocoa powder to the melted marshmallow mixture, then use chocolate drizzle instead of red.
Brain pops: Shape smaller brains and stick a lollipop stick in each one for a grab and go party tray.
Monster brains: Add candy eyeballs and a few sprinkles, like the brain is alive and decorating itself.
I am a simple person, so I usually do pink brains with red gel lines, then call it a day. It is classic Halloween gross.
What to Serve with Halloween Rice Krispies Brains
These are sweet, so I like pairing them with salty snacks or something warm to drink.
Easy combos:
Popcorn with a little salt, pretzel sticks, hot chocolate, or apple cider.
If you are feeding people before dessert, a quick rice dinner keeps things simple. I have done a weeknight Halloween party with 30 minute garlic turmeric rice plus whatever protein we had on hand, then put out the Rice Krispies Brains as the finale.
How to Store, Freeze, and Make Rice Krispies Brains Ahead of Time
Good news: these are perfect for making ahead, which is helpful if you are juggling costumes and life.
To store: Keep them in an airtight container at room temp. Put parchment between layers so the brain ridges do not get squished.
How long they last: They are best in the first 2 days, but still tasty for about 3 days.
To freeze: Wrap each brain tightly in plastic wrap, then place in a freezer bag. Freeze up to 4 weeks.
To thaw: Let them sit at room temp, still wrapped, for about an hour. Then unwrap and add fresh red gel lines if you want them to look extra vivid again.
If you plan to decorate with icing gel, you can shape the brains a day early and do the red lines closer to serving time. It stays brighter and looks fresher.
Common Mistakes to Avoid When Making Rice Krispies Treats
I have made every mistake at least once, so here is what to avoid if you want your Rice Krispies Brains to come out soft and cute creepy.
Cooking too hot: This is the big one. Burnt marshmallow tastes bitter and makes the texture stiff.
Packing them too tight: If you squeeze and compress the mixture, you will end up with hard brains. Shape gently.
Skipping the buttered hands: You will fight the stickiness and get frustrated. Just butter your palms lightly and you are golden.
Adding too much food coloring: A little goes a long way. It is easier to add than to fix.
Decorating too soon: If the brains are still warm, icing gel can melt and slide off. Let them set first.
Once you do one batch, you will get the feel for it. The second batch is always even better.
More Easy No-Bake Halloween Treats to Try
If you are already making Rice Krispies Brains, you are in the perfect mindset for more no bake snacks. I like having a couple options on the table so people can grab different things.
Some easy ideas:
Chocolate dipped pretzels with orange sprinkles, peanut butter spider bites, pudding cups with crushed cookies on top like dirt, and store bought cookies dressed up with candy eyes.
I also love doing a snack board with a mix of sweet and salty, then putting the brains right in the center so they get all the attention.
Creative Ways to Serve Rice Krispies Brains for Halloween Parties
Presentation makes these even more fun, and it does not have to be complicated.
Try this:
Put the Rice Krispies Brains on a black platter, then scatter a few candy bones or plastic spiders around them. Or place each brain in a cupcake liner so people can grab one without sticky fingers.
If you want the big wow factor, make a “mad scientist” tray. Add cotton candy around the edges like fog, then put the brains in the middle with little labels like “Specimen A.” People love that kind of silly detail.
For kids parties, I go less gory and more cute. Light pink brains, minimal red lines, and a couple candy eyeballs. Still spooky, just not nightmare fuel.
Recipe Notes, Substitutions, and Dietary Adaptations
This is a flexible recipe, so you can adjust it based on what you have or what you need.
Dairy free: Use dairy free butter and check that your marshmallows are dairy free.
Gluten free: Most crispy rice cereals are gluten free, but double check the label. Also check any sprinkles or gels you use.
Vegan: Use vegan butter and vegan marshmallows. They melt a bit differently, so keep the heat super low and stir patiently.
Lower dye option: Skip the pink coloring and leave them white, then just add the red squiggles. They still read as spooky brains, just ghostly.
Flavor add ins: A pinch of salt helps the sweetness. You can also add a little almond extract, but go easy because it can take over.
Most importantly, do not overthink it. The whole point is that they are playful and easy.
Common Questions
Can I make Rice Krispies Brains the night before?
Yes. Shape them, store airtight at room temp, and add the red gel details closer to the party if you want the lines to look freshest.
How do I make them look more like real brains?
Make deeper squiggles with your fingertips and do messy uneven folds. Realistic brains are not neat, so imperfections help.
What if my mixture is too sticky to shape?
Let it cool for a few minutes and butter your hands again. Sticky usually means it is still too warm.
Why did my treats turn out hard?
Most likely the marshmallows got too hot or you pressed the mixture too tightly. Next time keep heat low and shape gently.
Can I use marshmallow fluff instead of marshmallows?
You can, but it is trickier to get the texture right. If you try it, use low heat, add it slowly, and expect a softer set.
A Spooky Little Treat Worth Making
If you want a Halloween snack that is quick, silly, and guaranteed to disappear fast, Rice Krispies Brains are it. You get that familiar gooey crispy bite, plus the fun of shaping and decorating without needing any baking skills. If you want more inspiration, I found great ideas like Rice Krispies Treat Marshmallow Brains – Sprinkles and Sprouts and this super helpful take on Rice Krispies Brains – Fresh April Flours that can spark your own twist. Make a batch, do not stress about perfection, and have fun with the gross little details. You are going to love how easy they are, and your friends will absolutely talk about them.
Print
Rice Krispies Brains
- Total Time: 20 minutes
- Yield: 12 pieces 1x
Description
A fun no-bake Halloween treat that looks like spooky brains and is perfect for parties or movie nights.
Ingredients
Main Ingredients
- 6 cups Rice Krispies cereal (or any crispy rice cereal)
- 10 oz Mini marshmallows (or regular marshmallows)
- 3 tablespoons Butter (Salted is fine)
- 2 drops Pink food coloring (Gel works great, but liquid works too)
- 1 teaspoon Vanilla (Optional, but enhances flavor)
- 1 tube Red icing gel (For decoration)
Optional Decorations
- as needed Candy eyeballs (For decoration)
- as needed Halloween sprinkles (For decoration)
- as needed Edible glitter (For decoration)
Instructions
Preparation
- Line a baking sheet with parchment paper and set it aside.
- In a large pot on low heat, melt the butter.
- Add marshmallows and stir until smooth, maintaining low heat to avoid scorching.
- Turn off the heat and stir in vanilla if using.
- Add pink food coloring and stir until the desired color is achieved.
- Pour in Rice Krispies cereal and fold gently until coated.
- Let the mixture sit for 2 to 3 minutes to cool slightly.
- Butter your hands, scoop a portion, and shape it into a brain-like oval mound.
- Press in squiggly lines and folds to mimic brain texture.
- Let them set for about 20 to 30 minutes.
- Decorate with red icing gel to create creepy brain lines.
Notes
Store in an airtight container at room temp for best freshness. These treats are best eaten within the first 2 days but can last for about 3 days.
- Prep Time: 15 minutes
- Cook Time: 5 minutes
- Category: Dessert, Snack
- Cuisine: American
Nutrition
- Calories: 150
- Sugar: 10
- Sodium: 60
- Fat: 5
- Saturated Fat: 3
- Carbohydrates: 24
- Protein: 1

Related posts:
 Deliciously Simple Candied Orange Slices
 Decadent Hot Cross Bun Recipe
 Irresistibly Super Moist Chocolate Chip Banana Bread Recipe
 Crispy Air Fryer Churro Bites- Sweet & Simple
 Vegan Gluten-Free Lemon Sandwich Cookies with Lemon Curd (Easy Healthy Recipe)
 Easy Blueberry Tiramisu Recipe with Mascarpone (No Bake & Creamy)





 Appetizers & Sides
 Main Dishes
 Drinks & Wellness
 Desserts & Baking