There’s nothing quite like the joy of pulling a freshly baked sourdough loaf out of your oven. As a home baker who fell in love with the magic of sourdough, I can confidently say it’s more than just bread—it’s a labor of love. Whether you’re curious about making your first sourdough bread recipe or looking to create the best loaf yet, this guide has everything you need.

Sourdough bread has an irresistible tangy flavor and a chewy texture that you just can’t get from store-bought bread. Plus, it’s a healthier alternative made with simple ingredients: flour, water, and salt. By the time you finish this beginner-friendly guide, you’ll not only know how to make sourdough bread from scratch but also feel confident enough to experiment with your own loaves. Let’s dive into the wonderful world of sourdough!
What is Sourdough Bread?
Sourdough bread is so much more than just bread; it’s a craft, a tradition, and a deliciously rewarding experience. Unlike your average loaf made with commercial yeast, sourdough is leavened with a natural fermentation process using wild yeast and lactic acid bacteria. This age-old technique gives sourdough its signature tangy flavor, chewy texture, and rustic charm.
What Makes Sourdough Special?
The magic of sourdough lies in its simplicity. With just three ingredients—flour, water, and salt—you can create a loaf that’s not only wholesome but also packed with character. It’s a slow process, but every step is worth it. As the dough ferments, the wild yeast and bacteria work together to create air bubbles, giving the bread its rise, while also breaking down gluten for easier digestion.
The Unique Flavor of Sourdough
If you’ve ever bitten into a slice of sourdough, you’ll know there’s nothing quite like it. The flavor is complex, with a delightful tang that balances beautifully with the natural sweetness of the grains. This flavor develops over time, making each loaf a little different depending on your fermentation process. It’s like a fingerprint—no two sourdough loaves are exactly alike!
Why is Sourdough So Popular?
Beyond its incredible taste and texture, sourdough has gained a loyal following for its health benefits. The fermentation process breaks down phytic acid, which can inhibit nutrient absorption, making sourdough more nutritious than regular bread. It’s also lower on the glycemic index, which means it’s a better choice for managing blood sugar levels. Plus, making sourdough is a hands-on, meditative activity that connects you to the food you eat and the traditions of bakers who’ve come before us.
Why Choose Sourdough Bread?
- Health Benefits: The fermentation process breaks down gluten and makes sourdough easier to digest. It’s also rich in probiotics and has a lower glycemic index compared to other bread.
- Flavor: The complex, tangy taste of sourdough is unmatched. It’s a bread that’s as delicious on its own as it is paired with butter or toppings.
- Simplicity: Made with just three basic ingredients—flour, water, and salt—sourdough is a wholesome, natural choice for your table.
Now that you know what sourdough bread is, let’s dive into how you can start your own sourdough journey!
How to Start with Sourdough Bread
Starting your sourdough journey might seem overwhelming at first, but trust me, it’s simpler than it looks—and so rewarding. The key is to take it one step at a time and enjoy the process. Here’s how to get started:
What is a Sourdough Starter?
A sourdough starter is the heart and soul of sourdough baking. It’s a living mixture of flour and water that captures wild yeast and bacteria from the air. Think of it as your little jar of magic—it’s what makes your bread rise and gives it that irresistible tangy flavor. The best part? Once you’ve created a starter, you can keep it alive for years with just a little care and feeding.
How to Make a Sourdough Starter
Creating a starter is like nurturing a tiny pet—it needs daily attention at first but rewards you with bubbly, lively dough. Here’s a simple way to get started:
- Day 1: Mix 1/2 cup of flour and 1/4 cup of water in a jar. Stir well and leave it loosely covered at room temperature.
- Days 2-5: Discard half of the mixture each day and feed it with another 1/2 cup of flour and 1/4 cup of water. Stir until smooth.
- By Day 5, your starter should be bubbly and have a pleasant, slightly sour aroma. That means it’s ready to use! Pro tip: If it’s not quite there yet, give it another day or two—it’s all about patience.
Tools and Ingredients You Need
Starting sourdough doesn’t require fancy equipment, but a few basic tools will make the process much smoother:
- Digital Kitchen Scale: Precise measurements are key to sourdough success.
- Mixing Bowls: Opt for glass or stainless steel.
- Proofing Basket (Banneton): Helps shape the dough and create those beautiful ridges.
- Dutch Oven: Ensures a perfectly crusty loaf.
- High-Quality Flour and Water: Bread flour works best for beginners, and filtered water helps avoid issues with chlorine.
With your starter bubbling away and your tools ready, you’re all set to begin the exciting process of making your first loaf of sourdough bread. Remember, every baker starts somewhere, and the journey is as satisfying as the destination!
Step-by-Step Recipe for Sourdough Bread
Making your own sourdough bread is incredibly rewarding, and while it may take a bit of time, the results are well worth the effort. Let’s dive into the heart of the process: creating that perfect, tangy, and chewy loaf!
Ingredients for the Best Loaf
Before we start mixing, make sure you have all your ingredients ready to go. This simple recipe only calls for a few basics, but trust me—those few ingredients will work magic together.
- 500g bread flour: This flour has a high protein content, perfect for building that chewy texture we all love.
- 350g water: Hydration is key for a great sourdough. The amount of water you use will affect the dough’s consistency, so feel free to adjust slightly based on your environment.
- 100g active sourdough starter: This is your magic ingredient! Your starter should be bubbly, active, and ready to work its yeast-y wonders.
- 10g salt: Salt not only brings out flavor but also helps regulate fermentation, which is vital for the right rise.
Bulk Fermentation
Now comes the fun part—mixing your ingredients and letting them come to life!
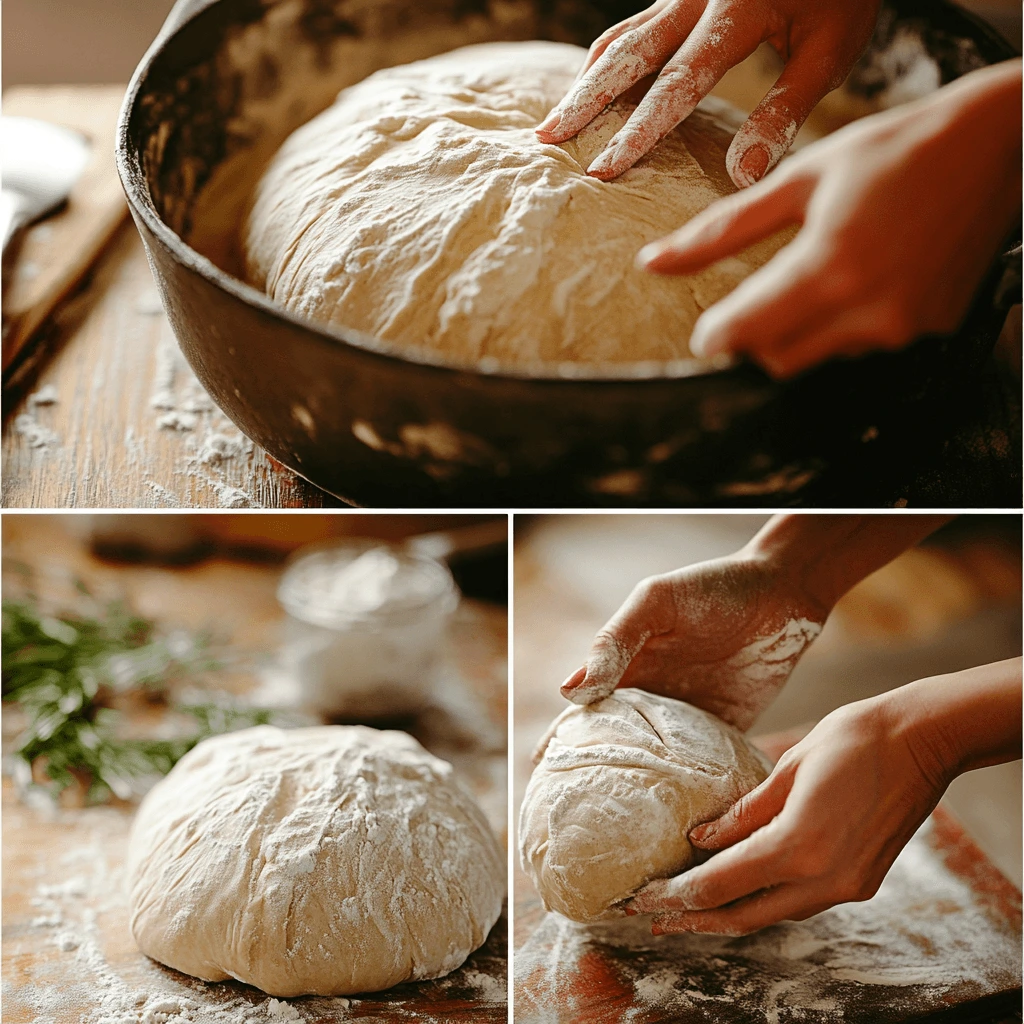
- Mix flour, water, and starter: In a large bowl, combine the bread flour and water. Stir gently until all the flour is hydrated. Then, add your sourdough starter and mix until it forms a rough, sticky dough. You don’t need to knead it just yet; let everything incorporate naturally.
- Add salt after 30 minutes: Let the dough rest for about 30 minutes, allowing the flour to fully absorb the water. After this rest, sprinkle the salt over the dough and start mixing it in. This can be a little tricky, but be patient and mix thoroughly until the dough feels smooth. You can use a pinch-and-fold method to incorporate the salt evenly.
- Stretch-and-fold technique: Here’s where you’ll build strength in your dough! Every 30 minutes for the next couple of hours, gently stretch and fold the dough. To do this, wet your hands and grab one side of the dough, stretching it up and over, then turn the bowl and repeat the process. This creates layers of gluten that will give your bread the structure it needs.
- Ferment and rest: After a few rounds of stretching and folding, let your dough rest for about 4-6 hours at room temperature. The dough should double in size and look bubbly and airy. If you’re using a cooler environment, you can let it ferment overnight in the fridge for a slower, more flavorful fermentation.
Shaping and Scoring
Once your dough has risen beautifully, it’s time to shape and score it. This is where the artistry of sourdough comes in, so don’t be afraid to get creative!
- Shaping the dough: Gently turn your dough out onto a lightly floured surface. Use your hands to gently shape it into a round or oval loaf, depending on your preference. Be careful not to deflate the dough too much; you want to preserve that airy texture you worked so hard to develop.
- Rest for a final rise: Let your shaped dough rest for 30-60 minutes while you preheat your oven. This last little rest allows the dough to expand and rise even further.
- Score the loaf: This is the fun part! Using a sharp knife or a bread lame (a razor blade designed for scoring), make a few shallow cuts across the top of your loaf. These cuts not only help the bread expand while baking but also give it that beautiful artisan look we all love.
Baking Your Sourdough
The moment of truth: baking your sourdough!
- Preheat your oven: Get your oven nice and hot, about 475°F (245°C). You’ll want it to be fully preheated so the bread can rise quickly when it hits the heat.
- Use a Dutch oven: A Dutch oven is perfect for baking sourdough because it traps steam, which helps create a beautiful, crispy crust. Place your loaf carefully inside the preheated Dutch oven (or onto a baking stone if you don’t have one). Cover it with the lid.
- Bake for 20 minutes: Place the Dutch oven in your oven and bake for 20 minutes with the lid on. This helps the bread rise without drying out.
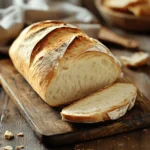
- Remove the lid and continue baking: After 20 minutes, take the lid off and let the bread bake for another 25-30 minutes. The loaf will turn golden brown, and you’ll know it’s done when it sounds hollow when tapped on the bottom.
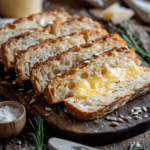
Enjoy Your Masterpiece!
Once your bread has cooled, slice it up and enjoy that tangy, chewy, perfectly crisp loaf of sourdough. It’s a moment you’ve earned, and there’s nothing quite like the taste of freshly baked homemade sourdough.
And there you have it—a beautiful loaf of sourdough bread, made with love and a little patience. If you’re feeling adventurous, try experimenting with different flours, hydration levels, or even adding mix-ins like herbs or olives for a fun twist. Enjoy the process and, most importantly, the delicious results!
Tips for Sourdough Bread Baking Success
Baking sourdough bread is a beautiful and rewarding journey, but it can also feel like a puzzle at times. Don’t worry—everyone encounters a few bumps along the way. The good news is that with just a little extra know-how, you can avoid common mistakes and nail the perfect loaf every time! Let’s dive into some pro tips that will make your baking experience a breeze.
Avoiding Common Mistakes
Even the most experienced bakers have faced these hiccups. But don’t worry, with a few adjustments, you’ll be on your way to the perfect loaf!
- Sticky dough? Add more flour.
Sourdough can be a bit sticky, especially when you’re just starting out. If your dough feels too sticky to handle, don’t be afraid to sprinkle in a little extra flour while mixing or shaping. Just be cautious—too much flour can make your dough dry, so add only a small amount at a time until it feels manageable. - Dense loaf? Ensure your starter is active.
A common problem for many home bakers is ending up with a dense loaf. This could be a sign that your starter isn’t as active as it should be. Make sure your starter is bubbly and fully fermented before using it. If it’s not quite ready, give it more time or feed it one more time to boost its strength. - Crumb too tight? Give it a longer fermentation time.
If your sourdough doesn’t have the open crumb (those airy holes) that you’re aiming for, the culprit could be under-fermentation. Let the dough rest a bit longer during both bulk fermentation and the final proofing stage. That extra time allows the gluten to develop and creates a lighter, fluffier texture.
Perfecting the Fermentation Process
Fermentation is the magic behind sourdough, but it’s also a little delicate. Getting it just right can be the difference between a good loaf and an amazing one. Here are some tips to get that fermentation spot on!
- Timing is key.
The beauty of sourdough is that it’s forgiving and flexible, but timing plays a huge role. If your dough is rising too quickly, it could be because your room temperature is too warm, and if it’s too slow, it may need a warmer spot. Try experimenting with different resting times to find the sweet spot where your dough doubles in size without over-proofing. - Temperature matters.
Just like us, sourdough thrives at the right temperature! For bulk fermentation, keep your dough at a consistent room temperature (around 75°F or 24°C). If it’s too cold, the dough will rise slowly, and if it’s too hot, it may over-ferment. A warm spot in your kitchen (like near a stovetop or in an oven with just the light on) can help maintain that perfect temperature. - Hydration is everything.
Different environments and flours can affect how much water your dough needs. If you live in a dry climate, you may need to increase hydration for a softer dough. If you’re working with whole grain flours or in a humid area, you might need to reduce the water slightly. Don’t be afraid to adjust the water amount as needed, but always keep track of your changes for future batches!
Using a Dutch Oven for Baking
Okay, here’s the secret weapon for a perfectly crispy crust and beautiful oven spring: the Dutch oven! If you’ve ever wondered why professional bakers use these heavy-duty pots, here’s the reason:
- Why it’s essential for a crisp crust.
When you place your dough in a preheated Dutch oven, the pot traps steam from the dough as it bakes, creating that signature golden, crackly crust. Without this steam, your loaf would bake too dry, and the crust wouldn’t have that satisfying crunch. So, don’t skip this step! - How to use it right.
Before placing your dough inside the Dutch oven, make sure it’s preheated in your oven for at least 30 minutes. When you’re ready to bake, carefully transfer your dough into the hot pot. (Be sure to use oven mitts and a lot of caution—this is a hot step!) Cover the Dutch oven with the lid for the first 20 minutes of baking, then remove the lid and let the bread continue baking uncovered. This allows the bread to rise and develop that perfect color and texture. - No Dutch oven? No problem!
If you don’t have a Dutch oven, you can still get amazing results! Try using a baking stone or a baking sheet, and create steam by placing a pan of water in the oven while the bread bakes. While it might not be exactly the same, it’s a great workaround!
Extra Tips for Achieving Baking Success
- Be patient, but trust your instincts.
Sourdough bread isn’t a rushed process. Embrace the time it takes, and trust your senses. Your dough should feel soft, slightly tacky but not sticky. It should be springy when you press it and have an almost bouncy quality. Don’t be afraid to pause and check your dough throughout the process! - Cool your bread completely before slicing.
I know it’s tempting to cut into that warm, freshly baked loaf, but trust me—let your bread cool on a rack for at least an hour before slicing. This will allow the flavors to fully develop, and you’ll get that perfect texture that’s hard to resist.
With these tips in your back pocket, you’re all set to bake some absolutely incredible sourdough bread! Don’t be afraid to make mistakes—that’s all part of the learning process. Just keep experimenting, and with each loaf, you’ll get closer and closer to mastering the art of sourdough. Happy baking!
Why You Should Start Baking Sourdough Bread Today
There’s something so magical about baking sourdough bread from scratch. It’s a process that connects you to centuries of baking traditions, while also giving you the chance to make something uniquely your own. If you’ve ever thought about starting your sourdough bread journey, now is the perfect time! Let me share a few reasons why you should jump in today.
The Joy of Baking Sourdough Bread
Let’s start with the most obvious reason—baking sourdough bread is downright fun! There’s an unmatched sense of satisfaction that comes from pulling a golden, crackly loaf of sourdough out of your oven. You’ll feel like a bread-making pro, and the best part is that you get to enjoy it with your favorite butter, jams, or even as a base for an epic sandwich. Baking sourdough bread isn’t just about the finished loaf; it’s about the experience of creating something from scratch, with your own two hands.
Plus, there’s nothing more comforting than the smell of fresh sourdough bread wafting through your house. That warm, yeasty scent? It’s pure happiness in the form of a loaf!
Health Benefits of Baking Sourdough Bread
Not only does sourdough bread taste amazing, but it also has some fantastic health benefits. When compared to other types of bread, sourdough bread stands out for being easier to digest. Thanks to the natural fermentation process, sourdough is packed with beneficial bacteria that help break down gluten, making it gentler on your tummy. This means that even people with mild gluten sensitivity might be able to tolerate sourdough bread better than conventional bread.
Sourdough bread also has a lower glycemic index (GI) than other bread, meaning it won’t cause those sugar spikes and crashes that many processed breads do. It’s a healthier choice for your blood sugar levels, and it’s also packed with fiber and essential nutrients from the whole grains often used in sourdough bread recipes.
But let’s be real—while the health benefits are great, the real reason you should bake sourdough bread is because it’s delicious. Nothing beats a warm slice of sourdough with a dollop of butter!
Fewer Additives and Preservatives in Sourdough Bread
In today’s world of quick, mass-produced foods, it’s so refreshing to know exactly what’s in your sourdough bread. When you bake sourdough bread at home, you’re only using a few simple ingredients: flour, water, salt, and your active sourdough starter. That’s it! No weird additives, preservatives, or chemicals—just pure, wholesome ingredients that come together in the most beautiful way.
With sourdough bread, you get to control exactly what goes into your loaf, which is a big win for anyone who wants to avoid unnecessary additives or preservatives that can be found in store-bought bread.
Baking Sourdough Bread Is Easier Than You Think!
I know, I know—when you hear the word “sourdough bread,” it might sound a little intimidating at first. The idea of creating a starter, waiting for days, and keeping track of temperatures may seem overwhelming. But guess what? It’s not as complicated as it sounds. With a little bit of patience and a few key techniques, you can master sourdough bread at home!
The beauty of sourdough bread is that once you’ve got your starter going, it’s a very forgiving bread to bake. It doesn’t require precise timing or perfect conditions (although they do help!)—you’ll find yourself adjusting the process as you go and learning to feel confident with each batch. Plus, there’s a wonderful sourdough bread community out there, and you’ll never be alone in your journey!
Sourdough Bread Is a Long-Lasting Skill
Here’s the best part: once you’ve mastered baking sourdough bread, it’s a skill you can keep for life! You’ll have the knowledge and confidence to bake fresh, homemade loaves of sourdough bread whenever you want. You can tweak the recipe to make it your own, add new flavors, or even share the process with friends and family. Plus, sourdough bread starters are forever. Once you have one, it can live for years with proper care, meaning that every loaf of sourdough bread you bake will be a bit of a legacy—a true “pass it on” kind of bread.
Join the Sourdough Bread Community

When you bake sourdough bread, you’re not just baking bread—you’re joining a community of passionate, creative bakers who are all in it together. Whether you’re sharing tips online, swapping recipes with friends, or showing off your latest loaf on social media, sourdough bread brings people together. It’s a way to connect with others who appreciate the artistry and patience that goes into making something beautiful from scratch.
And let’s not forget the ultimate bonus: getting to share your delicious homemade sourdough bread with your loved ones. Whether it’s for a cozy dinner, a special occasion, or just because, there’s something incredibly rewarding about seeing the joy on people’s faces when they take that first bite.
Ready to Bake the Best Sourdough Bread Ever?
Congratulations! You’ve learned the basics of sourdough bread making, and now it’s time to roll up your sleeves and start baking. Remember, baking sourdough is a journey, not a race. Each loaf you make will bring you closer to perfecting your technique, and the reward is always worth the effort. Whether you’re new to sourdough or a seasoned baker, there’s no better feeling than enjoying a warm slice of homemade bread that you crafted from scratch.
So, gather your ingredients, start your starter, and enjoy every step of the process. There’s a whole world of sourdough bread out there waiting for you to discover, and trust me—your future self will thank you for it!
Happy baking, and don’t forget to share your sourdough bread creations with us on social media. We’d love to see your beautiful loaves and hear about your experience!
Sourdough Bread FAQs
What is the best flour for sourdough bread?
Bread flour is ideal for sourdough bread, as it has a higher protein content, giving your bread structure and chewiness.
How long does it take to make sourdough bread?
From start to finish, sourdough bread usually takes around 24 hours, but most of the time is spent waiting for fermentation.
How do I know if my sourdough starter is ready?
Your starter should be bubbly, smell slightly tangy, and double in size within 4 to 6 hours after feeding.
Can I make sourdough bread without a starter?
No, a sourdough starter is essential for making sourdough bread, as it provides the wild yeast needed for fermentation.
How should I store homemade sourdough bread?
Store sourdough bread in a paper bag or a bread box at room temperature to maintain its crust and freshness.
Can I freeze sourdough bread?
Yes! You can freeze sourdough bread for up to 3 months. Just slice it first, wrap it tightly, and thaw it as needed.
Why is my sourdough bread too dense?
Dense sourdough bread can happen if your starter isn’t active enough or if the dough hasn’t been fermented long enough.
How do I make my sourdough bread rise more?
Make sure your starter is strong and active, and allow the dough to ferment at the right temperature for the best rise.
And if you’re looking for more sourdough bread recipes, check out these other amazing guides:
- How to Make Sourdough Quick Bread in Under an Hour
- How to Make Sourdough Sandwich Bread: Easy Recipe for Beginners
Happy baking, and don’t forget to share your sourdough bread creations with us on social media. We’d love to see your beautiful loaves and hear about your experience!
Related posts:
 Sourdough Quick Bread: Easy Recipe for Busy Bakers
 How to Make Sourdough Sandwich Bread: Easy Recipe for Beginners
 How to Make Vegan Jalapeño Cheese Artisan Bread: Step-by-Step Guide
 How to Make Sourdough Hamburger Buns: A Step-by-Step Guide
 Sourdough French Toast: Easy Recipe for the Best Breakfast Ever
 Gluten-Free Hawaiian Banana Bread: Easy Step-by-Step Guide
2 thoughts on “Sourdough Bread Recipe for Beginners: How to Make the Best Loaf”