
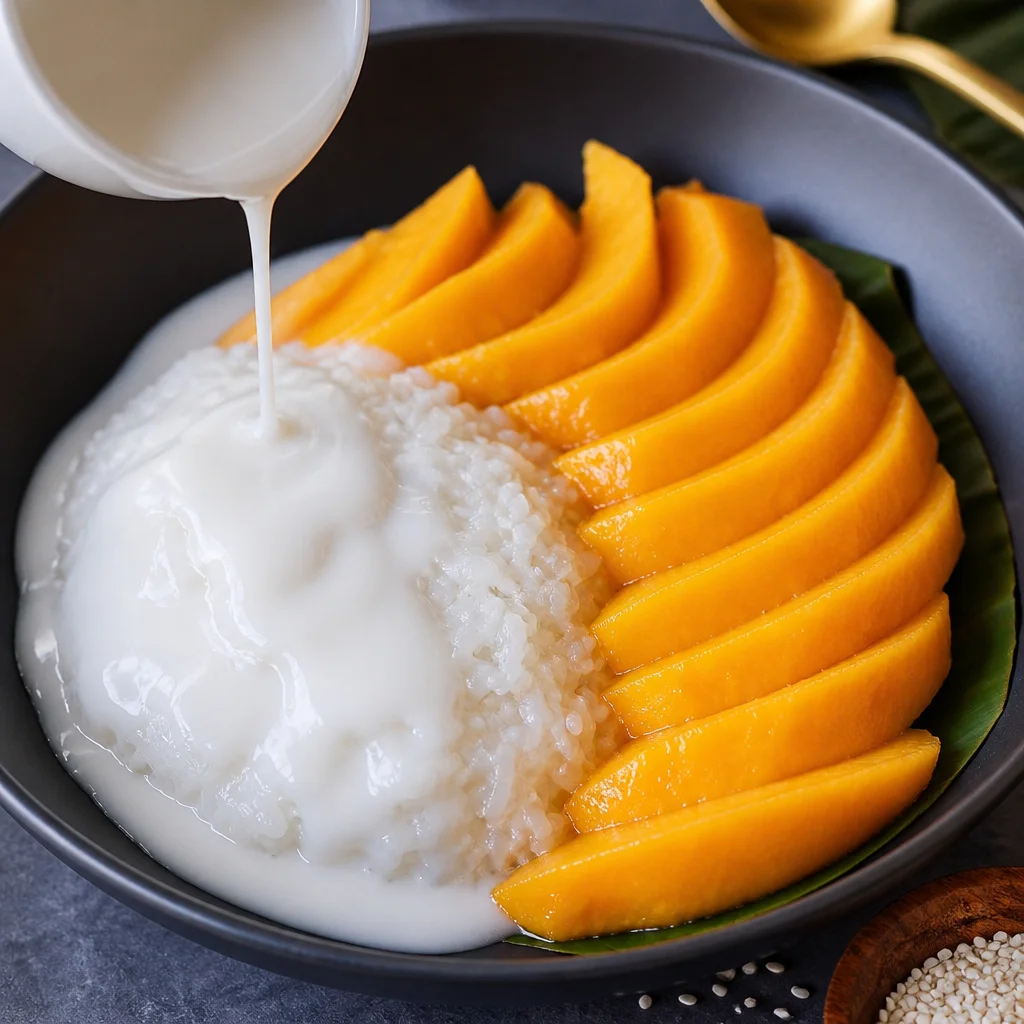
MANGO STICKY RICE is the dessert I make when I want something cozy but I do not feel like turning on the oven. Maybe you have had it at a Thai restaurant and thought, “No way I can make that at home.” I used to think that too, until I realized it is mostly about getting the rice texture right and using really good mangoes. This version is fully vegan, totally dairy free, and honestly just as satisfying as the classic. If you can stir a pot and slice a mango, you can do this.
Why This Mango Sticky Rice Recipe Outranks Traditional Versions (Authentic Thai vs Modern Vegan)
Traditional Thai mango sticky rice is already pretty close to being vegan, but sometimes restaurants add butter, sweetened condensed milk, or even a splash of dairy cream in the coconut sauce. That makes it richer, sure, but it also covers up the clean coconut flavor that makes this dessert so special.
What I love about a modern vegan approach is that we lean into what the dessert is supposed to taste like: coconut, salt, sweetness, and ripe mango. No extra heaviness. Just simple ingredients handled the right way.
Also, making it at home means you can control the sweetness. Some places make it super sugary. I like mine sweet, but not tooth aching sweet, especially when the mango is already doing most of the work.
And if you are thinking, “I am not a dessert person,” I get it. This is more like comfort food than a cake. Kind of like how a good bowl of rice can feel grounding, whether it is dessert or dinner. Speaking of rice, if you like easy rice recipes, I am obsessed with this 30-Minute Garlic Turmeric Rice for busy weeknights.
Key Ingredients for Mango Sticky Rice (Glutinous Rice, Coconut Milk, Ripe Mangoes)
Let us keep this straightforward. If you shop at an Asian market, this is a breeze. If not, you can still find most of it in larger grocery stores.
What you will need
- Glutinous rice (also called sweet rice)
- Full fat coconut milk for the sauce
- Ripe mangoes (the star of the show)
- Sugar (white or light brown both work)
- Salt (tiny amount, but do not skip it)
- Cornstarch or tapioca starch (optional, for thickening the topping sauce)
- Toasted sesame seeds or mung beans (optional topping)
One quick note: “glutinous” does not mean it has gluten. It is just a name for the sticky texture. So yes, Mango Sticky Rice can be naturally gluten free as long as your add ins are safe.
Best Type of Sticky Rice for Mango Sticky Rice (Glutinous Rice vs Sweet Rice)
This part confuses people because the labels vary. The best choice is glutinous rice, which is the same thing many brands call sweet rice. It is a short grain rice that turns chewy and sticky when steamed.
Do not use regular jasmine rice or basmati here. It will taste fine, but you will not get that classic pull apart sticky texture that makes Mango Sticky Rice feel so special.
If you see a bag labeled “Thai glutinous rice” at the market, grab it. If you see “Mochiko” or “sweet rice,” that is usually the right one too. Just make sure it is whole rice grains, not rice flour.
How to Choose the Perfect Mangoes for Thai Mango Sticky Rice (Sweet, Ripe, Seasonal Varieties)
Mangoes can make or break this dessert. I have made Mango Sticky Rice with “okay” mangoes, and it was still decent. But when you get a really ripe, fragrant mango, it suddenly tastes like something you would buy from a great Thai spot.
Here is what I look for:
Smell: sniff near the stem. If it smells fruity and sweet, you are in a good place.
Give: it should feel like a ripe peach, not mushy, but not rock hard.
Color: depends on the variety, so do not rely on color alone.
My favorites are Ataulfo mangoes (the small yellow ones) when they are in season. They are super smooth and sweet. If you only have larger red green mangoes, just make sure they are fully ripe.
How to Prepare Sticky Rice Step-by-Step (Soaking, Steaming, and Texture Control)
The rice is the only part that needs a little patience, but it is not hard. It is mostly waiting.
Step-by-step rice method
1) Rinse the rice until the water is mostly clear. This helps it steam up clean and not gummy.
2) Soak it in plenty of water for 4 hours, or overnight in the fridge. If you try to skip soaking, it will not cook evenly.
3) Drain well. Really well. I let it sit in the strainer for a few minutes.
4) Steam the rice for 25 to 35 minutes until it is tender and chewy. You can use a traditional bamboo steamer, a metal steamer basket, or even a fine mesh cloth in a steamer if the holes are too big.
5) Taste a few grains. If the center feels dry, keep steaming for another 5 minutes.
Texture tip: you want chewy and sticky, not wet. Steaming is better than boiling here because it keeps the grains firm and bouncy.
While the rice steams, I usually tidy up the kitchen or get dinner going. If you are making a full meal night, something like Caribbean Chicken and Rice is a fun main dish before this dessert, especially if you are cooking for friends.
How to Make Coconut Milk Sauce for Sticky Rice (Creamy, Sweet, Vegan Options)
This is the part that makes your kitchen smell amazing. You will make two coconut components: one to soak into the rice, and one thicker sauce to drizzle on top.
For the rice soaking sauce: warm coconut milk with sugar and a pinch of salt. Do not let it boil hard. Just heat until the sugar dissolves and it smells sweet and coconutty.
Then, when the rice is done steaming, scoop it into a bowl and pour most of that warm coconut mixture over it. Stir gently, cover, and let it sit for 20 to 30 minutes so it absorbs. This is where the magic happens.
For the topping sauce: use the remaining coconut milk mixture, and if you want it thicker like restaurant style, whisk a tiny bit of cornstarch with water and stir it in over low heat until it lightly thickens. Keep it pourable.
Salt tip: that little bit of salt is what makes the coconut flavor pop. It should not taste salty, just balanced.
Step-by-Step Assembly of Mango Sticky Rice (Layering Rice, Coconut Sauce, and Mango)
Now we are at the fun part where it starts looking like the dessert you ordered out.
Here is how I plate it:
1) Scoop a mound of warm sticky rice onto a plate or bowl.
2) Add sliced mango on the side. I do thick slices because they look pretty and feel generous.
3) Drizzle the thicker coconut sauce over the rice.
4) Finish with toppings like toasted sesame seeds, crunchy mung beans, or even a little lime zest if you like a bright note.
If you want it super neat, pack the rice into a small bowl, then flip it onto the plate like a dome. If you want it casual, just scoop and enjoy. Both ways taste the same, and that is what matters.
Common Mistakes to Avoid When Making Mango Sticky Rice at Home
I have made all of these mistakes at least once, so I am saving you the trouble.
Skipping the soak: the rice cooks unevenly and stays hard in the center.
Boiling the rice: it turns soft in a weird way and loses that chewy bite.
Using low fat coconut milk: the sauce tastes thin and not as satisfying.
Overheating coconut milk: it can separate and look oily. Keep the heat gentle.
Unripe mangoes: this dessert needs sweet fruit. If the mango is bland, everything feels bland.
Vegan, Gluten-Free, and Dairy-Free Mango Sticky Rice Variations
The classic version is already naturally vegan and dairy free when you keep it simple. But you can still play around with it.
If you want it less sweet, reduce the sugar in the coconut sauce and let the mango do more work.
If you want it extra rich, use coconut cream for the topping drizzle. Just thin it with a splash of coconut milk if it gets too thick.
If you want a fun twist, try adding:
Pandan flavor (pandan extract or pandan leaves if you know them)
Black sesame sprinkled on top
Fresh berries along with mango for a more modern vibe
And yes, it stays gluten free as long as your starch and toppings are gluten free.
Thai Street Food Style vs Restaurant Style Mango Sticky Rice Presentation
Street food style is usually simple: rice in a little container, mango on the side, sauce in a baggie or poured on top. It is casual, fast, and honestly the kind I crave most.
Restaurant style is prettier: neat rice shapes, fanned mango slices, extra drizzle, and sometimes crunchy toppings. If you are serving guests, this is the way to go.
I do both depending on my mood. If it is just me on the couch after a long day, I go full street food style with a bowl and a spoon. If friends are coming over, I take 2 extra minutes to make it look fancy.
It is kind of like how rice dishes can be dressed up or kept simple. I mean, a cozy baked dish like Chicken Enchilada Rice Casserole is not “fancy,” but it still feels special when you serve it hot and fresh.
Serving Suggestions for Mango Sticky Rice (Toppings, Garnishes, Pairings)
This dessert is already a complete situation, but the toppings can make it feel extra fun.
- Toasted sesame seeds for nuttiness
- Crunchy mung beans for that classic Thai texture
- Extra pinch of flaky salt on the coconut sauce
- Mint leaves if you want a fresh look
- A little lime wedge on the side for a bright squeeze
Pairing idea: hot tea or iced coffee is so good with it. Coconut plus coffee is a yes in my house.
Also, if you are building a rice themed dinner night, you can go savory first and sweet after. Something like Black Beans and Rice with Sausage is hearty and comforting before you finish with a cool mango dessert.
How to Store, Reheat, and Make Ahead Mango Sticky Rice
Good news: Mango Sticky Rice is very make ahead friendly, but you want to store the parts separately if possible.
My best storage routine
Rice: store in an airtight container in the fridge for up to 3 days. It will firm up, that is normal.
Coconut sauce: store in a small jar for up to 4 days. Reheat gently and stir.
Mango: slice fresh if you can. Pre sliced mango gets a little dry and loses that fresh perfume.
To reheat the rice: add a small splash of water or coconut milk and warm it in the microwave in short bursts, covered. Or steam it for a few minutes until soft again. Then add sauce and mango.
Common Questions
Can I make Mango Sticky Rice without a steamer?
Yes. Use a metal steaming basket over a pot, and line it with cheesecloth or a thin clean kitchen towel so the rice does not fall through.
Why is my sticky rice hard in the middle?
It usually did not soak long enough, or it needed more steaming time. Soak at least 4 hours and keep steaming until the grains are tender.
Is glutinous rice the same as regular rice?
No. It is a different type of rice that turns sticky and chewy. Regular jasmine rice will not give you that classic texture.
Can I use canned mango?
You can, but it will taste sweeter in a flat way. Fresh ripe mango is the main flavor, so it is worth it when you can get it.
How sweet should the coconut sauce be?
Sweet enough to taste like dessert, but not so sweet it hides the coconut. Start lighter, taste, then add a little more sugar if needed.
A Sweet Little Wrap Up
If you have been nervous about making Mango Sticky Rice, I hope this made it feel doable. Once you nail the soak and steam, the rest is just stirring coconut milk and slicing mangoes, which is pretty much my kind of cooking. If you want another solid reference point, I like comparing notes with recipes like Mango Sticky Rice Recipe – Hot Thai Kitchen and Mango Sticky Rice (a Thai dessert!) – Joyous Apron. Now go grab those ripe mangoes and treat yourself, because this is one of those desserts that feels like a mini vacation at home.
Print
Mango Sticky Rice
- Total Time: 4 hours 35 minutes
- Yield: 4 servings 1x
Description
A cozy, vegan dessert that’s easy to make at home, featuring sticky rice paired with ripe mango and a creamy coconut sauce.
Ingredients
Main Ingredients
- 1 cup Glutinous rice (Also called sweet rice, do not use regular jasmine rice.)
- 1 can Full fat coconut milk (For the sauce.)
- 2 large Ripe mangoes (Look for Ataulfo or any fragrant, ripe variety.)
- 2 tablespoons Sugar (White or light brown sugar works.)
- 1 pinch Salt (Enhances the coconut flavor.)
- 1 tablespoon Cornstarch or tapioca starch (Optional, for thickening the sauce.)
- to taste Toasted sesame seeds or mung beans (Optional topping.)
Instructions
Prepare Sticky Rice
- Rinse the rice until the water is mostly clear.
- Soak the rice in water for 4 hours, or overnight in the fridge.
- Drain the rice well.
- Steam the rice for 25 to 35 minutes until tender and chewy.
- Taste a few grains and continue steaming for another 5 minutes if needed.
Make Coconut Milk Sauce
- Warm coconut milk with sugar and a pinch of salt, stirring until the sugar dissolves.
- Once the rice is done steaming, pour most of the warm coconut mixture over it and let it sit for 20 to 30 minutes to absorb.
- For the topping, use the remaining coconut milk mixture and whisk with cornstarch mixed with water over low heat until thickened.
Assemble Mango Sticky Rice
- Scoop a mound of warm sticky rice onto a plate.
- Add thick slices of mango on the side.
- Drizzle the thicker coconut sauce over the rice.
- Finish with optional toppings like toasted sesame or mung beans.
Notes
Store rice in an airtight container in the fridge for up to 3 days. Coconut sauce can be refrigerated for up to 4 days. Reheat gently.
- Prep Time: 4 hours
- Cook Time: 35 minutes
- Category: Dessert, Snack
- Cuisine: Thai, Vegan
Nutrition
- Calories: 350
- Sugar: 10
- Sodium: 20
- Fat: 12
- Saturated Fat: 10
- Carbohydrates: 60
- Fiber: 2
- Protein: 4

Related posts:
 Deliciously Simple Candied Orange Slices
 Decadent Hot Cross Bun Recipe
 Irresistibly Super Moist Chocolate Chip Banana Bread Recipe
 Crispy Air Fryer Churro Bites- Sweet & Simple
 Vegan Gluten-Free Lemon Sandwich Cookies with Lemon Curd (Easy Healthy Recipe)
 Sourdough Discard Banana Bread (Ultra Moist & Easy Recipe)





 Appetizers & Sides
 Main Dishes
 Drinks & Wellness
 Desserts & Baking