
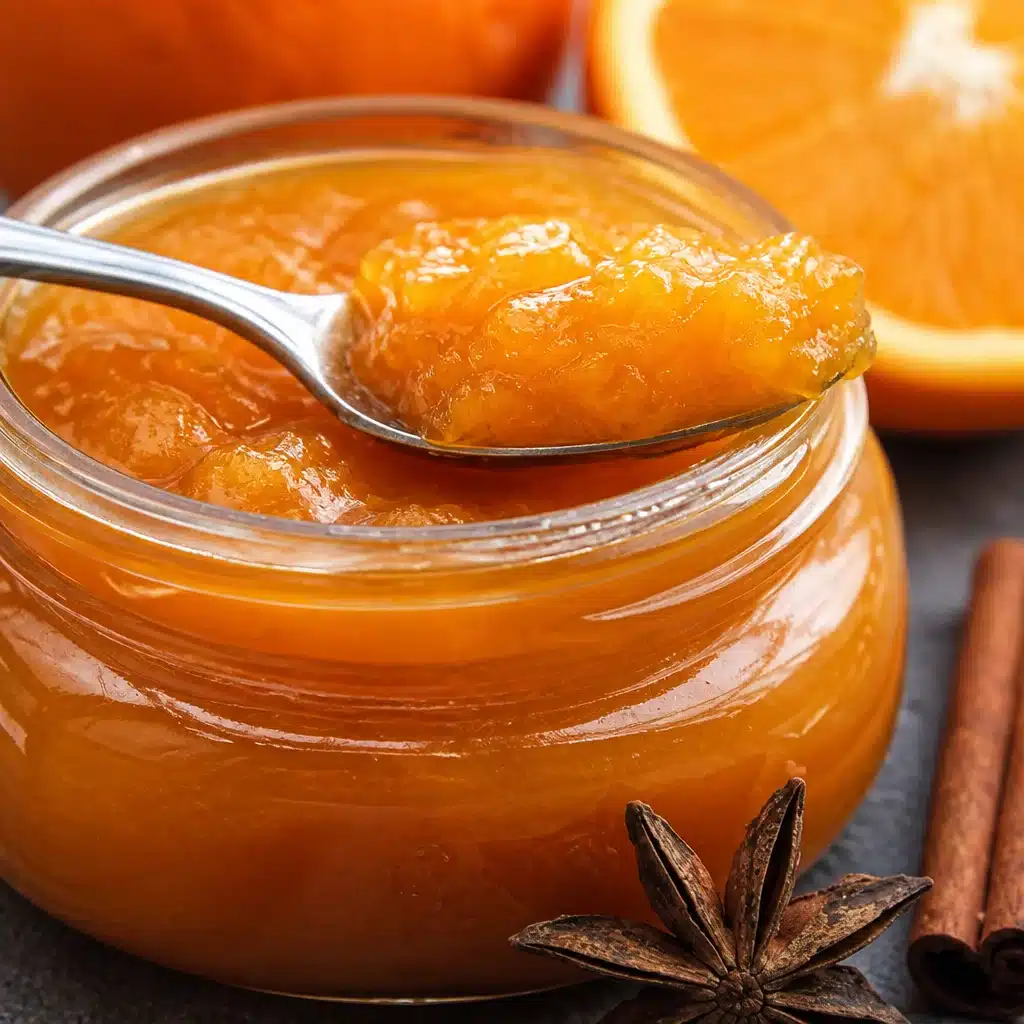
Orange Jam is one of those things I always mean to buy, then I see the price of a tiny jar and suddenly I remember I have perfectly good oranges sitting at home. If you have ever tried to make jam and got scared off by pectin packets and fancy steps, this is for you. This is my favorite easy homemade version that uses simple ingredients and a little patience. It tastes bright, fresh, and pleasantly bittersweet, like oranges are supposed to taste. Plus, your kitchen will smell amazing for the rest of the day.
Why You’ll Love This Homemade Orange Jam
I keep coming back to this recipe because it feels like a small win every time. You stir a pot, you wait, and suddenly you have a glossy jar of sunshine that makes toast feel special.
Here is why it works so well:
No pectin needed, so you are not hunting for specialty ingredients. The oranges and lemon do the job naturally.
Big flavor with that perfect sweet and slightly tangy balance.
It is flexible. You can make it smoother, chunkier, more bitter, or more candy sweet depending on how you prep the peel.
It feels homemade in the best way. Not overly set, not gummy, just spoonable and fresh.
Also, if you are already on an orange kick, you might love making candied orange slices too. I do both around the holidays and my kitchen basically turns into a citrus factory.
Ingredients You Need for the Best Orange Jam
This is a short list, which is honestly my favorite kind of list. The main thing is using oranges you actually enjoy eating.
- Oranges (about 2 pounds, which is usually 5 to 7 medium oranges)
- Granulated sugar (about 3 cups, adjust a little to taste)
- Fresh lemon juice (2 to 3 tablespoons)
- Water (about 1 cup, more if needed while simmering)
- Optional: a pinch of salt to round out the sweetness
I like this ratio because it gives you a jam that sets without tasting like straight sugar. If your oranges are super sweet, you can shave the sugar down slightly. If they are very tart or bitter, keep the sugar where it is.
How to Choose the Best Oranges for Jam Making
The best advice I can give is: pick oranges that smell like oranges. I know that sounds obvious, but it is the easiest trick. If you hold one up and you can smell it through the peel, you are already halfway there.
Here is what I look for at the store:
Thin skinned oranges usually have less pith, so your jam is less bitter.
Heavy for their size means they are juicy.
Avoid dull, dry fruit because it can taste flat after cooking.
Navel oranges are easy and reliable. Valencia oranges are also great and often extra juicy. If you love a slightly fancy vibe, blood oranges make a gorgeous ruby colored batch.
Kitchen Tools and Equipment for Making Orange Jam
You do not need anything complicated, but the right pot helps a lot. Use a wide pot if you can because it speeds up evaporation and helps the jam thicken.
Here is what I use:
Large wide pot or Dutch oven
Sharp knife and cutting board
Microplane or fine grater for zest (optional, but nice)
Wooden spoon or heat safe spatula
Small plate for the freezer test
Clean jars with lids for storing
If you plan to can it for pantry storage, you will need proper canning jars and a water bath canner setup, but for fridge jam you can keep it simple.
Step-by-Step Instructions for Making Homemade Orange Jam
My easy method (no pectin, no stress)
This is the part where your kitchen starts smelling like a bakery plus a fruit stand. Take your time with the first steps, because that is where good texture happens.
Step 1: Prep the oranges. Wash them well. If you want less bitterness, peel the oranges and scrape off most of the white pith. If you like a more classic marmalade vibe, leave a little pith and include some very thin slices of peel.
Step 2: Chop. Chop the orange flesh into small pieces. Remove seeds if you see them. Seeds can add bitterness and nobody wants that surprise.
Step 3: Simmer the fruit. Add chopped oranges and water to your pot. Simmer for about 15 to 20 minutes until the fruit softens and the mixture looks juicy.
Step 4: Add sugar and lemon. Stir in the sugar and lemon juice. Keep stirring until the sugar dissolves. Then let it come to a gentle boil.
Step 5: Cook until thick. Cook at a steady simmer, stirring often, for 30 to 45 minutes. It depends on your pot, your oranges, and how thick you want it. If it starts sticking, lower the heat and stir more often.
Step 6: Blend a little if you want. If you like a smoother jam, mash with a potato masher or do a few quick pulses with an immersion blender. I usually keep mine a bit chunky.
Step 7: Test for set, then jar it. Once it passes the set test (I explain it below), turn off the heat and ladle into clean jars.
Little side note: if you are looking for other cozy spreads, I have a soft spot for rhubarb cinnamon jam when spring hits. Totally different flavor, same homemade comfort.
How to Know When Orange Jam Has Reached the Perfect Set
This is where people get nervous, but it is actually simple. Orange jam thickens more as it cools, so do not cook it until it looks like store bought jelly in the pot. That can lead to a too stiff, almost candy like set.
The freezer plate test
Before you start cooking, put a small plate in the freezer. When you think the jam is close, spoon a little onto the cold plate, wait 30 seconds, and drag your finger through it. If it wrinkles slightly and the line holds, it is ready. If it runs back together like soup, keep cooking and test again in 5 minutes.
Another clue: when you stir, the bubbles look slower and thicker, and the jam falls off the spoon in a sheet instead of a thin drizzle.
Expert Tips for the Best Flavor, Texture, and Consistency
I have made enough batches to learn what matters most. Here are the tips I wish I knew earlier:
Control bitterness with the peel. The more pith and peel you use, the more bitter it can get. If you love that classic bite, go for it. If you want a sweeter, friendlier jam, keep peel minimal.
Do not rush the simmer. High heat can scorch the sugar and give you a burnt taste fast. A steady simmer is your friend.
Use lemon juice. It helps with the set and keeps the flavor lively, not dull.
Stir more toward the end. As it thickens, it sticks more easily. I hover at the stove for the last 10 minutes and treat it like a needy toddler.
Let it rest. The flavor improves after a day in the fridge. If you can wait, it is worth it.
If you want a fun citrus treat for gifting alongside jam, these orange chocolate truffles are a really good pairing. Sweet, rich, and totally snackable.
Orange Jam Variations (Spiced, Honey, Vanilla, Blood Orange, and More)
Once you make Best Orange Jam Recipe (Easy Homemade No-Pectin Jam) the classic way, it is hard not to start playing with it. Here are a few easy twists:
Spiced orange jam: Add 1 cinnamon stick while simmering, plus a tiny pinch of cloves. Remove the stick at the end.
Vanilla orange jam: Stir in 1 teaspoon vanilla extract after turning off the heat. It makes the jam smell like dessert.
Honey orange jam: Replace up to 1 third of the sugar with honey. Add honey near the end so it keeps its flavor.
Blood orange version: Use blood oranges for a deeper color and slightly berry like taste. It is so pretty in a jar.
Ginger kick: Add 1 to 2 teaspoons freshly grated ginger for a warm, zippy finish.
Delicious Ways to Serve Homemade Orange Jam
This is the part where the jar mysteriously disappears. Here are my favorite ways to use it without overthinking it:
- Spread on warm toast with butter
- Spoon into plain yogurt and top with granola
- Swirl into oatmeal right before eating
- Brush onto pancakes or waffles instead of syrup
- Use as a filling for thumbprint cookies
- Stir into a simple glaze for muffins or loaf cake
During December, I like setting out orange jam with other holiday spreads. If you want a festive combo, check out my Christmas jam recipe too. Together they make breakfast feel like a little party.
How to Store, Refrigerate, Freeze, and Can Orange Jam
This Best Orange Jam Recipe (Easy Homemade No-Pectin Jam) can be stored a few different ways, depending on how much you make and how fast you eat it.
Storage options that actually work
Refrigerator: Let the jam cool, then seal it in clean jars. It keeps well for about 2 to 3 weeks.
Freezer: Freeze in freezer safe containers or jars, leaving a little space at the top for expansion. It keeps for up to 3 months. Thaw overnight in the fridge.
Canning: If you want pantry stable jars, use proper water bath canning steps, sterilized jars, correct headspace, and processing time for your jar size and altitude. Safety matters here, so always follow tested canning guidelines from a trusted source.
If you are not into canning, no worries. Fridge jam is still real jam, and it is the easiest way to start.
Common Orange Jam Mistakes and How to Avoid Them
I have made every mistake at least once, so you do not have to.
Mistake 1: It is too bitter. Use less peel and remove more pith. Also, avoid boiling too aggressively, which can concentrate bitterness.
Mistake 2: It will not set. Cook a little longer and test again. Make sure you used enough sugar and lemon juice. Also remember it thickens as it cools.
Mistake 3: It is too thick and sticky. It likely cooked too long. Next time stop earlier. For now, you can stir in a small splash of hot water to loosen it slightly.
Mistake 4: It scorched. Heat was too high or you did not stir enough at the end. Use a heavier pot and keep the simmer gentle.
Mistake 5: Cloudy jam. This can happen if you stir too aggressively the whole time. Gentle stirring is fine, especially early on.
More Homemade Jam and Citrus Preserve Recipes to Try
If making this Best Orange Jam Recipe (Easy Homemade No-Pectin Jam) puts you in a homemade spreads mood, welcome to the club. Once you realize jam is basically fruit plus time, it gets kind of addictive.
Try mixing citrus with other fruit, or go in a cozy spiced direction. And if you end up with extra peel, do not toss it. It can become candied, baked into treats, or simmered into syrup.
Common Questions
Can I reduce the sugar?
You can reduce it a bit, but not drastically. Sugar helps the jam set and keeps it tasting fresh longer. If you cut too much, it may turn runny.
Do I need to zest the oranges?
Nope. Zest adds extra orange punch, but it is optional. If you do use zest, keep it light so it does not get bitter.
Why is my jam runny the next day?
It might just need more cooking time, or your oranges had extra juice. Put it back in the pot and simmer a bit longer, then test again with the freezer plate.
Can I make it with mandarins or clementines?
Yes, and it is delicious. They are sweeter and less bitter, so you might want a little extra lemon juice for balance.
How long should I wait before eating it?
You can eat it once it cools, but the flavor is even better the next day.
A Sweet Little Wrap Up Before You Go
If you have been wanting a simple citrus spread, Best Orange Jam Recipe (Easy Homemade No-Pectin Jam) is such a satisfying one to start with. It is just fruit, sugar, and a little time, and you end up with a jar that makes everyday snacks feel special. If you want to compare approaches, I also like reading other cooks takes like Orange Jam Recipe – Recipe52.com for extra tips, and I love the cultural twist in Orange Jam – Palestine In A Dish. Now go grab those oranges and put a pot on the stove. You are going to be so happy you did.
Print
Homemade Orange Jam
- Total Time: 1 hour 30 minutes
- Yield: 6 servings 1x
Description
This easy orange jam recipe requires no pectin and features a bright, fresh, and pleasantly bittersweet flavor, perfect for spreading on toast or using in various desserts.
Ingredients
Main Ingredients
- 2 pounds Oranges (about 5 to 7 medium oranges) (Choose oranges that smell fragrant and have thin skins for less bitterness.)
- 3 cups Granulated sugar (Adjust to taste depending on the sweetness of the oranges.)
- 2–3 tablespoons Fresh lemon juice (Enhances flavor and helps with the setting of the jam.)
- 1 cup Water (More if needed while simmering.)
- 1 pinch Salt (optional) (To round out the sweetness.)
Instructions
Preparation
- Wash the oranges well. Peel and scrape off most of the white pith if you want less bitterness, or leave a little for a classic marmalade vibe.
- Chop the orange flesh into small pieces and remove any seeds you find.
Cooking
- Add the chopped oranges and water to a wide pot and simmer for about 15 to 20 minutes until the fruit softens and looks juicy.
- Stir in the sugar and lemon juice, continuing to stir until the sugar dissolves, then let it come to a gentle boil.
- Cook at a steady simmer for 30 to 45 minutes, stirring often, until the jam reaches your desired thickness.
- Blend the jam lightly with a potato masher or an immersion blender if you prefer a smoother texture.
- Test for set using the freezer plate test: spoon a little jam onto a cold plate; if it wrinkles slightly and holds the line, it is ready.
- Turn off the heat and ladle the jam into clean jars.
Notes
Let the jam rest in the fridge for a day before using for better flavor. This jam can be stored in the refrigerator for 2 to 3 weeks or frozen for up to 3 months.
- Prep Time: 30 minutes
- Cook Time: 1 hour
- Category: Condiment, Snack
- Cuisine: American
Nutrition
- Calories: 50
- Sugar: 12
- Sodium: 1
- Carbohydrates: 13

Related posts:
 Deliciously Simple Candied Orange Slices
 Decadent Hot Cross Bun Recipe
 Irresistibly Super Moist Chocolate Chip Banana Bread Recipe
 Crispy Air Fryer Churro Bites- Sweet & Simple
 Vegan Gluten-Free Lemon Sandwich Cookies with Lemon Curd (Easy Healthy Recipe)
 Fluffy Pumpkin Cinnamon Rolls with Pumpkin Spice Filling





 Appetizers & Sides
 Main Dishes
 Drinks & Wellness
 Desserts & Baking