
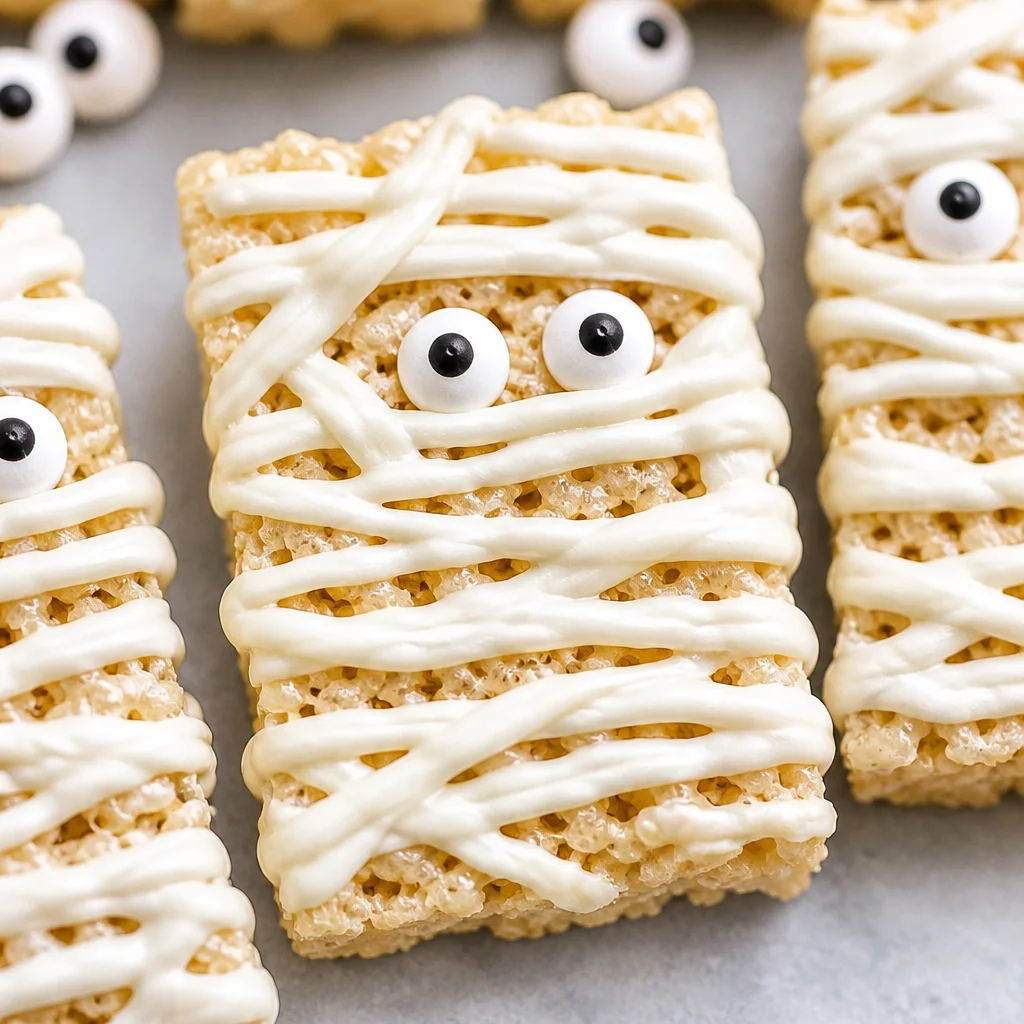
Mummy Rice Krispie Treats are basically my secret weapon for those nights when Halloween is suddenly tomorrow and you promised to bring something cute. You know the feeling. You want a fun treat that looks like you tried really hard, but you also do not want to turn your kitchen into a full on baking show. These are no bake, fast, and totally kid approved. Plus, they are the kind of snack that disappears the second you set the plate down.
Why You’ll Love These Easy Halloween Rice Krispie Treats
First, they are quick. If you can melt butter and stir, you can make these. Second, the mummy look is forgiving, so even if your chocolate drizzle is a little messy, it actually makes them look more realistic.
I also love that these are perfect for parties because they travel well and do not need plates or forks. I have brought them to school events, a neighbor’s Halloween bonfire, and even a movie night where we watched spooky stuff and ate way too much sugar.
If you are on a cute Rice Krispie kick, you might also like these Frankenstein Halloween Rice Krispie Treats for another easy character idea.
Ingredients You’ll Need for the Best Mummy Rice Krispie Treats
Here is the simple lineup. I try to keep it basic so you can grab everything in one trip.
- Rice Krispies cereal
- Mini marshmallows (or regular marshmallows in a pinch)
- Butter
- Vanilla extract (optional, but I love it)
- Salt (just a pinch helps the sweetness)
- White chocolate chips or white melting wafers
- Candy eyes
That is it. No mixer, no oven, no stress.
Ingredient Notes, Substitutions, and Optional Add-Ins
Let’s talk swaps, because we all have that moment where we realize we are out of something halfway through.
Marshmallows: Mini marshmallows melt more evenly, but regular ones work too. Just stir patiently and keep the heat low.
White chocolate: Chips are easy, but melting wafers tend to melt smoother. If you only have almond bark, that works as well for the mummy wraps.
Add ins: If you want a little extra, try:
Halloween sprinkles mixed into the treats or pressed on top, mini chocolate chips inside, or a tiny bit of cinnamon for warmth. I sometimes do a half batch plain and a half batch with sprinkles so everyone is happy.
And if you are planning a whole party menu with easy sides, I have made this for Halloween night alongside quick rice dishes like 30 Minute Garlic Turmeric Rice for dinner, then treats after. It sounds random, but it keeps the evening simple.
How to Make Mummy Rice Krispie Treats Step by Step
Quick step by step (no fancy tools needed)
This is the part where you realize how easy it really is.
- Line a 9×13 pan with parchment paper or lightly grease it.
- In a big pot, melt butter over low heat.
- Add marshmallows and stir until mostly melted and smooth.
- Turn off the heat and stir in vanilla and a pinch of salt.
- Add Rice Krispies and stir until everything is coated.
- Press the mixture gently into the pan. Do not smash it down too hard.
- Let it cool for about 20 to 30 minutes.
- Cut into rectangles or squares, whatever mummy shape you want.
I usually cut them into tall rectangles because they look more like little wrapped bodies. ;
Pro Tips for Soft, Gooey, and Chewy Rice Krispie Treats
If you have ever had hard Rice Krispie treats that feel like you could patch a wall with them, it is usually one of these issues.
Keep the heat low. High heat makes the marshmallow mixture tough once it cools.
Do not over stir once the cereal is in. Just mix until coated.
Press gently into the pan. I lightly butter my hands and press just enough to level it.
Fresh marshmallows matter. If your marshmallows are old and dry, your treats will not be as soft.
Decorating Mummy Rice Krispie Treats with White Chocolate and Candy Eyes
How to get that mummy wrap look without stress
This is the fun part, and it is also where you can let the kids help. Just accept that some mummies will look sleepy, some will look shocked, and that is part of the charm.
Melt your white chocolate in a microwave safe bowl in 20 second bursts, stirring each time. When it is smooth, you have two easy options:
Option 1: Spoon it into a zip top bag, snip a tiny corner, and drizzle back and forth across each treat.
Option 2: Use a spoon and flick it gently for those imperfect bandage lines.
Before the chocolate sets, press on two candy eyes. I like placing them slightly uneven so they look silly and spooky.
Let them set at room temp for about 15 to 20 minutes, or pop them in the fridge for 10 minutes if you are in a hurry.
Fun Halloween Variations and Creative Decorating Ideas
If you want to switch it up, here are a few ways I have done it over the years.
Spooky sparkle: Add edible glitter or sanding sugar right after you drizzle the chocolate.
Monster mash: Use candy eyeballs in different sizes so each mummy has its own personality.
Chocolate mummies: Make the base treats with cocoa flavored cereal, then wrap with white chocolate. The contrast is really cute.
Color twist: Drizzle a tiny bit of orange candy melts over the white wraps for a little Halloween pop.
Common Mistakes to Avoid When Making Rice Krispie Treats
I have made all these mistakes so you do not have to.
Using high heat and rushing the melting step. It seems faster, but it backfires.
Over packing the pan. You want chewy, not dense bricks.
Cutting too soon. If they are still warm, you will get sticky messy cuts.
Adding the eyes too late. If the chocolate sets, the eyes will not stick and you will end up chasing them around the tray.
Make-Ahead Tips, Storage, and Freezing Instructions
Keeping them soft for days
You can absolutely make Mummy Rice Krispie Treats ahead, which is honestly why I love them for parties.
Make ahead: I like making them the night before, decorating them, then letting them set. After that, I store them in a sealed container.
Storage: Keep at room temperature in an airtight container for up to 3 days. Add parchment between layers so the mummies do not stick together.
Freezing: You can freeze the plain treats (before chocolate) wrapped tightly for up to 6 weeks. Thaw at room temp, then decorate fresh. The white chocolate can sometimes get a little cloudy after freezing, so I prefer decorating after thawing if I can.
What to Serve with Halloween Rice Krispie Treats
If you are putting together a full Halloween spread, these treats fit right in next to salty snacks and something easy for dinner.
For a cozy meal before dessert, I love simple one pot style dinners. This Black Beans and Rice with Sausage is hearty and party friendly, and Caribbean Chicken and Rice is great if you want something a little different but still easy.
On the snack side, think popcorn, pretzels, and bowls of clementines with little jack o lantern faces drawn on them. It makes the table feel festive without extra work.
Recipe Variations for Different Dietary Needs
You can adapt these pretty easily, which is helpful for school parties where you never know what restrictions are coming.
Gluten free: Most Rice Krispies style cereals are gluten free, but check the label because brands vary.
Dairy free: Use dairy free butter and dairy free white chocolate or melting wafers.
Lower sugar: This one is tough because marshmallows are the base, but you can reduce candy on top and make smaller portions. I cut them into mini mummy bites sometimes and it helps.
More Easy No-Bake Halloween Desserts and Party Treats
If you enjoyed making Mummy Rice Krispie Treats, you are basically in the no bake Halloween club now. Other easy ideas include chocolate dipped pretzel rods, peanut butter stuffed dates with candy eyes, and pudding cups topped with crushed cookies to look like dirt.
I also like doing a treat board with a mix of homemade and store bought items, because real life is busy. Toss in your mummies, some cookies, a bowl of candy, and maybe a fruit option, and suddenly you look like you planned everything.
Common Questions
Can I make Mummy Rice Krispie Treats the day before?
Yes. They are actually better when you are not rushing. Store them airtight at room temperature.
Why are my Rice Krispie treats hard?
Usually it is too much heat or pressing the mixture too firmly into the pan. Low heat and a gentle press keeps them chewy.
Do I have to use candy eyes?
No, but they really sell the mummy look. In a pinch, you can pipe tiny dots of chocolate or use mini chocolate chips.
What is the best way to drizzle the white chocolate?
A zip top bag with a tiny snip corner is the easiest. A spoon works too if you like the messy bandage vibe.
How many does this recipe make?
A standard 9×13 pan usually makes about 12 to 16 mummies, depending on how you cut them.
A Sweet Little Halloween Send Off
If you need a cute treat that does not take over your evening, Mummy Rice Krispie Treats are the move. They are simple, they are fun to decorate, and they always get a happy reaction when you set them out. If you want even more inspiration, I have also bookmarked Mummy Rice Krispies Treats – Halloween Recipe – My Kitchen Love and Mummy Rice Krispie Treats (fun for kids to make) – Kathryn’s Kitchen because it is nice seeing how other people decorate theirs. Make a batch this week, put on a spooky playlist, and let your kitchen get a little silly for once.
Print
Mummy Rice Krispie Treats
- Total Time: 20 minutes
- Yield: 12 mummies 1x
Description
These adorable Mummy Rice Krispie Treats are an easy no-bake Halloween treat that are fun to make and perfect for parties. They are kid-approved and sure to disappear quickly!
Ingredients
Main Ingredients
- 6 cups Rice Krispies cereal
- 10 oz Mini marshmallows (Regular marshmallows can be used in a pinch.)
- 3 tbsp Butter (Melt over low heat.)
- 1 tsp Vanilla extract (Optional, but enhances flavor.)
- 1 pinch Salt (Adds flavor and balances sweetness.)
- 2 cups White chocolate chips or melting wafers (Melting wafers tend to melt smoother.)
- 1 pkg Candy eyes (For decoration.)
Instructions
Preparation
- Line a 9×13 pan with parchment paper or lightly grease it.
- In a big pot, melt butter over low heat.
- Add marshmallows and stir until mostly melted and smooth.
- Turn off the heat and stir in vanilla and a pinch of salt.
- Add Rice Krispies and stir until everything is coated.
- Press the mixture gently into the pan without smashing it down too hard.
- Let it cool for about 20 to 30 minutes.
- Cut into rectangles or squares to form the mummies.
Decoration
- Melt the white chocolate in a microwave-safe bowl in 20-second bursts, stirring each time until smooth.
- Spoon the melted chocolate into a zip-top bag, snip a tiny corner, and drizzle back and forth across each treat.
- Press two candy eyes onto each treat before the chocolate sets.
- Let them set at room temperature for about 15 to 20 minutes or refrigerate for 10 minutes if in a hurry.
Notes
Store in an airtight container at room temperature for up to 3 days. They can be made ahead of time and are great for parties. For make-ahead storage, add parchment between layers to prevent sticking.
- Prep Time: 10 minutes
- Cook Time: 10 minutes
- Category: Dessert, Snack
- Cuisine: American, Halloween
Nutrition
- Calories: 150
- Sugar: 10
- Sodium: 50
- Fat: 6
- Saturated Fat: 3
- Carbohydrates: 23
- Protein: 1

Related posts:
 Sakura Mochi: A Japanese Dessert You Can Easily Make at Home
 Deliciously Simple Candied Orange Slices
 Decadent Hot Cross Bun Recipe
 Irresistibly Super Moist Chocolate Chip Banana Bread Recipe
 Crispy Air Fryer Churro Bites- Sweet & Simple
 Vegan Gluten-Free Lemon Sandwich Cookies with Lemon Curd (Easy Healthy Recipe)





 Appetizers & Sides
 Main Dishes
 Drinks & Wellness
 Desserts & Baking