
Beginner’s Sourdough Bread is what I make when I want real bakery vibes at home but I also do not want a fussy recipe that makes me feel like I need a diploma. Maybe you have tried a loaf before and it came out flat, gummy, or just kind of sad. I have been there, and I promise it gets easier fast once you know what you are looking for. This post is the homemade sourdough bread recipe I keep coming back to for a crispy crust and a chewy crumb. I am going to talk you through it like a friend in your kitchen, not like a textbook.
Why Sourdough Bread Is Trending in 2025–2026 (Natural Fermentation & Gut-Friendly Baking)
Sourdough is having a serious moment, and honestly I get it. People want food that feels simple and real, and sourdough checks that box. It is basically flour, water, salt, and time, and the flavor you get from natural fermentation is just on another level.
Another reason is that lots of folks say sourdough feels gentler on their stomach than regular bread. I am not a doctor, but I can tell you the long ferment does change the dough, and many bakers love it for that reason. Plus it is just satisfying to keep a living starter going on your counter like a tiny kitchen pet.
And if you are already baking sourdough, you should absolutely play around with fun side recipes too. I love turning my starter into something snacky like sourdough garlic bread when I want a quick win.
Understanding Sourdough Starter: How to Make, Feed, and Maintain an Active Starter
Your starter is the engine of this homemade sourdough bread recipe. You do not need anything fancy, just flour, water, and a little consistency.
Quick starter basics (the calm, realistic version)
If you are brand new, you can make a starter in about 7 to 14 days. Mix equal parts flour and water by weight, keep it loosely covered, and feed it daily. Some days it smells a little weird, then it starts smelling pleasantly tangy, like yogurt or apples. That is a good sign.
To keep a starter active:
Feed it when it looks hungry, meaning it has risen and then starts to fall. A common feeding is 1 part starter, 2 parts water, 2 parts flour by weight, but you can adjust. If it is sluggish, feed it a little more often for a couple days.
How do you know it is ready to bake with? My simple test is: after feeding, it should double in size within about 4 to 6 hours in a warm room. If it does that, you are in business.
Essential Ingredients for Homemade Sourdough Bread (Simple Pantry Staples)
This is the part I love. The ingredient list is short, and that is why the details matter.
- Bread flour or strong all purpose flour: bread flour gives a chewier crumb.
- Water: filtered is nice if your tap water tastes strongly of chlorine.
- Salt: do not skip it. It makes the flavor and helps the dough behave.
- Active sourdough starter: bubbly, recently fed, and ready to rise.
If you want to branch out later, you can. But for your first few loaves, keep it simple so you can learn how the dough should look and feel.
Recommended Tools for Perfect Artisan Sourdough Bread (Dutch Oven, Banneton Basket & More)
You can bake sourdough with minimal tools, but a few things make the process smoother.
Here is what helps the most:
Dutch oven: traps steam so you get that crisp, blistery crust.
Kitchen scale: sourdough is easier when you weigh ingredients.
Bench scraper: makes shaping less sticky and less stressful.
Bowl and towel: if you do not have a banneton, a bowl lined with a floured towel works great.
Lame or sharp knife: for scoring the top.
If you are baking for a friend who is gluten free or doing low carb, it is a totally different world, but I keep these bookmarked for inspiration: 2 ingredient cottage cheese flatbread and carnivore bread recipes.
Step-by-Step Sourdough Bread Recipe (Beginner to Advanced Method Overview)
Before we get into the little techniques, here is the flow of the homemade sourdough bread recipe so you can see the whole path. Once you understand the rhythm, it feels way less intimidating.
Basic schedule:
Mix dough, rest, stretch and fold, bulk ferment, shape, cold proof, bake. That is it. The dough is doing most of the work. You are just guiding it.
I will give you a solid beginner formula that still makes an impressive loaf.
Simple sourdough formula (1 loaf):
500g flour
350g water
100g active starter
10g salt
That is a good hydration level for a chewy crumb without feeling like you are wrestling pancake batter.
How to Mix Sourdough Dough (Autolyse Method for Better Gluten Development)
Autolyse sounds fancy, but it is just a rest. You mix flour and water first, then wait before adding starter and salt. This helps the dough hydrate and start building structure without effort.
My easy autolyse routine
Mix 500g flour with 330g of the water (hold back 20g for later). Stir until no dry flour spots remain. Cover and rest 30 minutes. Then add 100g starter and 10g salt, plus the remaining 20g water. Squeeze and fold it together until it looks more like dough and less like a lumpy mess.
Do not worry if it feels sticky. Sourdough dough usually starts sticky and gets smoother as you work through the folds.
Stretch and Fold Technique Explained (Building Strength Without Kneading)
This is where the magic happens. Instead of kneading for 10 minutes, you do quick stretch and folds over the first couple hours.
How I do it: wet your hand, grab one side of the dough, stretch it up gently, and fold it over itself. Turn the bowl and repeat 3 more times. That is one round.
Do 3 to 5 rounds total, about every 30 minutes. By the end, the dough should hold its shape more and feel bouncy. It is such a nice moment when you notice it changing.
Bulk Fermentation Process: How to Know When Dough Is Ready
Bulk fermentation is the big rise that happens after mixing and folding. The tricky part is that it is not about time only. Temperature matters a lot.
In a cozy kitchen, bulk might take 4 to 6 hours. In a cool kitchen, it can take longer. Look for these signs:
It has risen about 30 to 60 percent, not always doubled.
Bubbles along the sides and top.
Jiggly feel when you gently shake the bowl.
Smooth and airy when you lift an edge.
If you push bulk too far, the dough can get weak and sticky and it may spread instead of springing in the oven. When in doubt, end bulk a little earlier rather than later. You can always proof longer in the fridge.
Shaping Sourdough Bread (Boule and Batard Techniques for Bakery-Style Loaves)
Shaping is just creating surface tension so the loaf rises up instead of out. I usually make a round loaf (boule) because it is forgiving.
Simple shaping that actually works
Lightly flour the counter. Turn out the dough. Pull it into a loose round, then let it rest 15 minutes. After the rest, tighten it: pull one side up and fold toward the center, repeat around the dough, then flip it seam side down. Cup your hands around it and gently drag it toward you to tighten the surface.
For a batard (oval), you fold it more like a letter, then roll it into a log. Either way, you want a smooth top with tension.
And if you want a super fun weekend project after you nail this loaf, try sourdough monkey bread. It is sticky, sweet, and ridiculously good for sharing.
Cold Proofing Overnight for Better Flavor and Structure
Cold proofing is when you put the shaped dough in the fridge, usually overnight. This slows everything down and builds flavor. It also makes scoring easier because cold dough is firmer.
I proof anywhere from 8 to 16 hours. If your fridge is very cold, it may need the full 16. If it is a warmer fridge, 8 to 12 might be perfect.
When you are ready to bake, bake straight from the fridge. No need to warm it up.
How to Score Sourdough Bread for Maximum Oven Spring and Artisan Look
Scoring is just a cut that tells the bread where to expand. Without it, the loaf will still expand, but it might blow out at the side or bottom.
Use a sharp blade and do one confident slash about 1/4 to 1/2 inch deep. For a round loaf, I like a simple curve across the top. Do not overthink it. The more you bake, the steadier your hand gets.
Baking Sourdough Bread in a Dutch Oven (Perfect Crust Every Time)
Preheat your oven to 475 F with the Dutch oven inside for at least 30 minutes. A hot pot matters for oven spring.
Carefully place the dough on parchment, lower it into the Dutch oven, cover, and bake:
20 minutes covered at 475 F
Then 20 to 25 minutes uncovered at 450 F
I bake uncovered until the crust is deep golden brown. If you like a thinner crust, pull it a little earlier. For a thicker, crackly crust, go a bit darker.
Then the hardest part: let it cool at least 1 hour before slicing. If you cut too soon, the crumb can get gummy. I know, it is torture.
Common Sourdough Baking Mistakes and How to Fix Them
If your loaf is not perfect, welcome to the club. Here are the issues I see most:
Flat loaf: usually overproofed or weak shaping. End bulk earlier and tighten the shape more.
Gummy crumb: often sliced too soon or underbaked. Bake a little longer and cool fully.
Too sour: proofed too long in the fridge or starter is very acidic. Shorten cold proof and feed starter more often.
Dense bread: starter was not strong enough or dough was too cold. Use starter at peak rise and ferment warmer.
Expert Tips for Chewy Crumb and Crispy Golden Crust
These are the little things that level up your homemade sourdough bread recipe without making it complicated.
Use bread flour if you can, for more chew.
Do not rush bulk, but do not let it go too far either. Watch the dough, not the clock.
Preheat the Dutch oven well so the loaf jumps up fast.
Bake darker than you think for the best crisp crust and deeper flavor.
Let it cool fully for a clean slice and better texture.
Sourdough Bread Variations (Whole Wheat, Seeded, and No-Knead Versions)
Once you feel good about the base loaf, you can play.
Easy variations:
Whole wheat: swap 50g of the flour for whole wheat. Add an extra splash of water if it feels dry.
Seeded: add 50 to 80g seeds (sunflower, sesame, flax). Toasting them first makes the flavor pop.
No knead style: keep the stretch and folds, but you can do fewer rounds and give it a longer bulk ferment.
Just change one thing at a time so you can tell what worked.
How to Store Sourdough Bread for Maximum Freshness (Room Temp & Freezer Guide)
Sourdough keeps better than most homemade bread, but storage still matters.
My routine:
Day 1 and 2: keep it cut side down on a cutting board, or in a paper bag.
After that: slice and freeze.
For freezing, slice the loaf first, then freeze in a bag. You can toast slices straight from frozen. The crust comes back to life like magic.
How to Serve Sourdough Bread (Breakfast, Sandwiches, Toast Ideas)
This bread disappears fast at my house. Here are some favorites:
- Breakfast toast with butter and flaky salt, or peanut butter and bananas.
- Eggs on toast with chili crisp or simple hot sauce.
- Sandwiches with turkey, sharp cheddar, and mustard.
- Soup night with a thick slice for dunking.
If your loaf is a day or two old, toast it. Sourdough toasted is honestly unbeatable.
Common Questions
Can I make this if my starter is not doubling yet?
You can, but the loaf will likely be dense. I would give your starter a few more days of consistent feedings until it reliably rises and falls on a schedule.
Why is my dough so sticky?
Sticky is normal at first. Use wet hands for folds, and let time do its thing. If it is still soupy after several folds, your flour may not absorb as much water, so reduce water by 20 to 30g next time.
How do I know I did bulk fermentation long enough?
Look for that puffy rise, bubbles on the sides, and a jiggly feel. If it feels heavy and tight, it needs more time.
Do I really need a Dutch oven?
It helps a lot, but you can bake on a sheet pan with a pan of hot water in the oven for steam. The crust may be slightly less dramatic, but it will still be good.
Why did my loaf split on the side?
Usually it needed a deeper score, or it was slightly underproofed and had too much oven spring pressure. Try scoring a bit deeper and proofing a touch longer.
A good loaf is closer than you think
If you take anything from this post, let it be this: sourdough gets easier the moment you start watching the dough instead of stressing over the clock. Keep your starter active, be patient during bulk fermentation, and bake it until the crust is the color you actually want. If you want extra guidance, I have learned a lot from Beginner’s Sourdough Bread (With Video) | The Perfect Loaf and also this super approachable walkthrough from Beginner’s Sourdough Bread Recipe – Farmhouse on Boone. Now go make your kitchen smell amazing, and tell me how your first loaf turns out.
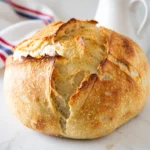
Beginner’s Sourdough Bread
- Total Time: 1 hour 45 minutes
- Yield: 1 loaf
Description
A simple and approachable recipe for homemade sourdough bread with a crispy crust and chewy crumb—perfect for beginners.
Ingredients
Main Ingredients
- 500 g bread flour or strong all-purpose flour (Bread flour gives a chewier crumb.)
- 350 g filtered water (Filtered is nice if your tap water tastes strongly of chlorine.)
- 10 g salt (Do not skip it; it enhances flavor and helps the dough behave.)
- 100 g active sourdough starter (Bubbly, recently fed, and ready to rise.)
Instructions
Mixing the Dough
- Mix 500g flour with 330g of water (hold back 20g for later) until no dry flour spots remain. Cover and rest for 30 minutes.
- Add 100g starter, 10g salt, and the remaining 20g water. Squeeze and fold until it looks more like dough.
Stretch and Fold
- Wet your hand, grab one side of the dough, stretch it up gently, and fold it over itself. Repeat this around the bowl for a total of 3 to 5 rounds every 30 minutes.
Bulk Fermentation
- Allow the dough to bulk ferment for 4 to 6 hours until it has risen about 30 to 60 percent and shows bubbles along the sides.
Shaping the Dough
- Lightly flour the counter, turn out the dough, and pull it into a loose round. Let it rest for 15 minutes.
- Tighten the shape, pull one side up and fold toward the center, then flip it seam side down.
Cold Proofing
- Place shaped dough in the fridge to cold proof overnight for 8 to 16 hours.
Baking
- Preheat the oven to 475°F with the Dutch oven inside for at least 30 minutes.
- Place the dough on parchment, lower it into the Dutch oven, cover, and bake for 20 minutes covered and 20 to 25 minutes uncovered at 450°F.
- Let it cool at least 1 hour before slicing.
Notes
For better flavor and structure, cold proof overnight. Use a sharp blade to score for best oven spring.
- Prep Time: 1 hour
- Cook Time: 45 minutes
- Category: bread, Snack
- Cuisine: American


 Main Dishes
 Drinks & Wellness