
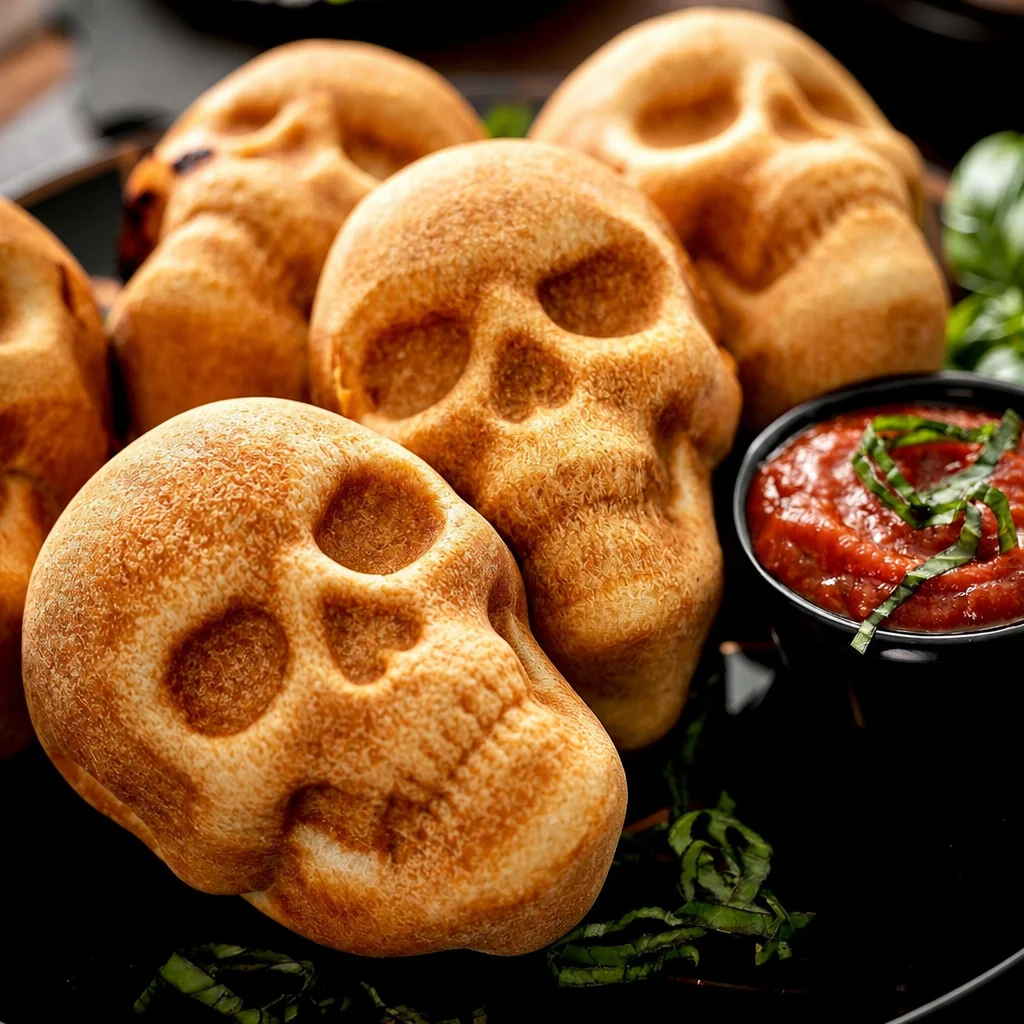
Halloween Pizza Skulls are my go to answer when I want something hot, cheesy, and just spooky enough to make everyone at the party smile. You know that moment when you have cute decorations, a fun playlist, and then you look at the snack table and it feels a little boring? That is exactly when I pull out this recipe. These little skulls look like you worked way harder than you actually did, and they disappear fast. Plus, they are basically pizza pockets, so even picky eaters usually get on board. Let’s make your kitchen smell like a pizzeria with a Halloween costume on.
Why You’ll Love These Cheesy Halloween Pizza Skulls
The first time I made these, I expected them to be more of a novelty. Like, cute but whatever. Nope. They were the first thing gone, and people kept asking if I had more coming out of the oven.
Here is why they are such a win:
They are handheld, so guests can grab one and keep mingling. They are gooey inside, with that stretchy cheese moment when you pull one apart. And they are easy to customize, so you can do half pepperoni and half veggie without starting from scratch twice.
If you are building out a whole creepy menu, I also love pairing them with something dramatic and dark like Halloween black spaghetti with mozzarella eyeballs for that spooky table vibe.
Ingredients for Halloween Pizza Skulls
You do not need anything fancy. This is all normal pizza night stuff, just shaped differently. Here is what I use most often.
- Pizza dough (store bought or homemade)
- Pizza sauce or marinara
- Mozzarella cheese (shredded works best)
- Pepperoni or cooked sausage (optional)
- Italian seasoning or oregano
- Garlic powder (optional but I always add it)
- 1 egg for egg wash (optional, for extra golden tops)
- Olives, extra pepperoni, or cheese bits for face details
- Flour for dusting
One quick note from experience: go light on the sauce inside. Too much sauce makes them harder to seal and they can leak while baking.
Best Pizza Dough, Sauce, Cheese, and Toppings to Use
Dough matters here, but you do not have to stress. If you use store bought dough, let it sit at room temp for about 20 to 30 minutes so it stretches without fighting you.
Dough tips that make shaping easier
Soft, slightly warm dough is easier to press into the skull mold without tearing. If your dough keeps shrinking back, give it a few minutes to rest, then try again. Also, dust your hands lightly with flour so you do not end up wearing the dough.
For sauce, plain pizza sauce is great. Marinara works too, just pick one that is not watery. For cheese, low moisture mozzarella is the best for that stretchy pull without turning soupy.
Toppings should be small pieces, not big chunks. Think chopped pepperoni, crumbled cooked sausage, or finely diced bell peppers. Big pieces can poke through the dough and break your seal.
And if you want a sweet spooky snack to go with dinner, these Frankenstein Halloween rice krispie treats are so fun on a dessert table.
How to Make Halloween Pizza Skulls Step by Step
This is the part where you realize it is basically stuffed pizza, just pressed into a skull shape. You will need a skull pan or skull candy mold that is oven safe. A silicone skull mold works great because the release is easier.
Quick overview:
Preheat your oven, prep your fillings, press dough into the mold, add fillings, seal with more dough, then bake until golden and melty. The details below will keep them from leaking and help you get clean skull shapes.
Also, if you are doing party prep, you can fully assemble these earlier in the day and keep them covered in the fridge until you are ready to bake.
How to Fill and Shape the Skull Pizza Pockets
Start by lightly greasing your skull mold. Then pinch off a piece of dough and press it into the skull cavity. You want it thin enough to cook through, but not so thin that it rips. I aim for about the thickness of a couple stacked tortillas, if that helps.
Now add:
1 spoon of sauce, a small handful of mozzarella, then your toppings. Leave a little border around the edges so you can seal it.
To seal, place a thin piece of dough over the top and pinch the edges together. If you want extra security, dab a tiny bit of water along the edge before sealing.
Flip the mold upside down on a baking sheet if your mold allows it, or just bake as is. The main goal is even heat and a solid seal so your cheese stays inside.
How to Bake Pizza Skulls Until Golden and Gooey
I bake mine at 400 F. Most batches take around 14 to 18 minutes, depending on how thick the dough is and how deep your mold is.
You are looking for:
Golden tops, puffed edges, and that baked bread smell. If you are using egg wash, brush a little on the exposed dough before baking for a shinier finish.
Let them cool in the mold for 3 to 5 minutes before popping them out. If you try to yank them out too soon, the cheese is basically lava and the skull details can squish.
Best Halloween Pizza Skull Filling Variations
This is where you can make the recipe feel new every time. Once you nail the basic Cheesy Halloween Pizza Skulls method, you can mix and match fillings based on what your guests like.
My favorites:
Classic pepperoni: chopped pepperoni plus extra mozzarella.
Meat lover: cooked sausage crumbles, bacon bits, and a little parmesan.
Buffalo chicken: shredded cooked chicken, a spoon of buffalo sauce, mozzarella, and a tiny bit of ranch seasoning.
Pizza supreme: diced peppers, onion, olives, and a few mini pepperoni pieces.
If you have a sweet and salty crowd, add a spooky snack bowl like bloody red velvet popcorn for Halloween nearby. It makes the whole spread feel more festive with basically zero effort.
How to Make Vegetarian Pizza Skulls
Vegetarian Cheesy Halloween Pizza Skulls are honestly just as good, maybe even better, because you can load them with flavor without making them heavy.
I like using:
Sauteed mushrooms (cook them first so they do not leak water), diced bell peppers, chopped spinach, black olives, and a mix of mozzarella plus a little feta.
Just keep the fillings fairly dry. If you are using spinach, squeeze it after cooking. That one step saves you from soggy skulls.
Easy Pizza Skull Toppings and Flavor Combinations
This section is all about the outside details. The skull shape is already fun, but adding a few quick touches makes them look party ready.
How to make the skull faces pop
Before baking, you can press small olive slices for eyes, cut tiny pepperoni triangles for noses, or poke little vents with a toothpick so steam can escape. If your mold has face details built in, you may not need to do much at all.
Flavor combos that always hit:
Garlic butter top: brush baked skulls with garlic butter and sprinkle parmesan.
Spicy: add crushed red pepper inside and a drizzle of hot honey after baking.
Extra cheesy: add a cube of mozzarella in the center so you get a molten core.
Tips for Perfect Skull-Shaped Pizza Every Time
I have messed these up so you do not have to. Here are the little fixes that make a big difference.
Do not overfill. This is the number one reason they leak.
Seal like you mean it. Pinch edges firmly, and smooth the top piece of dough so it connects well.
Use dry fillings. Cook mushrooms, drain pineapple if you use it, and avoid watery sauce.
Let them rest before unmolding. A few minutes sets the cheese and keeps the skull details crisp.
Also, make a couple extra. Every time I make Cheesy Halloween Pizza Skulls, there is always that one guest who goes back for seconds, and then you are glad you planned for it.
What to Serve with Halloween Pizza Skulls
These are rich and cheesy, so I like serving them with simple sides that balance things out. You do not need a complicated menu.
Great pairings:
- Warm marinara for dipping
- Ranch or garlic sauce
- A simple salad with crunchy romaine
- Roasted veggies or a tray of steamed broccoli for an easy healthy option
- Pickles or pepperoncini for a tangy bite
If kids are coming, I set out extra dipping sauces. They love options, and it makes the table feel more fun.
Halloween Party Food and Serving Ideas
I like to serve these on a big dark platter with a little bowl of marinara in the center. If you want to go full spooky, scatter a few black olives around like creepy little decorations, or label the marinara as vampire dip.
If you are building a whole spread, add one slow cooker candy option for the sweet side. This crockpot Halloween candy is perfect because it frees up your oven for the Cheesy Halloween Pizza Skulls.
For timing, I bake a first batch right as guests arrive, then bake another batch about 30 minutes later. Fresh and hot always wins, and it keeps people hovering near the kitchen in the best way.
How to Store and Reheat Pizza Skulls
If you somehow have leftovers, they store well. Let them cool completely first.
Fridge: Store in an airtight container for up to 3 days.
Freezer: Wrap individually and freeze for up to 2 months. They are great for quick snacks.
Reheating without drying them out
Oven or toaster oven is best. Heat at 350 F for about 8 to 12 minutes until warm. If reheating from frozen, add a few extra minutes and cover loosely with foil for the first half so the outside does not overbrown.
Microwave works in a pinch, but the dough can get a little soft. If you do microwave, do short bursts and let them sit for a minute so the heat spreads out.
Common Questions
Do I need a skull pan to make Halloween Pizza Skulls?
It helps a lot, but you can still do a skull vibe by shaping them by hand into ovals and adding face details with olives or pepperoni. The mold just makes them look extra cool.
Why did my pizza skulls leak cheese?
Usually it is overfilling or not sealing the edges well. Use less filling than you think you need and pinch the seam tightly.
Can I make Cheesy Halloween Pizza Skulls ahead of time?
Yes. Assemble them, cover, and refrigerate for several hours. Bake right before serving for the best gooey center.
What is the best cheese for these?
Low moisture mozzarella is the easiest and melts great. You can mix in a little cheddar for extra flavor, but keep mozzarella as the main one.
How do I keep the skull details from sticking?
Lightly grease the mold and let them cool for a few minutes before unmolding. Silicone molds usually release the easiest.
A Spooky Little Wrap Up Before You Party
If you want one recipe that looks festive but still tastes like real comfort food, Cheesy Halloween Pizza Skulls are it. They are easy to prep, fun to customize, and honestly just satisfying in that melty pizza way. If you want more inspiration, I have bookmarked both Pizza Skulls | Halloween – Hungry Happenings and Halloween Pizza Skulls – Lemon Blossoms for extra ideas on fillings and shaping. Try a batch for your next spooky night in, and do not be surprised when everyone asks you to make them again next year.
Print
Cheesy Halloween Pizza Skulls
- Total Time: 48 minutes
- Yield: 12 pieces 1x
Description
Deliciously spooky pizza skulls that are fun to make and guaranteed to be a hit at your Halloween party. These cheesy handheld treats can be customized with various fillings, making them perfect for all guests.
Ingredients
For the Pizza Skulls
- 1 package Pizza dough (store bought or homemade) (Let sit at room temperature for easier stretching.)
- 1 cup Pizza sauce or marinara (Use a thick sauce to prevent leaking.)
- 2 cups Mozzarella cheese, shredded (Low moisture is best for a stretchy texture.)
- 1 cup Pepperoni or cooked sausage (optional) (Chopped into small pieces.)
- 1 tablespoon Italian seasoning or oregano
- 1 teaspoon Garlic powder (optional) (For added flavor.)
- 1 large Egg (for egg wash, optional) (For a golden crust.)
- 1 cup Olives, extra pepperoni, or cheese bits for face details (Use for decoration on top.)
- 1/2 cup Flour for dusting (To prevent sticking while shaping.)
Instructions
Preparation
- Preheat the oven to 400°F (200°C).
- Lightly grease your skull mold.
- Pinch off a piece of dough and press it into the skull cavity, ensuring it is thin enough to cook through.
- Add one spoon of pizza sauce, a small handful of mozzarella, and your desired toppings inside each mold.
- Leave a border around the edges to seal.
- Seal the filling by placing another thin layer of dough on top and pinching the edges together.
Baking
- Bake in the preheated oven for 14 to 18 minutes until golden and bubbly.
- Let them cool in the mold for 3 to 5 minutes before unmolding.
Notes
These pizza skulls can be customized with different fillings, including vegetarian options. Do not overfill or they may leak cheese. Store leftovers in an airtight container for up to 3 days in the fridge or freeze for up to 2 months.
- Prep Time: 30 minutes
- Cook Time: 18 minutes
- Category: Appetizer, Party Food
- Cuisine: American, Halloween
Nutrition
- Calories: 250
- Sugar: 2
- Sodium: 600
- Fat: 10
- Saturated Fat: 5
- Carbohydrates: 30
- Fiber: 2
- Protein: 12

Related posts:
 5-Ingredients Crack Green Beans
 Deliciously Cheesy Funeral Potatoes
 Mango Cucumber Salad with Blueberry and Avocado
 Spring Salad with Goat Cheese for Easter – Light, Colorful & Delicious
 Make-Ahead Holiday Appetizers Everyone Loves (Easy Finger Foods for Parties)
 The Best Basil Aioli Recipe with Fresh Basil and Garlic





 Appetizers & Sides
 Main Dishes
 Drinks & Wellness
 Desserts & Baking