
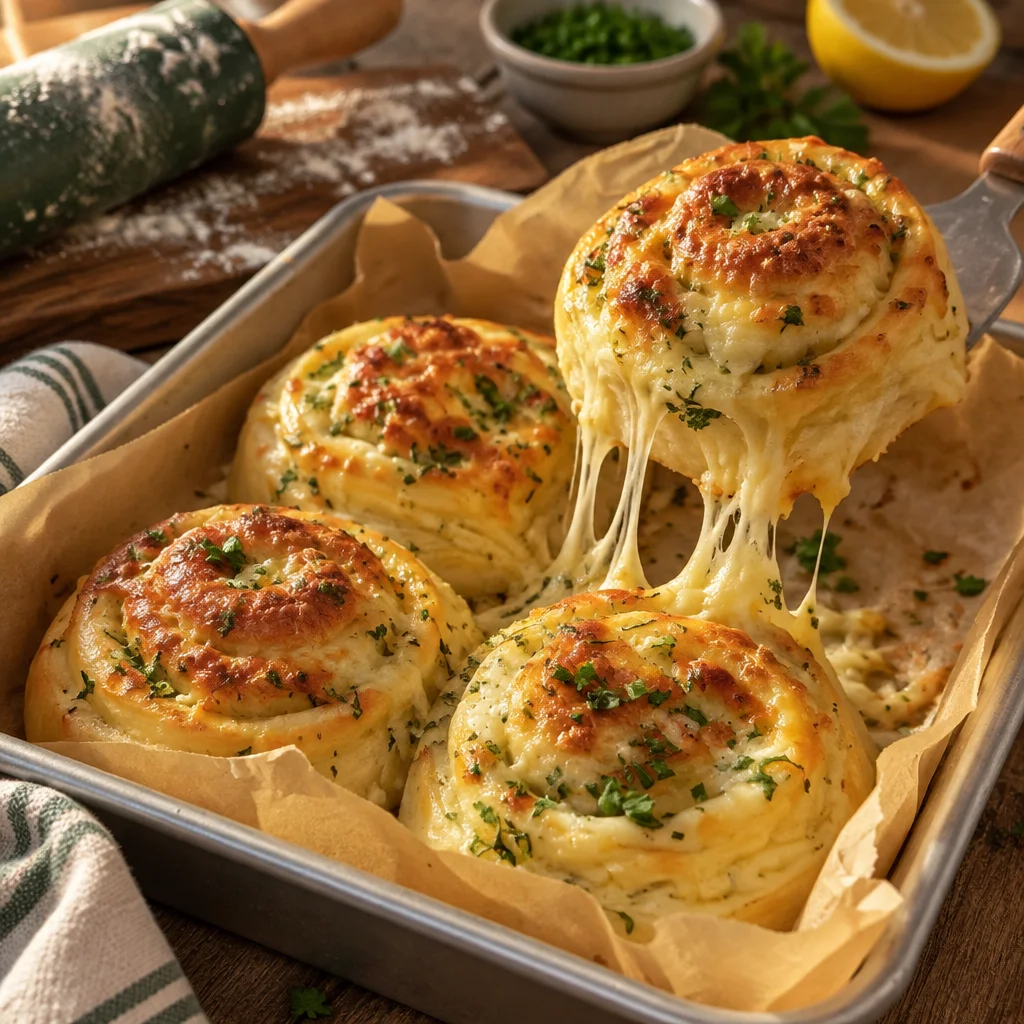
cheesy garlic rolls are the thing I make when I want the house to smell amazing and I need a guaranteed win at the table. You know those nights when dinner is fine but it feels like something is missing? That is when I pull out this soft homemade dough, roast a whole head of garlic, and whip up a buttery glaze that makes everything taste like a cozy pizza shop in the best way. These rolls are warm, cheesy, and a little messy in that good, pull apart way. If you have ever felt nervous about yeast, I have you, because this method is simple and forgiving.
Why These Garlic Cheese Rolls Are Soft and Buttery
The secret is an enriched dough, which just means we are using ingredients like milk, butter, and an egg to keep things tender. It bakes up pillowy, not tough, and it stays soft even after it cools. That is a big deal, because nobody wants a garlic roll that turns into a crouton the next day.
Also, we are layering flavor in a few ways: roasted garlic in the butter, fresh garlic in the filling (optional but so good), and cheese tucked into every swirl. This combo is why cheesy garlic rolls feel like more than “bread on the side.” They are basically the main character.
If you are planning a whole garlic themed dinner, I love pairing these with something easy like 30-minute garlic turmeric rice so the meal feels special without extra stress.
Ingredients for the Enriched Yeast Dough
This is the dough I use when I want soft homemade dough that is easy to handle. Here is what you need, and yes, you probably have most of it already.
- Warm milk (not hot): helps the dough stay tender
- Active dry yeast or instant yeast
- Sugar: feeds the yeast and adds balance
- Egg: makes the crumb soft and rich
- Melted butter or softened butter
- Salt: makes everything taste like itself
- All purpose flour: reliable and simple
Quick tip: if your kitchen is cold, warm your mixing bowl with hot tap water for a minute, dry it, then start. It sounds fussy, but it helps the dough rise without drama.
Cheeses and Fresh Garlic for the Filling
For the filling, I usually reach for mozzarella because it melts in those stretchy, satisfying strands. Then I add a little sharp cheese for flavor. My favorite combo is mozzarella plus parmesan or pecorino. It gives you that salty, punchy bite so the rolls do not taste flat.
Fresh garlic in the filling is optional since we are already using roasted garlic butter, but if you love garlic like I do, go for it. I keep it simple: finely mince one small clove and mix it into the butter that you brush over the dough before the cheese goes on.
If you are already in a cheesy garlic mood, you might also like this cozy pasta moment: cheesy garlic parmesan spaghetti. I have made that for weeknights when I did not feel like thinking, and nobody complained.
Equipment for Mixing Shaping and Baking Rolls
You do not need anything fancy here, but having the basics makes it smoother. I use:
A mixing bowl, a measuring cup, measuring spoons, and a baking dish are the main things. A rolling pin helps, but in a pinch, you can use a clean bottle. I like using dental floss (plain, unflavored) for slicing the roll log into even pieces. It sounds weird until you try it and realize it does not squish the dough like a knife sometimes can.
How to Roast Garlic Without Burning It
Roasting garlic is where the magic starts. It turns sharp garlic into something sweet and mellow, almost buttery by itself. Here is my foolproof method.
Cut the top off a whole head of garlic so you can see the tops of the cloves. Drizzle with a little olive oil and a pinch of salt. Wrap it snugly in foil and bake at 400°F (about 200°C) for around 40 to 50 minutes.
How to tell it is done: the cloves will be golden and soft, and you can squeeze them out like paste. If it looks dry or too dark, it went a little far. Next time, lower the oven to 375°F and give it a few extra minutes. Slow and steady is your friend.
Making Roasted Garlic Butter with Parsley
This roasted garlic butter is the reason people hover in the kitchen asking when the rolls are coming out. I mash the roasted garlic cloves into softened butter, then mix in chopped parsley, a pinch of salt, and a little black pepper.
If you want extra zip, add a spoon of grated parmesan right into the butter. You can also add a tiny squeeze of lemon, not enough to taste lemony, just enough to brighten the whole thing.
I brush this on before baking and again right after baking. That second brush is the glossy, can not stop smelling it finish.
How to Activate Yeast and Mix the Dough
If you are using active dry yeast, stir it into warm milk with a pinch of sugar and wait 5 to 10 minutes. It should look foamy on top. If it does not foam, the milk might have been too hot or the yeast might be old. It happens, and it is fixable by starting over with fresh yeast.
Then mix in the egg, butter, salt, and flour. I start with less flour and add more only if the dough feels too sticky to handle. A slightly tacky dough usually bakes up softer.
Side note: if you are planning a garlic heavy spread, these go great with something like air fryer artichoke hearts with garlic aioli. That is my snack while the dough rises, no shame.
Kneading Until the Dough Is Smooth and Elastic
Kneading sounds serious, but it is mostly just pressing and folding until the dough changes texture. You want it to go from shaggy to smooth. If you poke it, it should slowly spring back.
By hand, this takes about 8 to 10 minutes. In a mixer, maybe 5 to 7. If the dough is sticking like crazy, dust your hands with flour, but do not dump a bunch in all at once. Too much flour is the fastest way to lose that soft homemade dough feel.
First Rise and How to Know the Dough Is Ready
Put the dough in a lightly buttered bowl, cover it, and let it rise until it doubles. Time depends on your kitchen. In my place it is usually 60 to 90 minutes.
The best test is the finger poke test. Press a finger gently into the dough. If it springs back slowly and leaves a slight dent, it is ready. If it snaps back fast, give it more time. If it collapses, it may have over risen, but you can still shape and bake it. They will still taste great.
I made these for my family game night and everyone kept tearing off “just one more.” The roasted garlic butter smelled so good that people showed up early to snack. I am officially on roll duty forever.
Rolling Filling and Cutting Even Cheese Swirls
Roll the dough into a rectangle on a lightly floured surface. Brush a thin layer of roasted garlic butter over the top. Sprinkle your cheese evenly, making sure you get to the edges so every bite has something going on.
Roll it up tightly from the long side, like you are making cinnamon rolls. Then slice into even pieces. If you want super neat slices, slide floss under the roll, cross the ends, and pull. It cuts clean without squashing the swirl.
This is also the point where I usually sneak a little extra mozzarella into the center slices because I love the melty middle pieces the most. This is how cheesy garlic rolls become the thing people talk about after dinner.
Second Proof and Baking Until Golden
Arrange the rolls in a buttered baking dish with a little space between them. Cover and let them puff up again for 20 to 40 minutes. You want them to look plush and slightly expanded.
Bake at 375°F (about 190°C) until golden on top, usually 18 to 25 minutes depending on your oven and how big you cut them. If the tops are browning too fast, lightly cover with foil for the last few minutes.
When they come out, brush with more roasted garlic butter. This part feels extra, but it is not. It is the whole point.
How to Keep the Rolls Fluffy with Melted Cheese
Two things help here. First, do not over flour the dough during kneading and rolling. A slightly tacky dough bakes fluffier. Second, do not over bake. The second they look golden and smell like toasted garlic, check them.
For max gooey cheese, shred your own cheese if you can. Pre shredded cheese works, but it sometimes melts a little less smoothly because of the coating used to prevent clumping.
Also, let them cool for about 5 minutes before you pull one out. I know that is hard. But it helps the cheese set slightly so you get stretchy layers instead of molten lava burns.
Fixing Dough That Is Dry Sticky or Does Not Rise
This is the real life section, because yeast dough has moods.
If the dough is dry and stiff, add 1 teaspoon of milk at a time and knead it in. If it is super sticky and unworkable, dust with flour 1 tablespoon at a time. Go slowly.
If it does not rise, check these:
- Your yeast might be old
- Your liquid might have been too hot and killed the yeast
- Your kitchen might be cold, so the dough just needs more time
I have also had good luck letting the dough rise in the oven with the light on (oven off). It creates a gentle warm spot.
Flavor Variations and Cheese Substitutions
Once you get the base down, you can play. Here are a few combos I have tried and loved:
Spicy: add red pepper flakes to the butter and use pepper jack with mozzarella.
Herby: mix Italian seasoning into the roasted garlic butter and add a little extra parsley.
Extra savory: swap some mozzarella for provolone, fontina, or smoked gouda.
Pizza vibe: add a few chopped pepperoni pieces and a sprinkle of oregano.
If you want a dinner that matches the vibe, I am obsessed with these cheesy garlic chicken wraps on busy nights. And if you want the extra indulgent version, the melt in your mouth ooey gooey cheesy garlic chicken wraps are exactly what they sound like.
Make Ahead Freezing Storage and Reheating Tips
You can absolutely make cheesy garlic rolls work for your schedule.
Make ahead: shape the rolls, place in the baking dish, cover tightly, and refrigerate overnight. The next day, let them sit at room temp until puffy (usually 45 to 75 minutes), then bake.
Freeze: bake them first, cool completely, then wrap well and freeze. Or freeze unbaked rolls after shaping, then thaw in the fridge overnight and proof before baking.
Storage: keep leftovers in an airtight container. They are best within 2 days.
Reheat: warm in the oven at 325°F for 8 to 12 minutes, covered loosely with foil so they do not dry out. Add a tiny brush of butter before reheating if you want that fresh baked feel.
Common Questions
Can I use instant yeast instead of active dry yeast?
Yes. You can mix instant yeast right into the flour. I still like using warm milk because it helps the dough rise nicely.
Do I have to roast the garlic?
You do not have to, but it is what makes the flavor mellow and rich. If you skip it and use raw garlic only, use less so it does not get harsh.
Why did my rolls turn out dense?
Usually it is either too much flour, not enough rising time, or the rolls were baked too long. Next time, keep the dough slightly tacky and let it get properly puffy before baking.
Can I make them without eggs?
You can, but they may be a little less tender. If you need to skip eggs, add a bit more milk and a tablespoon of extra butter to make up for it.
What is the best cheese for the stretchiest pull?
Low moisture mozzarella is the classic choice. Mix in parmesan or pecorino for flavor, but keep mozzarella as the main cheese if you want the big cheese pull.
A warm pan of rolls fixes a lot of things
If you take one thing from this post, let it be this: roasted garlic butter plus soft homemade dough is a combo that never lets you down. Make the dough soft, let it rise until it is truly puffy, and do not forget that final butter brush when the rolls come out. If you want to compare versions, I like checking out recipes like Cheesy Garlic Rolls (Mozzarella, Pecorino, Garlic Stuffed) for extra inspiration, and this one is also fun for ideas on buttery topping: Buttery cheese Garlic Rolls – archer’s food. Now promise me you will eat one while they are still warm, because cheesy garlic rolls are at their best when the cheese is melty and the kitchen smells like garlic heaven.

Cheesy Garlic Rolls
- Total Time: 55 minutes
- Yield: 12 rolls 1x
Description
Warm, cheesy, and buttery rolls infused with roasted garlic, perfect for impressing guests or enhancing any meal.
Ingredients
For the Dough
- 1 cup warm milk (not hot, helps the dough stay tender)
- 2.25 tsps active dry yeast (or instant yeast)
- 2 tbsp sugar (feeds the yeast and adds balance)
- 1 large egg (makes the crumb soft and rich)
- 4 tbsp melted butter (or softened butter)
- 1 tsp salt (to enhance flavor)
- 3.5 cups all purpose flour (reliable and simple)
For the Filling
- 2 cups mozzarella cheese (for a stretchy texture)
- 0.5 cup parmesan cheese (for flavor)
- 1 clove fresh garlic (finely minced (optional))
For the Roasted Garlic Butter
- 1 head garlic (roasted)
- 4 tbsp softened butter (for mixing)
- 2 tbsp parsley (chopped)
- 1 pinch salt (to taste)
- 1 pinch black pepper (to taste)
Instructions
Prepare the Roasted Garlic
- Cut the top off a whole head of garlic, drizzle with olive oil and salt, wrap in foil, and bake at 400°F for 40-50 minutes until golden and soft.
Make the Roasted Garlic Butter
- Mash the roasted garlic cloves into softened butter, mix in parsley, salt, pepper, and optional parmesan.
Activate the Yeast
- Stir active dry yeast into warm milk with a pinch of sugar and let sit for 5-10 minutes until foamy.
Mix the Dough
- Mix in the egg, melted butter, salt, and flour gradually until a slightly tacky dough forms.
Knead the Dough
- Knead the dough for 8-10 minutes by hand or 5-7 minutes in a mixer until smooth and elastic.
First Rise
- Place the dough in a buttered bowl, cover, and let rise until it doubles in size (about 60-90 minutes).
- Use the finger poke test to check if the dough is ready.
Roll and Fill the Dough
- Roll the dough into a rectangle, brush with roasted garlic butter, sprinkle with cheese, and roll tightly like cinnamon rolls.
- Slice into even pieces.
Second Proof
- Arrange slices in a buttered baking dish, cover, and let rise again for 20-40 minutes.
Bake the Rolls
- Bake at 375°F for 18-25 minutes until golden on top, brushing with more roasted garlic butter right after baking.
Notes
For best results, do not over-flour the dough. You can make these rolls in advance and refrigerate or freeze as needed.
- Prep Time: 30 minutes
- Cook Time: 25 minutes
- Category: Appetizer, Side Dish, Snack
- Cuisine: American, Italian
Nutrition
- Calories: 220
- Sugar: 2
- Sodium: 300
- Fat: 9
- Saturated Fat: 5
- Carbohydrates: 30
- Fiber: 1
- Protein: 7

Related posts:
 Make-Ahead Holiday Appetizers Everyone Loves (Easy Finger Foods for Parties)
 The Best Basil Aioli Recipe with Fresh Basil and Garlic
 Easy Sautéed Mushrooms Recipe with Garlic Butter
 Best Cucumber Ranch Crack Salad (Creamy, Crunchy & Ready in 10 Minutes)
 Italian Crispy Breaded Eggplant Recipe
 Oven Roasted Sweet Potatoes (Crispy & Caramelized)





 Appetizers & Sides
 Main Dishes
 Drinks & Wellness
 Desserts & Baking