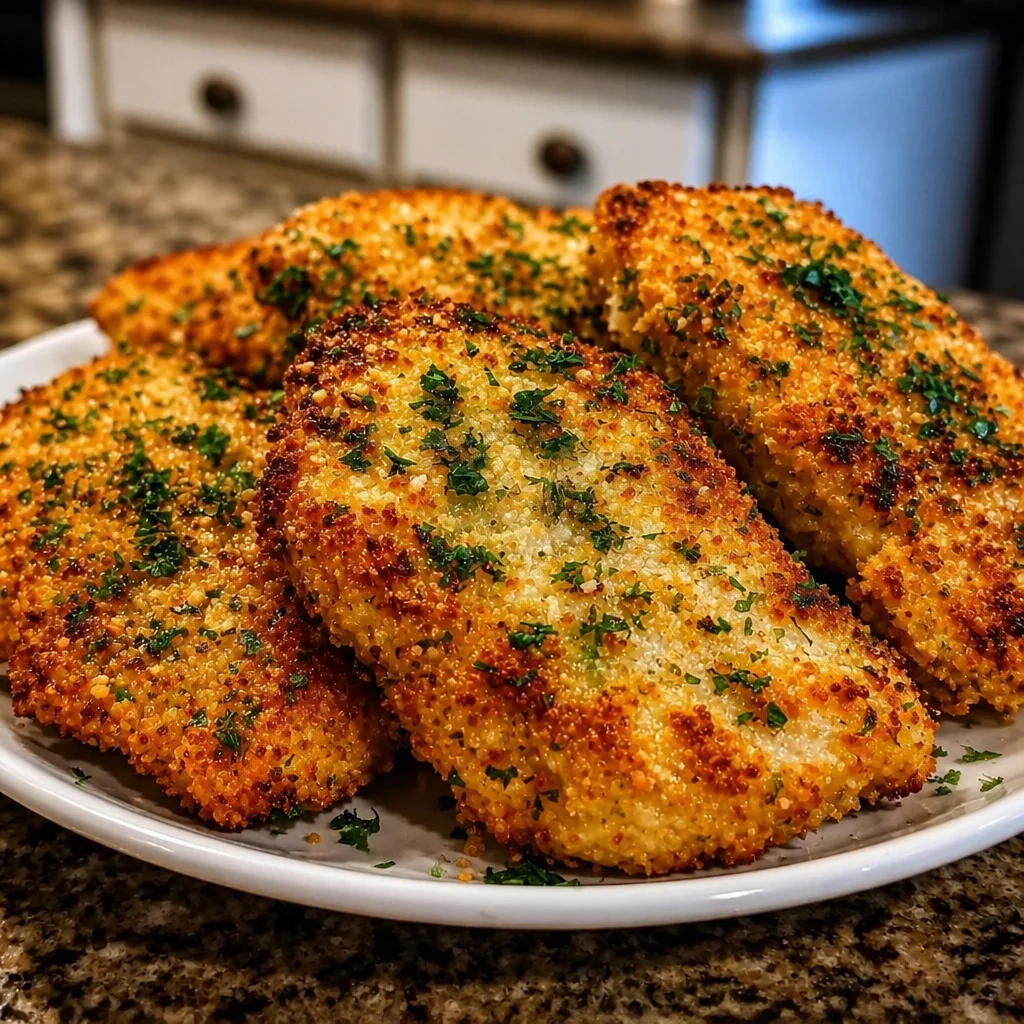
Garlic Parmesan Crusted Chicken Breasts are my answer to that weeknight moment when you want something crispy and cozy, but you do not want to babysit a frying pan. I have made this so many times that I can almost smell the garlic the second I start preheating the oven. The best part is that it feels a little fancy, like something you would order out, but it is honestly pretty simple. You get juicy chicken inside, and that crunchy, salty topping on the outside that people fight over. If your chicken breasts usually turn out dry or bland, this will fix that fast.
Why This Garlic Parmesan Chicken Breast Recipe Works for Perfect Crispy Results
The whole trick is that we are building a crust that actually stays crisp in the oven. A lot of recipes promise crunch and then you pull out chicken with a sad, soft coating. Not here.
This method works because:
We pat the chicken dry so the coating sticks instead of sliding.
We use a mix of panko and Parmesan so you get both airy crunch and deep salty flavor.
We bake on a rack or hot sheet to let heat circulate and crisp up the bottom too.
Also, a little oil or butter in the coating helps it brown without tasting greasy. If you love creamy versions too, you might like this one for another night: creamy garlic parmesan chicken breast.
Ingredients for Garlic Parmesan Crusted Chicken Breasts
Nothing weird here. Just solid pantry stuff that turns into something you will want to make again next week.
- Chicken breasts (2 large, or 4 small, about the same total weight)
- Salt and black pepper
- Garlic powder (and a little paprika if you like color)
- Grated Parmesan (the finer kind works best for sticking, freshly grated is amazing too)
- Panko breadcrumbs (this is where the crunch comes from)
- Italian seasoning or dried parsley plus a pinch of oregano
- Eggs (for the dunk, so the coating holds)
- Olive oil or melted butter (just enough to help browning)
- Optional: lemon wedges for serving
If you already know you love this flavor combo, you should try it in pasta form too: garlic parmesan chicken pasta.
Substitutions and Recipe Variations (Gluten-Free, Keto-Friendly, Air Fryer Option)
Real life cooking means you use what you have and what fits your needs. Here are easy swaps that still taste great.
Easy swaps that still stay crispy
Gluten-free: Use gluten-free panko or crushed gluten-free crackers. Check your seasoning blends too.
Keto-friendly: Swap panko for crushed pork rinds or almond flour mixed with extra Parmesan. It will brown faster, so keep an eye on it.
More garlic: Add a small clove of fresh grated garlic to the egg mixture, but do not overdo it or it can burn on the crust.
Spicy version: Add cayenne or red pepper flakes to the coating.
Air fryer option: Works great, just cook in batches so air can circulate and crisp everything up.
For a cozy dump and go vibe on a different day, this one is super comforting: garlic parmesan crockpot chicken potatoes.
Step-by-Step Instructions for Baked Garlic Parmesan Chicken Breast
This is how I make it when I want it to come out ultra crispy but still juicy inside. Take five extra minutes for setup and it pays you back in crunch.
1) Heat the oven. Set it to 425 F. High heat is your friend here.
2) Prep your pan. Use a sheet pan with a rack if you have one. If not, use parchment and lightly oil it. You can also preheat the sheet pan for extra crispness.
3) Pound the chicken. You do not need to go super thin. Just make the thickness even so it bakes evenly. Pat it dry with paper towels.
4) Season the chicken. Salt, pepper, garlic powder, and a touch of paprika if you want that golden look.
5) Set up two bowls. One bowl with beaten eggs. Another bowl with panko, Parmesan, Italian seasoning, and a drizzle of olive oil or melted butter mixed in.
6) Coat. Dip chicken in egg, let excess drip off, then press into the Parmesan panko mixture. Press it in like you mean it.
7) Bake. Place on rack or pan and bake about 18 to 24 minutes depending on thickness. The coating should look browned and crisp.
8) Rest. Let it sit for 5 minutes before slicing. This keeps the juices where they belong.
For another easy crunchy dinner idea that is basically a full meal on one pan, I make this when I want less cleanup: parmesan crusted chicken sheet pan dinner.
How to Make the Perfect Garlic Parmesan Crust (Crispy Panko & Parmesan Coating Technique)
The crust is the star, so let us treat it like one. The goal is a coating that tastes bold, browns nicely, and does not fall off when you slice.
My crust rules:
Use panko instead of regular breadcrumbs. Regular crumbs can turn a bit sandy.
Mix finely grated Parmesan into the panko so it melts and glues the crust together.
Add a little oil or melted butter right into the breadcrumb mix. It helps the coating toast instead of staying pale.
Press the coating onto the chicken. Do not just lightly dust it.
And one more thing: do not overcrowd the pan. If the chicken is too close together, steam builds up and crunch disappears.
Cooking Methods: Oven Baked, Pan-Seared Then Baked, and Air Fryer Garlic Parmesan Chicken
You have options, depending on your time and what appliances you like using.
Choosing the method that fits your night
Oven baked: This is the easiest and most hands off. It is my default for Garlic Parmesan Crusted Chicken Breasts because it stays simple and still gets that crispy top.
Pan-seared then baked: If you want extra golden color fast, sear the coated chicken in a little oil for about 2 minutes per side, then finish in the oven. This is great when your chicken breasts are thick and you want a head start on browning.
Air fryer: Preheat if your model needs it. Spray the basket lightly, add chicken in a single layer, and cook around 10 to 14 minutes at 375 F to 400 F, flipping once. Times vary, so check early.
No matter what, cook until the chicken is safely done. If you have a thermometer, pull it when it reaches 165 F in the thickest part.
Expert Tips for Juicy Chicken Breast with a Golden Crispy Crust
I have made every mistake with chicken breasts so you do not have to.
Pat the chicken dry before seasoning. Moisture is the enemy of crisp.
Even thickness matters more than people think. A thick end and a thin end means one side dries out while the other side is still cooking.
Let it rest after baking. Slicing too soon dumps juices onto the cutting board.
Use a rack if you can. It keeps the bottom from going soft.
Do not skimp on seasoning because the chicken itself needs flavor under the crust too.
If you want that ultra crispy vibe, a tiny extra drizzle of oil over the top before baking helps a lot.
Common Mistakes to Avoid When Making Parmesan Crusted Chicken
This is the section I wish I had the first time I tried making this kind of chicken.
Mistake 1: Using cold chicken straight from the fridge. It can cook unevenly. Let it sit out 15 minutes if you can.
Mistake 2: Too much Parmesan. I know, it sounds impossible. But if you go overboard, it can melt and get oily, which can soften the crust.
Mistake 3: Baking at a low temperature. Low heat dries chicken and makes the coating sad. Go hotter.
Mistake 4: Crowding the pan. Steam is not your friend here.
Mistake 5: Cutting immediately. Give it those few minutes to settle.
Once you dodge these, this Garlic Parmesan Chicken Breast Recipe becomes one of those recipes you can make without thinking too hard.
Flavor Profile Breakdown: Garlic, Parmesan, Herbs, and Savory Seasoning Balance
This is what makes it feel restaurant style even though it is just baked chicken.
Garlic: Warm and savory, not sharp. Garlic powder gives you even flavor in every bite.
Parmesan: Salty, nutty, and a little funky in a good way. It also helps the crust brown.
Herbs: Italian seasoning or parsley adds that clean, herby note so it does not taste flat.
Black pepper and paprika: Pepper adds bite. Paprika adds color and a mild smoky vibe.
If you like a brighter finish, a squeeze of lemon at the end cuts through the richness and wakes everything up.
Serving Suggestions for Garlic Parmesan Chicken Breast (Restaurant-Style Presentation)
If you are serving guests, or you just want your plate to look cute on a Tuesday, here is what I do.
- Slice the chicken on a slight angle and fan it out
- Add a lemon wedge and a sprinkle of chopped parsley
- Drizzle a tiny bit of warm butter mixed with garlic powder over the top
- Serve on a big plate with your sides tucked around it
The crunchy top looks best right out of the oven, so I usually get the sides ready first, then bake the chicken last.
Best Side Dishes for Garlic Parmesan Crusted Chicken (Vegetables, Pasta, Salads, Potatoes)
This is a rich, savory chicken, so I like sides that balance it. Here are my go tos.
Vegetables: Roasted broccoli, green beans, asparagus, or a simple side salad with a tangy dressing.
Pasta: Buttered noodles, garlic linguine, or a light cream sauce if you want comfort food energy.
Potatoes: Crispy roasted potatoes, mashed potatoes, or even a quick microwave baked potato when you are tired.
Salads: Caesar salad is basically made for this. Something with lemon vinaigrette also works great.
This Garlic Parmesan Chicken Breast Recipe also makes an amazing sandwich the next day if you tuck it into a toasted bun with lettuce and a little mayo.
How to Store, Freeze, and Meal Prep Garlic Parmesan Chicken Breasts
If you are meal prepping, this is a good one, with one little warning: the crust is crispiest fresh. But you can still store it and bring back some crunch later.
To store: Let chicken cool, then keep it in an airtight container in the fridge for up to 3 to 4 days.
To freeze: Freeze cooled pieces on a sheet pan first, then move to a freezer bag. This helps keep them from sticking together. Use within 2 months for best texture.
Meal prep tip: If you want the best crunch for later, store extra coating mix separately and coat fresh when you can. If not, it is still tasty, just a little softer.
I also like slicing leftovers and tossing them on top of salads for lunch. Easy win.
Reheating Instructions and Make-Ahead Meal Prep Guide for Busy Weeknights
Reheating is where a lot of crispy chicken gets ruined. The microwave is quick, but it makes the crust soft. Here is what actually works.
Best ways to reheat and keep the crunch
Oven: Bake at 375 F for about 10 to 12 minutes on a rack or sheet pan until hot. This brings back the crisp best.
Air fryer: 350 F for 4 to 7 minutes, depending on thickness. Check early.
Microwave: Use it only if you are in a rush. Do short bursts and expect the crust to soften.
Make-ahead: You can bread the chicken a few hours ahead and keep it covered in the fridge. If you do this, I recommend placing it on a rack so the coating stays dry.
If you are building a weeknight routine, this Garlic Parmesan Chicken Breast Recipe is a keeper because it reheats better than most breaded chicken once you use the oven or air fryer.
Common Questions
Can I use chicken thighs instead of breasts?
Yes. Boneless skinless thighs work great and stay juicy. They may need a few extra minutes depending on size.
How do I know the chicken is done without drying it out?
A thermometer is the easiest way. Pull it at 165 F in the thickest part, then let it rest.
Why is my crust not sticking?
Usually the chicken was too wet or you did not press the coating on. Pat dry first and press firmly into the crumbs.
Can I make this dairy free?
You can try dairy free Parmesan style shreds, but flavor and melt will vary. You may need extra seasoning to make up for it.
Can I prep this in the morning?
Yes. Bread it, place on a rack, cover lightly, and refrigerate. Bake when you get home.
A Cozy Final Note Before You Bake
If you want crispy, juicy chicken without a lot of drama, this is the one to try. The coating is bold, the inside stays tender, and it feels like a real dinner, not just chicken on a plate. If you want to compare with other cooks and methods, I have also pulled ideas from Baked Parmesan Crusted Chicken – Our Salty Kitchen and Baked Parmesan Crusted Chicken – The Cooking Jar, and it is fun seeing how small changes affect crunch. Make it once, then tweak the garlic and herbs until it tastes exactly like your favorite version. And when you pull that tray out and hear the crust crackle a little, you will know you nailed it.
Print
Garlic Parmesan Crusted Chicken Breasts
- Total Time: 34 minutes
- Yield: 4 servings
Description
Crispy and cozy Garlic Parmesan Crusted Chicken Breasts, perfect for a weeknight dinner with juicy chicken and a crunchy topping.
Ingredients
For the chicken
- 2 large Chicken breasts (or 4 small, about the same total weight)
- to taste Salt and black pepper
- 1 teaspoon Garlic powder (Add paprika if you like color)
- 1 cup Grated Parmesan (Finer kind works best for sticking, freshly grated is amazing)
- 1 cup Panko breadcrumbs (This is where the crunch comes from)
- 1 teaspoon Italian seasoning (or dried parsley plus a pinch of oregano)
- 2 Eggs (For the dunk, so the coating holds)
- 2 tablespoons Olive oil or melted butter (Just enough to help browning)
- for serving Optional: lemon wedges (For serving)
Instructions
Preparation
- Heat the oven to 425°F.
- Prepare your pan. Use a sheet pan with a rack, or cover a sheet pan with parchment and lightly oil it.
- Pound the chicken to an even thickness and pat it dry with paper towels.
- Season the chicken with salt, pepper, garlic powder, and paprika if desired.
Coating
- Setup two bowls: one with beaten eggs and another with a mix of panko, Parmesan, Italian seasoning, and olive oil or melted butter.
- Dip the chicken into the egg mixture, letting excess drip off, then press into the Parmesan panko mixture.
Baking
- Place the coated chicken on the rack or pan and bake for about 18 to 24 minutes, depending on thickness, until the coating is browned and crisp.
- Let the chicken sit for 5 minutes before slicing to keep juices locked in.
Notes
For extra crunch, preheat the sheet pan. To store, keep in an airtight container in the fridge for 3 to 4 days, or freeze for up to 2 months. Reheat in the oven at 375°F for about 10 to 12 minutes to restore crispiness.
- Prep Time: 10 minutes
- Cook Time: 24 minutes
- Category: dinner, Main Course
- Cuisine: American
Related posts:
 Sweet Potato Bowl Recipes 2025: 10 Viral Ideas to Try at Home
 Crockpot Sausage and Green Beans: Dump-and-Go Recipe
 Why This Crockpot Chicken Pot Pie Is the Easiest Comfort Food
 Cajun Potato Soup for Holidays and Cold Weather
 Delicious Shrimp and Corn Chowder That Will Warm Your Heart
 Crunchy Crispy Air Fryer Chicken & Mozzarella Wraps | Easy Air Fryer Recipe

 Main Dishes
 Drinks & Wellness