
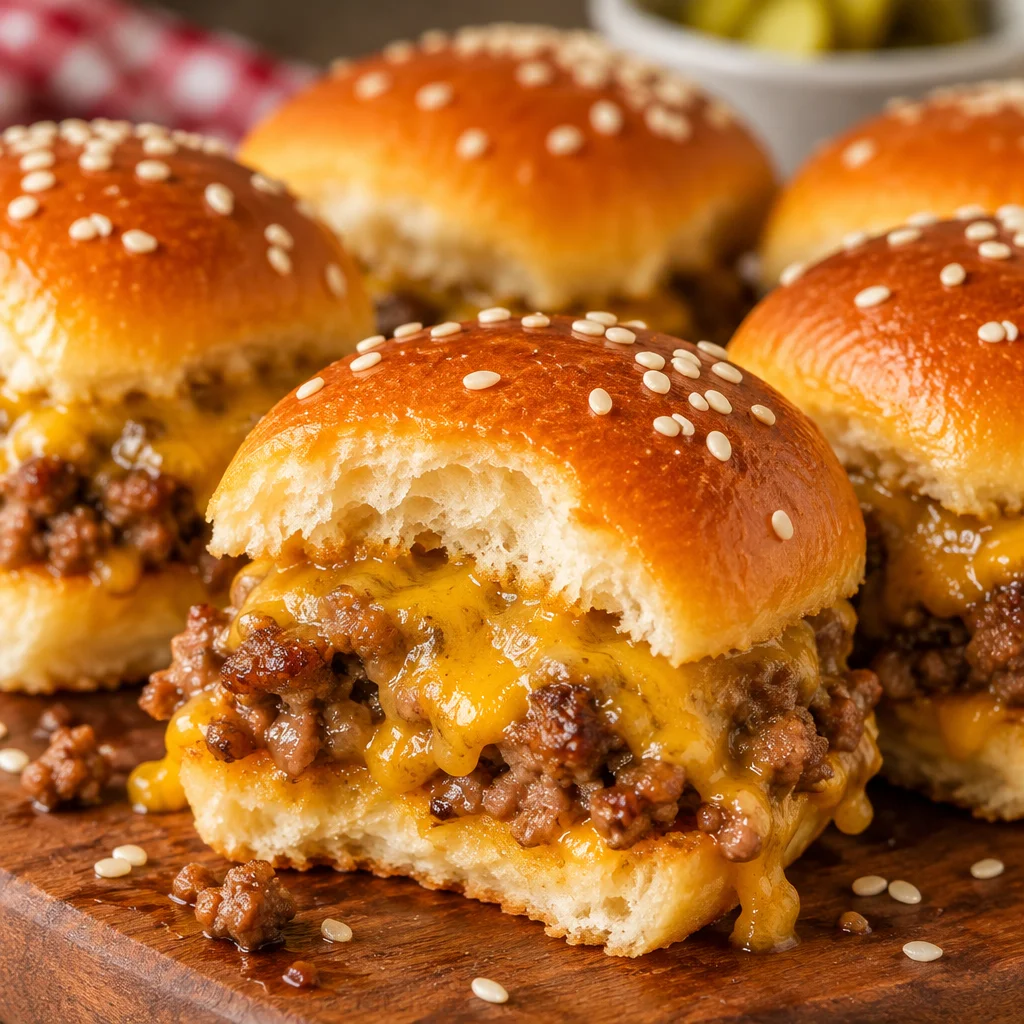
cheeseburger sliders have saved me more times than I can count when I needed something fun, filling, and basically guaranteed to disappear fast. You know those days when people are coming over and you do not want to stand at the stove flipping individual burgers like you are running a diner? This is the answer. These little sandwiches bake all at once, smell like a real burger joint, and make everyone hover around the pan. I make mine with ground beef and cheddar because it is classic, it is cozy, and it just works. Let’s get into it, because you can absolutely pull this off even on a busy weeknight.
Why Cheeseburger Sliders Are Perfect for a Crowd
The best part about cheeseburger sliders is that they feel like a party food, but they are secretly practical. You are feeding a bunch of people without juggling a grill spatula or trying to keep patties warm.
I love them for game day, sleepovers, family movie nights, and potlucks because they are:
Easy to scale up and you can bake two pans at once. They are also easy to carry since you can cover the pan with foil and go. Plus, everyone gets the same good bite with beef, melted cheddar, and that soft roll.
If you are in a slider mood and want a different vibe next time, these Bang Bang Chicken Sliders are a fun spicy switch up.
Best Rolls, Beef, and Cheese to Use
Let’s keep it simple. For rolls, I like soft slider buns or Hawaiian style rolls because they stay tender in the oven. If your rolls are super sweet, just know the final flavor leans more sweet and savory, which some people love.
For the beef, choose ground beef around 80 20. Too lean and the filling can feel dry. Too fatty and you end up draining a lot. We are going for juicy but not oily.
Cheddar is my go to here. Sharp cheddar gives you that real cheeseburger taste, but mild cheddar melts like a dream. If you only have sliced cheese, it still works. If you shred it, it melts into every little corner.
When I want a comfort food dinner with the same vibe, I make Cheeseburger Macaroni Soup. It hits the same craving, just with a spoon.
Flavor Boosters for the Ground Beef Filling
Ground beef is like a blank canvas, so I always add a few little things to make it taste like a real cheeseburger and not just taco meat without seasoning. My usual flavor boosters are:
- Onion, finely diced so it melts into the beef
- Garlic, just a little for depth
- Salt and pepper, more than you think, but taste as you go
- Worcestershire sauce for that burger joint flavor
- Ketchup and mustard, a spoonful of each makes it taste like a cheeseburger bite
If you like a smoky note, add a pinch of smoked paprika. And if you love bacon on burgers, you can toss in cooked crumbled bacon too. Or if you want bacon in a totally different way, this Bacon Cheeseburger Pasta in One Pan is honestly dangerous because it is so easy to keep eating.
How to Cook the Beef Without Making It Greasy
This part matters more than people think. Greasy beef can soak into the rolls and make everything feel heavy.
Here is what I do: I brown the beef in a large skillet over medium heat and break it up as it cooks. Once it is no longer pink, I drain off excess grease if there is a lot. Then I put the beef back in the pan and add my flavor boosters so they cling to the meat instead of sliding around in fat.
One more thing, do not add a bunch of liquid sauces at the start. Add them at the end so the beef stays meaty and not wet. Let it cook for another minute or two so everything thickens up a bit before you build the sliders.
How to Slice and Prepare Slider Rolls
If you are using connected rolls, do not pull them apart. That is the trick that makes this so fast. Take the whole slab of rolls and slice them horizontally like you are making one giant sandwich. A serrated knife helps a lot.
Place the bottom half in a greased baking dish. I like a 9 by 13 pan for a standard pack of rolls. If your rolls are extra tall, you can press them down gently once everything is layered.
Quick tip: if you are worried about sogginess, you can toast the bottom slab of rolls in the oven for about 3 to 4 minutes before filling. It gives you a little barrier.
How to Layer Cheeseburger Sliders
This is where it gets fun, because it is basically burger building but in one pan. Here is my layering order for cheeseburger sliders:
- Bottom rolls
- A thin layer of cheese first (this helps protect the bread)
- Seasoned ground beef filling
- More cheddar on top (do not be shy)
- Pickles if you want them baked in
- Top rolls
I know some people prefer adding pickles after baking, and that is totally fine. Baked pickles get softer and more mellow. Fresh pickles stay snappy and bright. I do both depending on my mood.
“I brought these to a backyard party and people were literally asking who made the sliders before they even finished chewing. The beef was so flavorful and the tops were perfectly golden.”
If you like sliders that feel extra loaded, check out Cowboy Sliders Loaded sometime too. They are big flavor and super shareable.
How to Get Buttery Golden Sesame Tops
The buttery top is what makes these taste like something from a real casual restaurant. I brush the tops with melted butter and sprinkle sesame seeds. That is it, but it makes a huge difference.
If you want a little more flavor, stir a pinch of garlic powder and onion powder into the melted butter. Not too much, just enough to smell amazing when it hits the oven.
One more tip: brush butter all the way to the edges. Those corner sliders are everyone’s favorite because they get extra golden.
Baking Time and How to Know They Are Ready
I bake cheeseburger sliders at 350 F. Usually 15 to 20 minutes does it, depending on your pan and how cold your filling is. If you built them with warm beef, they will heat through faster.
I like to cover the pan loosely with foil for the first 10 minutes so the tops do not brown too fast. Then I remove the foil so they finish golden and glossy.
You will know they are ready when the cheese is fully melted and the sliders feel hot in the center. If you lift one gently with a spatula, it should hold together but still feel soft.
How to Keep Cheeseburger Sliders from Getting Soggy
Soggy sliders are a bummer, but they are easy to avoid. The biggest causes are greasy beef and too much moisture inside.
Here is what helps:
Drain the beef if needed, and let the filling cool for a few minutes before assembling if it looks juicy. Also, use the cheese as a barrier under the beef. And if you are adding sauces, go light inside the bake and serve extra on the side.
If you are packing them to go, let them cool for about 10 minutes before covering tightly. Trapped steam can soften the tops.
Best Pickles, Condiments, and Burger Sauces
I am a pickle person, so I always put out pickles. Dill chips are classic. Bread and butter pickles are sweet and tangy, and they work shockingly well with sharp cheddar.
For condiments, keep it simple and familiar:
Ketchup, mustard, mayo, and a quick burger sauce. My quick sauce is mayo plus a little ketchup, a tiny squirt of mustard, pickle relish, and black pepper. Stir it up and taste it. If it needs more tang, add a few drops of pickle juice.
If you want a spicy option for the table, I love having something like these Buffalo Chicken Sliders on your radar for another party, because not everyone wants the same heat level.
Easy Cheeseburger Slider Variations
Once you make these once, you will start thinking of a million versions. A few easy twists:
Bacon cheddar with crumbled bacon in the beef. Mushroom Swiss with sautéed mushrooms and Swiss cheese. Pizza burger with a little marinara and mozzarella. BBQ cheeseburger with BBQ sauce and crispy onions.
You can also make them a little lighter by using ground turkey, just add extra seasoning and a small splash of oil so it stays juicy.
How to Make Sliders Ahead of Time
If you want to get ahead, you have two good options. First option, cook the beef filling earlier in the day and store it in the fridge. When you are ready, warm it slightly so it spreads easily, then assemble and bake.
Second option, fully assemble the sliders without the butter topping, cover, and refrigerate for up to 8 hours. When it is time to bake, brush on the butter and sesame seeds right before they go into the oven.
If they are cold from the fridge, you might need an extra 5 minutes in the oven.
What to Serve with Cheeseburger Sliders
I keep sides simple because the sliders are the star. A few favorites:
- Potato chips and crunchy pickles
- Simple coleslaw
- Oven fries or tater tots
- Fruit salad if you want something fresh
- A big green salad with ranch or vinaigrette
And if you are feeding teens, just accept that you may need two pans. I say that with love and experience.
How to Store and Reheat Leftover Sliders
Leftovers are honestly great. Store sliders in an airtight container in the fridge for up to 3 days. If you are stacking them, put a piece of foil or parchment between layers.
To reheat, the oven is best. I do 325 F for about 10 to 12 minutes, covered loosely with foil so they do not dry out. For a quick option, microwave works, but the bread will be softer. If you want the tops a little crisp again, pop them under the broiler for a minute, but watch closely.
Game Day, Potluck, and Party Serving Tips
For parties, I cut them right in the pan and serve with a spatula. Put sauces on the side so people can customize. If you are traveling with them, bake them at home, cool for 10 minutes, then cover with foil and wrap the whole pan in a towel to keep warm.
Also, label your sauces if you have a spicy one. Someone always grabs the wrong cup and looks betrayed.
One more thing I learned the hard way: bring napkins. These are gloriously messy in the best way.
Common Questions
Can I use pre sliced cheese instead of shredded?
Yes. Lay the slices so they overlap a little. It melts just fine and makes layering super easy.
Do I have to use sesame seeds on top?
Nope. They are optional. The butter is the important part for flavor and color.
Can I make cheeseburger sliders without onions?
Absolutely. Leave them out, or swap in a little onion powder for a gentler flavor.
How do I keep the tops from getting too brown?
Cover with foil for the first half of baking, then uncover to finish. Also, keep your oven rack in the middle.
Can I freeze them?
You can, but they are best fresh. If you do freeze, wrap tightly and reheat in the oven covered until hot, then uncover for a few minutes to crisp the tops.
A Pan of Sliders You Will Want to Make Again
If you try these cheeseburger sliders, I really think they will become one of your go to party foods, especially when you want maximum payoff without a lot of effort. Once you nail the seasoned beef, the cheddar melt, and those buttery sesame tops, the rest is basically assembly. For more inspiration, I have bookmarked this Cheeseburger Sliders (Easy, 30-min Recipe) – NatashasKitchen.com and also this helpful Cheeseburger Sliders Recipe (Baked with Hawaiian Rolls) when I want to compare methods. Make a pan, set out a few sauces, and watch how fast they vanish.
Print
Cheeseburger Sliders
- Total Time: 40 minutes
- Yield: 12 sliders 1x
Description
These cheeseburger sliders are a fun, easy, and crowd-pleasing party food, baked all at once for a juicy, cheesy treat.
Ingredients
For the Filling
- 1 lb ground beef (80/20) (Juicy but not too fatty)
- 1 cup cheddar cheese, shredded (Sharp or mild cheddar works well)
- 1 medium onion, finely diced (Melts into the beef)
- 2 cloves garlic, minced (For depth of flavor)
- 1 tbsp Worcestershire sauce (Adds burger joint flavor)
- 1 tbsp ketchup (Part of the cheeseburger flavor)
- 1 tbsp mustard (Part of the cheeseburger flavor)
- to taste salt and pepper (Season to taste)
- optional smoked paprika (For a smoky flavor)
- optional cooked crumbled bacon (For a bacon flavor)
For the Sliders
- 1 package slider buns or Hawaiian rolls (Use soft slider buns for the best texture)
- 1 tbsp butter, melted (For brushing on the top)
- to taste tbsp sesame seeds (Optional, for topping)
Instructions
Prepare the Beef Filling
- Brown the ground beef in a large skillet over medium heat, breaking it up as it cooks.
- Once no longer pink, drain off excess grease if necessary.
- Stir in the diced onion, minced garlic, Worcestershire sauce, ketchup, mustard, salt, and pepper.
- Cook for an additional 1-2 minutes until everything is heated through and well combined.
Prepare the Rolls
- If using connected slider rolls, slice them horizontally without separating.
- Place the bottom half of the rolls in a greased 9×13 baking dish.
- Optionally, toast the bottom half of the rolls in the oven for 3-4 minutes.
Assemble the Sliders
- Layer a thin layer of cheddar cheese on the bottom half of the rolls.
- Spread the seasoned beef filling evenly over the cheese.
- Add more cheddar cheese on top of the beef.
- Place the top half of the rolls back on.
Bake the Sliders
- Brush the top with melted butter and sprinkle with sesame seeds.
- Cover loosely with foil and bake at 350°F for 10 minutes.
- Remove foil and bake for an additional 10 minutes until golden and the cheese is melted.
Notes
Serve with a variety of condiments like ketchup, mustard, mayo, and pickles. To reheat, cover loosely with foil and bake at 325°F for 10-12 minutes.
- Prep Time: 20 minutes
- Cook Time: 20 minutes
- Category: Appetizer, Main Course, Party Food
- Cuisine: American
Nutrition
- Calories: 250
- Sugar: 2
- Sodium: 450
- Fat: 10
- Saturated Fat: 5
- Carbohydrates: 30
- Fiber: 1
- Protein: 12

Related posts:
 Sweet Potato Bowl Recipes 2025: 10 Viral Ideas to Try at Home
 Crockpot Sausage and Green Beans: Dump-and-Go Recipe
 Why This Crockpot Chicken Pot Pie Is the Easiest Comfort Food
 Cajun Potato Soup for Holidays and Cold Weather
 Delicious Shrimp and Corn Chowder That Will Warm Your Heart
 Crunchy Crispy Air Fryer Chicken & Mozzarella Wraps | Easy Air Fryer Recipe





 Appetizers & Sides
 Main Dishes
 Drinks & Wellness
 Desserts & Baking