
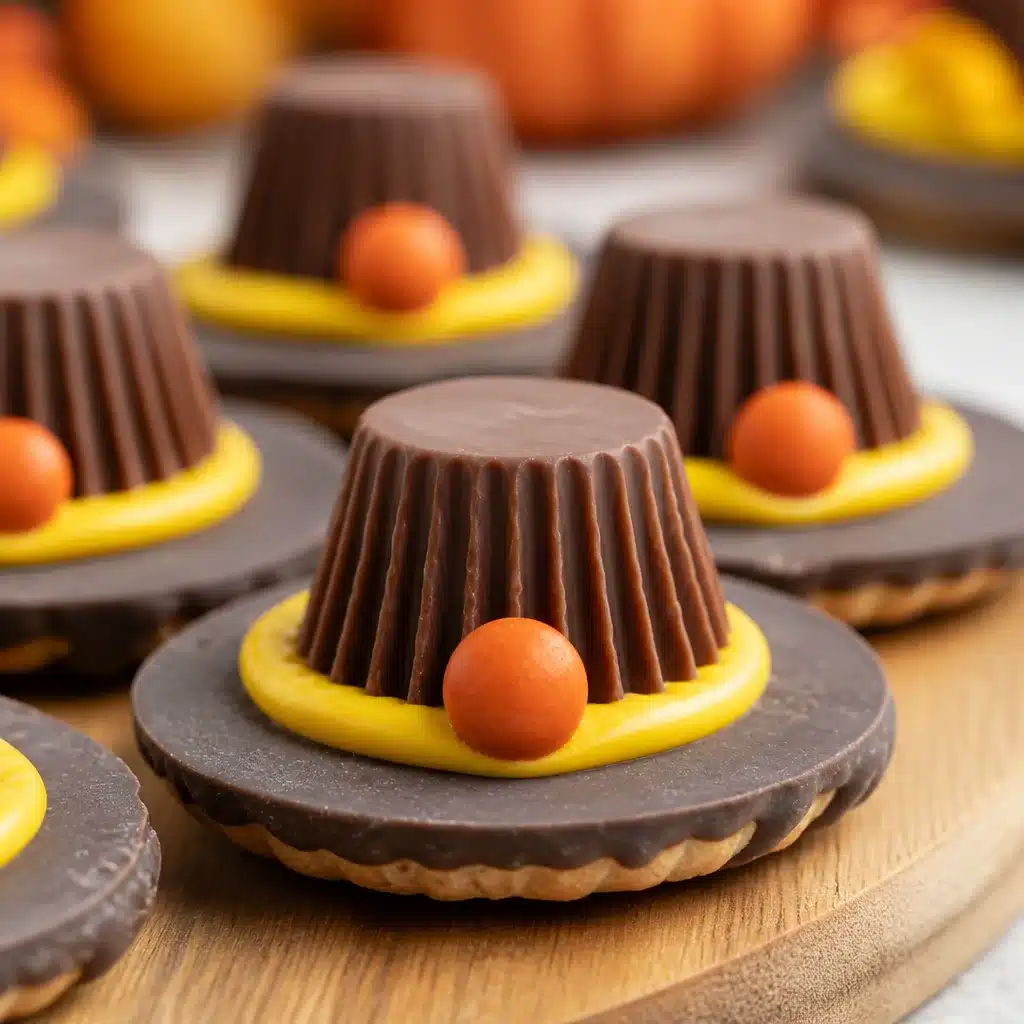
pilgrim hat cookies always pop into my head right around that pre Thanksgiving chaos moment when I realize I volunteered to bring “a cute dessert” and I do not have time to bake. If you have ever been juggling turkey timers, family texts, and a sink full of dishes, this is your kind of treat. These are sweet, a little nostalgic, and honestly kind of adorable on a platter. The best part is you can pull them together fast with store bought goodies. Let’s make something fun that looks like you tried really hard, even if you did not.
Why Pilgrim Hat Cookies Are an Easy Thanksgiving Treat
I love desserts that feel festive but do not wreck my schedule, and pilgrim hat cookies do exactly that. They are basically a small assembly project, not a baking project. You get that classic Thanksgiving vibe without pulling out a mixer, measuring flour, or waiting on batches in the oven.
They also work for almost any gathering. I have set these out during football games, on the kids table, and even tucked a couple onto place settings as a little surprise. If you like holiday cookies in general, you might also enjoy these Christmas sugar cookies when December rolls around.
Ingredients for No-Bake Pilgrim Hat Cookies
You only need a handful of ingredients, and most grocery stores have them year round. Here is what I typically grab:
- Flat round cookies for the brim (like Fudge Stripe style, or a similar chocolate cookie)
- Peanut butter cups or Rolos for the hat top
- Chocolate chips (or melting wafers) to act like edible glue
- Yellow candy for the buckle (M and M type candies work great)
- Optional: a tiny bit of shortening or coconut oil to help the chocolate melt smoother
If you are the type who loves trying different cookie flavors, you should check out these German butter cookies for a totally different vibe on a cozy weekend.
Choosing the Best Cookies for the Hat Brims
The brim is the base, so you want something that is flat and sturdy. My go to is a chocolate striped cookie because it already looks a little fancy and it is the perfect size. But you have options.
What works best:
Pick cookies that are: flat, not crumbly, and wide enough that the candy hat top does not topple over.
Some quick notes from my own trial and error:
Thin wafer cookies can snap when you press the candy on top. Soft cookies can bend and make your hats lean. If you are shopping quickly, just give the cookie package a gentle shake. If it sounds like a bunch of crumbs, I skip it.
And hey, if you are in a “cute cookie shapes” phase, these flower sugar cookies are a fun project for another day.
Peanut Butter Cups, Rolos, and Other Hat Top Options
This is where you can customize based on what your family likes. The classic version uses a mini peanut butter cup turned upside down. It looks exactly like a little hat and tastes great with the chocolate cookie base.
But Rolos are also amazing because you get that caramel center, and they are already kind of hat shaped. If you want to branch out, you can even use:
Other ideas: chocolate truffles, chocolate kisses (wider base ones work better), or chocolate covered caramels.
Just keep the size in mind. If the candy is too tall and narrow, it can wobble. If it is too big, it looks more like a top hat from a costume shop, which is still kind of funny, honestly.
How to Make the Hat Band and Candy Buckle
The hat band is just a small strip of chocolate that goes around the base of the candy. The buckle is your yellow candy pressed right onto that band while the chocolate is still soft.
Here is the simple way I do it:
Dip the bottom edge of the candy (the wide part) into melted chocolate, or use a spoon to paint a thin band around it. Then press on one yellow candy. You do not need much chocolate for the band, so go light. Too thick and it looks chunky.
If you do not have yellow candies, you can use a small square of yellow frosting, a dot of colored icing, or even a tiny piece of yellow fruit leather cut into a buckle shape. It is forgiving.
Tools That Make Assembly Easier
You can absolutely do this with a spoon and a microwave safe bowl, but a few tools make it smoother and less messy, especially if kids are helping.
My favorites:
Helpful tools: parchment paper, a small spoon, a butter knife for spreading chocolate, and a zip top bag you can snip for quick piping.
A pair of clean tweezers is oddly helpful for placing the tiny buckle candies neatly. Sounds extra, but it works.
How to Melt and Pipe the Chocolate Mixture
I melt chocolate in short bursts because burnt chocolate is the fastest way to ruin your mood. I do 20 to 25 seconds, stir, then repeat until it is mostly melted. Stirring finishes the job.
If the chocolate feels thick, add a tiny bit of shortening or coconut oil, like half a teaspoon at a time. You want it smooth enough to pipe or spread, but not so runny that it slides everywhere.
For piping, you can spoon the melted chocolate into a zip top bag, push it into one corner, and snip a tiny hole. It is not fancy, but it works like a charm.
How to Assemble Pilgrim Hat Cookies Step by Step
This is the fun part. Put on a playlist, clear a little counter space, and line a tray with parchment paper.
Here is my step by step method:
1) Lay the brim cookies flat, chocolate side up if they have one.
2) Add a small dollop of melted chocolate to the center of each cookie.
3) Press a peanut butter cup or Rolo upside down onto the melted chocolate.
4) Add a thin chocolate band around the bottom of the candy.
5) Press on the yellow candy buckle and let everything set.
Once you make a few, you will get into a rhythm. This is also a cute time to set out a little plate of “extras” for snacking, because you will have leftover candies. That is just part of the process.
How to Help the Cookies Set Quickly
If your kitchen is warm or you are in a hurry, setting can take longer than you want. My trick is to put the tray in the fridge for 10 to 15 minutes. That usually does it.
If you are doing a big batch, work in rows. Assemble one tray, chill it, then start the next. It keeps the chocolate from getting smeared while you are still working.
Common Assembly Problems and How to Fix Them
These are no bake, but they still have a couple of little hiccups that can happen. Nothing tragic, just mildly annoying.
Problem: The candy top slides off.
Fix: Use a slightly larger dollop of chocolate and press gently for a second or two. Also make sure the brim cookie is not oily or dusty with crumbs.
Problem: Chocolate is too thick to pipe.
Fix: Stir well and add a tiny bit of coconut oil or shortening. Also make sure you did not overheat it.
Problem: Buckle candies fall off.
Fix: Press them in right after you add the band, while the chocolate is still soft.
I made these last year for my son’s classroom party and every kid wanted the “hat cookies” first. A couple even asked if I bought them at a bakery, which made my day.
Ingredient Substitutions and Peanut-Free Options
If you need peanut free pilgrim hat cookies, you can still totally make them. Swap the peanut butter cups for another candy with a similar shape.
Good peanut free options:
Try: Rolos, plain chocolate domes, chocolate truffles, or allergy friendly sunflower butter cups if your store has them.
Also check labels on the cookies and candies if you are serving someone with allergies. Cross contamination warnings can matter for school events.
Tips for Making These Cookies with Kids
This is one of my favorite “kids can actually help” recipes. It is basically edible crafts. The key is to give them jobs that fit their age.
What works well:
Little kids can place the buckles and help line up the cookies on the tray. Older kids can pipe the chocolate band with a baggie. I usually handle the hot melting part and keep a damp cloth nearby for sticky fingers.
And if you want another kid friendly holiday idea later in the year, these Easter birds nest cookies are a blast to make too.
How to Make Pilgrim Hat Cookies Ahead
You can make pilgrim hat cookies a day or two ahead, which is a lifesaver when Thanksgiving week gets busy. Once they are fully set, they hold up well.
My best tip is to let them firm up on the tray first, then transfer them to a container. If you move them too soon, you will smudge the buckles or knock the tops loose.
If you are planning a whole cookie tray, I like to mix in a lighter flavor too, like these basil lime sugar cookies for something unexpected and fresh alongside all the chocolate.
How to Store and Serve Thanksgiving Pilgrim Hats
Once set, store them in a single layer if you can, or use parchment between layers. A cool room is fine for most homes, but if your kitchen runs warm, the fridge is safer.
Storage tips: keep them in an airtight container, away from the stove, and do not stack heavy things on top because the hats can pop off.
For serving, I like a big platter with a few mini pumpkins around the edge. If you are doing place settings, one cookie at each plate is such an easy win.
Pilgrim Hat Cookies FAQs
Can I use white chocolate instead of regular chocolate?
Yes, but it sets softer. If your house is warm, chill them a bit longer.
How long do they take to set?
At room temperature, usually 30 to 45 minutes. In the fridge, around 10 to 15 minutes.
Do pilgrim hat cookies travel well?
They do, as long as they are fully set and packed snugly in a container so they do not slide.
What if I cannot find the right yellow candy for the buckle?
Use orange candies, a dot of yellow frosting, or even a little square cut from a fruit snack. People get the idea.
Can I freeze them?
I do not love freezing them because condensation can make the chocolate look dull. If you must, freeze in a tight container and thaw in the fridge.
My Favorite Way to Wrap This Up for Thanksgiving
If you need a fast, cute dessert, pilgrim hat cookies really do check all the boxes. They are quick, no bake, and they look like a little Thanksgiving craft project in the best way. I also like peeking at other versions when I want to compare candy options, like Easy Pilgrim Hat Cookies – House of Nash Eats, Pilgrim Hat Cookies Recipe | Hersheyland, or Pilgrim Hat Cookies – Recipes | Pampered Chef Canada Site. If you make pilgrim hat cookies this year, do yourself a favor and make a few extras because they disappear fast. Put on some music, let the chocolate do the heavy lifting, and enjoy having one less stressful thing on your Thanksgiving list.
Print
Pilgrim Hat Cookies
- Total Time: 15 minutes
- Yield: 12 cookies 1x
Description
Quick and adorable no-bake cookies that resemble pilgrims’ hats, perfect for Thanksgiving gatherings.
Ingredients
- 12 pieces Flat round cookies (like Fudge Stripe cookies) (These serve as the brim of the hats.)
- 12 pieces Peanut butter cups or Rolos (These will be placed upside down on the cookies.)
- 1 cup Chocolate chips or melting wafers (Used as edible glue.)
- 12 pieces Yellow candy (like M&M’s) (Used as the buckle on the hat.)
- 1 tbsp Shortening or coconut oil (Optional help for melting the chocolate smoothly.)
Instructions
Assembly
- Lay the brim cookies flat, chocolate side up if applicable.
- Add a small dollop of melted chocolate to the center of each cookie.
- Press a peanut butter cup or Rolo upside down onto the melted chocolate.
- Add a thin chocolate band around the bottom of the candy.
- Press on the yellow candy buckle and let everything set.
Notes
For optimal results, chill the assembled cookies in the fridge for 10-15 minutes to help them set quickly. Use a zip-top bag for an easy piping method for the melted chocolate.
- Prep Time: 15 minutes
- Category: Dessert, Snack
- Cuisine: American
Nutrition
- Calories: 110
- Sugar: 8
- Sodium: 50
- Fat: 6
- Saturated Fat: 3
- Carbohydrates: 15
- Protein: 1

Related posts:
 Deliciously Simple Candied Orange Slices
 Decadent Hot Cross Bun Recipe
 Irresistibly Super Moist Chocolate Chip Banana Bread Recipe
 Crispy Air Fryer Churro Bites- Sweet & Simple
 Vegan Gluten-Free Lemon Sandwich Cookies with Lemon Curd (Easy Healthy Recipe)
 Spooky Halloween Cookies with a Gooey Witches’ Brew Surprise





 Appetizers & Sides
 Main Dishes
 Drinks & Wellness
 Desserts & Baking