
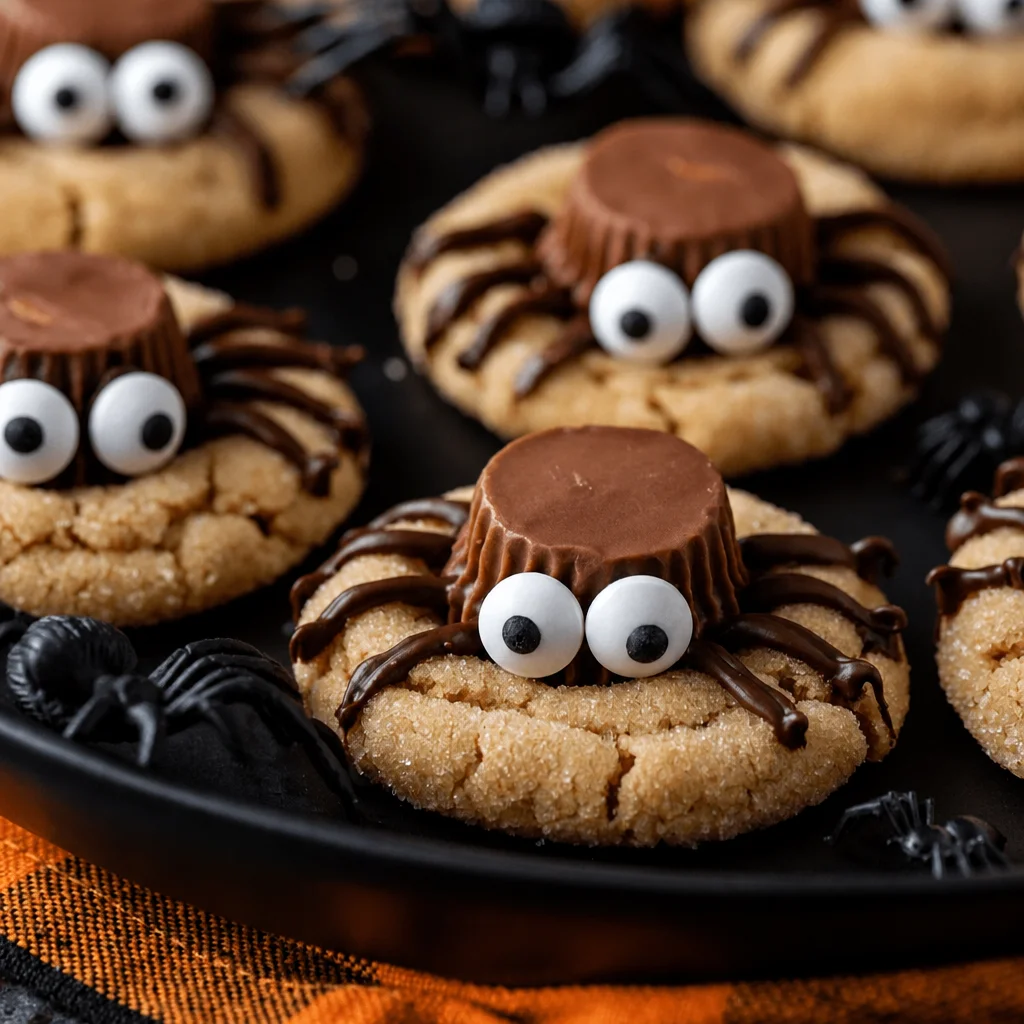
Peanut Butter Spider Cookies are my go to Halloween fix when I want something cute, a little spooky, and honestly pretty foolproof even on a busy weeknight. You know that feeling when Halloween sneaks up on you and suddenly you need a treat for a class party, a work thing, or just your own snack plate for movie night? That is exactly where these cookies save me every single year. They are soft, peanut buttery, and they look way more impressive than the effort you actually put in. Plus the kids (and adults) always hover around the tray like it is the main event.
Why You’ll Love These Peanut Butter Spider Cookies
First, they are fast. I can mix the dough in one bowl, and I do not have to chill it forever or fuss with rolling pins.
Second, the flavor is a classic. Peanut butter and chocolate just work, and when you add that little Reese’s cup in the middle, it is basically instant joy.
Third, they are a Halloween craft you can eat. If you have little helpers, letting them place legs and candy eyes is pure fun, even if the spiders come out looking a little goofy.
Also, if you are the type who likes collecting seasonal cookie ideas, you might also like these crisp and pretty German butter cookies for when you want something less spooky and more tea time cozy.
Ingredients for Peanut Butter Spider Cookies
Nothing fancy here, which is part of the charm. I like recipes where I can grab everything at a regular grocery store.
- Creamy peanut butter (not natural runny style if you can help it)
- Butter (softened)
- Brown sugar plus a little granulated sugar
- 1 egg
- Vanilla extract
- All purpose flour
- Baking soda and a pinch of salt
- Reese’s mini cups (or other chocolate centers)
- Melted chocolate or chocolate frosting for the legs
- Candy eyes
If you are already in a peanut butter mood, bookmark these snacky chocolate banana peanut butter bites too. They are great when you want something sweet without turning on the oven.
How to Make Peanut Butter Spider Cookies Step by Step
My quick, no stress method
I keep this simple, because Halloween is not the time for complicated baking drama.
Step 1: Preheat your oven to 350 F. Line two baking sheets with parchment paper.
Step 2: In a big bowl, mix softened butter, peanut butter, and both sugars until it looks creamy and smooth.
Step 3: Mix in the egg and vanilla. Scrape the bowl once so you do not end up with weird butter streaks.
Step 4: Sprinkle in flour, baking soda, and salt. Stir until the dough comes together. It should be soft, not dry.
Step 5: Scoop little balls (about 1 tablespoon each) and place them spaced out on the baking sheet.
Step 6: Bake about 8 to 10 minutes. They should look set at the edges but still a bit soft in the middle.
When they come out, let them sit for 2 minutes on the pan before you do anything. That tiny wait helps them hold together instead of falling apart.
How to Create the Reese’s Spider Cookie Design
This part is the Halloween magic, and it is easier than it looks.
As soon as the cookies come out of the oven and have rested a minute or two, gently press a Reese’s cup right into the center of each cookie. Do not smash it all the way down. You want it snug, not buried.
Then let the cookies cool. The chocolate will get slightly glossy and soft at first, then firm up again as it cools, which makes decorating less messy.
Little tip from my own trial and error: unwrap all the Reese’s cups before you bake. It sounds obvious, but when cookies are hot and you are rushing, you will thank yourself.
How to Add Chocolate Spider Legs and Candy Eyes
For the legs, you have options depending on your patience level.
If I am feeling neat, I melt chocolate chips in the microwave in short bursts, stir until smooth, then spoon it into a zip top bag and snip the tiniest corner. Instant piping bag.
If I am feeling lazy, I use chocolate frosting from a tub. It is thicker, but it still works for spider legs, especially if you do not care about perfect lines.
Pipe 4 legs on each side of the Reese’s cup, so 8 total. Then add two candy eyes on the front. If the eyes will not stick, dab a dot of melted chocolate as glue.
These are meant to look playful, not museum quality. Some of my favorite spiders are the slightly wonky ones.
Expert Tips for Soft and Chewy Peanut Butter Spider Cookies.
I have made Peanut Butter Spider Cookies enough times to learn what actually matters for that soft bite.
Do not overbake. Pull them when the edges look set. The centers will finish cooking as they cool.
Use creamy peanut butter. Crunchy can work, but it changes the texture and makes shaping a little harder.
Scoop evenly. If some cookies are bigger, they bake unevenly, and then you end up with some dry ones and some underdone ones.
Press the candy in gently. If you shove the Reese’s cup down too far, the cookie can crack around it.
And if you love cookies with a bright twist, these basil lime sugar cookies are surprisingly refreshing among all the heavy holiday desserts.
Common Mistakes to Avoid When Making Spider Cookies
I have made all of these mistakes so you do not have to.
Baking too long: This is the number one cookie killer. Ten minutes can be plenty.
Pressing the Reese’s cup too soon: If you press immediately, the cookie is so hot it can spread and crack. Wait that minute.
Hot chocolate legs: If your melted chocolate is super hot and runny, the legs spread into puddles. Let it cool a bit before piping.
Skipping parchment: Peanut butter dough can stick. Parchment keeps cleanup easy and cookies intact.
When in doubt, do a small test batch of 3 cookies first. It takes 10 minutes and saves the whole tray.
Easy Variations for Halloween Spider Cookies
If you want to switch things up, here are a few fun ideas that still keep the spider vibe.
White chocolate spiders: Use white melting wafers for legs, and use dark chocolate Reese’s cups for contrast.
Orange sprinkle dough: Roll the dough balls in orange sanding sugar before baking.
Extra spooky: Add a tiny dot of red gel icing on the candy eyes to make them look a little wild.
Mini spiders: Make smaller dough balls and use mini chocolate kisses instead of Reese’s cups.
If you are making a whole Halloween spread, I also love pairing sweet treats with something savory like this easy butter chicken flatbread for a party table. People always appreciate a break from sugar.
How to Make Peanut Butter Spider Cookies Without Reese’s Cups
Totally doable. Peanut Butter Spider Cookies are flexible, and you can still make the spider look without the classic candy cup.
Here are a few swaps that work well:
Chocolate kiss: Press one into the center just like you would the Reese’s.
Chocolate truffle: Adds a rich center, just keep them chilled until you need them.
Chocolate covered caramel: The gooey middle is fun, just let cookies cool more before adding legs.
Big chocolate chip cluster: Press a few chocolate chips into the center while warm, then add eyes on top once melted.
The spider legs and eyes do most of the visual work anyway, so nobody feels like they are missing out.
How to Make Spider Cookies Ahead of Time
If you are doing party prep, this is what I do.
You can make the dough a day ahead and keep it covered in the fridge. Let it sit on the counter about 20 minutes so it is scoopable again.
You can also bake the cookies ahead, but I usually wait to add the legs and eyes until the day I serve them. The decoration looks fresher and it is less likely to smudge in storage.
If you need to transport them, pack them in a single layer if you can. Those legs are cute, but they are a bit delicate.
How to Store Peanut Butter Spider Cookies
I store Peanut Butter Spider Cookies in an airtight container at room temperature. They stay soft for about 3 to 4 days, depending on how warm your kitchen is.
If your house is dry and you are worried about them drying out, toss a slice of bread into the container for a day. The cookies pull a little moisture from it and stay softer. Old school trick, but it works.
Try not to stack them too high unless the chocolate is fully set, or you might end up with spider leg tattoos on the tops of the cookies.
Can You Freeze Peanut Butter Spider Cookies?
Yes. Peanut Butter Spider Cookies freeze surprisingly well.
I prefer freezing them undecorated. Bake, cool completely, then freeze in a freezer safe container with parchment between layers. They are good for about 2 months.
When you are ready, thaw at room temperature, then add the legs and eyes. The cookies taste fresher that way, and the candy eyes do not get weird from freezer moisture.
If you already decorated them, you can still freeze them, just expect a few legs to snap. I call that realistic spider drama.
How to Serve Halloween Spider Cookies
This is the fun part. I like leaning into the theme without making it stressful.
- Serve on a dark plate with a little sprinkle of cocoa powder for a spooky look
- Add them to a Halloween snack board with pretzels, grapes, and popcorn
- Pair with warm cocoa or cold milk for the easiest dessert moment ever
- Wrap two cookies in a clear bag and tie with orange ribbon for party favors
I usually make a double batch because they disappear fast, especially if kids are involved. Adults pretend they only want one, then quietly come back for another.
Common Questions
Can I use natural peanut butter?
You can, but the dough can be looser and the cookies may spread more. If it looks oily, stir the jar really well and consider adding 1 to 2 extra tablespoons of flour.
Usually the cookie was too hot or you pressed too hard. Let them rest a minute or two, then press gently.
Do I have to use candy eyes?
Nope. You can pipe two little dots of white chocolate instead, or even use mini chocolate chips as eyes.
How do I keep the chocolate legs from melting or smearing?
Let the cookies cool fully before decorating, and let the legs set at room temp for at least 20 minutes before packing them up.
Can I make these gluten free?
Yes, a 1 to 1 gluten free baking flour usually works fine here. Just watch the dough texture and add a spoonful of flour if it feels sticky.
A sweet, spooky send off
If you make Peanut Butter Spider Cookies this Halloween, I really think you will love how simple they are for how cute they look on the table. Soft centers, chocolate on top, and just enough decorating to feel festive without turning into a huge project. If you want more ideas and another take on the same classic, check out Peanut Butter Spider Cookies – The First Year Blog and Peanut Butter Spider Cookies – Ella Claire & Co.. Make a batch, put on a Halloween movie, and let the spiders take over your kitchen in the best way. You have totally got this.
Print
Peanut Butter Spider Cookies
- Total Time: 25 minutes
- Yield: 24 cookies 1x
Description
These Peanut Butter Spider Cookies are a fun and cute Halloween treat that are quick to make and perfect for parties!
Ingredients
Cookie Base
- 1 cup Creamy peanut butter (Not natural runny style if possible)
- 1/2 cup Butter, softened
- 1/2 cup Brown sugar
- 1/4 cup Granulated sugar
- 1 large Egg
- 1 teaspoon Vanilla extract
- 1 1/4 cups All-purpose flour
- 1 teaspoon Baking soda
- 1/4 teaspoon Salt
Decorations
- 12 pieces Reese’s mini cups (For centers)
- 1/2 cup Melted chocolate or chocolate frosting (For spider legs)
- 12 pieces Candy eyes
Instructions
Preparation
- Preheat your oven to 350°F (175°C). Line two baking sheets with parchment paper.
- In a large bowl, mix softened butter, peanut butter, and both sugars until creamy and smooth.
- Mix in the egg and vanilla. Scrape the bowl to avoid butter streaks.
- Add flour, baking soda, and salt. Stir until the dough comes together; it should be soft, not dry.
- Scoop balls of dough (about 1 tablespoon each) and place them spaced out on the baking sheet.
Baking
- Bake about 8 to 10 minutes until set at the edges but still soft in the middle.
- Let them sit for 2 minutes on the pan before moving to a cooling rack.
Decorating
- Press a Reese’s cup gently into the center of each cookie right after removing from the oven.
- Let the cookies cool, then decorate with melted chocolate as legs and add candy eyes.
Notes
Store cookies in an airtight container at room temperature for 3 to 4 days. For longer storage, freeze undecorated cookies for up to 2 months.
- Prep Time: 15 minutes
- Cook Time: 10 minutes
- Category: Dessert, Halloween, Snack
- Cuisine: American
Nutrition
- Calories: 150
- Sugar: 8
- Sodium: 100
- Fat: 7
- Saturated Fat: 3
- Carbohydrates: 18
- Fiber: 1
- Protein: 3

Related posts:
 Sakura Mochi: A Japanese Dessert You Can Easily Make at Home
 Deliciously Simple Candied Orange Slices
 Decadent Hot Cross Bun Recipe
 Irresistibly Super Moist Chocolate Chip Banana Bread Recipe
 Crispy Air Fryer Churro Bites- Sweet & Simple
 Vegan Gluten-Free Lemon Sandwich Cookies with Lemon Curd (Easy Healthy Recipe)





 Appetizers & Sides
 Main Dishes
 Drinks & Wellness
 Desserts & Baking