
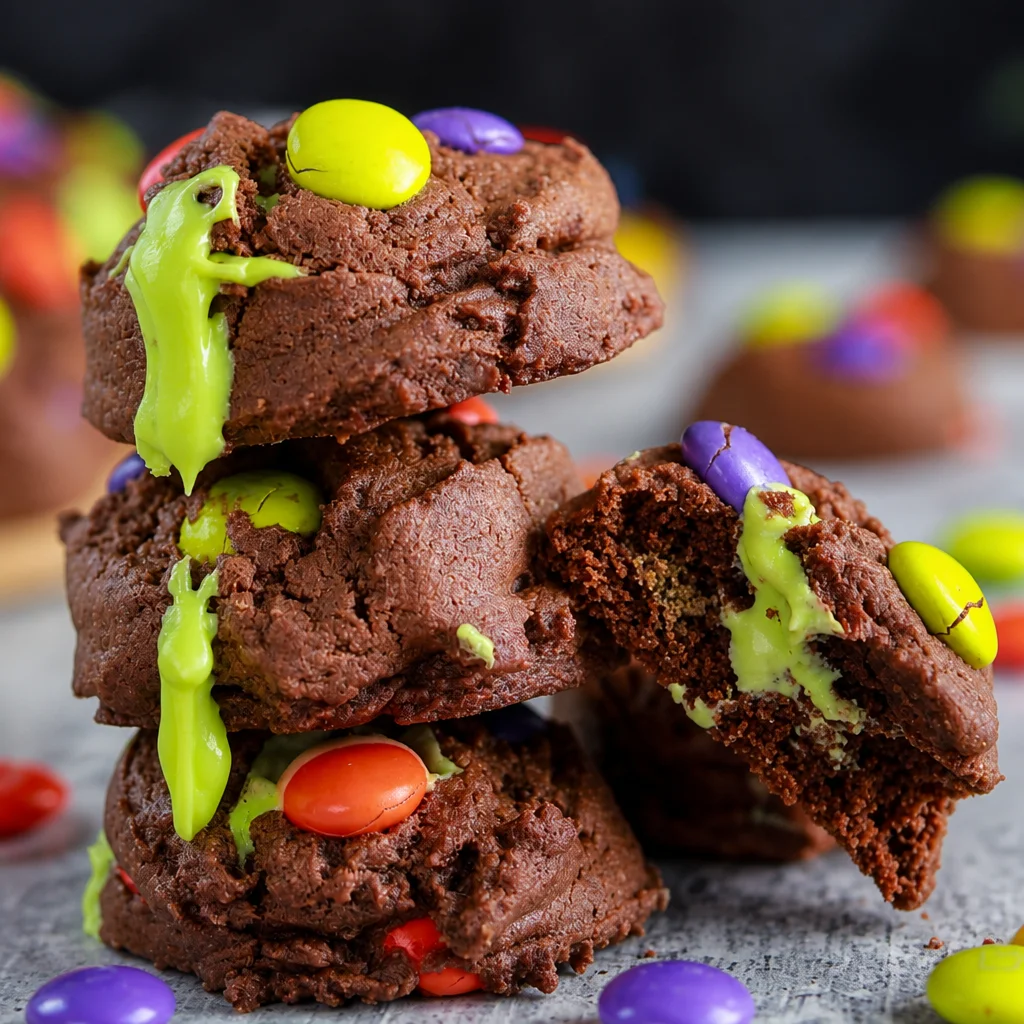
Spooky Halloween Cookies are my go to fix for that classic October problem: you want something cute and festive, but you do not want to spend all night decorating like you are on a baking show. I also wanted a cookie that feels fun the second you bite in, not just something pretty on the outside. So I started making these soft chocolate cookies with a gooey green witches brew surprise tucked inside. They look innocent, then boom, the filling oozes out and everybody gets weirdly excited. If you are baking with kids or bringing a tray to a party, this is the one.
What Makes These Hocus Pocus Halloween Cookies So Special
First, they are genuinely easy. The dough is one bowl friendly, and the filling is just a quick frosting that turns into that witchy slime vibe once you sandwich it inside.
Second, the texture is exactly what I want in Spooky Halloween Cookies: **soft centers**, slightly crisp edges, and a surprise that makes people laugh when they break one open.
Third, they are customizable without turning into a craft project. You can keep it simple with a few candies on top, or go wild if you are feeling extra. If you love the whole spooky dessert vibe, you might also like these spooky pumpkin cookies for something a little cozier and less chocolatey.
Ingredients for Chocolate Slime Filled Halloween Cookies
I am going to keep this practical and realistic, like what you can actually grab at a normal grocery store. Here is what you will need.
- Butter (softened, not melted)
- Brown sugar and a little white sugar
- 1 egg
- Vanilla extract
- All purpose flour
- Cocoa powder (unsweetened)
- Baking soda
- Salt
- Powdered sugar (for the filling)
- Milk or cream (just a splash to loosen the frosting)
- Green food coloring
- Optional: a tiny drop of peppermint or almond extract for a potion like twist
- M and M candies for decorating
Quick tip: if your cocoa is super dark, the cookies will look extra spooky. If it is a lighter cocoa, they still taste great, they just look more like classic chocolate cookies.
How to Make the Chocolate Halloween Cookie Dough
This is the part that makes the whole recipe feel doable on a weeknight.
Start by creaming the softened butter and sugars until it looks kind of fluffy. You do not need a fancy mixer, but it does help. Then mix in the egg and vanilla until it looks smooth.
In a separate bowl, stir together flour, cocoa powder, baking soda, and salt. Add the dry ingredients into the wet and mix just until you do not see dry flour anymore. The dough will look dark and thick, and that is exactly right.
If your kitchen is warm and the dough feels sticky, pop it in the fridge for 20 to 30 minutes. It makes shaping the cookies way less annoying.
How to Bake Soft and Chewy Halloween Cookies
The biggest trick for soft cookies is not overbaking. I know it is tempting to wait until they look fully done, but that is how you end up with crunchy little hockey pucks.
Heat your oven to 350 F. Scoop the dough into balls and space them out on a lined baking sheet. Bake until the edges look set but the centers still look a tiny bit underdone, usually around 9 to 11 minutes depending on your oven and cookie size.
Let them cool on the pan for a few minutes first. They finish setting up as they cool, and you will keep that chewy center. This is the foundation for your Spooky Halloween Cookies, so do not rush it.
How to Make the Green Witches’ Brew Frosting
This frosting is basically a quick buttercream, but we are aiming for gooey and dramatic, not perfectly piped roses.
Beat softened butter with powdered sugar, then add a splash of milk or cream. Start small. You can always add more, but you cannot un add it. Add green food coloring until it looks like something a cartoon witch would proudly stir in a cauldron.
If you want the filling to feel extra slime like, make it a little looser than normal frosting. When you sandwich it inside the cookies, it squishes out in the best way.
How to Fill Halloween Cookies With Gooey Green Slime Frosting
Make sure your cookies are fully cool before filling. If they are warm, the frosting will melt and slide everywhere, and not in a cute way.
Pair up cookies by size so your sandwiches look neat. Spread or spoon a thick ring of green frosting onto the flat side of one cookie, then add a little extra in the middle. Press the second cookie on top gently until you see the filling peek out at the edges.
These are the moments I love most when making Spooky Halloween Cookies, because you can already tell they are going to get a reaction when someone bites in.
How to Decorate Halloween Cookies With M&M Candies
This is the easy win. I like using M and M candies because they are bright, they stick easily, and they scream Halloween without needing a piping bag.
You can press a few M and Ms on top right after baking when the cookies are still warm and soft, or you can add them after filling by placing a few into the visible frosting edge. Either way, do not overthink it. A little messy looks fun here.
If you are building a bigger dessert table, these pair really well with something crunchy like bloody red velvet popcorn for Halloween. Sweet plus crunchy is such a good combo at parties.
Tips for Perfect Halloween Cookies Every Time
Here are the things I have learned after making these more times than I want to admit.
Use softened butter, not melted. Melted butter can make the cookies spread too much.
Do not overmix once the flour goes in. Overmixing can make cookies tough.
Chill the dough if it feels sticky. Even 20 minutes helps.
Underbake slightly for that soft center. The cookie should not look dry all over when you pull it out.
Cool completely before filling so your witches brew stays thick and gooey, not runny.
Halloween Cookie Variations and Fun Decorating Ideas
If you want to switch things up, here are a few ideas that still keep the recipe simple.
Make the filling purple or orange instead of green. The gooey surprise still works, it just looks like a different potion.
Add mini chocolate chips to the dough for extra chocolate. Or swap in chopped candy bars if you want a sweeter bite.
Turn them into monster cookies with candy eyes. Two eyes always gets a laugh.
If you are into super playful Halloween treats, you should also peek at these spooky marshmallow Halloween brains. They are gross in the best way, especially for kids.
How to Make These Halloween Cookies Ahead of Time
This recipe is actually pretty friendly for planning ahead, which I appreciate when October gets busy.
You can make the dough a day or two in advance and keep it covered in the fridge. When you are ready, scoop and bake like normal. You can also bake the cookies ahead, let them cool, and fill them the day you are serving so the centers stay extra gooey.
If you want a warm dessert option for movie night, this spooky pizookie recipe for Halloween is also a great make ahead style treat because you can prep everything and bake it fresh.
How to Store and Freeze Halloween Cookies
If the cookies are filled, store them in an airtight container. I like to keep them in the fridge if my kitchen is warm, because the frosting holds up better. Let them sit out for 10 minutes before serving so the cookies soften back up.
To freeze, I recommend freezing the cookies unfilled. Put baked cooled cookies in a freezer bag with parchment between layers. They keep well for about 2 months. Thaw at room temp, then add the witches brew frosting fresh for the best gooey center.
How to Serve Hocus Pocus Cookies for Halloween Parties
These are a total party cookie because you get that dramatic center without needing plates and forks.
- Stack them on a big tray with a few plastic spider rings scattered around
- Serve with cold milk, hot cocoa, or cider
- Set out extra green frosting in a small bowl for people who want more slime
- Cut one cookie in half and place it front and center so people see the gooey surprise
If you are packing them for school events or potlucks, bring them chilled and let them sit out right before serving. That way the filling stays put during travel.
More Easy Halloween Desserts and Spooky Treats
I love having a few options on hand, because not everyone wants the same level of chocolate and sugar. If you are building a little Halloween menu, mix textures and flavors. Do one gooey thing, one crunchy thing, and one cute thing.
These Spooky Halloween Cookies cover the gooey part perfectly. Add something light like fruit, or something salty like popcorn, and you have a full spread with almost no stress.
Common Questions
Can I make these cookies without food coloring?
Yes. The filling will just be pale instead of witch green, but it still tastes great. You can also tint it with a tiny bit of matcha for natural color if you like that flavor.
Why did my cookies spread too much?
Usually it is butter that was too warm or dough that was not chilled. Next time, chill the dough 20 to 30 minutes and make sure your baking sheet is cool before the next batch.
Can I use store bought frosting for the filling?
You can, and I have done it when I was in a rush. Stir it well and add green coloring if needed. The flavor is a bit sweeter, but it works.
How do I keep the center really gooey?
Make the frosting slightly looser with a splash of milk, then do not overfill. A thick ring plus a little extra in the middle gives you that ooze without making a mess.
Are these okay to make with kids?
Totally. Kids can help scoop dough, press in candies, and mix the green potion. I just handle the oven part.
A Cozy Little Send Off and A Few More Ideas
If you try these Spooky Halloween Cookies, do yourself a favor and break one open before you serve them, just to see that green gooey middle. It is half the fun. Keep the bake time short, let them cool, and go heavy on the **witches brew frosting** for the best surprise. If you want even more cookie inspiration, I really like browsing recipes like Spooky Halloween Cookies Recipe – Handle the Heat and Spooky Cookies – Love to be in the Kitchen when I am planning a Halloween dessert table. Now go make a batch and let somebody take the first bite, because that reaction is priceless.
Print
Chocolate Slime Filled Halloween Cookies
- Total Time: 40 minutes
- Yield: 24 cookies 1x
Description
These Spooky Halloween Cookies feature soft chocolate cookies with a gooey green witches brew surprise, perfect for Halloween parties with kids or festive gatherings.
Ingredients
- 1 cup softened butter (not melted)
- 1 cup brown sugar
- 0.5 cup white sugar
- 1 large egg
- 1 teaspoon vanilla extract
- 2.5 cups all purpose flour
- 0.5 cup cocoa powder (unsweetened)
- 1 teaspoon baking soda
- 0.5 teaspoon salt
For the frosting
- 2 cups powdered sugar
- 2 tablespoons milk or cream (just a splash to loosen the frosting)
- 5 drops green food coloring
- 1 drop peppermint or almond extract (optional for flavor)
- 1 cup M and M candies (for decorating)
Instructions
- Cream the softened butter and sugars until fluffy.
- Mix in the egg and vanilla until smooth.
- In a separate bowl, combine flour, cocoa powder, baking soda, and salt.
- Add the dry ingredients into the wet ingredients and mix until no dry flour remains.
- If the dough is sticky, chill it in the fridge for 20 to 30 minutes.
- Preheat the oven to 350°F (175°C).
- Scoop dough into balls and place on a lined baking sheet with space between them.
- Bake for 9 to 11 minutes, until edges are set but centers are still slightly underdone.
- Cool on the baking sheet for a few minutes before transferring to a wire rack.
Make the frosting
- Beat softened butter with powdered sugar.
- Add milk or cream and mix until desired consistency is reached.
- Add green food coloring to achieve a vibrant slime effect.
- Ensure cookies are fully cool before filling.
- Pair cookies by size and spread a thick ring of green frosting on one cookie, adding extra in the center.
- Press the second cookie on top, allowing the filling to peek out at the edges.
Decorate
- Press M and M candies onto the cookies right after baking or after filling.
Notes
Use softened butter for best results. Do not overbake cookies if you want them soft and chewy. Can be made ahead and chilled before baking.
- Prep Time: 30 minutes
- Cook Time: 10 minutes
- Category: Dessert, Snack
- Cuisine: American, Halloween
Nutrition
- Calories: 150
- Sugar: 10
- Sodium: 100
- Fat: 7
- Saturated Fat: 4
- Carbohydrates: 20
- Fiber: 1
- Protein: 2

Related posts:
 Deliciously Simple Candied Orange Slices
 Decadent Hot Cross Bun Recipe
 Irresistibly Super Moist Chocolate Chip Banana Bread Recipe
 Crispy Air Fryer Churro Bites- Sweet & Simple
 Vegan Gluten-Free Lemon Sandwich Cookies with Lemon Curd (Easy Healthy Recipe)
 Monkey Bread with Biscuits and Cinnamon Sugar





 Appetizers & Sides
 Main Dishes
 Drinks & Wellness
 Desserts & Baking