
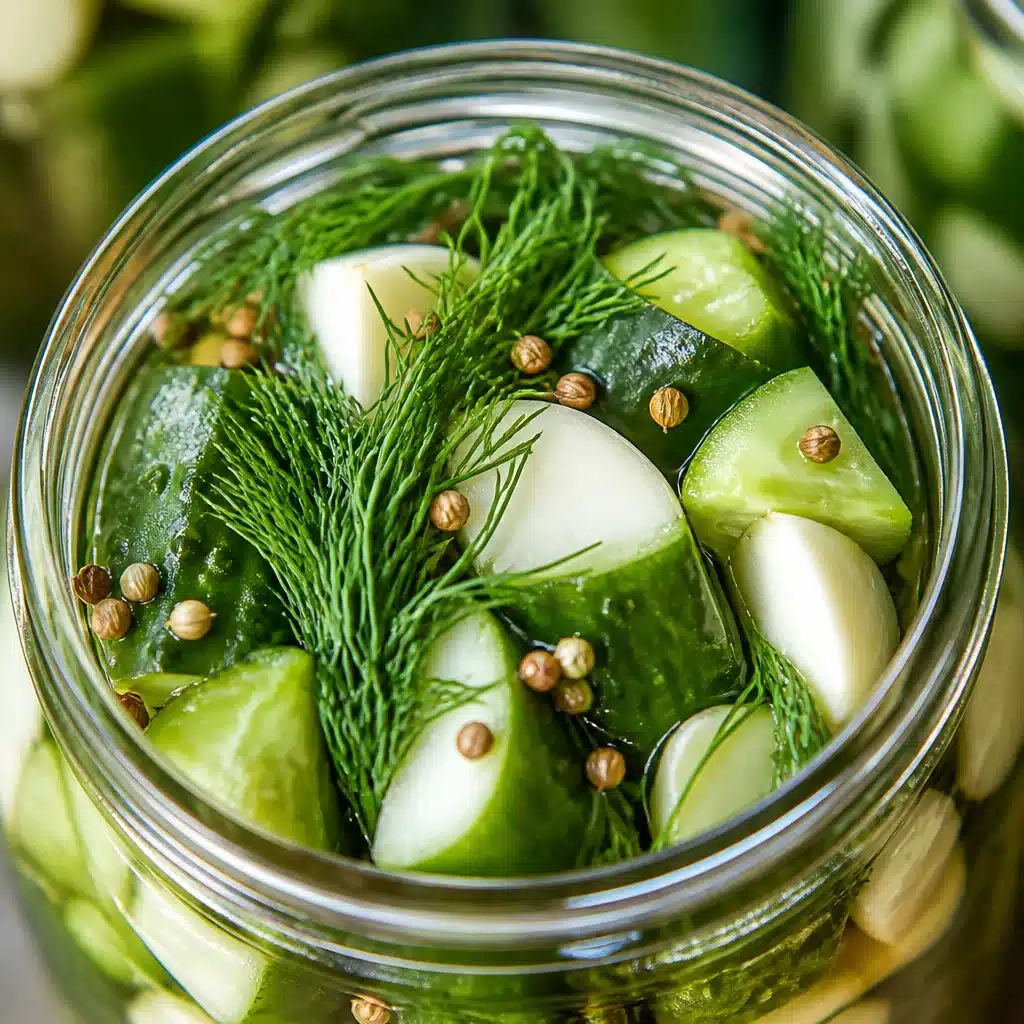
Kosher Dill Pickles are one of those things I used to buy without thinking, until I had a batch that tasted kind of flat and, honestly, a little floppy. If you have ever opened a jar and felt that tiny heartbreak when the pickle is soft, you are not alone. The good news is that crunchy homemade pickles are not complicated, and you do not need fancy gear to make them happen. You just need the right cucumbers, a solid brine, and a couple of little habits that make a big difference. I am going to walk you through exactly how I make my favorite jar at home, with that bold garlicky dill flavor and a clean snap.
Why You’ll Love These Homemade Kosher Dill Pickles
These are my go to pickles for sandwiches, snack plates, and late night fridge rummaging. They taste like the deli kind, with lots of **garlic**, **dill**, and a brine that is salty and tangy without being harsh.
I also love that you can control everything. Want them more garlicky? Add another clove. Want more bite? Add peppercorns and a pinch of red pepper flakes. And because this is a refrigerator style recipe, it is low stress and very forgiving.
If you are the kind of person who also loves crunchy pickle snacks, you might want to check out my air fryer fried pickles for a fun way to use up a jar once they are ready.
Ingredients for Classic Kosher Dill Pickles
Here is what you need. This list is simple on purpose. The magic is in fresh cucumbers and a brine that is balanced.
- 2 pounds small pickling cucumbers (Kirby cucumbers are perfect)
- 3 cups water
- 3 cups white vinegar (5 percent acidity)
- 3 tablespoons kosher salt (not table salt)
- 1 tablespoon sugar (optional, but it rounds out the sharp edge)
- 6 to 8 garlic cloves, lightly smashed
- 2 to 3 heads fresh dill (or a big handful of dill sprigs)
- 1 teaspoon whole black peppercorns
- 1 teaspoon mustard seeds (optional but very classic)
- 1 to 2 bay leaves (optional)
- Optional for crunch: 1 to 2 grape leaves or a pinch of pickle crisp (calcium chloride)
About the salt: **kosher salt** is the move here because it dissolves well and tastes clean. If you swap in table salt, your brine can taste too harsh and sometimes cloudy.
How to Choose the Best Cucumbers for Dill Pickles
This part matters more than people think. The best homemade pickles start with the right cucumber, and the wrong ones will fight you no matter how perfect your brine is.
Here is what I look for at the store or farmers market:
Size: small to medium cucumbers, about 3 to 5 inches long. Big cucumbers tend to have more seeds and softer centers.
Texture: firm, bumpy skins. If they bend easily, skip them.
Freshness: same day is best. If they have been sitting around for a week, they will not stay crisp.
If you grow cucumbers, pick them early in the day and get them into brine quickly. That is one of those tiny steps that makes your Kosher Dill Pickles taste like you know what you are doing.
How to Make Homemade Pickle Brine
This brine is a classic half and half mix of water and vinegar. It makes a pickle that is bright, tangy, and not overwhelmingly sour.
In a pot, add water, vinegar, kosher salt, and sugar (if using). Bring it just to a simmer, then stir until the salt dissolves. That is it. No need to boil it like crazy.
Let the brine cool for about 10 to 15 minutes. I like it warm when it hits the jars, but not scorching hot. Warm brine helps the flavors start to mingle quickly while still keeping the cucumbers crisp in the fridge.
How to Prepare Jars and Fresh Dill for Pickling
Since we are doing refrigerator pickles, you do not need full canning equipment. You do need clean jars with tight fitting lids.
What I do:
Wash jars and lids with hot soapy water, then rinse well. If you want to be extra careful, you can pour boiling water into the jars, then dump it out and let them air dry.
For the dill, rinse it and pat it dry. I like using whole dill heads if I can find them because they feel extra old school and they perfume the jar like crazy. Dill sprigs work great too.
How to Make Classic Kosher Dill Pickles Step by Step
This is the part where it all comes together. Put on a podcast, take your time, and your kitchen is about to smell amazing.
Step 1: Wash cucumbers well. Trim a thin slice off the blossom end of each cucumber. That blossom end can carry enzymes that soften pickles, so I never skip this.
Step 2: Pack the jars. Add dill, garlic, peppercorns, and mustard seeds to the bottom. Then pack cucumbers in snugly. If you want spears, slice them lengthwise first.
Step 3: Pour brine over. Cover the cucumbers completely. Leave a little space at the top of the jar so it closes easily.
Step 4: Tap and settle. Gently tap the jar on the counter to release air bubbles. Add a bit more brine if needed.
Step 5: Chill. Close the lid and refrigerate. They start tasting like pickles in about 24 hours, but they are best after 3 to 5 days.
Once your Kosher Dill Pickles are ready, they are basically begging to be tucked into sandwiches. If you want a pickle friendly meal idea, my crispy dill chicken sandwich recipe is seriously made for this moment.
Tips for Making Crunchy, Flavorful Dill Pickles
Crunch is the whole point, right? Here are my best real life tips that actually work.
Start with cold cucumbers. If they are not super fresh, soak them in ice water for 1 to 2 hours before pickling.
Trim the blossom end. I said it already, but it is that important.
Do not overheat the brine. Boiling hot brine can soften cucumbers faster.
Pack tightly. Less floating means more even pickling.
Use grape leaves or pickle crisp if you want insurance. Grape leaves have tannins that help keep things firm. Pickle crisp is easy and reliable if you keep it in the pantry.
How to Keep Homemade Dill Pickles Crisp
If you have ever made pickles that taste great but feel a little soft, it is usually one of these issues.
First, the cucumbers were not fresh enough. Second, the blossom end was not trimmed. Third, they sat in the fridge for a long time and slowly lost that snap.
My personal crisp routine looks like this: fresh Kirby cucumbers, ice water soak if needed, blossom end trimmed, and brine that is warm but not boiling. If I am making a big batch for a party, I add a small pinch of pickle crisp. It is not cheating, it is just being practical.
Refrigerator Dill Pickles vs. Canned Dill Pickles
Refrigerator pickles are what we are doing here. They are quick, easy, and perfect if you want pickles this week without the whole canning setup.
Here is the simple breakdown, and yes I made this because I used to get confused about it too.
Refrigerator pickles: stored in the fridge, ready fast, super crisp, best eaten within a few weeks.
Canned pickles: shelf stable, great for long term storage, but they take more time and care to process safely.
If you fall in love with making Kosher Dill Pickles and want to go deeper later, you totally can. For now, the fridge version gives you that deli vibe with minimal fuss.
Easy Variations for Garlic, Spicy, and Extra-Sour Dill Pickles
This is where you can have fun without messing up the basics.
Garlic lovers: double the garlic. I will not judge. Add one clove sliced for stronger garlic flavor.
Spicy: add 1 teaspoon red pepper flakes, or a sliced jalapeno, or a few dried chiles.
Extra sour: use a little more vinegar, like 3.5 cups vinegar and 2.5 cups water. It is punchier, so if you are new to pickling, try the classic ratio first.
And if you love quick, crispy weeknight food that pairs well with pickles, my crispy vegetarian quesadillas are amazing with a few pickle spears on the side. That salty tang cuts through the cheesy goodness in the best way.
How to Make Dill Pickles With Garden-Fresh Vegetables
Once you have the brine down, you can pickle more than cucumbers. I do this when my garden is going a little wild or when I have random produce in the fridge drawer.
Try adding small amounts of these along with cucumbers:
Green beans: they turn into crunchy dilly beans.
Carrot sticks: sweet and snappy.
Cauliflower florets: great for snack plates.
Radishes: peppery and bright.
Just keep pieces similar in size so everything pickles evenly. And if you are in a cucumber mood but want something fresh, not pickled, my easy cucumber dill salad recipe is a nice little side dish to keep in your back pocket.
How to Store Homemade Kosher Dill Pickles
Store the jars in the refrigerator, always. Keep the cucumbers under the brine so the tops do not dry out or get weird.
A few storage tips I have learned the hard way:
Use clean utensils. No fingers in the jar, no used forks. That is how you keep the brine fresh.
Keep lids tight. It helps the flavors stay strong and keeps your fridge from smelling like dill in a way that takes over everything.
Label your jar. A tiny piece of tape with the date saves you from guessing later.
After a few days, the flavor will deepen, the garlic mellows, and the dill really settles in. This is when Kosher Dill Pickles start disappearing fast in my house.
How Long Do Homemade Dill Pickles Last?
In the fridge, they are at their best for about 2 to 3 weeks. They can last up to a month if you are careful with clean utensils and keep everything submerged, but the crunch slowly fades over time.
If anything smells off, looks slimy, or the brine turns cloudy in a suspicious way, toss them. Trust your senses. Pickles should smell sharp, garlicky, and clean.
Common Questions
Can I use regular cucumbers instead of pickling cucumbers?
You can, but they are more watery and usually softer. If you do it, choose the smallest, firmest ones and eat them sooner.
Do I have to boil the brine?
Nope. You just need the salt dissolved. A gentle simmer is plenty.
Why did my pickles turn out soft?
Usually old cucumbers, skipping the blossom end trim, or using very hot brine. A quick ice water soak helps too.
How soon can I eat them?
You can snack after 24 hours, but the best flavor shows up around day 3 to 5.
Can I reuse the brine?
I do not recommend it for a full new batch. It gets diluted and the flavor balance is off. Better to make fresh brine.
A friendly little push to go make a jar
If you have been chasing that crunchy, deli style bite, this is the batch to try. Keep it simple, use fresh cucumbers, and give the jar a few days to work its magic. If you decide you want to explore the canning route later, this Kosher Dill Pickles: Canning Recipe – Grow Forage Cook Ferment is a great read, and I also love the cozy, classic approach in Favorite Kosher Dill Pickles – Lana’s Cooking. For now, grab a handful of dill and some garlic, and make your fridge a happier place. Once you taste a fresh homemade pickle with real crunch, it is hard to go back.
Print
Classic Kosher Dill Pickles
- Total Time: 30 minutes
- Yield: 10 servings 1x
Description
Crunchy homemade pickles with bold garlicky dill flavor, perfect for sandwiches and snacks.
Ingredients
Cucumbers and Dill
- 2 pounds small pickling cucumbers (Kirby cucumbers are perfect) (Choose firm, bumpy-skinned cucumbers.)
- 2 to 3 heads fresh dill (or a big handful of dill sprigs) (Whole dill heads are preferred.)
Brine Ingredients
- 3 cups water (Ideal for the brine.)
- 3 cups white vinegar (5 percent acidity) (For a tangy flavor.)
- 3 tablespoons kosher salt (Not table salt, as it tastes harsh.)
- 1 tablespoon sugar (optional) (Balances the sharpness.)
Spices
- 6 to 8 cloves garlic (lightly smashed) (Add more for a stronger garlic flavor.)
- 1 teaspoon whole black peppercorns (For added flavor.)
- 1 teaspoon mustard seeds (optional) (Adds a classic touch.)
- 1 to 2 pieces bay leaves (optional) (Enhances the brine.)
- 1 to 2 pieces grape leaves (optional) (Helps keep the pickles crisp.)
Instructions
Preparation
- Wash cucumbers well and trim a thin slice off the blossom end of each cucumber.
- In a pot, combine water, vinegar, kosher salt, and sugar (if using). Bring to a gentle simmer, stirring until salt dissolves. Allow to cool for 10 to 15 minutes.
- Wash jars and lids with hot soapy water, then rinse well.
- Rinse dill and pat dry.
Packing the Jars
- Add dill, garlic, peppercorns, and mustard seeds to the bottom of each jar.
- Pack cucumbers snugly into the jars. If using spears, slice them lengthwise first.
- Pour brine over the cucumbers, covering them completely while leaving a little space at the top.
- Gently tap the jar on the counter to release air bubbles and add more brine if needed.
Storing and Chilling
- Close the lids and refrigerate. Let them chill for at least 24 hours for initial flavor, best after 3 to 5 days.
Notes
Use fresh cucumbers and avoid boiling brine to maintain crispness. Store in the fridge and consume within 2 to 3 weeks for best quality.
- Prep Time: 30 minutes
- Category: Condiment, Snack
- Cuisine: American, Deli
Nutrition
- Calories: 10
- Sodium: 150
- Carbohydrates: 2

Related posts:
 Spring Salad with Goat Cheese for Easter – Light, Colorful & Delicious
 Make-Ahead Holiday Appetizers Everyone Loves (Easy Finger Foods for Parties)
 The Best Basil Aioli Recipe with Fresh Basil and Garlic
 Easy Sautéed Mushrooms Recipe with Garlic Butter
 Best Cucumber Ranch Crack Salad (Creamy, Crunchy & Ready in 10 Minutes)
 Italian Crispy Breaded Eggplant Recipe





 Appetizers & Sides
 Main Dishes
 Drinks & Wellness
 Desserts & Baking