
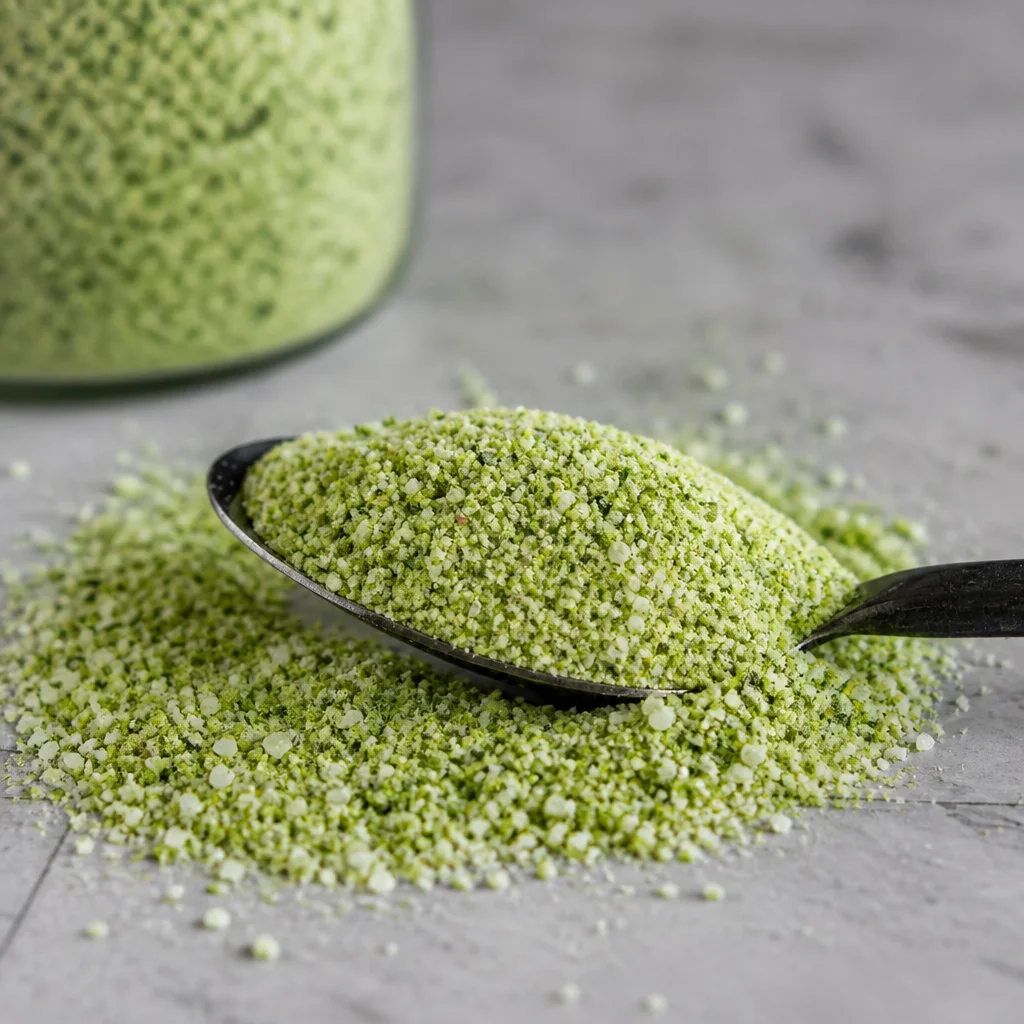
Jalapeño Salt has saved my dinner more times than I can count. You know those nights when you taste your food and it feels flat, like it needs something but you do not want to start a whole new sauce situation? This is the quick fix that makes eggs, veggies, chicken, and even popcorn taste like you actually tried. I started making it after I got tired of paying for tiny jars of “spicy finishing salt” that barely had any heat. Once you make your own, you will want a jar within arm’s reach at all times.
Why You’ll Love This Homemade Jalapeño Salt
This is one of those recipes that feels almost too easy for how useful it is. The flavor is clean and bright, not muddy, and it gives food a gentle kick that you can control. I love that it turns plain ingredients into something snacky and exciting.
Here is what makes it a keeper in my kitchen:
It is fast to use. You sprinkle, taste, and you are done.
It is budget friendly. A couple jalapeños and a cup of salt makes a generous batch.
It reduces waste. Got jalapeños getting soft in the fridge? This is their glow up.
If you are into fun salts, you might also like the color trick vibe of this blue salt trick recipe. I made it once for a dinner party and people kept asking what it was.
Ingredients You’ll Need to Make the Best Jalapeño Salt
You only need two main ingredients, plus a couple optional add ins if you want to play around.
- Fresh jalapeños (about 6 to 8 medium)
- Salt (1 cup)
- Optional: 1 teaspoon garlic powder
- Optional: zest of 1 lime
That is it. And yes, you can scale it up or down depending on how many peppers you have. If you want it milder, use fewer jalapeños or scrape out the seeds and ribs before drying.
Choosing the Best Jalapeños and Salt for Maximum Flavor
Let us talk about flavor, because not all jalapeños are the same. I like jalapeños that are glossy, firm, and deep green. If they have little white lines or “stretch marks,” they are often a bit hotter. Not always, but it is a good hint.
Now the salt. You can use regular table salt, but I really prefer a coarser salt because it blends better and feels nicer between your fingers. Kosher salt is my usual. Sea salt is also great. If you are curious about mineral rich salts, I have tried this Celtic salt trick and it is a fun read if you like experimenting with different textures.
My best advice is: pick a salt you already like the taste of. Since the recipe is so simple, the salt is not just a background player. It is basically the stage.
How to Make Jalapeño Salt Step by Step
This is my no stress method. I am going to write it like I would explain it to a friend in my kitchen.
Step 1: Wash and slice the jalapeños.
Rinse them well and pat dry. Slice into thin rounds. The thinner they are, the faster they dry.
Step 2: Decide your heat level.
If you want it spicy, keep the seeds and ribs. For a gentler heat, scrape most of them out. I usually do a mix because I like a little surprise but not a full meltdown.
Step 3: Dry the jalapeños.
Use a dehydrator at 135 F until fully dry and brittle, usually 6 to 10 hours depending on thickness. If you are using an oven, do the lowest temp your oven can handle and keep the door cracked a bit. More on that later.
Step 4: Blend with salt.
Once the jalapeños are completely dry, add them to a spice grinder or blender with the salt. Pulse until you like the texture. I like it mostly fine with a few little flecks.
Step 5: Taste and adjust.
This is important. Sprinkle a pinch on a cucumber slice or a piece of bread with butter. If you want more kick, blend in more dried jalapeño. If it is too spicy, add more salt.
Expert Tips for Perfect Homemade Jalapeño Seasoning Salt
I have made a few batches that were “fine” and a few that were wow. The difference is usually the small details.
Make sure the peppers are truly dry. If they still bend even a little, they can add moisture to your salt and cause clumping.
Let the peppers cool before grinding. Warm peppers can release a bit of steam in the grinder, and again, moisture is the enemy.
Grind in short pulses. Continuous blending can warm the mixture and make it clump.
Start with less pepper than you think. You can always add more dried jalapeño, but you cannot un spice it.
Also, open your grinder carefully the first time. The spicy aroma can hit you right in the face, and it is a lot. I learned that one the hard way while leaning in for a dramatic sniff.
Recipe Variations (Smoked, Habanero, Serrano, Garlic, Lime & Herb Jalapeño Salt)
Once you get the base down, you will start thinking of all the ways to tweak it. Here are my favorites.
Smoked: Use smoked salt or add a pinch of smoked paprika.
Habanero: Swap in 1 to 2 dried habaneros for serious heat. Go slow.
Serrano: Serranos make it brighter and sharper. Great on tacos.
Garlic: Add 1 to 2 teaspoons garlic powder. This one disappears fast in my house.
Lime: Add lime zest, but only if you will use the salt within a couple weeks because zest can soften the mix over time.
Herb: Add dried cilantro, oregano, or parsley. Keep the herbs fully dried and crush them well.
If you like playing with different salt styles, this Japanese pink salt recipe is another fun one to keep on your radar. It is totally different from Jalapeño Salt, but it scratches the same “homemade pantry upgrade” itch.
Delicious Ways to Use Jalapeño Salt on Everyday Foods
This is where it gets fun. I use Jalapeño Salt the way other people use plain salt, just with more excitement. It is especially good when food feels a little boring or too rich and needs a pop.
My everyday favorites:
Eggs: scrambled, fried, hard boiled, all of them.
Avocado toast: sprinkle on top with a squeeze of lemon.
Roasted vegetables: especially potatoes, carrots, and cauliflower.
Chicken: use it as the final seasoning right when it comes off the heat.
Popcorn: add a little butter and a light shower of this salt. Dangerous.
Fruit: yes, fruit. Try it on mango or pineapple for a sweet spicy thing.
I also love it on tortilla chips with lime juice when I want a snack but I do not want to cook. It tastes like you bought something fancy, but you did not.
How to Store Homemade Jalapeño Salt and Keep It Fresh
Storage is simple, but it matters. The big goal is keeping moisture out so it stays free flowing.
Use a clean, dry jar with a tight lid. I like small glass jars so I am not opening a huge container every time I cook. Keep it in a cool, dark spot like a pantry or cabinet away from the stove.
It should taste great for at least 3 to 6 months, often longer, as long as your jalapeños were fully dried. If it starts clumping, it usually means moisture got in. You can spread it on a baking sheet and dry it in the oven on low for a bit, then cool and re jar it.
If you want a slightly different vibe, you can check out this pink Himalayan salt recipe too. I like keeping a couple salts around for different moods.
Can You Make Jalapeño Salt Without a Dehydrator?
Yes, you can. A dehydrator is nice, but it is not required.
Oven method: Set your oven to the lowest temperature, usually 170 F or lower if it has that option. Line a baking sheet with parchment, spread jalapeño slices in a single layer, and bake until they are dry and brittle. This can take 2 to 4 hours, sometimes longer. Flip them once or twice, and keep an eye on them so they do not brown too much.
Air drying: I do not recommend it for this. It is slow and can get weird depending on humidity.
Just remember, fully dry is the goal. If you are not sure, give them more time. When they snap easily, you are good.
Common Mistakes to Avoid When Making Flavored Salt
I have made every mistake on this list at least once, so you do not have to.
Grinding peppers that are not completely dry. This is the number one issue. It leads to clumps and shorter shelf life.
Using too much pepper right away. Start mild, then adjust after tasting.
Storing it near heat or steam. Next to the stove seems convenient, but it can get humid there.
Not labeling the jar. Trust me, all homemade salts start to look the same after a while.
Touching the mix with wet fingers. It only takes one damp pinch to start a clump party.
If you avoid those, your Jalapeño Salt will be easy, reliable, and super snackable.
More Homemade Seasoning Blends and Flavored Salt Recipes to Try
Once you start making your own seasonings, it is kind of addictive. You realize how much flavor you can pack into a jar, and how nice it is to control the ingredients.
Some easy next steps after Jalapeño Salt:
Chili lime salt for fruit and grilled corn
Garlic herb salt for roasted veggies
Smoky BBQ salt for burgers and potatoes
Simple taco seasoning that actually tastes fresh
I like building a tiny shelf of these because it makes weeknight cooking feel less like a chore. Sprinkle, taste, done.
Equipment You’ll Need for This Recipe
You do not need much. Here is what helps.
- Dehydrator (optional, but helpful)
- Baking sheet (if using the oven)
- Parchment paper
- Spice grinder or small blender
- Jar with a tight lid
- Gloves (optional if your skin is sensitive)
If you do not have a spice grinder, a blender works, but you may need to make a bigger batch so it blends evenly. And if you only have a mortar and pestle, you can still do it, it just takes some elbow grease.
Common Questions
How spicy is Jalapeño Salt?
It is usually medium, but you control it. Remove seeds for mild, keep seeds for more heat, or use more peppers for extra punch.
Can I use pickled jalapeños?
I would not. Pickled peppers carry moisture and vinegar, and that does not dry the same way. Fresh is best here.
Why did my salt turn clumpy?
Most likely the jalapeños were not fully dried or the jar got moisture in it. You can re dry it gently in the oven on low, cool it, and re jar.
Should I make it fine or chunky?
Totally personal. Fine mixes into food easily. Chunky is great as a finishing salt on eggs, avocado, and grilled meat.
How long does homemade jalapeño salt last?
If everything was properly dried and stored in a tight jar, it stays tasty for months. I aim to use mine within 6 months for the brightest flavor.
A Little Jar That Makes Everything Better
If you take one thing from this post, it is that Jalapeño Salt is a tiny effort for a big payoff. Keep your peppers fully dried, choose a salt you enjoy, and adjust the heat until it feels right for you. If you want another perspective, I also liked reading Homemade Jalapeño Salt Recipe – A Fork’s Tale and this one too, Jalapeno Salt – The Flavored Finishing Salt You Need!, because they reminded me how many little ways you can make it your own. Now go make a jar, and the next time dinner feels bland, you will be ready with one quick pinch.
Print
Jalapeño Salt
- Total Time: 10 hours 20 minutes
- Yield: 24 teaspoons 1x
Description
A quick and flavorful finishing salt that elevates any dish with a touch of spice and vibrancy.
Ingredients
Main Ingredients
- 6–8 medium Fresh jalapeños (Choose glossy, firm, deep green jalapeños for best flavor.)
- 1 cup Salt (Coarse salt is preferred for better blending.)
Optional Ingredients
- 1 teaspoon Garlic powder (Optional for added flavor.)
- 1 zest Lime (Optional for a citrus kick.)
Instructions
Preparation
- Wash and slice the jalapeños into thin rounds.
- Decide your heat level: keep seeds for spiciness or scrape them out for milder flavor.
- Dry the jalapeños in a dehydrator at 135°F until fully dry, lasting about 6 to 10 hours, or use an oven at the lowest setting.
Blend and Store
- Add the dried jalapeños to a spice grinder or blender with the salt and pulse until desired texture is achieved.
- Taste and adjust: blend in more dried jalapeño for more kick or more salt if too spicy.
- Store in a clean, dry jar with a tight lid in a cool, dark place.
Notes
Use freshly dried jalapeños for best flavor and to avoid clumping in storage. Can use various salts for different flavors, like smoked salt or herb-infused salts.
- Prep Time: 20 minutes
- Cook Time: 10 hours
- Category: Condiment, Snack
- Cuisine: American, Tex-Mex
Nutrition
- Sodium: 2300

Related posts:
 Mango Cucumber Salad with Blueberry and Avocado
 Spring Salad with Goat Cheese for Easter – Light, Colorful & Delicious
 Make-Ahead Holiday Appetizers Everyone Loves (Easy Finger Foods for Parties)
 The Best Basil Aioli Recipe with Fresh Basil and Garlic
 Easy Sautéed Mushrooms Recipe with Garlic Butter
 Best Cucumber Ranch Crack Salad (Creamy, Crunchy & Ready in 10 Minutes)





 Appetizers & Sides
 Main Dishes
 Drinks & Wellness
 Desserts & Baking