This is a simple one that brightens the table without fuss. The main keyword appears naturally here because I know you might search for a way to make deviled eggs feel a little more thoughtful and pretty. I make these when I want something a bit special but not complicated.
If you like little twists on old favorites, I also use the same idea in other recipes like my deviled egg macaroni salad. It keeps dinner from feeling boring. Trust me, small changes matter.
Why This Is a Recipe You’ll Keep
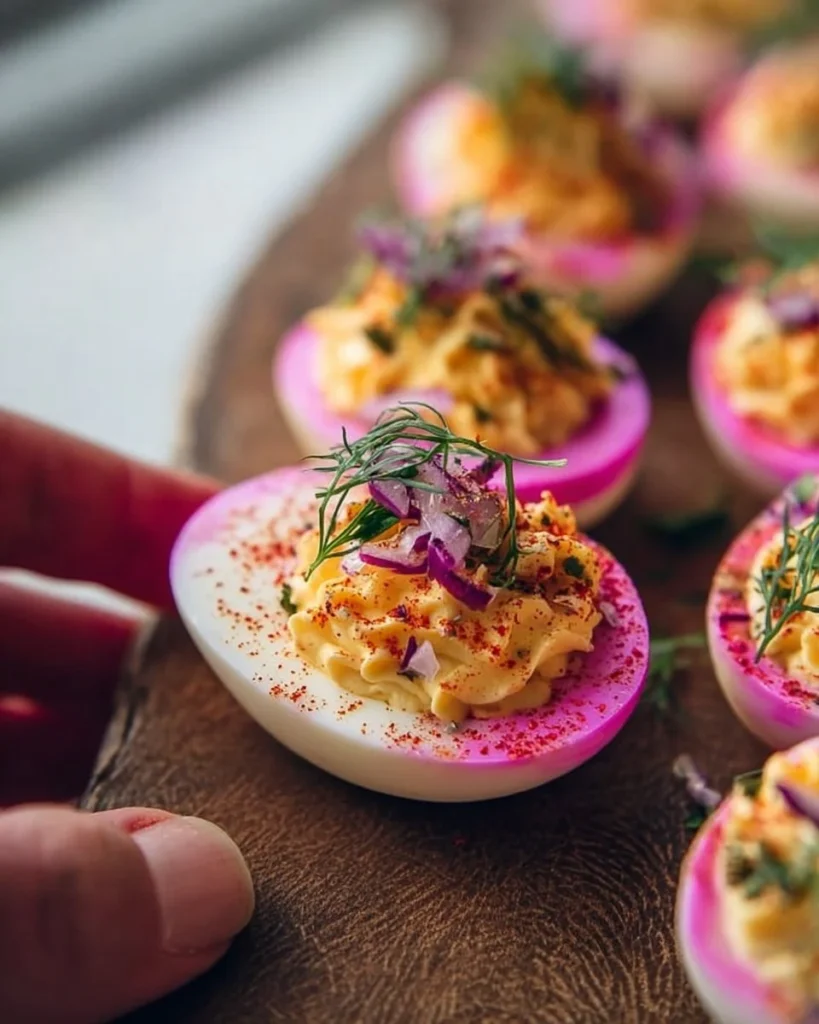
You only need a few things and a little planning. Hard boil the eggs, steep them in beet pickle liquor, and finish the filling. That is it. The beets do all the work to give the whites that gentle pink glow. It looks homemade and cared for, not showy.
Most days I want food that travels well to a picnic or sits on the counter for people to nibble. These keep their charm and do not fall apart if you leave them out for a bit. And yes, the color makes people smile. That matters.
How This Dish Comes Together
Here’s the thing. This recipe moves in clear steps. Make the beet pickle. Cook the eggs. Chill them in the beet liquid. Make the filling. Spoon or pipe it in. Top with whatever you have. No special gear required.
If you want a salty contrast I sometimes add a little Japanese pink salt to the filling or on top. It is optional, but it lifts the flavors in a quiet way.
The full List Of Ingredients You’ll Need
- 2 medium beets, peeled and thinly sliced
- 3 cups water
- 1 cup apple cider vinegar
- 1 teaspoon sea salt
- 1 teaspoon black peppercorns
- 2 bay leaves
- 9 extra-large eggs
- 1–2 teaspoons lemon juice or dill pickle juice
- 2 teaspoons Dijon mustard
- 2 tablespoons cold butter, diced
- 4 tablespoons mayo
- Crispy bacon
- Chives, thinly sliced
- Fresh dill
- Pickled red onion
- Capers
- Cucumber, thinly sliced
- Radish, thinly sliced
Making the Dish Step-by-Step Instructions
- Make the Beet Pickle by combining all pickle ingredients. Bring to a boil, then set aside to cool in a bowl or container large enough to hold the beet liquid and eggs.
- Cover eggs in cold water, and bring to a boil. Stir eggs gently a few times as the water comes to a boil to keep the yolks in the centre, then turn off the heat, cover, and set aside for 11-12 minutes. Stir 2 times in the first 3 minutes.
- For Pink Pickled Devilled Eggs (2 hours chilling): Remove the shell, place eggs into beetroot pickling liquid for 2 hours. Drain, and pat dry with paper towel and set aside.
- For Halloween “Dinosaur” Webbed Eggs (4 hours chilling): Crack the shells of the eggs. Leaving the shells on, submerge the eggs completely in the beet liquid. Leave for 4 hours. Remove from the liquid and peel the eggs
- Filling and assembly: Gently remove the yolks from the whites. In a food processor combine the yolks, lemon juice, Dijon mustard, butter, and mayo in a food processor, then blend until flight and fluffy. Alternatively, mash yolks finely with a fork then beat in the other ingredients. The final result should be smooth, light and fluffy.
- If the butter isn’t chilled enough or the mixture becomes too warm, the yolk mixture may look a little split. Dont stress. Pop the mixture into the freezer for 10 minutes to chill, then blend again to emulsify.
- Pipe or spoon the mixture into the egg whites and garnish as desired, with a slice of crispy bacon, cucumber radish. Add capers or pickled red onion, then sprinkle with your chilli flake of choice (I love Aleppo pepper in this!), chives, and finish with a sprig of dill. Make it your own and add any toppings you have at hand.
Happy cooking!
How We Like to Serve It?
Keep things simple. Put the eggs on a platter with a small bowl of extra pickled beet slices. Let people pick toppings as they like. I set out a spoon for the filling and a small plate for discarded shells or bacon crumbs. Easy.
Serve with crusty bread or a plain green salad and you have a light lunch. For a party I set them on a big tray with tongs and let folks grab. No fuss. No drama.
Saving What’s Left And Freezing Tips
Store leftovers in an airtight container in the fridge. Keep filling and whites together if you plan to eat them within a day. If you want the best texture, keep the yolk filling separate and pipe it just before serving. They last about 3 days refrigerated.
Do not freeze filled eggs. The texture breaks and they turn watery. You can freeze yolks alone if you need, but I avoid it unless I have to. Most days, plan for what you will eat in a couple of days and that will save disappointment.
Small Kitchen Tricks From Experience
Chill the butter before you add it to the yolk mix. That keeps the mixture smooth and light. If the mix looks off, pop it in the freezer for 10 minutes to firm back up, then blend. I learned this the hard way.
To peel eggs cleanly, crack them all over and roll gently before peeling under running water. It helps the shell come off in larger pieces. If you want a marbled look, crack the shells and then steep in the beet liquid. It looks fun and a little wild.
If you do not have a food processor, use a fork to mash the yolks very fine. Then beat in the butter and mayo. It takes longer but it works. Small tip: warm hands make the butter softer, so work quickly or chill the butter a bit more.
I sometimes pair these with a bright, simple beet salad or even a jelly for a retro table setting. See a playful take with pink gelatin if you like that sort of thing at gatherings here.
Common Mistakes to Avoid
Adding warm butter to the yolks. It can split the mixture. Chill the butter and add it cold.
Skipping the gentle stirring when the eggs come to a boil. It keeps the yolks centered. If you rush this step, you know what happens.
Leaving eggs in the pickle too long if you want a subtle color. Two hours gives a delicate pink. Four hours or more gives a stronger hue and a firmer beet flavor.
Overfilling the whites. Aim for a small mound. The filling looks nicer and the eggs sit better on a plate.
Simple Changes and Adaptations You Can Make
Make the filling tangier by using dill pickle juice in place of some lemon juice. Swap Dijon for a little whole grain mustard if you want texture.
Top with smoked salmon instead of bacon for a lighter option. Use Greek yogurt in place of some mayo to cut richness. None of these change how you do the main steps. They just change what you taste.
If you prefer a floral note, add a few chopped capers to the filling. I like the pop in each bite. Little things go a long way.
Questions That Usually Come Up
How long can I pickle the eggs? Two hours gives a gentle color. Four hours or more gives a stronger color and flavor. It comes down to how pink you want them.
Can I make these a day ahead? Yes. Make the beet pickle and chill the eggs in it up to a day ahead. Fill them the day you serve for the best texture.
Do I have to use Kewpie mayo? No. It adds a touch of sweetness that I like, but any mayo works fine.
What if my yolk mixture looks split? Chill it for 10 minutes then blend again. It usually comes back together.
Can I use store-bought pickled beets? Yes. Warm the liquid gently with a little vinegar and use it to steep the eggs. It saves time.
A Quiet Closing Note
Make this on a slow afternoon or when you need a small lift for a meal. It does not need to be perfect. It will still bring a familiar smile to the table.
For another pink deviled egg take on things, I like the ideas at Pink Deviled Eggs – She Keeps a Lovely Home which has a few different serving suggestions. And if you want a similar recipe for presentation and technique, see the version at Perfectly Pink Deviled Egg Recipe – The Culinary Cartel.
Print
Pink Pickled Deviled Eggs
- Total Time: 2 hours 12 minutes
- Yield: 9 pieces
Description
These vibrant deviled eggs are immersed in beet pickling liquid to create a beautiful pink hue, making them a delightful and easy addition to any meal or gathering.
Ingredients
Beet Pickle
- 2 medium beets, peeled and thinly sliced
- 3 cups water
- 1 cup apple cider vinegar
- 1 teaspoon sea salt
- 1 teaspoon black peppercorns
- 2 leaves bay leaves
Egg Filling
- 9 extra-large eggs (hard boiled)
- 1–2 teaspoons lemon juice or dill pickle juice
- 2 teaspoons Dijon mustard
- 2 tablespoons cold butter, diced
- 4 tablespoons mayonnaise (Kewpie recommended for sweetness)
Garnishes
- shards of crispy bacon (optional topping)
- thinly sliced chives (for garnish)
- fresh dill (for garnish)
- pickled red onion (optional topping)
- capers (optional topping)
- thinly sliced cucumber (optional topping)
- thinly sliced radish (optional topping)
Instructions
Make the Beet Pickle
- Combine all pickle ingredients in a pot and bring to a boil. Set aside to cool in a bowl or container large enough to hold the beet liquid and the eggs.
Prepare the Eggs
- Cover the eggs with cold water, then bring to a boil. Stir gently to center the yolks, then turn off the heat, cover, and let sit for 11-12 minutes.
- Remove eggs from hot water and place in beet pickling liquid for 2 hours for pink eggs, or crack the shells and soak in beet liquid for 4 hours for a stronger flavor.
Make the Filling
- Gently remove yolks from the whites. In a food processor, combine yolks, lemon juice, Dijon mustard, butter, and mayo. Blend until smooth and fluffy.
- If mixture looks split, chill for 10 minutes in the freezer and blend again.
Assemble
- Pipe or spoon yolk mixture into the egg whites. Garnish with toppings of choice.
Notes
Store leftovers in an airtight container, mixing whites and filling together if eaten within a day. For the best texture, keep yolk filling separate until serving. Do not freeze filled eggs.
- Prep Time: 30 minutes
- Cook Time: 12 minutes
- Category: Appetizer, Snack
- Cuisine: American, French
Related posts:
 Strawberry Crunch Cheesecake Tacos
 Strawberry Kiss Cookies: Cute Valentine’s Day Cookies Everyone Loves
 Crack Chicken Sliders on Hawaiian Rolls – Easy Game Day Sandwiches
 Crispy Buffalo Wings Recipe, Easy Homemade Wings with Classic Buffalo Sauce
 Honey Curry Roasted Cauliflower
 Moist Rhubarb Cake with Butter Sauce

 Main Dishes
 Drinks & Wellness