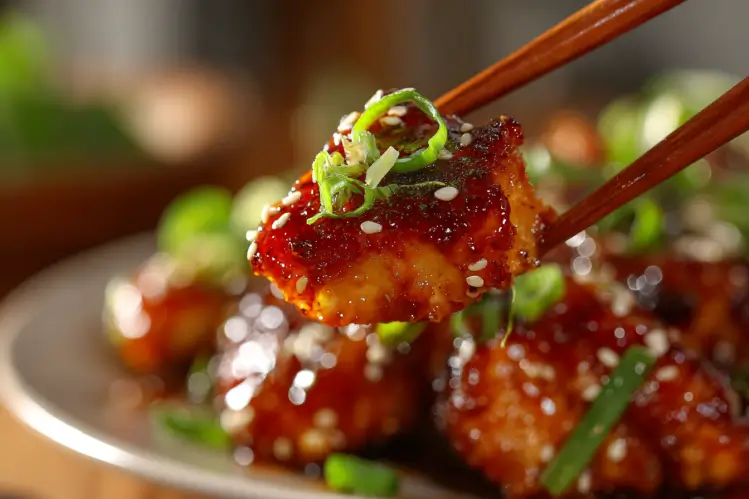
Honey Sesame Chicken is my go-to when I need something fast, comforting, and family-approved. You know those nights when you’re starving, the sink is full, and the idea of a complicated dinner makes you want to order takeout? This is the answer. It’s sticky, savory, a little sweet, and it hits the table in about 30 minutes if you prep smart. The sauce clings to every bite, and the chicken stays juicy with a light, crisp coating. I’ve made this so many times that I’ve got it down to a rhythm you can easily follow too.
3. Essential Ingredients for the Perfect Sticky Sesame Sauce
The magic of this recipe is the sauce. It’s glossy, balanced, and clings to the chicken without turning gummy. Use pantry staples and take a minute to measure before you start cooking, because once the chicken hits the pan, things move quickly.
- Soy sauce: Use low sodium so the dish doesn’t get too salty.
- Honey: For natural sweetness and that shiny finish.
- Rice vinegar: A gentle tang that keeps the sauce from tasting flat.
- Sesame oil: Just a little for nutty depth.
- Fresh garlic and ginger: Grated or finely minced for big flavor.
- Cornstarch: To thicken and give the sauce body.
- Water or chicken broth: Adjusts the consistency without overpowering the taste.
- Sesame seeds and scallions: For crunch and freshness at the end.
Pro tip: whisk the cornstarch with a splash of water before it meets the hot pan. That simple slurry keeps the sauce silky and lump-free. If you like a deeper savory note, add a teaspoon of oyster sauce. If you like heat, a squeeze of sriracha or a pinch of red pepper flakes is perfect.
Balance is everything here. Taste as you go and add a touch more honey if you want it sweeter, or a dash more vinegar if you want it brighter.
4. Best Cuts of Meat: Chicken Thighs vs. Chicken Breast
Both work, but they cook a little differently. Boneless, skinless chicken thighs are naturally juicy and forgiving, which is why I usually reach for them on busy nights. Chicken breast is lean and cooks fast, but it can dry out if overcooked. If you’re using breast, slice it into thin strips so it cooks evenly and quickly.
How I prep each cut
For thighs: trim excess fat and cut into bite-size pieces. They handle high heat like champs and stay tender. For breast: slice across the grain into thin pieces, about a half inch thick. Pat the chicken dry either way before coating it so the outer layer gets crispy instead of soggy.
5. Substitutions for Gluten-Free and Low-Sodium Sesame Chicken
Gluten-free is easy here. Swap soy sauce for tamari or coconut aminos and you’re set. Use cornstarch instead of flour for the coating, which also makes the crust extra light. For low sodium, use low-sodium soy sauce and dilute the sauce with a bit more water or unsalted chicken broth. Taste and adjust with a squeeze of lemon if it needs a little lift without adding salt.
If you love the garlic-forward vibe of this dish, you might also enjoy my Honey Garlic Chicken Thighs for another weeknight keeper with a savory-sweet finish.
6. How to Make Honey Sesame Chicken: Step-by-Step Instructions
Quick flow that always works
1. Prep the sauce: whisk soy sauce, honey, rice vinegar, sesame oil, grated ginger, and garlic. In a separate cup, mix cornstarch with water to make a slurry. Set both aside.
2. Prep the chicken: cut into pieces, pat dry, and toss lightly in cornstarch with a pinch of salt and pepper. Shake off extra so you don’t get a gummy coating.
3. Cook the chicken: heat a slick of neutral oil in a large skillet until it shimmers. Lay chicken in a single layer and let it sit for a minute before stirring. Brown, flip, and cook through. Do this in batches if needed so you don’t crowd the pan.
4. Build the sauce: reduce the heat to medium-low. Pour in the sauce base, simmer 30 seconds, then drizzle in the slurry while stirring. It will thicken fast. If it thickens too much, loosen with a splash of water.
5. Finish and serve: toss chicken back in the pan, coat completely, and simmer one minute. Sprinkle sesame seeds and scallions. Serve hot over rice or noodles.
Cook once, enjoy twice. Double the sauce recipe and keep half in the fridge for up to five days. It’s great on roasted veggies or salmon too.
7. The Secret to Extra Crispy Chicken: Cornstarch vs. Flour
Flour makes a thicker, more breaded coating, which can feel heavy in a saucy dish. I prefer cornstarch for this recipe because it gives a light, crisp shell that holds up when you stir in the sauce. It also helps the sauce cling to the chicken. If you like a hybrid, use a 50-50 mix of flour and cornstarch. Keep the oil hot and avoid overcrowding to keep that crust snappy.
If you like oven-baked crunch, you’ll probably enjoy these baked chicken tenders that use a similar light-coating approach with great texture.
8. Healthy Cooking Methods: Deep Fry, Shallow Fry, or Air Fryer
Shallow fry in a skillet is my favorite balance of speed and control. You only need a thin layer of oil and the chicken still gets those golden edges. Deep fry gives the crispiest crust, but it’s messier and uses more oil. The air fryer is a weeknight hero. Spray your coated chicken pieces with oil, cook at 390 F for 8 to 10 minutes, shaking halfway. Then toss in the hot sauce on the stove or in a big bowl.
Want more air fryer inspo for busy nights? These air fryer chicken mozzarella wraps are cheesy, melty, and perfect for lunch the next day too.
Air fryer tip: preheat it. A hot basket makes a big difference for color and crispness.
9. Mastering the Aromatics: Using Fresh Ginger and Garlic
Fresh ginger and garlic make this dish sing. I like to grate both on a microplane so they melt into the sauce and don’t burn in the pan. If chopping, go fine. Add them to the sauce base rather than to the hot oil so you don’t end up with bitter bits. If you only have ground ginger, use a smaller amount since it’s more concentrated. Fresh garlic beats jarred in flavor and aroma, but if jarred is what you’ve got, it still works.
10. Pro Tips for the Glossiest Honey Sesame Glaze
Keep the heat at medium when you thicken, then drop it to low once the sauce turns shiny. Stir constantly after adding the slurry. A teaspoon of butter at the very end can make the sauce extra glossy. If your sauce tastes too salty, add a squeeze of honey and a splash of water. If it’s too sweet, splash in a little more rice vinegar. Finish with toasted sesame seeds for extra nutty flavor and texture.
11. What to Serve with Honey Sesame Chicken: Side Dish Ideas
- Steamed jasmine rice or leftover cold rice warmed in a pan with a splash of water.
- Garlic butter noodles or quick sesame noodles.
- Stir-fried broccoli, snap peas, or bell peppers.
- Crisp cucumber salad with rice vinegar and a pinch of sugar.
- Cauliflower rice if you want something lighter.
For a hearty bowl that leans into sweet-savory flavors, check out this easy Honey BBQ Chicken Rice idea. It’s flexible and great for meal prep.
12. Recipe Variations: Spicy, Nut-Free, and Vegetable Add-ins
Spicy: add gochujang, sriracha, or chili crisp to the sauce. Start small and build to your heat level. Nut-free: this recipe already is, but skip sesame seeds if allergies are severe and use a neutral oil instead of sesame oil. Veggie add-ins: toss in steamed broccoli, blanched green beans, or sautéed mushrooms right before you glaze the chicken. For a lighter twist, add shredded carrots and cabbage for crunch.
Make it yours
You can swap half the honey for orange marmalade for a citrus twist. Or stir in pineapple chunks at the end for a sweet pop. I’ve even made a half chicken, half tofu version when I had a mix of preferences at the table, and it worked great.
13. Meal Prep and Storage: How to Reheat and Freeze
Store leftovers in an airtight container in the fridge for up to 4 days. Reheat gently in a skillet with a splash of water until the sauce loosens and the chicken warms through. For a crisp edge, reheat the chicken in a hot skillet first, then add sauce at the end. You can freeze cooked chicken in sauce for up to 2 months. Thaw overnight in the fridge and reheat on the stove.
Prep ahead
Slice the chicken and mix the sauce base in the morning. When you get home, you only need to coat, cook, and thicken. If you’re packing lunches, portion the rice and veggies separately so the chicken’s sauce doesn’t soak everything before you eat it.
14. Troubleshooting: How to Fix Thin Sauce or Soggy Chicken
Thin sauce: simmer longer and add a small extra splash of cornstarch slurry. Stir and watch it thicken. Too thick: loosen with water or broth, one tablespoon at a time. Soggy chicken: your pan was crowded or the oil wasn’t hot. Next time, cook in batches and let the pieces sit before stirring so they can sear. Sauce not sticking: coat the chicken lightly in cornstarch and reduce the sauce until it’s slightly tacky before tossing the chicken back in.
Flavor tweaks on the fly
Too salty: add honey and water. Too sweet: add rice vinegar or a squeeze of lemon. Flat flavor: a splash of soy sauce and a pinch of white pepper bring it back to life.
Common Questions
Can I make this without cornstarch?
Yes. Use potato starch or a light dusting of all-purpose flour. Cornstarch gives the best crisp, but these are solid backups.
Can I bake the chicken instead?
Yes. Bake at 425 F on a greased sheet for 12 to 16 minutes, flipping once. Toss with hot sauce in a skillet for best texture.
How do I keep the garlic from burning?
Add it to the sauce base, not straight to the hot oil. If you sauté it, do so briefly over medium heat and add the liquid before it browns.
What oil should I use?
Use a high smoke point oil like canola, avocado, or peanut oil. Save the sesame oil for the sauce and finishing.
Can I use frozen chicken?
Thaw it completely and pat dry before coating. Excess moisture prevents browning.
Ready to make it tonight
Savory Honey Sesame Chicken for Busy Weeknights is the kind of recipe that makes you feel capable on a chaotic day, and it tastes like something you waited for at your favorite takeout spot. Keep your sauce balanced, your pan hot, and your batches small, and you’ll nail it.
If you’re curious about lighter spins and want more ideas, this take on Sesame Chicken offers a useful point of reference for tweaking flavors while keeping the dish satisfying. And if you want another quick dinner win, I’ve got a crispy favorite in this bang bang chicken bowl that brings heat and creaminess together in the best way. You’ve got this, and dinner’s going to be delicious.
Print
Honey Sesame Chicken
- Total Time: 30 minutes
- Yield: 4 servings
Description
A quick and comforting dish featuring juicy chicken coated in a sweet and sticky sesame sauce, perfect for busy weeknights.
Ingredients
For the Sauce
- 1/2 cup low sodium soy sauce (Use low sodium to avoid oversalting.)
- 1/4 cup honey (For natural sweetness.)
- 2 tablespoons rice vinegar (To add tang.)
- 1 tablespoon sesame oil (For nutty depth.)
- 2 cloves fresh garlic (Grated or finely minced.)
- 1 tablespoon fresh ginger (Grated or finely minced.)
- 1 tablespoon cornstarch (For thickening the sauce.)
- 1/2 cup water or chicken broth (To adjust consistency.)
- 2 tablespoons sesame seeds (For garnish.)
- 2 scallions scallions (For garnish.)
For the Chicken
- 1 pound boneless, skinless chicken thighs or breasts (Thighs stay juicier.)
- 1/4 cup cornstarch (For coating.)
- 1 teaspoon salt (For seasoning.)
- 1/2 teaspoon black pepper (For seasoning.)
- 2 tablespoons neutral oil (For frying.)
Instructions
Preparation
- Whisk together soy sauce, honey, rice vinegar, sesame oil, grated ginger, and garlic in a mixing bowl.
- In a separate cup, mix cornstarch with a splash of water to create a slurry.
- Cut the chicken into bite-sized pieces and pat dry. Toss lightly in cornstarch with salt and pepper.
Cooking
- Heat neutral oil in a large skillet until shimmering.
- Add the chicken in a single layer and let it brown for a minute before stirring. Cook until fully cooked.
- Reduce heat to medium-low. Pour the sauce mixture into the skillet and simmer for 30 seconds.
- Drizzle in the cornstarch slurry while stirring until the sauce thickens.
Serving
- Return the chicken to the pan; toss to coat and simmer for one more minute.
- Garnish with sesame seeds and scallions. Serve hot over rice or noodles.
Notes
This dish can be stored in the fridge for up to 4 days. For storage, reheat gently on the stove with a bit of water. Can also be frozen for up to 2 months. Preheat your air fryer for best results when using that method to cook chicken.
- Prep Time: 10 minutes
- Cook Time: 20 minutes
- Category: dinner, Main Course
- Cuisine: asian, Chinese
Related posts:
 Sweet Potato Bowl Recipes 2025: 10 Viral Ideas to Try at Home
 Crockpot Sausage and Green Beans: Dump-and-Go Recipe
 Why This Crockpot Chicken Pot Pie Is the Easiest Comfort Food
 Cajun Potato Soup for Holidays and Cold Weather
 Delicious Shrimp and Corn Chowder That Will Warm Your Heart
 Crunchy Crispy Air Fryer Chicken & Mozzarella Wraps | Easy Air Fryer Recipe

 Main Dishes
 Drinks & Wellness