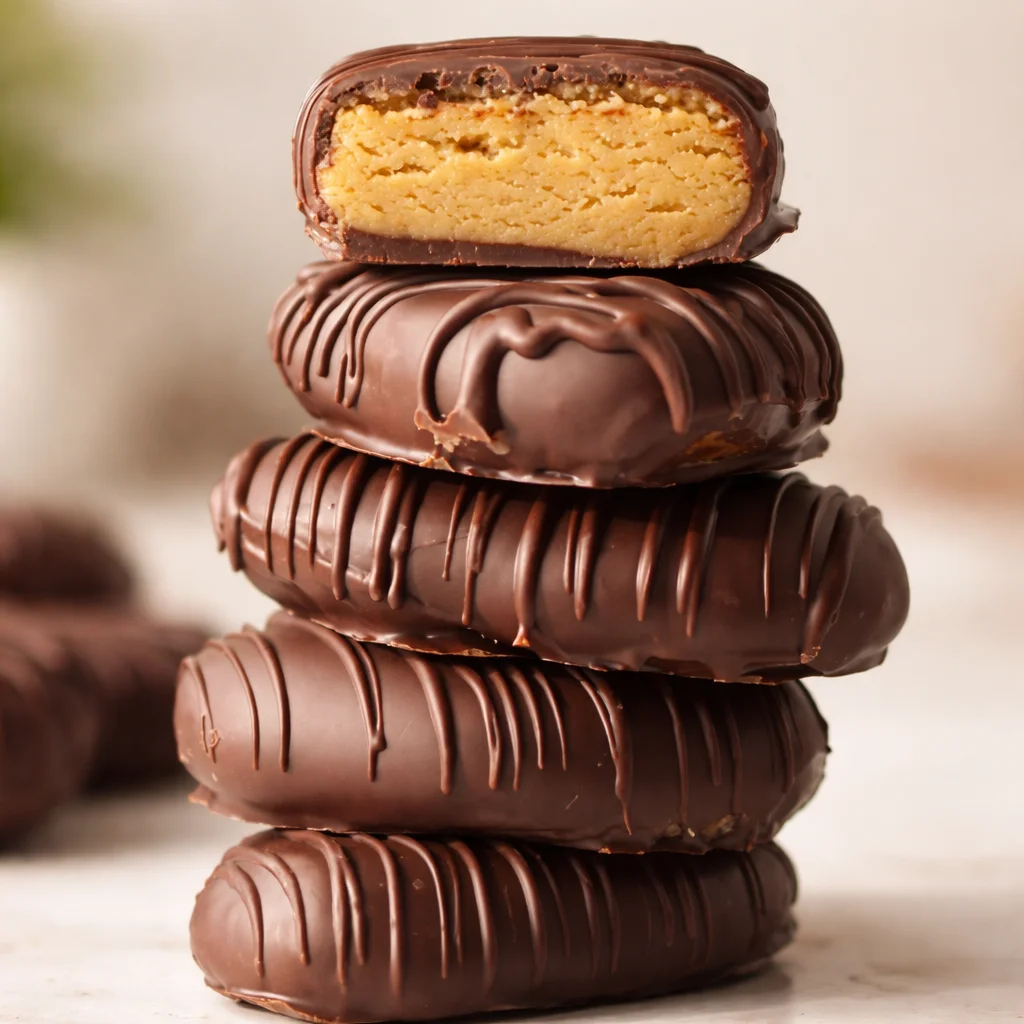
Homemade Reese’s Peanut Butter Eggs are my fix for that moment when you want the classic candy taste, but you also want it fresher and a little less sweet. I started making these after one too many store bought eggs tasted kind of waxy to me. The homemade version has a peanut butter center that actually tastes like peanut butter, and the chocolate shell snaps in the best way. They are also way easier than people think, especially once you learn the quick dip trick. Let me walk you through how I make them in my own kitchen, messes and all.
Key Ingredients for Peanut Butter Egg Filling (Natural Peanut Butter, Maple Syrup, Coconut Flour)
The filling is the whole point, right? I keep it simple and focused on ingredients that bring flavor and also help the dough hold its shape. This is where you get that dreamy, soft bite that still feels like candy.
What you need for the peanut butter egg filling:
- Natural peanut butter: the main flavor. I like it salty and drippy.
- Maple syrup: sweetens and keeps the filling smooth.
- Coconut flour: thickens everything fast and makes the mixture shapeable.
The coconut flour is the little hero here. A small amount changes the texture quickly, so add it gradually. If you have only ever used powdered sugar style recipes, this version tastes more real and less like straight sugar.
Also, if you are planning a cozy cooking weekend, I usually pair candy making with something comforting on the stove like this French onion butter rice because it basically perfumes the whole kitchen while I work.
Chocolate Coating Ingredients (Dark Chocolate Chips/Bar + Coconut Oil for Smooth Melting)
The chocolate coating is super forgiving as long as you melt it gently. I use either dark chocolate chips or a chopped dark chocolate bar. Dark chocolate balances the sweet filling so well, but you can absolutely use semi sweet if that is what you have.
For the chocolate shell: dark chocolate plus a little coconut oil. The coconut oil helps the chocolate melt smoother and makes dipping easier. It also gives that nicer bite once it sets, instead of feeling thick and clunky.
If you are melting in the microwave, go in short bursts and stir a lot. If you are using a double boiler setup, keep the heat low and do not let steam get in the bowl. Water is the enemy of melted chocolate, and it can make it seize up into a weird grainy mess.
Optional Add-Ins & Boosters (Collagen Peptides, Sea Salt, Vanilla Extract)
This part is totally optional, but it is where you can make the eggs feel customized. I do not always add extras, but when I do, I notice the difference.
Here are my favorites:
Vanilla extract makes the filling taste more like a real candy center. Just a little is enough.
Sea salt is a must if your peanut butter is unsalted. Even if it is salted, a tiny pinch on top of the chocolate before it sets is so good. Sweet plus salty is the whole reason people love this candy.
Collagen peptides can be mixed into the filling if you want a little boost. It does not add much flavor, but it can make the dough slightly drier, so you might need an extra teaspoon of maple syrup or peanut butter to balance it.
Best Peanut Butter to Use (Creamy vs Natural “Drippy” + Ingredient Labels)
This matters more than people think. The peanut butter you pick changes the texture a lot.
Creamy conventional peanut butter (the kind with added oils and sugar) gives a thicker, more stable filling right away. It is easy mode, and it tastes very close to the classic candy vibe.
Natural “drippy” peanut butter tastes more peanut forward, but it can make the dough softer at first. If you use natural, make sure you stir the jar really well so the oils are not separated. And check the label. I like ones that are basically just peanuts and salt.
If your natural peanut butter is super loose, do not panic. That is why coconut flour is in this recipe. It thickens it back up fast.
Step-by-Step: Make the Peanut Butter Dough (Correct Consistency + How to Fix Runny Dough)
This is the part where you want to trust your eyes more than the measuring spoons. Your goal is a soft dough that you can roll and shape without it sticking all over your hands.
My basic method:
Mix natural peanut butter and maple syrup first. Add vanilla if using. Then sprinkle coconut flour in, stir, and wait about 30 seconds. Coconut flour takes a moment to absorb moisture. Stir again and check texture.
Correct consistency: it should feel like soft play dough. Not crumbly, not wet.
If the dough is runny: add coconut flour 1 teaspoon at a time, mixing well and waiting a moment between additions.
If the dough is too dry: add a small spoon of peanut butter or a drizzle of maple syrup, then mix again.
Once you nail the texture one time, you will feel like you can make Homemade Reese’s Peanut Butter Eggs on autopilot.
Step-by-Step: Shape Perfect Egg Shapes (Cookie Scoop, Hands, and Parchment Tips)
Shaping is honestly the fun part. I like putting on a show or podcast and just going for it.
Here is what helps:
Use a small cookie scoop if you want even sizing. Scoop, roll into a ball, then gently press and pinch one end to make an egg shape. If you do not have a scoop, just eyeball it and keep them close in size so they dip evenly.
Parchment paper is your best friend. Put the shaped eggs on a parchment lined tray so nothing sticks and cleanup is easy.
If the dough sticks to your hands, rub a tiny bit of coconut oil on your palms. Do not overdo it, just enough to keep it smooth.
When I am in a savory mood after shaping candy, I love tossing together something quick like garlic butter steak and zucchini since it is fast and feels like a real dinner before dessert happens.
Step-by-Step: Freeze for Easy Dipping (Chill Times + Why It Matters)
Do not skip the freezing step. It is what makes dipping clean instead of chaotic.
I freeze the shaped eggs for about 25 to 40 minutes. You want them firm, not rock hard. If they freeze too long, the chocolate can set too fast when it hits the cold surface and look thicker. Still tasty, just less smooth.
Why it matters: cold filling holds its shape when you dip it, and it releases from the fork easier. This is the difference between pretty eggs and chocolate puddles.
If you are meal prepping for a party, you can freeze the centers longer, even overnight, and dip the next day. Just let them sit out for 5 minutes before dipping.
Step-by-Step: Dip & Drizzle in Chocolate (Fork Method + Glossy Finish)
This is the moment where they start looking like the real deal. And yes, your first one might look a little wonky. Mine always does. Then you get into the groove.
Fork method: Drop one frozen egg into melted chocolate. Use a fork to flip it and coat it. Lift it out with the fork, tap gently on the side of the bowl to let extra chocolate drip off, then slide it onto parchment.
For a glossy finish, let your chocolate cool slightly after melting. If it is super hot, it can look dull when it sets. Not a tragedy, but if you want that shiny candy look, slightly cooler chocolate helps.
Drizzle: Once the coating sets a bit, drizzle extra chocolate over the top with a spoon. If you want the drizzle to be thin and neat, make sure the chocolate is fluid, not thick. A tiny extra bit of coconut oil can help.
If you are making these around holidays, I also like baking something simple on the side like German butter cookies for a cute dessert tray situation.
Pro Tips for Success (Cool Chocolate, Prevent Seizing, Clean Edges, Pretty Drizzle)
These tips come from messing up a few batches so you do not have to.
Cool chocolate a bit before dipping for a smoother set.
Prevent seizing: keep bowls and tools completely dry. Even a drop of water can mess with chocolate.
Clean edges: if you get little chocolate feet around the bottom, you can trim them off once set using a small knife. Or just leave them. I usually eat the ugly ones first.
Pretty drizzle: use a zip top bag with a tiny corner snipped off for a more controlled drizzle.
Work in batches: keep the rest of the eggs in the freezer while you dip a few at a time. Warm filling is harder to work with.
Ingredient Swaps & Dietary Variations (GF, DF, Vegan, Refined Sugar-Free, Paleo, Nut-Free)
This recipe is naturally gluten free as long as your ingredients are certified if needed. And it is easy to adjust depending on how you eat.
Dairy free: use dairy free dark chocolate.
Vegan: maple syrup is already vegan, just make sure the chocolate is vegan too.
Refined sugar free: choose a refined sugar free chocolate and stick with maple syrup.
Paleo: use a paleo friendly chocolate, and make sure your peanut butter fits your version of paleo, or swap for almond butter if that works for you.
Nut free: sunflower seed butter works, but the flavor changes and sometimes it can turn a little greenish when mixed with certain ingredients. It still tastes good, just a heads up.
The nice thing about Homemade Reese’s Peanut Butter Eggs is that they are flexible. You can make them work for your kitchen without buying a bunch of specialty stuff.
Fun Shapes & Seasonal Variations (Hearts, Footballs, Mini Cups, Halloween + White Chocolate)
You do not have to stick to egg shapes. I do eggs for spring, but the same filling works for pretty much any shape you can dream up.
Hearts for Valentines Day, footballs for game day, and little mini cups pressed into a mini muffin liner are adorable. For Halloween, shape them like little pumpkins and drizzle lines on top.
White chocolate is also fun for dipping, especially if you add a tiny pinch of salt to balance it. You can even do half dark, half white for a fancy look with almost no effort.
Serving Ideas for Easter & Beyond (Party Platter, Gifts, Meal Prep, Kid-Friendly)
These disappear fast, so I usually make a double batch if I am sharing. Here are a few ways I like to serve them:
- Party platter: pile them on a tray with berries and a few cookies.
- Gifts: tuck two or three into a small bag with a ribbon. They look homemade in the best way.
- Meal prep treats: keep a few in the fridge for after lunch sweets.
- Kid-friendly: let kids drizzle the tops. It is messy, but they love it.
They also pair weirdly well with cozy slow cooker dinners, like you eat something hearty and then finish with a chocolate peanut butter egg. If that is your vibe, try slow cooker garlic butter beef bites on the same day and thank me later.
Common Questions
How long do Homemade Reese’s Peanut Butter Eggs last?
In the fridge, I like them best within 7 to 10 days. In the freezer, they are great for up to 2 months. Store them in an airtight container so they do not pick up weird freezer smells.
Do I have to use coconut flour?
Coconut flour works best because it absorbs moisture fast. If you swap it, the texture will change. If you only have almond flour, use more of it and expect a softer filling.
Why is my chocolate coating thick and clumpy?
Usually the chocolate got too hot or it seized from moisture. Add a tiny bit more coconut oil and stir gently. And make sure your bowl and spoon are totally dry.
Can I make them without a microwave?
Yes. Use a heatproof bowl over a pot of barely simmering water. Keep the heat low and stir until melted.
How do I keep the eggs looking smooth?
Freeze the centers until firm, tap off extra chocolate, and let the dipped eggs set at cool room temperature or in the fridge. And do not rush the drizzle, wait until the base coat is set.
A Sweet Little Wrap Up (and a nudge to try them)
If you have been craving that classic candy taste, Homemade Reese’s Peanut Butter Eggs are honestly such a fun win to make at home. Once you get the dough texture right and freeze the centers, the dipping part feels way less intimidating. If you want another take on the idea, check out this Copycat Reese’s Peanut Butter Eggs – The Squeaky Mixer for more inspiration and tweaks. Now go grab your peanut butter and chocolate, and make a batch, then hide a few in the fridge so you actually get some.
Print
Reese’s Peanut Butter Eggs
- Total Time: 40 minutes
- Yield: 12 pieces
Description
A fresh take on the classic candy with a creamy peanut butter filling and a rich chocolate coating, perfect for Easter or any occasion.
Ingredients
Peanut Butter Egg Filling
- 1 cup Natural peanut butter (Make sure it’s drippy and salted.)
- 1/4 cup Maple syrup (For sweetness and smoothness.)
- 1/4 cup Coconut flour (Add gradually for desired consistency.)
Chocolate Coating
- 8 oz Dark chocolate chips or bar (Use for a richer taste.)
- 1 tbsp Coconut oil (Helps chocolate melt smoothly.)
Optional Add-Ins
- 1 tsp Vanilla extract (Enhances flavor.)
- 1 pinch Sea salt (Balances sweetness.)
- 1 scoop Collagen peptides (For extra nutrients.)
Instructions
Make the Peanut Butter Dough
- In a bowl, mix the natural peanut butter and maple syrup until smooth.
- Gradually sprinkle in coconut flour, stirring well between additions. Let it absorb moisture.
- The dough should feel like soft play dough, not crumbly or wet.
Shape the Eggs
- Use a small cookie scoop to portion out the dough, roll into a ball, and shape into an egg.
- Place shaped eggs on a parchment-lined tray.
Freeze for Easy Dipping
- Freeze the shaped eggs for 25-40 minutes until firm.
Dip in Chocolate
- Melt the dark chocolate with coconut oil using a microwave or double boiler.
- Dip each frozen egg into the chocolate, ensure it’s well coated, and let excess chocolate drip off.
- Place back on parchment and repeat until all are coated.
Finish with Drizzle (Optional)
- Once the coating has set slightly, drizzle extra chocolate over the top for a decorative finish.
Notes
These candies can be stored in an airtight container for up to 10 days in the fridge or 2 months in the freezer. Customize the shape for holidays.
- Prep Time: 30 minutes
- Cook Time: 10 minutes
- Category: Dessert, Snack
- Cuisine: American, Candy


 Main Dishes
 Drinks & Wellness