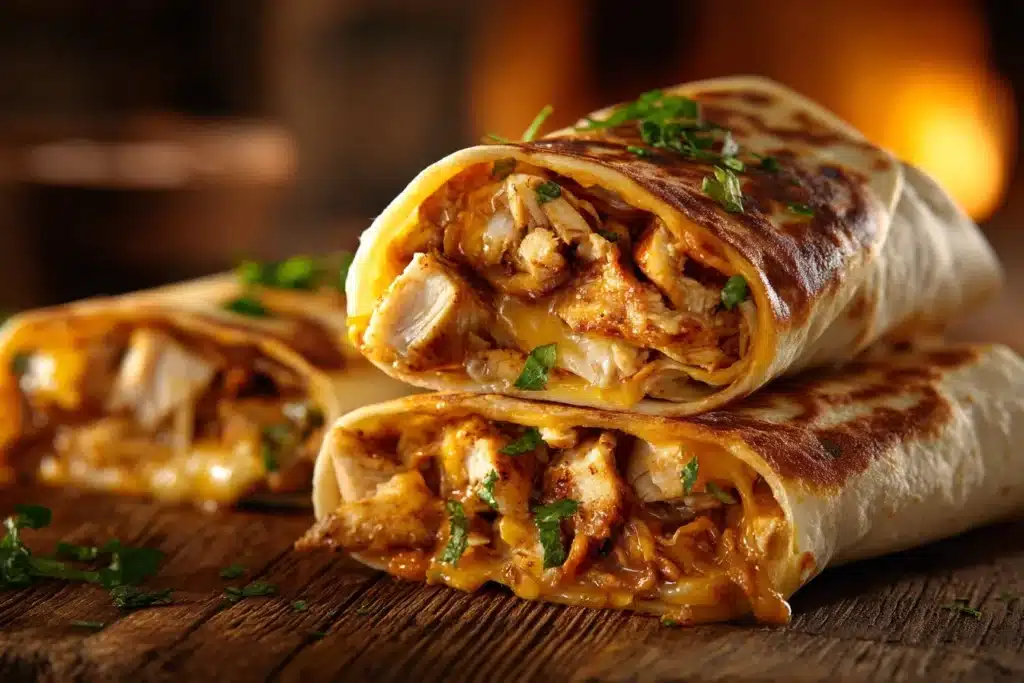
There are nights when you want dinner to feel like a hug. Cheesy Garlic Chicken Wraps hit that note warm, a little gooey, and forgiving if you’re short on time.
I make a batch and keep some extra on hand. It saves the evening more than once. If you like a crunchy edge on your wrap, there’s a similar twist I lean on sometimes at a simple wrap recipe I trust. It’s an easy place to start when you’re testing this out.
Why This Dish Feels Like Home
This one cooks down to a few good things: cooked chicken, melty cheese, a soft tortilla. It doesn’t demand fancy tools. Most days that’s what matters.
It feeds a small crowd. It fills bellies without fuss. You can set the pan on the table and people take their own. That’s game-changing after a long day.
And yes, garlic matters here. Don’t skip it.
How It Comes Together in the Kitchen
You’ll do a little mixing, a bit of rolling, and then a quick sear. It’s calm work. No one needs to stand watch for an hour.
Start with warm tortillas so they bend easily. Break the chicken into pieces that tuck into the wrap. Heat a skillet and let the outside get golden, that crunch gives the soft filling something to play off of. If you want to try a crisp finish without a pan, some people use an air fryer; I sometimes look at an air-fryer version for ideas. It changes the texture but keeps the heart of the dish.
What You’ll Need To Make this recipe
- 2 cups cooked chicken, shredded
- 1 cup shredded mozzarella cheese
- 1/2 cup cream cheese, softened
- 4 cloves garlic, minced
- 2 tablespoons fresh parsley, chopped
- 1 teaspoon Italian seasoning
- 4 large flour tortillas
- Salt and pepper to taste
- Olive oil for cooking
Steady Steps To Make the Recipe this recipe
- In a bowl, mix shredded chicken, mozzarella cheese, cream cheese, minced garlic, parsley, Italian seasoning, salt, and pepper until well combined.
- Lay out a tortilla and place a generous amount of the chicken mixture in the center.
- Roll the tortilla tightly, folding in the sides as you go to secure the filling.
- Heat olive oil in a skillet over medium heat.
- Once hot, place the wrap seam side down in the skillet and cook until golden brown and crispy, about 3-4 minutes per side.
- Remove from skillet, slice, and serve warm.
Follow those steps. No need to overthink the rolling. A tight seam keeps the filling in. If you have a heavy pan, press lightly while it cooks to get an even crust.
How to Serve It at the Table
Keep it simple. Cut each wrap in half and lay them on a plate. Offer a small bowl of extra parsley or a tangy sauce on the side a little ranch, plain yogurt mixed with lemon, or a bit of salsa works.
A quick salad or raw carrots and celery makes the meal feel complete without needing much time. If you prefer, a handful of kettle chips adds crunch. People like having choices.
I sometimes set a jar of pickles nearby. They disappear fast.
Also, if you like a lighter crunch and less oil, try warming the wraps under the broiler for a minute instead of pan-frying. It crisps the outside without extra oil. For another crisp method, check out this different air-fryer take that I read through when I wanted to cut the oil a bit: air fryer chicken mozzarella wraps.
Keeping Leftovers for Later
Wraps keep well. Let them cool to room temperature first. Then wrap each one tightly in plastic wrap or foil and place in an airtight container.
In the fridge they last 3 to 4 days. Reheat in a skillet over low heat so the cheese melts and the outside crisps again. A microwave will warm them quickly, but you lose that crunch.
To freeze, wrap individually and slip them into a freezer bag. They keep for up to 2 months. Thaw in the fridge overnight before reheating.
Little Comfort-Building Tips this recipe
- Use rotisserie chicken if you want to skip cooking. It’s fine and saves time.
- Let the cream cheese come to room temp. It blends smoother and keeps the filling creamy.
- Mince garlic small. Big chunks can surprise you.
- If your tortillas tear, wet your hands and press the tear; it helps seal them. I learned that the hard way once.
- Don’t pile the filling so high you can’t roll. Tight and modest wins every time. And yes, this part matters.
Cozy Variations You Can Try
- Add a handful of baby spinach for color and a slight bite.
- Stir in a spoonful of pesto for a herb-forward change.
- Swap mozzarella for cheddar for a sharper flavor. It’s fine.
- Add thinly sliced roasted red peppers for sweetness.
Keep it small. One or two tweaks will still feel like the same cozy dish.
Make-Ahead and Freezer Notes
Assemble the filling up to a day ahead. Keep it in the fridge in a covered bowl. For busy nights, roll the wraps and store them raw, separated with parchment, in the fridge for up to 24 hours. Cook them straight from the fridge and add a minute or two if needed.
If you freeze uncooked wraps, thaw overnight before searing. They cook up better when they’re not rock hard. If you want to cook and then freeze, crisp them first, cool, wrap tightly, and freeze. Reheat in a hot oven or skillet so they don’t steam and get soggy. For another freezer-friendly chicken idea with peppers that I go to sometimes, I like the straightforward bake method found here: cheesy baked chicken and peppers.
Questions People Often Ask
Q: Can I use a different cheese?
A: Yes. Cheddar, Monterey Jack, or a blend all work. Mozzarella keeps it milder and gooey.
Q: Do I have to cook the chicken first?
A: The recipe uses cooked chicken. Use rotisserie or leftovers if you like. If you’re starting raw, cook and shred it first.
Q: How do I keep tortillas from drying out?
A: Store them in their original bag or a sealed container. A quick pass in a hot, dry skillet for 10–15 seconds softens them before filling.
Q: Can I make these vegetarian?
A: Sure. Swap the chicken for cooked beans, mashed chickpeas, or a mix of sautéed mushrooms and spinach. Season more boldly.
Q: What’s the best oil to use?
A: Olive oil is the go-to here for flavor. Use a neutral oil if you want less flavor from the pan.
Q: Will the garlic be too strong raw?
A: The garlic mixes with cream cheese and heats in the pan. It mellows and blends into the filling. If you’re worried, use 2 cloves instead of 4.
A Warm Closing Note
You don’t need to make this perfect. Make an honest batch, call people over, and let the kitchen smell like garlic and cheese. That’s the whole point. Someone will say, “This is good,” and you’ll feel it that small quiet in the room. I always make extra.
If you want to compare notes or see another version of the dish, this Cheesy Garlic Chicken Wraps – Cooked & Loved recipe shows one way to do it.
Print
Cheesy Garlic Chicken Wraps
- Total Time: 23 minutes
- Yield: 4 servings
Description
Warm, cheesy, and filled with flavor, these wraps make for the perfect comforting dinner that can be easily prepared and served to a crowd.
Ingredients
Filling Ingredients
- 2 cups cooked chicken, shredded (Use rotisserie chicken for convenience.)
- 1 cup shredded mozzarella cheese
- 1/2 cup cream cheese, softened (Let it come to room temperature for easier mixing.)
- 4 cloves garlic, minced (Mince finely to avoid strong bites.)
- 2 tablespoons fresh parsley, chopped
- 1 teaspoon Italian seasoning
- 4 large flour tortillas (Warm them for easier rolling.)
- to taste Salt and pepper
- as needed Olive oil for cooking (Can substitute with a neutral oil.)
Instructions
Preparation
- In a bowl, mix shredded chicken, mozzarella cheese, cream cheese, minced garlic, parsley, Italian seasoning, salt, and pepper until well combined.
- Lay out a tortilla and place a generous amount of the chicken mixture in the center.
- Roll the tortilla tightly, folding in the sides as you go to secure the filling.
Cooking
- Heat olive oil in a skillet over medium heat.
- Once hot, place the wrap seam side down in the skillet and cook until golden brown and crispy, about 3-4 minutes per side.
- Remove from skillet, slice, and serve warm.
Notes
If you prefer a lighter crunch and less oil, try warming the wraps under the broiler for a minute instead of pan-frying. Leftovers can be stored in the fridge for 3 to 4 days or frozen for up to 2 months.
- Prep Time: 15 minutes
- Cook Time: 8 minutes
- Category: dinner, Main Course
- Cuisine: American
Related posts:
 Classic Garlic Butter Beef Bites Recipe With Potatos
 Banana Oatmeal Bars: A simple start for busy mornings and snack time
 Slow Cooker Unstuffed Cabbage Rolls
 Blueberry Swirl Yogurt Bites: Healthy Frozen Snack
 Easy Asian Cucumber Salad – The Perfect Side Dish
 Avocado-Egg Toast (Healthy & Hearty Breakfast)

 Main Dishes
 Drinks & Wellness