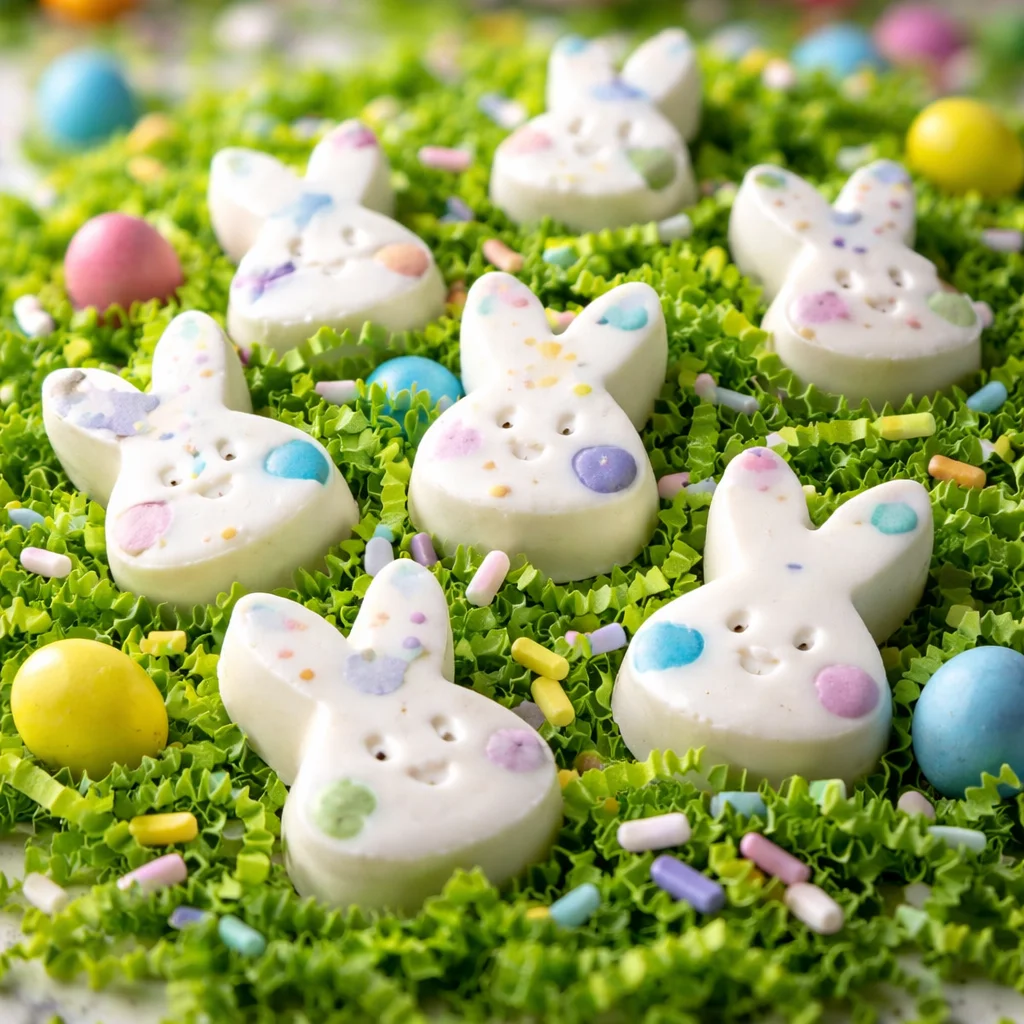
Easter Bunny Bark is my go to move when I need something cute, sweet, and fast for a spring party or a last minute classroom treat. You know that feeling when you want to bring a dessert that looks like you tried really hard, but you also have laundry going and about twelve other things on your mind? This is that recipe.
It is basically a pretty sheet of white chocolate loaded with Easter candy, then you crack it into fun pieces and suddenly everyone thinks you are a genius. It is also a really fun project if you have kids who want to help, because the decorating part is all play and no stress. Let me show you exactly how I make it at home without overthinking it.
Ingredients for White Chocolate Easter Bark (Best Candy & Sprinkles)
I like to keep the base simple and let the toppings do the talking. The secret is using white chocolate you actually like the taste of, because it is the main flavor. I usually grab good quality white chocolate chips or melting wafers, and I avoid anything that tastes waxy.
Here is what I use most often for Easter Bunny Bark:
- White chocolate (about 16 to 20 ounces, depending on how thick you want it)
- Sprinkles (pastel jimmies, confetti, or bunny shaped sprinkles)
- Mini eggs (or any candy coated chocolate)
- Small bunny chocolates or candy bunnies
- A tiny pinch of salt (optional, but it helps the sweetness)
- Optional: a teaspoon of neutral oil or coconut oil if your chocolate seems thick
If you want a similar idea for another season, I have also made a version like this for fall and it is just as addictive. Here is a fun one to bookmark: Halloween cookie bark recipe.
Best Easter Candy Toppings (Mini Eggs, Bunny Chocolates & More)
This is the part where you can totally make it your own. I usually do a mix of crunchy, chewy, and chocolatey so every bite feels different. Think of it like building the perfect trail mix, but prettier.
My favorite toppings for Easter Bunny Bark:
Mini eggs give that satisfying crunch and they look so festive. Bunny chocolates are adorable, especially if you can find the tiny ones that sit nicely on top without sinking. I also love pastel M and M style candies, jelly beans (use a light hand because they are chewy), and marshmallow bits.
Sprinkles matter more than you think. The soft pastel ones melt into the chocolate a little and look dreamy. The crunchy sugar pearls are pretty, but they can be a bit hard, so I only use a few.
One quick tip: if your toppings are big, like chunky bunny shapes, press them in gently right after you spread the chocolate. If you wait too long, they will just sit on top and fall off when you break the bark.
How to Melt White Chocolate the Right Way (Microwave & Double Boiler)
White chocolate can be a little dramatic. It melts fast, but it also burns fast. The good news is you do not need fancy tools. You just need patience and lower heat than you think.
Microwave method
Put the white chocolate in a microwave safe bowl. Heat it for 20 seconds, stir well, then keep going in 15 to 20 second bursts. Stir every time, even if it looks like nothing happened. It will melt from the inside out, and stirring saves you from overheating it.
Double boiler method
If you are nervous about the microwave, do the double boiler. Set a heat safe bowl over a pot of simmering water. Make sure the bowl does not touch the water. Stir constantly until it is smooth, then remove it right away.
Also, keep water far away from your white chocolate. Even a tiny splash can make it seize and turn grainy. If you are using sprinkles that feel a little damp or sticky, skip those.
Step-by-Step: How to Make Easter Bunny Bark at Home
This is where everything comes together, and it really is easy. I like to line a baking sheet with parchment paper so cleanup is basically nothing.
My simple steps:
First, line a sheet pan with parchment. Melt your white chocolate using your favorite method. Stir in a tiny pinch of salt if you want to balance the sweetness. Pour the melted chocolate onto the parchment, then spread it into a rough rectangle with a spoon or spatula. Do not stress about perfect edges because broken bark looks charming and homemade.
Next, sprinkle your toppings all over while the chocolate is still soft. Press the bigger pieces in gently so they set into the chocolate. Then let it sit at room temp until set, or pop it into the fridge for about 15 to 25 minutes.
When it is totally firm, lift it off the pan and break it into pieces. I like a mix of big shards and smaller snacky bits. That is it, you just made Easter Bunny Bark and it looks like a bakery treat.
If you love the bark idea in general, you would probably also like this fun twist: cookie bark recipe. It is the same low stress vibe.
Pro Tips for Perfect Chocolate Bark Texture & Snap
If you want that clean snap when you break it, focus on two things: melting gently and letting it set fully. Rushing is what makes bark soft or streaky.
My best tips:
Do not overheat the white chocolate. If it gets thick and clumpy, it probably got too hot. Add a tiny bit of coconut oil and stir, but if it smells burnt, start over. Also, spread the chocolate in an even thickness. Super thin spots get brittle and super thick spots can feel too rich.
And one more thing that helps: let it set without touching it. I know it is tempting to poke it, but hands leave marks and warmth. If you are storing it in the fridge, keep it away from strong smells like onions or leftovers. White chocolate loves to absorb odors.
Fun Variations: Milk Chocolate, Dark Chocolate & Swirled Bark
White chocolate is the classic Easter look, but you can absolutely play around. Sometimes I do a half and half situation because not everyone loves white chocolate.
Easy variation ideas:
Milk chocolate Easter bark tastes like a candy bar and pairs great with mini eggs. Dark chocolate is perfect if you want less sweet, especially with jelly beans or marshmallows. For swirled bark, melt white chocolate and milk or dark chocolate separately, pour both onto the parchment, then gently swirl with a knife. Do not overmix or you will lose the pretty streaks.
You can even add a little flavor to the white chocolate, like a drop or two of peppermint extract, but go easy. Too much extract can make the chocolate seize.
Kid-Friendly Decorating Ideas for Easter Candy Bark
This is one of my favorite kitchen projects to do with kids because there is no knife work, no raw eggs, and no exact measuring. I just set up little bowls and let them create their own designs.
Some fun ideas:
Make sections like a little candy mosaic. One area is mini eggs, one area is sprinkles, one area is bunny candies. You can also do a simple pattern like stripes of sprinkles or a rainbow of pastel candies. If you have cookie cutters, you can place them on the chocolate and fill them with sprinkles, then lift the cutter off for a cute shape outline.
My only rule is this: remind them to press toppings in gently so the pieces do not fall off later. If you want another seasonal activity style treat, this is a cute one to browse too: Halloween cookie bark recipe. Same concept, different vibe.
Dietary Swaps: Gluten-Free, Nut-Free & Dairy-Free Options
One reason I love Easter Bunny Bark is how easy it is to adapt. The base recipe is naturally gluten free as long as your toppings are gluten free. The biggest issues tend to be cross contamination and sneaky ingredients in candies.
For gluten free, check labels on sprinkles and candy coatings. For nut free, skip anything made in facilities with tree nuts if you are being careful, and avoid candies with praline or nut fillings. For dairy free, use dairy free white chocolate alternatives, and choose dairy free candies. They exist, but you may need to look at specialty brands.
If you are making this for a school event, I always suggest keeping it simple and clearly labeling the ingredients. It is a small step that helps everyone feel safe grabbing a piece.
Serving Ideas for Easter Dessert Boards & Party Tables
This bark is basically made for sharing. I love putting it on a platter with other easy sweets and fruit. It looks festive without a lot of work.
Simple ways to serve it:
Layer pieces of Easter Bunny Bark on a cake stand, then tuck in strawberries or grapes around the edges. Add a bowl of jelly beans for extra color. If you are doing a dessert board, mix bark pieces with shortbread cookies, pretzels, and mini cupcakes. The bark also makes a cute topper for ice cream, just stick a shard into a scoop like a little flag.
How to Store, Freeze & Make Easter Bark Ahead
I am a big fan of making holiday treats ahead because the day of the event is always chaos. The good news is bark stores really well.
To store it, keep it in an airtight container at cool room temp for about a week, as long as your kitchen is not warm. If it is warm, store it in the fridge. Just know that fridge storage can sometimes cause a little condensation when you bring it out, so keep it covered until it comes to room temp.
You can freeze it too. Place pieces in a freezer safe container with parchment between layers. It will keep for about 2 months. Thaw in the fridge overnight, then bring to room temp while still covered.
Packaging Ideas for Easter Baskets & Edible Gifts
This is one of my favorite edible gifts because it is lightweight, cheerful, and easy to portion. Plus it does not crumble like cookies sometimes do.
Packaging ideas that look cute fast:
Cellophane bags tied with pastel ribbon, little treat boxes with a parchment liner, or mason jars if you want that cozy homemade feel. If I am giving it as a teacher gift, I add a small label that says what it is and a quick note like handmade Easter Bunny Bark. People really appreciate knowing what they are biting into.
If you want to add a little extra, tuck in a few chocolate eggs or a tea bag. It makes it feel like a whole gift moment.
Common Mistakes to Avoid When Making Chocolate Bark
I have made every bark mistake so you do not have to.
The biggest ones are overheating the chocolate, adding toppings too late, and using wet tools. Another common issue is putting it in the freezer to set quickly. That can sometimes lead to weird texture or condensation later. The fridge is gentler.
Also, do not overload it. I know more candy feels fun, but if you pile it too thick, the chocolate cannot hold it and the pieces fall apart when you break them. Aim for a nice even sprinkle with a few standout toppings.
One more thing: if you are using candy with a coating, like mini eggs, do not chop them while they are super cold. The coating can crack and shed. Let them sit out a few minutes first.
And if you are in the mood for another bark style treat, I have to mention this again because it is such a good idea for parties: Halloween cookie bark recipe. Different holiday, same easy joy.
Common Questions
Can I make Easter Bunny Bark without sprinkles?
Yes. It will still taste great. Add more candy or crushed cookies for texture, or leave it clean and simple.
Why did my white chocolate turn grainy?
Usually it got too hot or a tiny bit of water got into it. Melt slower, stir often, and keep everything dry.
How thick should I spread the chocolate?
I like about 1 quarter inch. Thin enough to snap, thick enough to hold toppings.
Can I use food coloring to tint the chocolate?
Only use oil based coloring made for chocolate. Regular liquid food coloring can make it seize.
Is Easter Bunny Bark safe to make ahead for a party?
Totally. It is actually better when it has time to set and the flavors settle a bit.
A sweet little Easter win
If you make this once, you will see why I keep coming back to it every spring. Easter Bunny Bark is easy, adorable on a table, and one of those treats that makes people smile as soon as they see it. If you want more inspiration, I also love browsing ideas like Easy Bunny Bark – Sprinkle Bakes when I feel like switching up the colors and candy mix. Grab your favorite chocolates, let the kids go wild with the sprinkles, and have fun with it. You have got this, and your future self will be so happy you made it.
Print
Easter Bunny Bark
- Total Time: 25 minutes
- Yield: 12 pieces
Description
Cute, sweet, and quick to make, Easter Bunny Bark is the perfect treat for spring parties or last-minute classroom gifts. This delightful dessert features a base of melted white chocolate adorned with colorful Easter candies and sprinkles.
Ingredients
Main Ingredients
- 16 to 20 ounces White chocolate (Use good quality white chocolate chips or melting wafers.)
- 1 pinch Salt (Optional, helps balance the sweetness.)
- 1 teaspoon Neutral oil or coconut oil (Optional, if the chocolate seems thick.)
Candy Toppings
- 1 cup Sprinkles (Pastel jimmies, confetti, or bunny-shaped sprinkles.)
- 1 cup Mini eggs (Or any candy-coated chocolate.)
- 1 cup Small bunny chocolates or candy bunnies (Use tiny ones that can sit nicely on top.)
Instructions
Preparation
- Line a sheet pan with parchment paper.
- Melt the white chocolate using your preferred method (microwave or double boiler).
- Stir in a pinch of salt if desired, then pour the melted chocolate onto the parchment.
- Spread the chocolate into a rough rectangle.
Topping
- Sprinkle your toppings over the melted chocolate while it is still soft.
- Press larger pieces gently into the chocolate to secure them.
Setting
- Allow the bark to sit at room temperature until set, or place it in the fridge for 15 to 25 minutes.
- Once firm, lift it off the pan and break it into pieces.
Notes
If you want to make it gluten-free or dairy-free, check the ingredient labels on the toppings. For optimal texture and snap, avoid overheating the white chocolate. Store in an airtight container at room temperature for up to a week or freeze for up to 2 months.
- Prep Time: 10 minutes
- Category: Dessert, Snack
- Cuisine: American
Related posts:
 Sakura Mochi: A Japanese Dessert You Can Easily Make at Home
 Crumbl Chocolate Chip Cookie Recipe You’ll Want to Make Again
 Spooktacular Witch’s Brooms Recipe for Halloween Fun
 Small Batch Apple Pumpkin Streusel Muffins
 Crumbl Christmas Sugar Cookies Easy Recipe
 Deliciously Simple Candied Orange Slices

 Main Dishes
 Drinks & Wellness