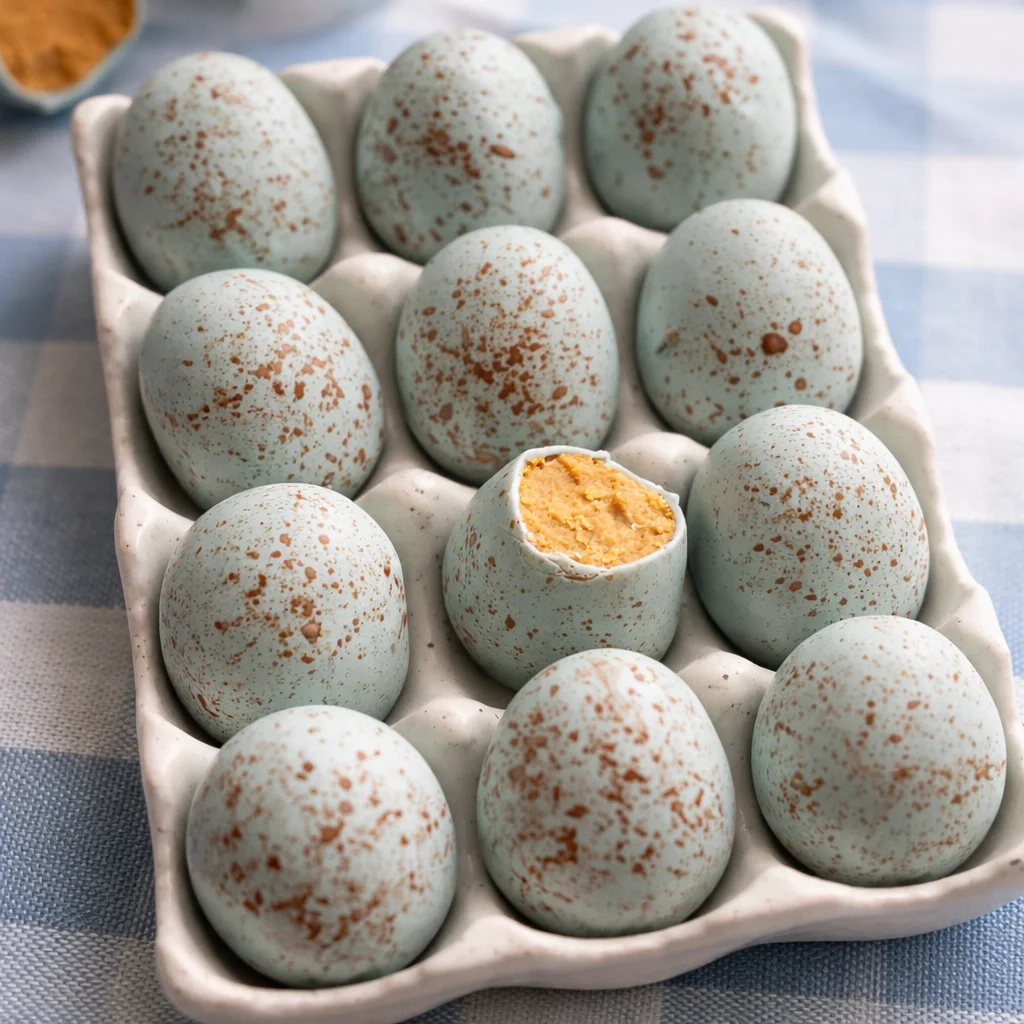
Peanut Butter Easter Eggs are my go to treat when I want something cute, chocolatey, and homemade without turning my kitchen into a stress zone. Maybe you have Easter plans coming up, maybe you just want a fun weekend project, or maybe you have that one bag of chocolate chips sitting in the pantry giving you the guilt stare. This recipe is the kind of sweet that feels special but is honestly pretty simple. No baking, no fancy candy thermometer, and no waiting around for dough to rise. If you can stir peanut butter and melt chocolate, you are absolutely in business.
Ingredients for the Best Peanut Butter Easter Eggs (Substitutions + Dietary Options)
I like to keep this ingredient list short because the whole point is easy. The flavor comes from **creamy peanut butter**, a little sweetness, and that snappy chocolate shell. Here is what I use most often, plus some swaps that actually work.
- Creamy peanut butter: regular supermarket peanut butter works best because it is stable. Natural peanut butter can work, but it tends to be softer and oilier.
- Butter: helps the filling set and makes it taste like candy shop filling.
- Powdered sugar: gives structure and that classic melt in your mouth texture.
- Vanilla extract: optional, but it makes the filling taste warm and bakery like.
- Salt: a tiny pinch makes the peanut butter taste louder in the best way.
- Chocolate: chips, bars, wafers, whatever you love melting and dipping.
- Optional coconut oil or shortening: a small spoonful makes melted chocolate smoother for dipping.
Dietary and substitution notes:
If you need dairy free, use a plant based butter and dairy free chocolate. If you need peanut free, sunflower butter works, but the flavor is different and it can be softer, so you may need a bit more powdered sugar. For lower sugar, you can reduce powdered sugar slightly, but the filling will be less firm. You can also try a powdered sweetener substitute, just know texture varies by brand. Also, if you are on a big butter kick lately, you might love these cozy side dishes too like French onion butter rice for your holiday table.
How to Make Peanut Butter Easter Eggs Step-by-Step (No-Bake Method)
This is the part where you realize homemade candy is not as scary as it sounds. I make Peanut Butter Easter Eggs in two main phases: mix and shape the filling, then dip in chocolate.
Step 1: Make the filling.
In a medium bowl, mix peanut butter and softened butter until smooth. Add vanilla and salt. Then stir in powdered sugar in batches. At first it looks crumbly, then suddenly it comes together like play dough.
Step 2: Chill the filling.
Pop the bowl in the fridge for 15 to 20 minutes. This makes shaping easier and less sticky.
Step 3: Shape the eggs.
Scoop a heaping tablespoon and roll it into a ball, then gently pinch one end to make an egg shape. Place on a parchment lined tray.
Step 4: Freeze briefly.
Freeze the shaped eggs for about 20 to 30 minutes. You want them firm, not rock solid.
Step 5: Melt the chocolate.
Melt chocolate in the microwave in short bursts, stirring often. Add a little coconut oil if you want it thinner.
Step 6: Dip and set.
Dip each egg, let the extra chocolate drip off, then place it back on parchment. Chill until set. That is it. No bake, no drama.
These are perfect after dinner when you want a sweet bite, kind of like how I feel about comfort meals such as one pan chicken buttered noodles when I need something easy and cozy.
Pro Tips for Perfect Chocolate-Covered Peanut Butter Eggs Every Time
I have made these enough times to learn a few things the hard way, so you do not have to.
Chill the shapes before dipping. If the filling is warm, it will slide around in the chocolate and you will be annoyed.
Keep your hands cool. If your kitchen runs warm, rinse your hands in cool water, dry them, then shape a few eggs at a time.
Do not overheat the chocolate. If chocolate gets too hot, it can look dull or thick. Go slow and stir a lot.
Use a fork for dipping. A fork lets extra chocolate drip off cleanly. Tap gently on the side of the bowl.
Fix bald spots. If you see a thin spot after dipping, spoon a little extra chocolate over it and smooth it out.
When you nail the texture, Peanut Butter Easter Eggs look like they came from a candy shop, and that feeling is weirdly satisfying.
Choosing the Best Chocolate for Dipping and Coating Easter Candy
Chocolate choice matters, but you do not need to overthink it. Use what you like to eat straight from the bag.
Chocolate chips are convenient and tasty, but they melt a bit thicker. Adding a teaspoon or two of coconut oil helps.
Chocolate bars usually melt smoother and can look glossier.
Candy melts are the easiest for a super smooth coat, but the flavor can be more sweet than chocolatey.
My personal favorite is semi sweet chocolate for balance, since the filling is already sweet. If you are making these for kids, milk chocolate is always a hit.
Tools and Equipment You Need for Easy Homemade Easter Candy
You do not need much. Here is the basic setup that makes the process painless.
Must haves: mixing bowl, spoon or hand mixer, baking sheet, parchment paper, microwave safe bowl, fork for dipping.
Nice extras: small cookie scoop for even sizing, silicone spatula, disposable piping bag if you want fancy drizzles.
If you are already pulling out kitchen gear for holiday cooking, you might be planning a hearty main too, and I keep recipes like crockpot garlic butter beef bites potatoes in my back pocket because it frees up time for dessert projects like this.
How to Shape, Fill, and Dip Peanut Butter Eggs Like a Pro
Shaping is the only part that feels artsy, but it is forgiving.
For clean shapes: keep your portions consistent. A scoop helps. Roll into a ball, then press slightly to flatten the bottom just a touch so it sits nicely. Pinch one end for that egg look.
For smooth dipping: make sure the eggs are cold and the chocolate is fluid. Dip fast, lift with a fork, tap once or twice, then slide onto parchment.
For pretty tops: if you want sprinkles, add them right after dipping while the chocolate is still wet. If you want a drizzle, wait until the first layer sets, then drizzle contrasting chocolate over the top.
Flavor Variations: Classic, Vegan, Keto, and Healthy Peanut Butter Eggs
Once you have the base down, it is fun to play around.
Classic: add vanilla and a pinch of salt, then use semi sweet chocolate.
Crunchy: use crunchy peanut butter or mix in crushed rice cereal for a little crackle.
Vegan: plant butter, dairy free chocolate, and double check your powdered sugar brand if you are strict about it.
Keto style: use a powdered sugar free sweetener and a low sugar chocolate. Texture can be a little softer, so chill longer.
Healthier vibe: reduce the powdered sugar slightly and add a tablespoon of almond flour to help the filling stay sturdy. It is still candy, just a bit less sweet.
How to Make Copycat Reese’s Peanut Butter Eggs at Home
If what you really want is that familiar store bought taste, this is the trick: keep the filling simple, sweet, and smooth. Reese style Peanut Butter Easter Eggs usually have a filling that is not too peanut forward and not too salty.
Use creamy peanut butter, do not use natural. Add enough powdered sugar so it is firm but still soft when you bite in. Then coat in milk chocolate for that classic vibe. If you want that extra candy taste, skip fancy chocolate and just use regular milk chocolate chips. Sometimes simple really is the answer.
Decorating and Presentation Ideas for Easter Dessert Platters
This is where you can make them look like a big deal, even if you made them in sweatpants.
Easy decorating ideas:
Drizzle with white chocolate. Add pastel sprinkles. Dust lightly with powdered sugar for a soft look. Or press a tiny candy flower on top right after dipping.
For platters, I like mixing them with berries and a few cookies. If you want another homemade treat that looks fancy but is actually straightforward, check out German butter cookies. They are so good with coffee.
Make-Ahead, Storage, and Freezing Tips for Peanut Butter Easter Eggs
One reason I love making Peanut Butter Easter Eggs is that they are great for planning ahead.
Make ahead: you can shape the filling eggs and freeze them on a tray. Once solid, store in a freezer bag. Dip in chocolate later when you have time.
Fridge storage: keep in an airtight container in the fridge for up to about 1 week for best texture.
Freezing: freeze finished eggs in a sealed container with parchment between layers for up to 2 to 3 months. Thaw in the fridge so the chocolate does not sweat too much.
Serving Suggestions for Easter Brunch, Parties, and Gift Boxes
These are basically made for sharing. Here are a few ways I like to serve them.
- Easter brunch: set them on a platter with fruit and mini muffins for a grab and go sweet.
- Party dessert table: stack them on a tiered stand and add a little bowl of extra sprinkles.
- Gift boxes: place 2 to 4 eggs in a small treat box with parchment paper and a simple ribbon.
- After dinner treat: one egg with coffee is honestly perfect.
Common Mistakes to Avoid When Making Homemade Peanut Butter Eggs
I have done all of these at least once.
Filling too soft: usually means too much peanut butter or not enough powdered sugar. Add more powdered sugar a spoonful at a time, then chill.
Chocolate too thick: it may be overheated or just naturally thick like chips. Add a little coconut oil and stir.
Eggs cracking: this happens if you freeze them too long and the temperature shock is big when dipping. Let them sit a couple minutes before dipping.
Grainy filling: butter was too cold or not mixed enough. Use softened butter and mix until smooth before adding sugar.
Nutrition Info, Allergen Tips, and Ingredient Swaps
Nutrition will vary based on size and chocolate, but here is the general idea: these are a rich candy, so I treat them like a special treat, not an all day snack. If you want smaller portions, make mini eggs and use a teaspoon sized scoop.
Allergens: peanuts and dairy are the big ones if you use butter and milk chocolate. Some chocolates also contain soy lecithin. Always check labels if you are serving others.
Ingredient swaps that work: sunflower butter for peanut butter, plant butter for butter, dairy free chocolate for regular chocolate. If you use natural peanut butter, expect a softer filling and plan to chill longer.
Common Questions
Why won’t my Peanut Butter Easter Eggs hold their shape?
The filling is usually too warm or too soft. Chill it longer, and add a bit more powdered sugar until it feels like soft play dough.
Can I use natural peanut butter?
Yes, but it is trickier because it is oilier. Stir it really well first, then expect to add more powdered sugar and chill more.
How do I make the chocolate coating smooth and shiny?
Melt slowly, stir often, and do not overheat. A small spoonful of coconut oil can help the chocolate flow better for dipping.
Can I make these without butter?
You can, but the texture will be different and sometimes a little crumbly. A plant based butter is the closest swap.
How far ahead can I make them?
You can make them a week ahead and keep them in the fridge, or freeze them for a couple months for longer planning.
A Sweet Little Easter Win
If you make these once, you will see why I keep coming back to them every spring. Peanut Butter Easter Eggs are simple, fun, and they taste like that perfect mix of creamy filling and crisp chocolate. If you want to compare methods or get more inspiration, I also like checking out this Peanut Butter Easter Eggs – Crowded Kitchen post when I am in recipe browsing mode. Now grab your chocolate, clear a little fridge space, and give it a try. You will probably “test” one right away, and honestly, I support that.
Print
Peanut Butter Easter Eggs
- Total Time: 40 minutes
- Yield: 12 pieces
Description
Delicious no-bake Peanut Butter Easter Eggs with a creamy filling and a chocolate shell, perfect for Easter or a fun weekend project.
Ingredients
For the Filling
- 1 cup creamy peanut butter (Regular supermarket peanut butter works best.)
- 2 tablespoons butter, softened (Helps the filling set and adds flavor.)
- 1 cup powdered sugar (Gives structure and classic melt-in-mouth texture.)
- 1 teaspoon vanilla extract (Optional, enhances the flavor.)
- 1 pinch salt (Enhances the peanut butter flavor.)
For the Chocolate Coating
- 1 cup chocolate chips (Semi-sweet chocolate recommended.)
- 1 teaspoon coconut oil or shortening (Optional, helps make melted chocolate smoother.)
Instructions
Making the Filling
- In a medium bowl, mix peanut butter and softened butter until smooth.
- Add vanilla and salt, then stir in powdered sugar in batches until a dough-like consistency is achieved.
Chilling the Filling
- Refrigerate for 15 to 20 minutes to make shaping easier.
Shaping the Eggs
- Scoop a heaping tablespoon of the mixture, roll it into a ball, and pinch one end to form an egg shape.
- Place shaped eggs on a parchment-lined tray.
Freezing
- Freeze the eggs for about 20 to 30 minutes to firm them up.
Melting the Chocolate
- Melt chocolate in the microwave in short bursts, stirring often. Add coconut oil if desired.
Dipping the Eggs
- Dip each shaped egg in melted chocolate, allowing excess to drip off before placing them back on parchment.
- Chill until chocolate is set.
Notes
These eggs can be made ahead and stored in the fridge for up to a week or frozen for 2-3 months. Adjust the filling consistency with powdered sugar as needed.
- Prep Time: 40 minutes
- Category: Dessert, Snack
- Cuisine: American, Easter
Related posts:
 Sakura Mochi: A Japanese Dessert You Can Easily Make at Home
 Crumbl Chocolate Chip Cookie Recipe You’ll Want to Make Again
 Spooktacular Witch’s Brooms Recipe for Halloween Fun
 Small Batch Apple Pumpkin Streusel Muffins
 Crumbl Christmas Sugar Cookies Easy Recipe
 Deliciously Simple Candied Orange Slices

 Main Dishes
 Drinks & Wellness