
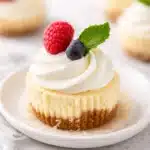
Mini Cheesecakes are my go to dessert when I need something cute, reliable, and party friendly without spending my whole day in the kitchen. You know that moment when you realize you promised to bring dessert and suddenly your brain goes blank? Yep, that’s when these save me. They bake fast, chill nicely, and everyone gets their own little bite size treat. Plus, you can top them a bunch of different ways so they look fancy even when they are super simple. Let’s get into it.
Ingredients You’ll Need for Homemade Mini Cheesecakes
I love this recipe because the ingredient list is short and everything is easy to find. The key is using room temperature cream cheese so the filling turns out extra creamy and smooth.
- Graham cracker crumbs (or cookie crumbs) for the crust
- Butter, melted
- Cream cheese, full fat tastes best
- Sugar
- Sour cream (or Greek yogurt) for that soft tang
- Vanilla extract
- Eggs, room temperature
- Pinch of salt
Optional but highly encouraged toppings: fresh berries, lemon curd, salted caramel, mini chocolate chips, or a spoonful of jam.
Also, if you’re in a no bake mood, I have a soft spot for these no-bake cheesecakes too. Different vibe, same happiness.
Essential Tools and Equipment for Perfect Mini Cheesecakes
You do not need anything fancy here, which is part of the charm. But a few basics make the process smoother and help you get that clean bakery look.
Here’s what I grab:
Standard muffin pan, 12 count is perfect
Paper liners so they lift out easily
Mixing bowls
Hand mixer or stand mixer
Measuring cups and spoons
Small cookie scoop (optional, but makes portioning neat)
Rubber spatula for scraping every last bit, because yes, we want all of it
And just a quick party snack detour. If you’re building a holiday spread, these mini grilled cheese Hawaiian rolls are dangerously easy to snack on while the cheesecakes bake.
Step-by-Step Instructions for Baking Mini Cheesecakes
This is the part where it feels like magic because the steps are simple, and the results look like you worked way harder than you did.
1) Prep the crust
Heat your oven to 325 F. Line your muffin pan with paper liners. Mix graham cracker crumbs with melted butter and a little sugar if you like it sweeter. Spoon about 1 tablespoon into each liner and press it down firmly. A shot glass works great for pressing.
2) Mix the filling
Beat the cream cheese and sugar until smooth. Add sour cream, vanilla, and salt. Then add eggs one at a time, mixing just until combined. Try not to overmix once the eggs go in, because too much air can lead to cracks.
3) Fill and bake
Scoop the filling into the cups, almost to the top. Bake about 15 to 18 minutes. They should look set around the edges but still a little wiggly in the center.
If you’re craving a cozy baking day, these cinnamon swirl pumpkin bread minis are also a sweet fall win alongside Mini Cheesecakes on a dessert table.
No Water Bath Method for Easy Mini Cheesecakes
I used to think cheesecake always meant a water bath and a bunch of stress. But mini versions are way more forgiving. The small size helps them bake evenly without all the drama.
My no water bath approach:
Bake at 325 F so they cook gently.
Do not overbake, pull them when the centers still jiggle slightly.
Avoid overmixing the batter after adding eggs.
If your oven runs hot, place a simple pan of hot water on the lower rack. Not a bath, just a little steam support.
Honestly, this is why I make Mini Cheesecakes for parties. They look impressive, but they are pretty low stress.
Cooling, Chilling, and Setting Your Mini Cheesecakes
This step is where patience pays off. The flavor gets better and the texture gets firmer as they chill.
Here’s my routine:
Let them cool in the pan for about 15 minutes.
Move them to a rack and cool to room temp.
Chill for at least 3 hours, but overnight is even better.
When they are fully chilled, peel the liner down gently for that clean edge. If you want super tidy sides, use thicker liners and let them chill completely before touching them.
Creative Mini Cheesecake Variations and Flavors
This is where you can have fun and make them feel custom for the season or the person you’re feeding. I like sticking with one base recipe and splitting the toppings so there’s something for everyone.
Easy flavor ideas:
Lemon: add lemon zest and top with lemon curd. If you like bright desserts, these mini meringues with lemon curd are also adorable on a spring table.
Chocolate: add cocoa powder or melted chocolate and top with ganache.
Cookies and cream: fold in crushed sandwich cookies.
Pumpkin spice: swap in pumpkin puree and warm spices for fall.
Berry swirl: swirl in a teaspoon of jam before baking.
Serving Suggestions for Parties, Holidays, and Everyday Desserts
Mini Cheesecakes are basically built for sharing. They travel well, they plate well, and they don’t require a knife. Here are my favorite ways to serve them:
- Set up a topping bar with berries, whipped cream, caramel, chocolate sauce, and crushed cookies
- Serve on a tiered stand for that instant party look
- Add holiday sprinkles to match the theme
- Pair with coffee or hot cocoa for an easy dessert moment
- Do a sweet and savory spread with bites like savory mini grilled cheese Hawaiian rolls
For Christmas parties, I like to mix in a few playful appetizers too. These mini brie Christmas trees always get people hovering around the snack table.
Tips for Make-Ahead Mini Cheesecakes and Freezing
If you’re hosting, make ahead is your best friend. I almost always bake these the day before so I am not scrambling while guests are texting, “On my way.”
Make ahead: Bake and chill overnight, then add toppings right before serving.
Freezing: Freeze them plain, without whipped cream or juicy fruit on top. Wrap each one and store in a freezer bag. They keep well for about 1 to 2 months.
Thawing: Move to the fridge overnight. They taste best chilled, not room temp.
Mini Cheesecake Decorating Ideas: From Simple to Fancy
I’m not the person doing complicated piping work on a Tuesday, so I lean on simple tricks that look great.
Quick decorating ideas:
One berry plus a mint leaf, super easy and pretty.
Whipped cream swirl with a sprinkle of cookie crumbs.
Chocolate drizzle using a spoon, no perfection needed.
Caramel and a pinch of flaky salt for that sweet salty hit.
Holiday style sprinkles or colored sugar.
If you’re serving Mini Cheesecakes at a big event, try doing three topping styles and repeating them. It looks intentional and you don’t need 12 different things.
Quick and Easy Mini Cheesecake Bites for Kids and Adults
These are basically the friendliest dessert. Kids love having their own little treat, and adults love that it feels portioned. You can also bake them in mini muffin tins for true bite size minis, just reduce the bake time and keep an eye on them.
For kid friendly versions, I like topping with crushed cookies, mini chocolate chips, or a tiny dollop of whipped cream with sprinkles. For adults, I’ll do espresso powder in the batter or top with a spoon of berry compote.
Nutritional Information and Ingredient Substitutions
I’m not a nutrition calculator in human form, but I can give you a realistic idea. One standard mini cheesecake (with crust, no heavy toppings) usually lands around 180 to 260 calories, depending on size and ingredients. Toppings can bump that up fast, especially caramel and whipped cream.
Easy swaps that still work:
Gluten free: use gluten free graham crackers or cookies for the crust.
Lower sugar: reduce sugar slightly and use a fruit topping for sweetness.
Sour cream substitute: plain Greek yogurt works well and keeps it tangy.
Dairy free: use dairy free cream cheese and dairy free yogurt, but expect a slightly different set and flavor.
Common Questions
Why did my mini cheesecakes crack?
Usually overbaking or overmixing. Pull them when the center still has a gentle jiggle.
Can I make Mini Cheesecakes without liners?
You can, but liners make life easier. Without liners, grease the pan well and use a thin knife to loosen them.
How long do they last in the fridge?
About 4 to 5 days, kept covered so they do not pick up fridge smells.
Can I use store bought crusts?
For minis, it is easier to press your own crumbs into liners. Store bought crusts are usually made for full pies.
Do I have to chill them?
Yes, chilling is what gives you that classic cheesecake texture. Warm cheesecake is just not the same.
A Sweet Little Wrap Up Before You Bake
If you want a dessert that looks party ready but feels totally doable, Mini Cheesecakes are it. Keep the base simple, chill them well, and let toppings do the fun work. If you want another solid reference for technique and timing, I also like this guide on Mini Cheesecakes (in a Standard Muffin Pan) – Sally’s Baking because it lines up with how most home kitchens actually work. Now pick your topping plan, clear a little fridge space, and go make a batch for your next holiday or random Tuesday night treat.
Mini Cheesecakes
- Total Time: 3 hours 48 minutes
- Yield: 12 servings
Description
These adorable Mini Cheesecakes are the perfect party dessert easy to make, customizable, and always a crowd-pleaser.
Ingredients
For the crust
- 1 cup Graham cracker crumbs (Or any cookie crumbs)
- 4 tablespoons Butter, melted
- 2 tablespoons Sugar (Optional for sweeter crust)
For the filling
- 16 ounces Cream cheese, full fat (Room temperature for best results)
- 3/4 cup Sugar
- 1/2 cup Sour cream or Greek yogurt (For a soft tang)
- 1 teaspoon Vanilla extract
- 2 Eggs (Room temperature)
- 1 pinch Salt
Optional toppings
- Fresh berries (For a refreshing topping)
- Lemon curd (Bright and tangy option)
- Salted caramel (For a sweet and salty twist)
- Mini chocolate chips
- Jam (For a fruity touch)
Instructions
Preparation
- Heat your oven to 325°F. Line your muffin pan with paper liners.
- Mix graham cracker crumbs with melted butter and sugar if desired. Spoon about 1 tablespoon into each liner and press down firmly using a shot glass.
Making the filling
- Beat the cream cheese and sugar until smooth.
- Add sour cream, vanilla, and salt, then add eggs one at a time, mixing just until combined. Be careful not to overmix.
Baking
- Scoop the filling into the muffin cups, almost to the top.
- Bake for about 15 to 18 minutes, until they are set around the edges but still slightly wiggly in the center.
Cooling and chilling
- Let them cool in the pan for about 15 minutes.
- Move them to a rack to cool to room temperature, then chill for at least 3 hours, preferably overnight.
Notes
Make ahead and freeze plain for 1-2 months. Top just before serving for the best presentation.
- Prep Time: 30 minutes
- Cook Time: 18 minutes
- Category: Dessert, Snack
- Cuisine: American


 Main Dishes
 Drinks & Wellness