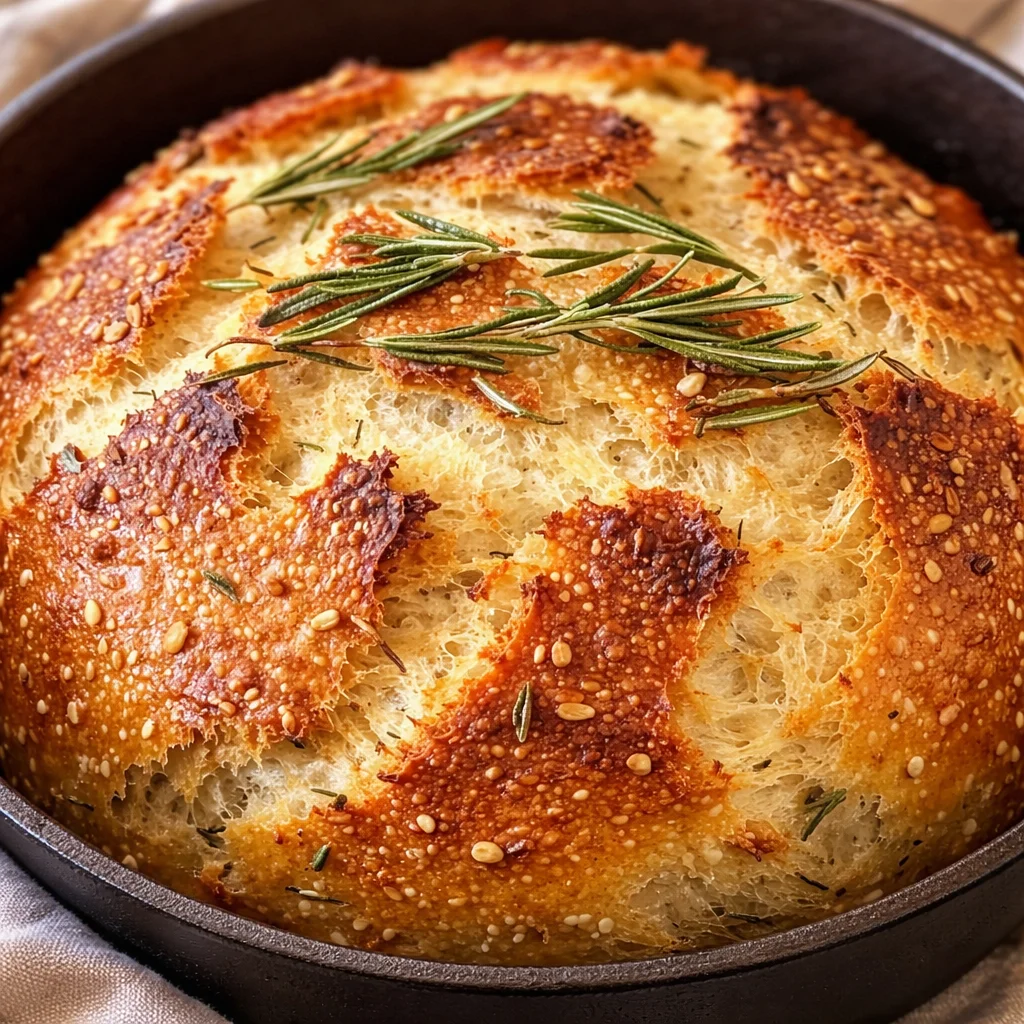
Dutch Oven Garlic Rosemary Bread is my go to move when I want something that feels impressive but doesn’t require me to babysit the oven all day. You know those days when dinner is handled, but the table still feels kind of sad? This bread fixes that fast. The crust comes out crackly, the inside is chewy and soft, and your kitchen smells like garlic and fresh herbs for hours. I started making it after one too many bland store loaves, and honestly, I never looked back. Let’s bake a loaf that makes you feel like you have your life together, even if the sink is full of dishes.
Ingredients for the Best Garlic Rosemary Dutch Oven Bread
If you’ve ever been intimidated by bread recipes, this one is friendly. The ingredient list is short, and most of it is pantry stuff. The flavor comes from a few simple add ins that do a lot of heavy lifting.
- All-purpose flour (you can absolutely use bread flour too)
- Active dry yeast
- Warm water (not hot, think warm bath)
- Salt
- Fresh rosemary (dried works in a pinch)
- Garlic (fresh minced is best)
- Olive oil
When I’m in a garlic mood, I’ll serve this with something cozy like my favorite soup, or I’ll plan a full garlic theme night. If that sounds like you, you might also like this cheddar garlic herb potato soup on the side. Total comfort.
Key Ingredients: All-Purpose Flour, Active Dry Yeast, Fresh Rosemary, Garlic, Olive Oil
This is where the magic really happens, so let’s talk about the important players without getting all science class about it.
All-purpose flour makes a loaf that’s tender but still chewy. Bread flour gives you a slightly stronger chew, but all-purpose is totally reliable and what I use most often.
Active dry yeast is the little engine that makes your dough rise. If your yeast is old, your bread will be sad and dense. If you’re not sure if it’s alive, proof it in warm water for a few minutes and look for foam.
Fresh rosemary is that woodsy, cozy flavor that makes the loaf feel fancy. Chop it up pretty fine so you don’t end up with big pokey herb pieces in every bite.
Garlic should be minced or grated. I’ve tried garlic powder before, and it’s fine, but fresh garlic gives that real savory bite that makes this loaf unforgettable.
Olive oil rounds everything out. It adds a little richness and helps the crumb stay soft.
Ingredient Substitutions and Flavor Enhancements
I’m a big fan of recipes that don’t fall apart if you swap one thing. Here are the swaps I’ve tested and actually feel good about.
If you only have dried rosemary, use about one third of the amount you’d use fresh. Dried herbs are stronger. If you want a softer garlic vibe, roast a few cloves first and mash them into the dough. Roasted garlic turns sweet and mellow, and it’s honestly addictive.
Want more savory flavor? Add a handful of grated parmesan or shredded mozzarella. Or go bold and mix in cracked black pepper and a pinch of red pepper flakes. If you’re already thinking about cheesy garlic situations, you might want to check out these cheesy garlic chicken wraps for an easy weeknight pairing.
For a slightly heartier loaf, swap in up to 1 cup of whole wheat flour. More than that and the loaf can start to feel heavy unless you increase the water a bit.
Essential Equipment for Baking Bread in a Dutch Oven
You don’t need a fancy setup, but a few tools make the whole process smoother. The main thing is the Dutch oven, because it traps steam and gives you that bakery style crust.
I also like having a large mixing bowl, a wooden spoon or spatula, and something to cover the dough while it rises. A clean towel works great. Parchment paper is a lifesaver for lifting the dough in and out without burning your fingers.
Choosing the Right Dutch Oven (Cast Iron, Enameled, Size Guide)
A 5 to 7 quart Dutch oven is the sweet spot for a round loaf. Cast iron and enameled both work. I use enameled most of the time because it’s easier to clean, but plain cast iron gives a gorgeous crust too.
Quick tips for choosing:
Size: Too small and your loaf will hit the lid. Too big and the bread spreads out more than it rises.
Lid: You want a tight fitting lid to trap steam.
Handles: Big handles are easier to grab with oven mitts.
Tools for Mixing, Proofing, and Scoring Dough
You can keep it simple. For mixing, you just need a bowl and spoon. For proofing, a towel or plastic wrap. For scoring, you can use a sharp knife if that’s what you’ve got, but a razor blade or bread lame gives cleaner cuts.
Scoring helps the loaf expand where you want it to. If you skip scoring, the bread will still rise, it’ll just crack wherever it feels like, which can be a little chaotic. Not the end of the world though.
How to Make Dutch Oven Garlic Rosemary Bread Step-by-Step
This is the part where it all comes together. I’ve made this loaf enough times to tell you it’s very forgiving. The goal is a dough that’s sticky but manageable. And yes, your hands will get a little messy. That’s part of the fun.
If you’re a garlic bread superfan like me, you might also like my weekend project loaf vibes from this sourdough garlic bread recipe. Different style, same garlic joy.
Mixing and Hydrating the Dough
In a big bowl, mix flour, salt, yeast, chopped rosemary, and minced garlic. Add warm water and olive oil, then stir until it looks like a shaggy, sticky dough. If there’s dry flour at the bottom, keep mixing until it’s fully combined.
Don’t overthink it. You’re not trying to make it pretty at this stage.
First Rise and Proper Proofing Techniques
Cover the bowl and let it rise until it looks puffy and has clearly grown in size. In a warm kitchen, that might take 60 to 90 minutes. If your kitchen is chilly, it could take closer to 2 hours.
Here’s my little real life trick: I sometimes put the bowl near the oven while it preheats. Not on top of the stove if it’s hot, just nearby where it’s gently warm.
Shaping and Scoring for Oven Spring
Turn the dough out onto a lightly floured surface. Shape it into a round by tucking the edges underneath. You don’t need perfection. Then place it seam side down on parchment paper.
Right before baking, score the top with a shallow cut. A simple cross is classic and easy.
Baking in a Preheated Dutch Oven for a Crispy Crust
Preheat your Dutch oven with the lid on inside the oven. This part matters because a hot pot means better rise and a crispier crust.
Carefully lift the dough using the parchment paper and lower it into the Dutch oven. Put the lid back on.
Bake with the lid on first, then remove the lid toward the end so the crust can brown and crisp up. When it’s done, it should look deeply golden and sound a little hollow when tapped.
Pro Tips for a Crispy Crust and Soft, Chewy Interior
These are the little things that make your Dutch Oven Garlic Rosemary Bread feel like it came from a bakery.
Preheat the Dutch oven. This is non negotiable for that dramatic oven spring.
Don’t add too much flour when shaping. A slightly sticky dough bakes up lighter and more airy.
Let it cool at least 30 minutes before slicing. I know it’s torture, but slicing too early can make the inside gummy.
And one more: if you want extra garlic flavor, brush the warm crust with olive oil mixed with a tiny bit of grated garlic. Do it lightly so it doesn’t burn your tongue. It’s strong.
Common Bread Baking Mistakes and How to Fix Them
I’ve made every mistake at least once, so here’s the friendly shortcut.
Dense loaf: Your yeast might be old, or the dough didn’t rise long enough. Give it more time, especially in a cool kitchen.
Too salty: Measure salt carefully. Bread needs salt, but it’s easy to overdo it when you’re eyeballing.
Pale crust: You likely didn’t bake long enough with the lid off. The uncovered time is what browns it.
Bottom too dark: Put a baking sheet on the rack under your Dutch oven to buffer the heat, or raise the rack position slightly.
No-Knead Method vs. Traditional Kneaded Dough: Which Is Better?
I’ve done both. Traditional kneading is great if you like the hands on process and want a slightly more structured crumb. But for everyday life, I lean no-knead because it’s simple and still gives you a gorgeous loaf.
No-knead dough tends to be wetter and stickier, and time does the work that kneading usually does. Traditional dough is faster in some ways, but it asks more of you up front.
For this Dutch Oven Garlic Rosemary Bread, either method works. If you’re new to bread, no-knead is the friendliest place to start.
Flavor Variations and Add-Ins (Cheese, Whole Wheat, Roasted Garlic, Herbs)
If you make this loaf once, you’ll start dreaming up your own versions. Here are a few I actually love.
Cheese: Add shredded cheddar or parmesan. It melts into salty pockets.
Whole wheat: Replace up to 1 cup flour for a slightly nutty vibe.
Roasted garlic: Swap the fresh minced garlic for roasted, mashed cloves for sweet garlic flavor.
Herb mix: Rosemary plus thyme is so good. A little oregano makes it feel pizza adjacent.
Sometimes I plan a full comfort meal around this loaf, like serving it with saucy pasta or something garlicky and quick. This 30-minute garlic turmeric rice is a surprisingly great side if you’re doing a roasted chicken or veggie bowl situation.
How to Serve Garlic Rosemary Artisan Bread
This bread is the kind of thing you put on the table and people start tearing into it before you sit down. It’s hearty enough for dinner, but also perfect with a lazy afternoon snack.
Pairing with Soups, Pasta, Salads, and Holiday Meals
I love it with soups, especially creamy ones. It’s also great with pasta nights, big salads, and holiday spreads where you want something warm that fills in the gaps. If you’re doing spaghetti, a fun idea is serving it with these spaghetti garlic bread bowls for maximum carbs in the best way.
On holiday tables, it fits right in next to roasted meats, veggie sides, and a big salad.
Dipping Ideas with Olive Oil and Butter
My favorite dip is a shallow plate of olive oil with a pinch of salt and cracked pepper. Sometimes I add a tiny sprinkle of chili flakes. For butter lovers, whipped butter with a little garlic and chopped rosemary is basically magic.
Make-Ahead, Storage, and Freezing Instructions
This loaf is best the day it’s baked, but it stores well if you treat it right.
Room temp: Keep it wrapped in a clean towel or in a paper bag for the first day to keep the crust nice. After that, move it to a sealed bag to prevent it from drying out.
Freezing: Slice it first, then freeze slices in a freezer bag. That way you can grab what you need without thawing the whole loaf.
How to Reheat Bread for Fresh-Baked Texture
For slices, toast is easiest. For a bigger piece, warm it in the oven for a few minutes. If the crust feels too hard after a day or two, a quick warm up brings it back to life.
Nutrition Information and Dietary Modifications (Vegetarian, Dairy-Free Options)
This bread is naturally vegetarian, and it’s easy to keep dairy-free since it uses olive oil instead of butter. Just watch what you serve it with.
Nutrition will vary based on slice size, but generally you’re looking at carbs from the flour, a little fat from olive oil, and not much sugar. If you’re trying to boost protein, serve it alongside something hearty, or pair it with a higher protein bread option on other days. I’ve even played with alternative breads like this 2-ingredient cottage cheese flatbread when I want something quick and more protein focused.
Common Questions
1. Can I use dried rosemary instead of fresh?
Yes. Use about one third the amount, since dried is stronger. Crush it a bit between your fingers before adding so it wakes up.
2. Why did my bread stick to the Dutch oven?
Usually it’s because there was no parchment paper, or the pot was not preheated. Parchment makes it basically stress free.
3. How do I know when it’s fully baked?
Look for a deep golden crust. If you tap the bottom carefully, it should sound hollow. If you have a thermometer, the center should be around 200 to 210 F.
4. Can I make the dough ahead and bake later?
Yes. Let it rise, then refrigerate it covered. Bake the next day. Cold dough can actually be easier to score.
5. My loaf didn’t rise much. What happened?
Most likely the yeast was old, the water was too hot, or the dough needed more time to rise. Give it warmth and patience.
Your Kitchen Is About to Smell So Good
If you bake this Dutch Oven Garlic Rosemary Bread once, you’ll get why I keep coming back to it. It’s simple, it’s cozy, and it makes even a basic dinner feel special. Try it on a weekend, slice it thick, and don’t forget the olive oil dip. If you want more inspiration, I really like the vibe and tips in Easy Artisan Garlic Rosemary Bread | The Bewitchin’ Kitchen, especially if you enjoy comparing methods like I do. Now go make that loaf and let your house do the bragging for you.
Print
Garlic Rosemary Bread
- Total Time: 1 hour 15 minutes
- Yield: 8 servings
Description
An impressive yet easy bread that combines garlic and rosemary for a flavorful, crusty loaf baked in a Dutch oven.
Ingredients
Bread Ingredients
- 3 cups All-purpose flour (Bread flour can also be used.)
- 1 packet Active dry yeast (Make sure it’s fresh.)
- 1.5 cups Warm water (Not hot; think warm bath.)
- 1 tbsp Salt (Measure carefully.)
- 2 tbsp Fresh rosemary (Chop fine; dried works in a pinch.)
- 4 cloves Garlic (Minced or grated is best.)
- 2 tbsp Olive oil (Adds richness and helps with softness.)
Instructions
Mixing and Hydrating the Dough
- In a big bowl, mix flour, salt, yeast, chopped rosemary, and minced garlic.
- Add warm water and olive oil, then stir until it looks like a shaggy, sticky dough.
First Rise
- Cover the bowl and let it rise until it’s puffy, about 60 to 90 minutes in a warm kitchen.
Shaping and Scoring
- Turn the dough onto a lightly floured surface and shape it into a round.
- Place it seam side down on parchment paper and score the top with a shallow cut.
Baking
- Preheat your Dutch oven with the lid on inside the oven.
- Carefully lift the dough using the parchment paper and lower into the Dutch oven, then cover with the lid.
- Bake with the lid on, then remove the lid towards the end to brown and crisp the crust.
Notes
Let the bread cool for at least 30 minutes before slicing to avoid a gummy interior. For extra garlic flavor, brush the warm crust with olive oil mixed with a bit of grated garlic.
- Prep Time: 30 minutes
- Cook Time: 45 minutes
- Category: bread, Side Dish
- Cuisine: Italian


 Main Dishes
 Drinks & Wellness