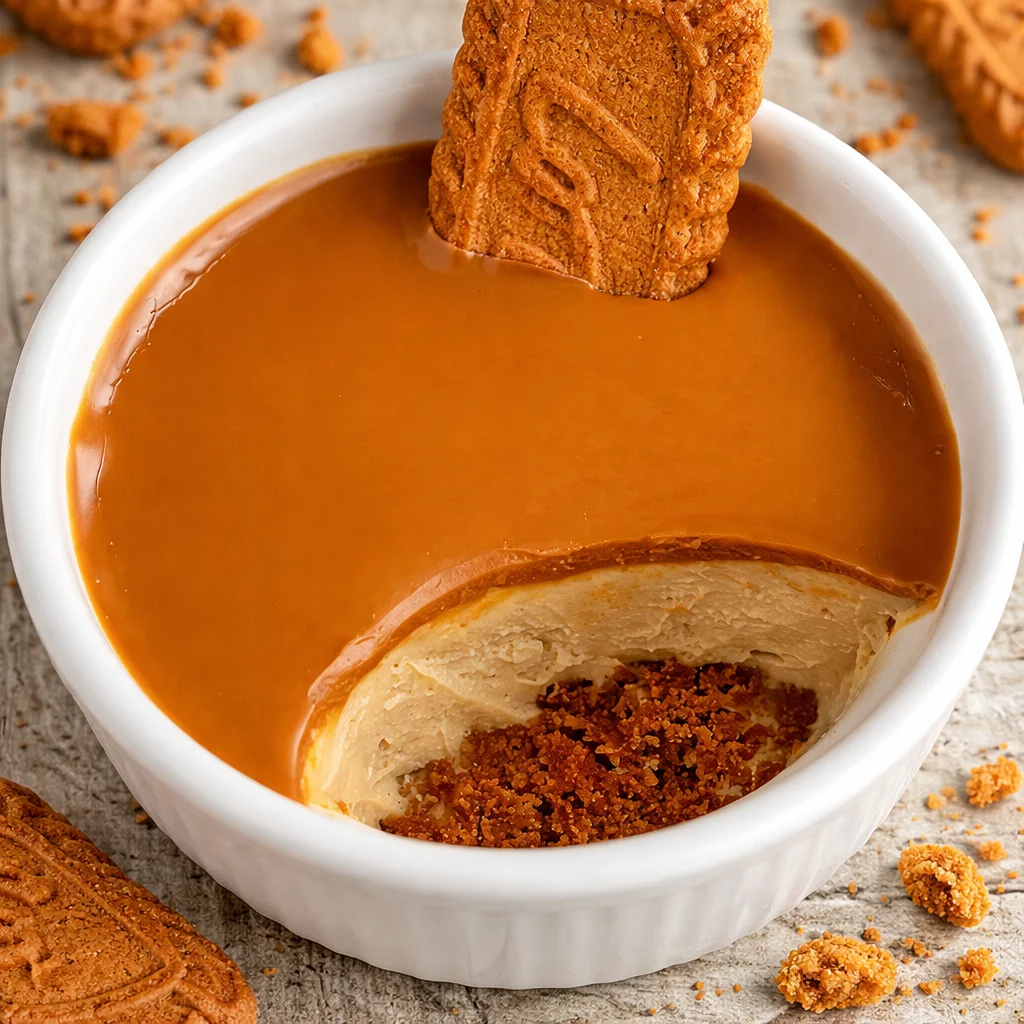
One Pot Lotus Biscoff Cheesecake is my go to dessert for those days when I want something that feels bakery level, but I do not want to turn my kitchen into a disaster zone. You know the mood, you want cheesecake, but you do not want a water bath, a springform panic, or a sink full of bowls. This recipe is creamy, cozy, and has that caramel spice flavor that makes people hover near the fridge asking, are we eating it yet. It is also no bake, which means your oven gets to stay off and you still look like you tried really hard. Let me walk you through how I make it, with all the little tips I have learned the tasty way.
Key Ingredients for a Creamy Biscoff Cheesecake
If you want that dreamy texture and bold cookie butter flavor, the ingredients matter. Nothing fancy, just the right stuff in the right balance. Here is what I always reach for when I am making One Pot Lotus Biscoff Cheesecake.
- Lotus Biscoff biscuits for the base and for a little extra crunch on top
- Unsalted butter to bind the crumbs and make a solid base
- Full fat cream cheese for the classic cheesecake taste and structure
- Powdered sugar to sweeten without any graininess
- Heavy cream to whip into the filling so it sets up nice and thick
- Biscoff spread for that signature caramelized cookie flavor
- Vanilla and a small pinch of salt to round everything out
Quick note from my own trial and error. Low fat cream cheese can make the filling looser and sometimes a bit tangy in a not great way. If you are going to splurge anywhere, splurge on the cream cheese.
Essential Tools and Equipment for No Bake Cheesecake
You do not need a ton of tools, which is kind of the whole point here. The one pot idea is really about keeping the process simple and the cleanup minimal.
Here is what I use:
One medium to large pot for gently warming the Biscoff spread and sometimes melting butter, plus it becomes the main mixing vessel if you want it to. A sturdy spoon or spatula for mixing. A whisk or hand mixer for getting the filling fluffy. And a cake tin, ideally with a removable bottom, but a standard tin lined with parchment also works.
If you are in a cozy comfort food season and want more easy dinners that do not trash your sink, I have been obsessed with this clickable recipe: one pot creamy cajun sausage pasta. Different vibe than cheesecake, but same energy of easy and satisfying.
How to Make the Perfect Biscoff Biscuit Base
The base is simple, but it can make or break the slice. A good base should be buttery, packed, and not crumbly when you cut it.
Base texture: how fine should the crumbs be?
I like mostly fine crumbs with a few slightly bigger bits mixed in. Too fine and it can go a little dense like wet sand. Too chunky and it falls apart.
Steps I follow:
Crush the biscuits in a bag with a rolling pin, or pulse them in a food processor. Melt the butter, then stir it into the crumbs until everything looks evenly coated. Press it into your tin firmly. I use the bottom of a glass and really push into the corners. Then chill the base while you make the filling.
If you love recipes that start with a cozy base and end with something comforting, you might also like this one pot soup moment: one pot lasagna soup. Total opposite of dessert, but it is a weeknight hero.
Step-by-Step Cheesecake Filling Preparation
This is where the magic happens. The filling for One Pot Lotus Biscoff Cheesecake is rich but not heavy, and it tastes like cookie butter clouds. Also, you can make it without bouncing between five bowls.
My simple method:
1) In your pot, gently warm a good scoop of Biscoff spread just until it is loose and pourable. Do not boil it, just warm it enough to stir smoothly.
2) In the same pot off the heat, add softened cream cheese and powdered sugar. Mix until smooth. If you have a hand mixer, this is the moment to use it, but you can also mix firmly with a spatula if your cream cheese is truly soft.
3) Pour in cold heavy cream and whip until thick. You want it to hold its shape, like when you lift the whisk and it leaves a soft peak that does not melt back instantly.
4) Add vanilla, a pinch of salt, and a couple spoonfuls of Biscoff spread. Mix again briefly.
5) Spoon it onto the chilled biscuit base and smooth the top.
That is it. It is honestly one of the easiest impressive desserts I make.
Tips for Achieving a Smooth and Creamy Cheesecake Texture
If you have ever made a no bake cheesecake and ended up with little cream cheese lumps, I feel you. Here is what actually fixes it.
My best no stress tricks for lump free filling
Start with truly softened cream cheese. I leave it out for about 45 to 60 minutes. Cold cream cheese fights back. Sift the powdered sugar if it is clumpy. And whip the cream while it is cold. Warm cream will not whip right, and the filling can turn slack.
Also, do not overmix once it thickens. Once it is fluffy and holding shape, stop. Overmixing can make it lose structure and look a bit deflated after chilling.
One-Pot Method: Simplifying Cheesecake Preparation
The whole one pot idea is simple. Warm the spread, mix the base ingredients if you want, and make the filling all in the same pot. It cuts down on dishes and keeps the process relaxed.
Here is how I keep it tidy:
I warm the Biscoff spread in the pot, scrape it into the filling mix, and then keep using that same pot as my main bowl. I line my tin before I start so I am not searching for parchment with sticky hands. And I rinse the spatula right away after smoothing the top, because dried cheesecake filling is basically edible glue.
Chilling and Setting Your No Bake Cheesecake for Best Results
Chilling is not optional, sadly. This is the part where patience pays off.
I recommend at least 6 hours, but overnight is even better. If you slice too early, it will still taste amazing but it may lean or squish. Overnight gives you those clean, proud slices.
If you are in a rush, you can pop it in the freezer for 45 to 60 minutes to speed up the first set, then move it to the fridge. Just do not forget it in the freezer for hours unless you want a frozen cheesecake situation.
Delicious Biscoff Cheesecake Variations and Flavor Twists
Once you have the base version down, it is fun to play.
Easy twists I actually make:
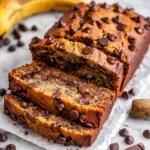
Chocolate swirl by drizzling melted chocolate over the filling and gently swirling with a knife. Banana layer by adding thin banana slices on the base before the filling, kind of like a banoffee vibe. Crunchy topping with extra crushed biscuits mixed with a little melted butter and sprinkled on top before chilling.
You can also do mini jars for parties. Same steps, just press the base into small cups and spoon in the filling. People love having their own little cheesecake.
Serving Suggestions: Toppings, Garnishes, and Presentation Ideas
This is the fun part. One Pot Lotus Biscoff Cheesecake looks fancy with almost no effort, especially if you add a topping that makes it look finished.
- Warm Biscoff spread drizzle over the top right before serving
- Whipped cream around the edges for that bakery look
- Crushed Biscoff biscuits sprinkled in the center
- Extra cookie halves standing up on top if you want drama
- A pinch of flaky salt if you like sweet and salty together
If you are planning a full comfort meal day, I love pairing dessert nights with something simple earlier like this: one pot vegetable soup. It is easy, cozy, and then cheesecake feels like a reward.
Storage, Freezing, and Reheating Tips for Long-Lasting Cheesecake
Cheesecake stores really well, which makes it great for make ahead plans.
In the fridge: Keep it covered and it is best within 4 to 5 days. The base softens slightly over time but it is still very good.
In the freezer: Freeze slices on a tray until firm, then wrap each slice and store in a container. It keeps well for up to 2 months. Thaw in the fridge overnight for the best texture.
Reheating: You do not reheat cheesecake, but you can warm the Biscoff spread for topping. Just microwave in short bursts and stir.
For another cozy recipe that stores well for lunches, this one is great: one pot soy sauce mushroom rice. It is savory, simple, and makes your future self happy.
Common Cheesecake Mistakes and How to Avoid Them
I have made every mistake at least once, so you do not have to.
Quick fixes for the most common issues
Runny filling: Usually from underwhipping the cream or using low fat cream cheese. Whip until thick and use full fat.
Lumpy filling: Cream cheese was too cold. Let it soften properly, then mix until smooth before adding cream.
Crumbly base: Not enough butter or not pressed firmly. Add a little more melted butter and really compact it.
Cheesecake sticking to the pan: Line the base with parchment and run a warm knife around the edge before removing.
Too sweet: Use less powdered sugar and add a small pinch of salt. It balances everything fast.
Common Questions
Can I make One Pot Lotus Biscoff Cheesecake without a mixer?
Yes, but make sure the cream cheese is very soft. You can whisk hard by hand and it will work, it just takes a bit longer.
Do I have to use a springform pan?
Nope. A regular cake tin works if you line it well with parchment so you can lift it out.
How much Biscoff spread should I add to the filling?
I like a few spoonfuls for flavor plus extra for topping. You can add more, but too much can make the filling softer.
Can I make it ahead for a party?
Absolutely. I actually prefer it the next day. Make it the night before and keep it chilled until serving.
Why did my top crack or look bubbly?
Usually from overmixing at the end or spreading too aggressively. Smooth it gently and tap the pan lightly on the counter to pop air bubbles.
A sweet, simple finish that is totally worth the wait
If you want a dessert that feels special but does not demand a full day in the kitchen, One Pot Lotus Biscoff Cheesecake is honestly such a win. Keep the base packed, whip the filling until thick, and give it enough chill time and you will get those neat slices everyone loves. If you want to compare methods or grab extra ideas, I have two great references I like browsing, One Pot Biscoff Cheesecake – Fitwaffle Kitchen and Biscoff Cheesecake – Taming Twins. Now promise me you will sneak a spoonful of the filling before it sets, because that is part of the fun. Make it this week and let it be your little treat moment.
Print
One Pot Lotus Biscoff Cheesecake
- Total Time: 6 hours
- Yield: 8 servings
Description
A creamy, no-bake cheesecake made with Lotus Biscoff biscuits and cookie butter for a delicious and easy dessert experience.
Ingredients
For the crust
- 250 g Lotus Biscoff biscuits (Crushed for the base)
- 100 g Unsalted butter (Melted for binding the crumbs)
For the filling
- 400 g Full fat cream cheese (Must be softened)
- 100 g Powdered sugar (Sift if clumpy to avoid lumps)
- 300 ml Heavy cream (Cold, to whip into the filling)
- 200 g Biscoff spread (For flavor and topping)
- 1 tsp Vanilla extract
- 1 pinch Salt (To enhance flavors)
Instructions
Prepare the crust
- Crush the Lotus Biscoff biscuits in a bag with a rolling pin or pulse in a food processor until mostly fine crumbs with a few larger bits.
- Melt the unsalted butter and stir it into the crumbs until evenly coated.
- Press the mixture firmly into the base of a lined cake tin and chill while preparing the filling.
Make the filling
- In the same pot, gently warm the Biscoff spread until it is loose and pourable, then remove from heat.
- Add the softened cream cheese and powdered sugar to the pot and mix until smooth, preferably using a hand mixer.
- Pour in the cold heavy cream and whip until thick, achieving soft peaks that hold their shape.
- Stir in vanilla, a pinch of salt, and a couple spoonfuls of Biscoff spread before mixing briefly.
- Spoon the filling onto the chilled biscuit base and smooth the top.
Chill and serve
- Chill the cheesecake for at least 6 hours, preferably overnight, to set properly.
- Before serving, drizzle warmed Biscoff spread on top and garnish with whipped cream or crushed biscuits if desired.
Notes
Make sure to use full fat cream cheese for the best texture. Do not rush the chilling process for optimal results, and feel free to customize with toppings or flavors like chocolate or banana.
- Prep Time: 30 minutes
- Category: Dessert, No Bake
- Cuisine: American, Comfort Food


 Main Dishes
 Drinks & Wellness