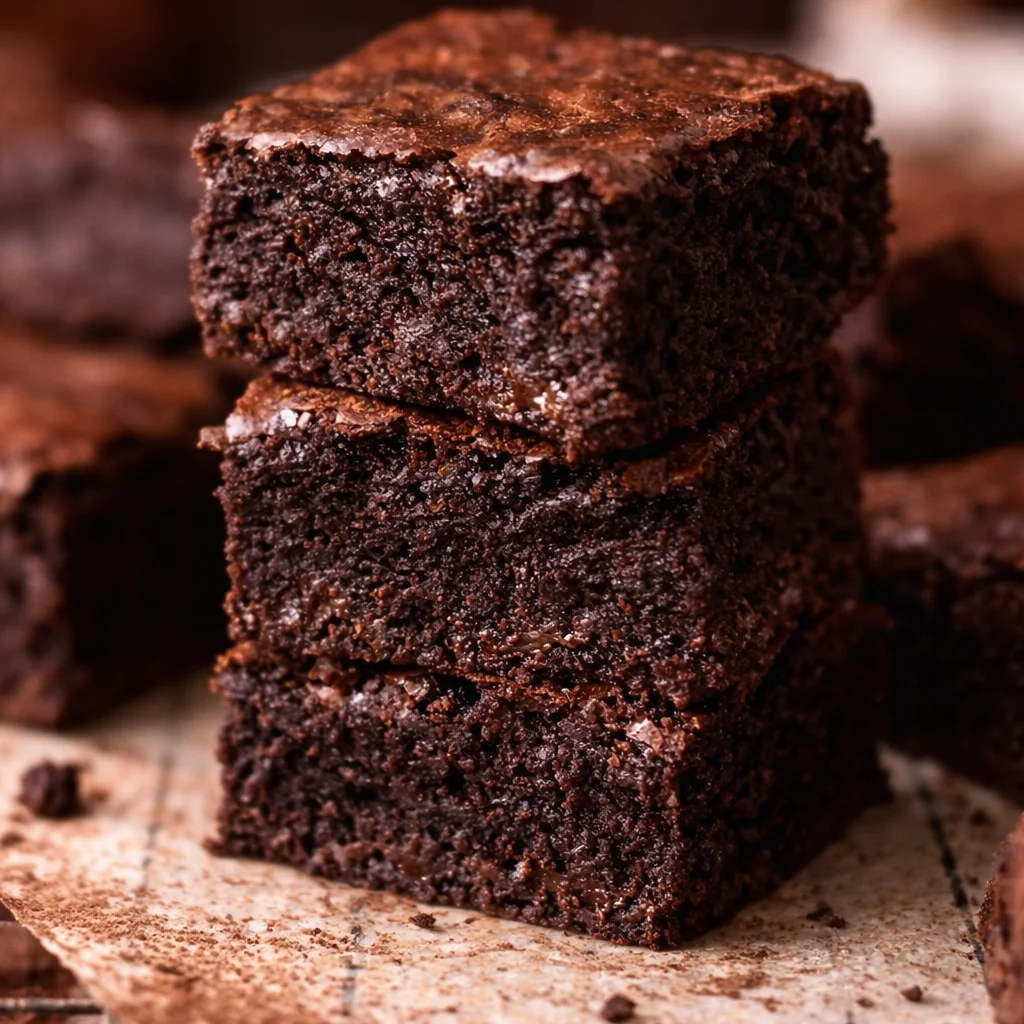
the BEST fudgy brownies are the answer when you want something rich and chocolatey but you do not want to fuss with a mixer, fancy layers, or a long list of steps. I have had those nights where you just want a warm square of brownie, the kind that sticks a little to your fork in the best way.
This is my go to batch when friends pop by or when I need a guaranteed win for a bake sale table. If your brownies usually come out dry or cakey, do not worry, I have been there. Today I am walking you through exactly what works in my kitchen, with simple tips that make a big difference.
Ingredients for Ultra Fudgy Brownies (Butter, Cocoa, Chocolate Chips)
This recipe keeps it basic on purpose. The magic is in the ratios and the order you mix things, not in weird ingredients you will use once and forget. Here is what I always grab for **fudgy brownies** that taste like a chocolate shop treat.
- Butter: real butter, not margarine. It gives that rich, smooth bite.
- Granulated sugar: helps create the shiny top and keeps the middle moist.
- Eggs: they bind everything and help with that chewy edge situation.
- Unsweetened cocoa powder: the backbone of the chocolate flavor.
- All purpose flour: just enough so it holds together, not enough to turn cakey.
- Salt: yes, even in dessert. It sharpens the chocolate flavor.
- Vanilla: optional but I love it.
- Chocolate chips or chopped chocolate: for pockets of melted chocolate.
Quick personal note: if you are the type who loves a holiday brownie moment, you might also like these frosted christmas brownies for a festive twist.
Best Cocoa Powder for Brownies: Dutch-Process vs Natural
Let us talk cocoa because it matters more than people think. Natural cocoa tastes a bit sharper and more intense, while Dutch process cocoa tastes smoother and darker.
For **fudgy brownies**, I usually reach for Dutch process when I want that deep, almost bakery style chocolate vibe. Natural cocoa is great too, especially if that is what you already have in your pantry. The good news is this recipe works with either.
If you want a simple rule:
Dutch process equals mellow, dark, rich. Natural equals bold, classic cocoa punch.
Chocolate Options: Dark Chocolate, Semi-Sweet Chips, Chopped Chocolate
This is where you can really make the batch feel like your own. You can use:
Semi sweet chips for classic brownie flavor, dark chocolate if you like it less sweet, or chopped chocolate if you want those melty pools that look fancy when you cut a square.
I usually do semi sweet chips because they are easy and consistent. But when I have a half bar of dark chocolate sitting around, I chop it up and throw it in. Those uneven chunks melt into little ribbons and it is so good.
Also, if you love the whole brownies plus cookies vibe, bookmark these fudgy chewy browkies. They are dangerously snackable.
Essential Tools & Pan Sizes (8×8, 9×13, Parchment, Metal vs Glass)
You do not need much, but the right pan makes your life easier. Here is what I recommend:
Pan size: An 8×8 pan gives thicker brownies with a super gooey center. A 9×13 pan makes thinner brownies and bakes faster, great for parties.
Parchment paper: If you have ever tried to pry brownies out of a pan, you already know why. I leave a little overhang so I can lift the whole slab out.
Metal vs glass: I prefer metal because it bakes more evenly and gives better edges. Glass works, but it holds heat longer, so brownies can overbake if you are not watching closely.
That is basically it. A bowl, a whisk, a spatula, and you are in business.
Step-by-Step: How to Make Fudgy Brownies From Scratch
This is my simple method that I have made a ton of times. It is not fussy, but it is specific where it counts.
1) Heat the oven to 350 degrees F. Line your pan with parchment.
2) Melt butter in a saucepan or microwave until just melted.
3) Mix butter and sugar in a bowl. Stir well for about a minute.
4) Add eggs and vanilla. Stir until it looks glossy and smooth.
5) Add cocoa, flour, and salt. Stir just until you do not see dry streaks.
6) Fold in chocolate chips or chopped chocolate.
7) Bake until the center is set but still soft.
Small reminder: for **fudgy brownies**, you do not want to whip a ton of air into the batter. Stir with intention, but keep it simple.
The Crackly Top Secret: Melting Butter + Sugar & Proper Mixing
The shiny, crackly top is not luck. It comes from dissolving the sugar a bit and mixing it well with the melted butter and eggs. You are basically making a quick, simple base that turns into that thin papery crust once baked.
Here is what I do:
Stir butter and sugar until the mixture looks slightly thicker and more combined. Then when you add the eggs, stir again until it looks glossy. That gloss is the sign you are on the right track.
Do not overdo it once the flour goes in. Overmixing at that stage can make brownies tough instead of tender.
Bake Time + Doneness Tests: Moist Crumbs, Not Overbaked
Overbaking is the fastest way to lose that fudgy middle. I start checking early because every oven runs a little different.
General timing:
8×8 pan: around 25 to 32 minutes. 9×13 pan: around 20 to 28 minutes.
My doneness test is simple: a toothpick should come out with moist crumbs, not wet batter. If it comes out totally clean, you probably went too far and the brownies will set up more dry as they cool.
Another tip: the edges should look set, but the center can still look slightly soft. It keeps baking a bit from the heat of the pan after you pull it out.
Cooling & Cutting Clean Squares (Chill Time, Knife Tips)
I know it is painful, but cooling is part of the recipe. If you slice too soon, you get chocolate lava. Sometimes that is fun, but if you want neat squares, give them time.
My routine:
Let the pan cool on the counter for about 45 minutes, then chill for 30 minutes if I have time. For super clean cuts, I wipe my knife between slices. A plastic knife also works surprisingly well for clean edges.
This is also when the flavor really settles in. The chocolate tastes deeper after they cool, and the texture becomes that perfect brownie chew.
Pro Tips for Perfect Fudgy Center + Chewy Edges Every Time
These are the little things I learned after making **fudgy brownies** a bunch of times and messing them up in every way possible.
Use room temp eggs if you can. They blend in smoothly.
Measure flour lightly. If you pack it down, you will add too much and push the brownies toward cakey.
Do not overbake. Pull them when you are unsure. Slightly underbaked brownies set up into fudgy perfection after cooling.
Line with parchment. You will thank yourself later.
Add a pinch of flaky salt on top right after baking if you love that sweet salty combo.
Brownie Variations: Nuts, Espresso, Salted, Gluten-Free, Small Batch
The base recipe is solid, but it is also a great blank canvas.
Nuts: Add chopped walnuts or pecans for crunch. I do about half a cup.
Espresso: Add 1 to 2 teaspoons espresso powder to the cocoa. It does not make them taste like coffee, it makes them taste more like chocolate.
Salted: Sprinkle flaky salt on top right after baking.
Gluten free: Swap the flour for a 1 to 1 gluten free flour blend. The texture can be slightly more delicate, but still very good.
Small batch: Cut everything in half and bake in a loaf pan. Start checking early.
If you are into bright, tangy dessert bars too, these zesty lemon brownies are a fun change when you need a break from chocolate.
Serving Ideas: Warm Brownies, Vanilla Ice Cream, Hot Fudge, Party Platter
Brownies are already a treat, but serving them right takes them to the next level. Here are my favorites.
- Warm brownie with vanilla ice cream and a pinch of salt
- Drizzle with hot fudge or caramel
- Top with berries for a fresh bite
- Cut into small squares for a party platter so people can grab more than one
If you are putting together snacks for a crowd, this list of 25 christmas appetizers best 2025 holiday dinner is a lifesaver, especially when you want both sweet and savory options on the table.
Storage & Freezing: Keep Brownies Moist for Days (Room Temp, Fridge, Freezer)
Good news, brownies store really well if you keep air out.
Room temp: Store in an airtight container for 3 to 4 days. I like to place a piece of parchment between layers.
Fridge: They will last closer to a week, but they can firm up. Let a square sit out for 10 minutes before eating, or warm it for a few seconds.
Freezer: Wrap individual squares in plastic wrap, then place in a freezer bag. They keep well for up to 2 months. Thaw at room temp, or microwave for a quick warm brownie moment.
Common Questions
Why did my brownies turn cakey?
Usually it is too much flour or too much mixing. Measure flour lightly and stir just until combined.
Can I use oil instead of butter?
You can, but butter gives better flavor and that classic brownie texture. If you swap, expect a slightly different bite.
How do I know when to pull them out?
Look for set edges and a center that is not jiggly. A toothpick should come out with moist crumbs, not wet batter.
Can I double the recipe?
Yes, bake in a 9×13 pan and start checking early. Remember, thinner brownies bake faster.
Why do my brownies stick to the pan?
No parchment, or not enough greasing. Parchment with a little overhang is the easiest fix.
A Sweet Finish and a Little Nudge to Bake
If you try these **fudgy brownies**, I hope you go for that slightly underbaked pull and let them cool before slicing, because that is where the magic lives. When you want a trusted baseline to compare methods, check out The Best Fudgy Brownies Recipe – Inspired Taste because it is a solid cocoa brownie reference. Once you have your perfect pan of chocolate squares, you can branch out into fun treats like the best dorayaki recipe a japanese dessert made simple or a chewy, buttery bake like the best butter mochi recipe traditional japanese dessert made simple. Now go melt that butter, grab your cocoa, and make a batch this week, you will be so glad you did.
Print
Fudgy Brownies
- Total Time: 40 minutes
- Yield: 16 pieces
Description
These ultra fudgy brownies are rich, chocolaty, and easy to make without a mixer. Perfect for a quick treat or bake sale, they’re guaranteed to impress.
Ingredients
Main Ingredients
- 1 cup Butter, unsalted (Real butter, not margarine.)
- 1 cup Granulated sugar (For creating a shiny top and moisture.)
- 2 large Eggs (Room temperature preferred.)
- 1 cup Unsweetened cocoa powder (Dutch process recommended for a richer taste.)
- 1/2 cup All-purpose flour (Measured lightly to avoid cakiness.)
- 1/4 teaspoon Salt (Enhances the chocolate flavor.)
- 1 teaspoon Vanilla extract (Optional, but adds flavor.)
- 1 cup Chocolate chips or chopped chocolate (For pockets of melted chocolate.)
Instructions
Preparation
- Preheat your oven to 350°F (175°C) and line an 8×8 inch pan with parchment paper.
- Melt the butter in a saucepan or microwave until just melted.
- In a bowl, mix the melted butter and granulated sugar together for about a minute.
- Add eggs and vanilla extract, stirring until the mixture is glossy and smooth.
- Add cocoa powder, flour, and salt, and stir just until there are no dry streaks.
- Fold in the chocolate chips or chopped chocolate.
Baking
- Pour the batter into the prepared pan and spread it evenly.
- Bake in the preheated oven until the center is set but still soft, about 25-32 minutes for an 8×8 pan.
- Check for doneness with a toothpick; it should come out with moist crumbs.
Cooling and Serving
- Let the brownies cool on the counter for about 45 minutes, then chill for an additional 30 minutes if time permits.
- Slice with a knife, wiping the blade between cuts for clean squares.
Notes
Use parchment paper for easy removal and cut with a plastic knife for neat edges. Optional: sprinkle flaky salt on top right after baking for a sweet and salty flavor.
- Prep Time: 10 minutes
- Cook Time: 30 minutes
- Category: Dessert, Snack
- Cuisine: American


 Main Dishes
 Drinks & Wellness