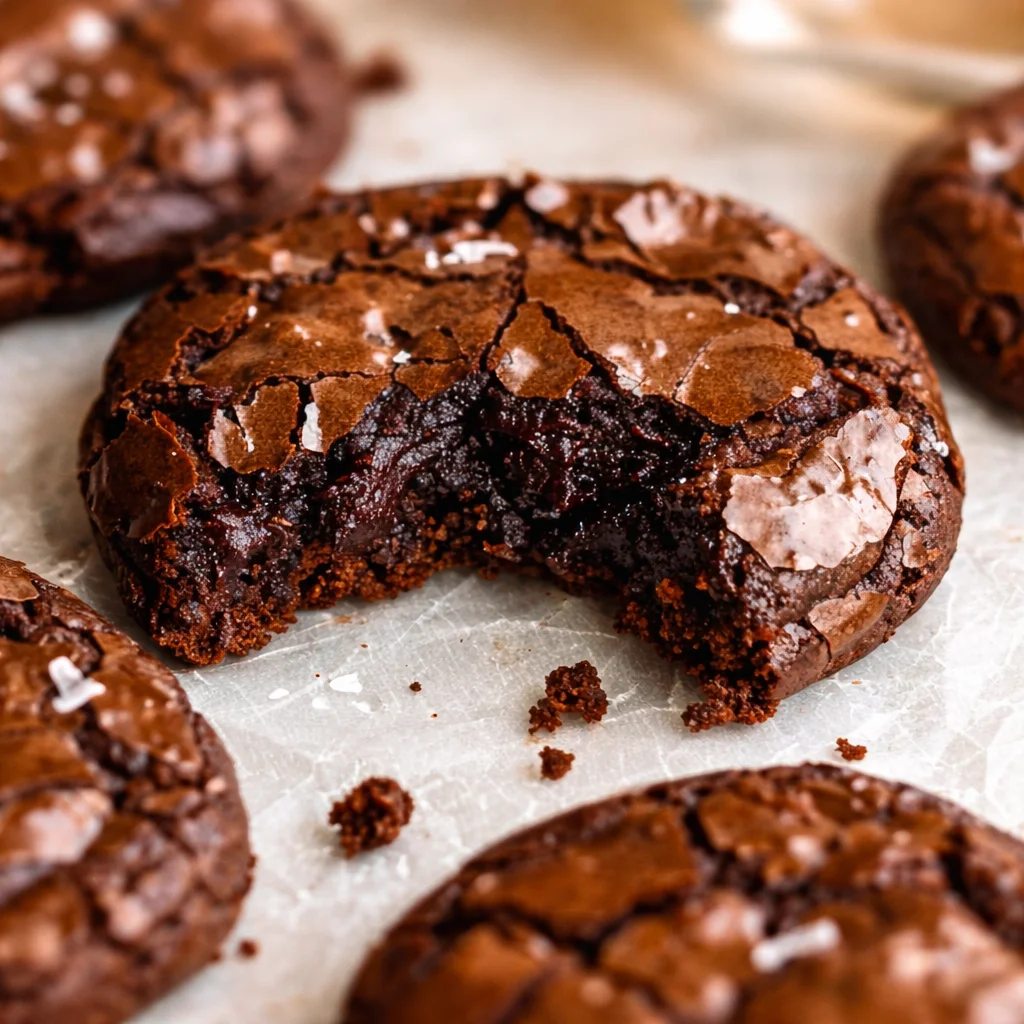
The Best Fudgy Chewy Browkies are what I make when I cannot decide between a cookie and a brownie, and honestly, I refuse to choose. You know that moment when you want a thick chocolate chip cookie, but you also want a fudgy brownie center that sticks to your fork a little? Same.
This recipe solves that problem in one pan, and it is the kind of bake that makes people hover around your kitchen like they “just happened to walk by.” I have baked these for movie nights, potlucks, and that random Tuesday when I needed a win. Let’s make them together, and I will share all the little tips that keep them chewy, fudgy, and not dry.
Ingredients for Brookies (Cookie Dough Layer + Brownie Batter Layer)
I like to keep the ingredients simple and grocery store friendly. If you bake even a little, you probably have most of this already. Here is what you need for **two layers** that bake up like one perfect bar.
- Cookie layer: all purpose flour, baking soda, salt, unsalted butter, brown sugar, white sugar, 1 egg, vanilla extract, chocolate chips
- Brownie layer: unsalted butter, sugar, 2 eggs, vanilla extract, cocoa powder, all purpose flour, salt, chocolate chips or chopped chocolate
Quick tip: if your brown sugar feels like a rock, toss a slice of bread in the container overnight. It softens right up and makes your cookie layer extra chewy.
Best Chocolate for Brookies (Cocoa Powder vs Melted Chocolate, Chocolate Chips, Dark vs Semi-Sweet)
This is where the magic lives. For the brownie part, you can go cocoa powder only, or cocoa plus melted chocolate. Cocoa powder alone gives that classic brownie taste and keeps it easy. Adding melted chocolate makes it richer and a little more truffle like.
Here is how I usually choose:
Cocoa powder: Use unsweetened. Dutch process tastes deeper, natural cocoa tastes a bit sharper. Both work.
Melted chocolate: Great if you want a more intense chocolate bite and a softer fudgy center.
Chocolate chips: Semi sweet is my everyday pick. Dark chocolate feels more grown up. Milk chocolate is sweeter and can make the whole thing taste like candy, which is not always bad.
If you want to see my main recipe version with all my exact amounts, I keep it updated here: fudgy chewy browkies recipe. I also love tossing a handful of extra chips on top right before baking so they look bakery style.
Tools + Pan Sizes (9×13 vs 9×9), Parchment Paper, and Prep for Clean Slices
Pan size changes everything. A 9×9 gives you thicker bars and a gooier center. A 9×13 gives you thinner bars that bake faster and slice into more pieces for a party.
My must do steps:
Parchment paper: Line the pan with a sling so you can lift the whole slab out. This is the difference between pretty squares and a crumbly mess.
Nonstick spray: Spray the pan first so the parchment stays put.
Rest time: Plan time to cool. Warm browkies taste amazing but they do not slice cleanly until they set.
Also, if you are planning a big holiday spread, this kind of bar dessert fits right in next to savory snacks. I have a full list of party ideas here: Christmas appetizers for holiday dinner. I like to balance salty bites with a sweet tray of browkies.
Step-by-Step: Make the Chocolate Chip Cookie Dough Base (Thick, Chewy, No-Spreading Tips)
The cookie layer is your foundation, so you want it thick and sturdy, not greasy and flat.
My method:
1) Cream the butter and sugars until it looks fluffy, about 1 to 2 minutes. Do not rush this.
2) Mix in the egg and vanilla until smooth.
3) Add flour, baking soda, and salt. Mix just until you do not see dry streaks.
4) Fold in chocolate chips.
No spreading tips: Use softened butter, not melted. If your kitchen is warm or the dough looks loose, chill it 15 minutes. Also measure flour correctly. If you scoop the measuring cup straight into flour, you can pack in too much and make it dry.
Step-by-Step: Make the Fudgy Brownie Batter (Shiny Crust, Avoid Overmixing)
This brownie layer is where that fudgy chew comes from. The big goal is a rich batter and minimal mixing once flour goes in.
1) Melt butter and let it cool for a minute so it is warm, not blazing hot.
2) Stir in sugar. Mix well for about 30 seconds so it looks glossy.
3) Add eggs and vanilla. Stir until smooth and a little thicker.
4) Add cocoa powder, flour, and salt. Mix just until combined.
5) Stir in chocolate chips or chopped chocolate.
Shiny crust tip: Mixing the sugar into warm butter helps, and so does stirring the eggs in well before you add flour. But once flour is in, stop when it comes together. Overmixing makes brownies more cakey.
How to Assemble Brookies (Cookie Layer Bottom vs Middle Swirl, Even Layers, Marbled Look)
There are two ways I do this depending on my mood.
Classic and easiest: Press cookie dough into the bottom of the lined pan. Pour brownie batter on top and spread gently.
Marbled look: Press two thirds of the cookie dough into the pan. Pour in all the brownie batter. Dot the top with little bits of the remaining cookie dough, then swirl lightly with a butter knife. Do not over swirl or it turns muddy.
Either way, try to keep layers even so you do not get a thin cookie corner and a thick brownie corner. That is the one complaint I hear when people eyeball it too hard.
Bake Time + Doneness Tests (Toothpick Cues, Fudgy Center, Prevent Overbaking)
Bake times depend on your pan and how thick your layers are, but here is the real trick. You are not baking until the toothpick is totally clean. You want a few moist crumbs.
General guide at 350 F:
9×9 pan: around 28 to 35 minutes
9×13 pan: around 22 to 28 minutes
Doneness cues:
The edges look set and slightly pulled from the pan. The center looks set but still soft. A toothpick comes out with fudgy crumbs, not wet batter.
If you ever overbake them, they still taste good, but you lose that gooey brownie feeling. And since we are chasing The Best Fudgy Chewy Browkies vibe, I always start checking early.
Cooling, Cutting, and Getting Perfect Squares (Chill Time, Wipe Knife Trick)
This part takes patience, and I say that as someone who wants to eat them immediately.
Let them cool in the pan for at least 30 to 45 minutes. For super clean squares, chill the whole pan in the fridge for 30 minutes after cooling. Then lift them out using the parchment sling.
Wipe knife trick: Use a large sharp knife and wipe it clean between cuts. If you want extra neat edges, run the knife under hot water, wipe it dry, then slice. It is oddly satisfying.
Brookies Texture Troubleshooting (Too Cakey, Too Dry, Too Gooey, Sinking Layers, Crumbly Edges)
I have made every mistake at least once, so here is the quick fix list.
Too cakey: You probably overmixed the brownie after adding flour, or added too much flour. Mix less and measure carefully.
Too dry: Overbaked or too much flour. Pull them earlier and check your measuring.
Too gooey: Underbaked or sliced too soon. Bake a few more minutes next time, and cool longer.
Sinking layers: Cookie dough too soft or brownie batter too heavy in one spot. Press cookie layer evenly and spread brownie gently.
Crumbly edges: Pan runs hot or edges baked too long. Try lowering the oven temp by 10 to 15 degrees and add a few minutes instead.
Easy Variations (Nutella Brookies, Peanut Butter, Oreo, Salted Caramel, Espresso, Brown Butter)
This is where you can play. The base recipe is solid, so you can riff without stress.
Nutella: Swirl a few spoonfuls into the brownie batter.
Peanut butter: Dollop on top and lightly swirl.
Oreo: Chop and fold into the brownie layer.
Salted caramel: Drizzle caramel between layers and sprinkle flaky salt on top.
Espresso: Add 1 to 2 teaspoons instant espresso powder to the brownie batter.
Brown butter: Brown the butter for the cookie layer for a deeper toasty flavor. Let it cool so it does not melt the sugars too much.
When I am on a Japanese dessert kick, I will do a dessert trio situation with something like dorayaki or butter mochi. The soft chewy textures pair so well with browkies on a platter.
Holiday + Seasonal Brookies (Peppermint, Pumpkin Spice, Red Velvet, S’mores, Valentine’s)
These bars are basically built for holidays because you can change the vibe with one or two easy swaps.
Peppermint: Add crushed candy canes on top in the last 5 minutes of baking.
Pumpkin spice: Add pumpkin spice to the cookie layer and use cinnamon chips if you can find them.
Red velvet: Add a little red food coloring to the brownie layer and use white chocolate chips.
Smores: Add graham cracker pieces to the cookie layer, then top with mini marshmallows near the end.
Valentine’s: Use pink and red sprinkles and cut them into hearts if you are feeling extra.
Dietary Swaps (Gluten-Free, Dairy-Free, Egg-Free Options + Best Substitutions That Still Bake Well)
I get asked about swaps a lot, and while I think the original is best, you can still make a really good pan with a few changes.
Gluten-free: Use a 1 to 1 gluten free baking flour blend. Let the bars cool fully before cutting, because gluten free bakes can crumble when warm.
Dairy-free: Use a plant based butter and dairy free chocolate chips. Choose a butter that is made for baking, not a soft spread.
Egg-free: Use a flax egg for the cookie layer and brownie layer. For each egg, mix 1 tablespoon ground flax with 3 tablespoons water and let it gel. Texture will be slightly softer and less shiny on top, but still tasty.
One more practical tip: if you are changing ingredients, do not change everything at once. Swap one thing, test it, then adjust. That is the easiest way to get a result you can trust.
Serving Ideas (Warm with Ice Cream, Party Platter, Bake Sale Packaging, Lunchbox Treats)
This is the fun part. Browkies are friendly. They travel well, they stack well, and people recognize what they are right away.
Here are my go to serving ideas:
- Warm with ice cream: 10 seconds in the microwave, then add vanilla ice cream and a pinch of salt.
- Party platter: Slice small squares and mix them with mini cookies and fruit.
- Bake sale packaging: Wrap two squares in plastic wrap, then tie with a ribbon. Looks cute and stays fresh.
- Lunchbox treat: Cut into smaller pieces and tuck into a container. They hold up great.
Common Questions
Can I make The Best Fudgy Chewy Browkies a day ahead?
Yes, and I actually like them even more the next day. The layers settle and get chewier. Store covered at room temp for 2 to 3 days.
Should I refrigerate browkies?
Only if your kitchen is hot or you like a firmer bite. Fridge makes them denser. Let them sit out 10 minutes before serving for the best texture.
Can I freeze them?
Totally. Slice, wrap individually, and freeze up to 2 months. Thaw at room temp or microwave for a warm gooey square.
Why did my brownie layer crack?
A little crack is normal and honestly pretty. Big cracks usually mean they baked too long or your oven runs hot. Check a few minutes earlier next time.
Do not overbake, and do not pack in too much flour. Also, using more brown sugar than white sugar in the cookie layer helps keep it soft and chewy.
A sweet last note before you bake
If you try The Best Fudgy Chewy Browkies, remember this is all about the balance: chewy cookie base, fudgy brownie top, and just enough bake time to keep the center rich. Do not stress if your first pan is not perfectly photogenic, because the flavor is the real prize here. If you want to compare methods or get extra inspiration, I also like reading The BEST Fudgy Chewy Brookies – Savvy Bites and seeing how other bakers do their layers. Now grab your chocolate chips, line that pan, and go make a batch that disappears faster than you expect.
Print
Fudgy Chewy Browkies
- Total Time: 55 minutes
- Yield: 16 pieces
Description
Indulge in the ultimate treat that combines the richness of brownies and the chewiness of chocolate chip cookies, baked together in perfect harmony.
Ingredients
Cookie Dough Layer
- 2 cups all purpose flour (Make sure to measure correctly to avoid dryness.)
- 1 teaspoon baking soda
- 1/2 teaspoon salt
- 1/2 cup unsalted butter, softened (Should be at room temperature.)
- 1 cup brown sugar (Use soft brown sugar for chewiness.)
- 1/2 cup white sugar
- 1 egg
- 2 teaspoons vanilla extract
- 1 cup chocolate chips (Semi-sweet or dark chocolate.)
Brownie Batter Layer
- 1/2 cup unsalted butter (Melt and cool slightly.)
- 1 cup sugar
- 2 eggs
- 1 teaspoon vanilla extract
- 1/3 cup cocoa powder, unsweetened (Dutch process for a deeper flavor.)
- 1/2 cup all purpose flour
- 1/4 teaspoon salt
- 1 cup chocolate chips or chopped chocolate (Use your preference for added richness.)
Instructions
Make the Cookie Layer
- Cream the butter and sugars until fluffy, about 1 to 2 minutes.
- Mix in the egg and vanilla until smooth.
- Add flour, baking soda, and salt, mixing just until no dry streaks remain.
- Fold in chocolate chips.
Make the Brownie Layer
- Melt butter and let it cool for a minute.
- Stir in sugar and mix well until glossy.
- Add eggs and vanilla, stirring until smooth.
- Add cocoa powder, flour, and salt, mixing until just combined.
- Stir in chocolate chips.
Assemble
- Press cookie dough into the bottom of a lined pan.
- Pour brownie batter on top and spread gently.
Bake
- Bake in a preheated oven at 350°F for about 22 to 28 minutes for a 9×13 pan.
- Check for doneness with a toothpick; it should come out with moist crumbs.
Cool and Cut
- Let cool in the pan for at least 30 to 45 minutes, then chill for cleaner slices.
- Use a clean, warm knife for cutting.
Notes
Browkies can be stored at room temperature for 2-3 days, and they even taste better the next day. For freezing, slice and wrap individually for up to 2 months.
- Prep Time: 20 minutes
- Cook Time: 35 minutes
- Category: Dessert
- Cuisine: American


 Main Dishes
 Drinks & Wellness