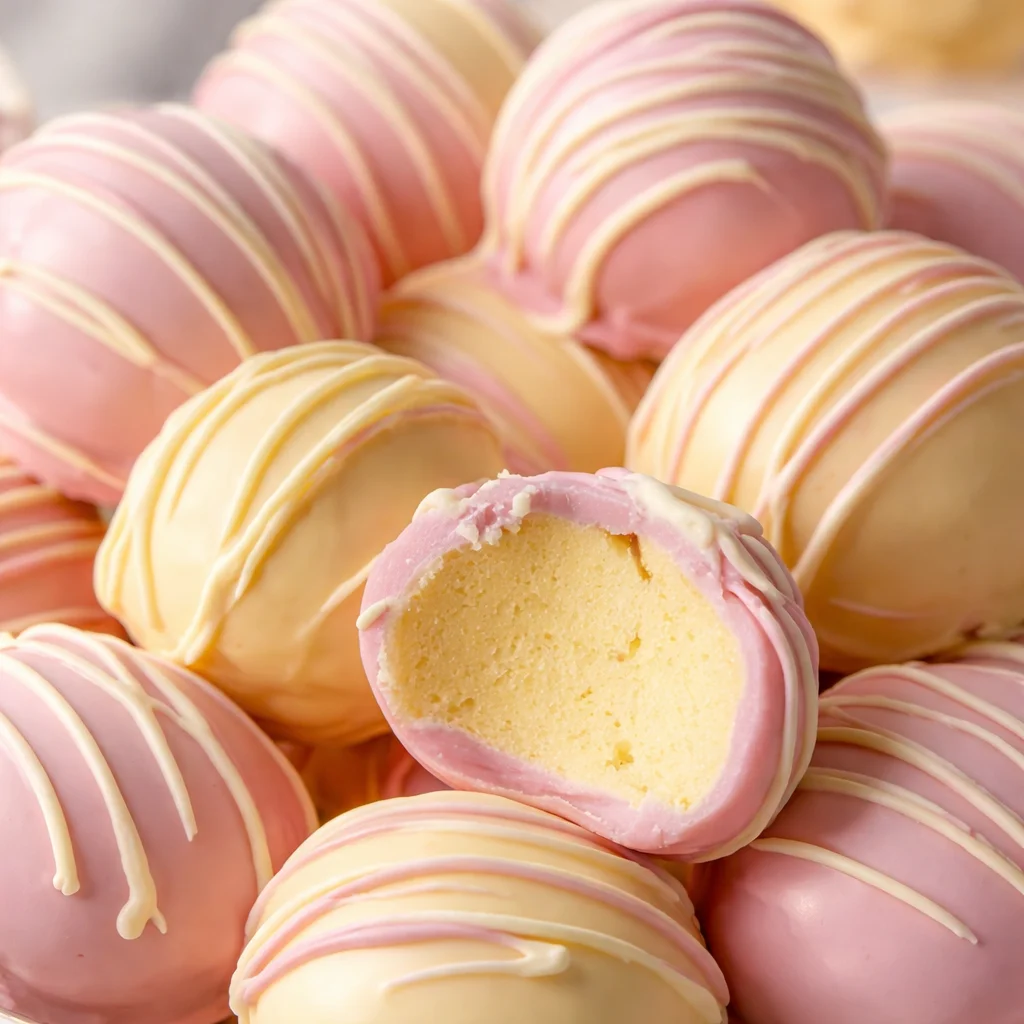
Banana Pudding Easter Truffles are my go to when I need a cute Easter dessert but I do not want to turn the kitchen into a disaster zone. You know that moment when you volunteer to bring something sweet, then you remember you also have a million other things to do? Yep, this is the fix.
These little truffle balls taste like creamy banana pudding with that familiar vanilla wafer vibe, but they look like fancy candy shop treats. They are no bake, super forgiving, and honestly kind of fun to decorate with pastel sprinkles. Let me walk you through exactly how I make them so yours turn out smooth, creamy, and party ready.
Ingredients You Need for No-Bake Banana Pudding Truffles
This recipe is simple, and the ingredients are easy to find. I like keeping everything classic so the banana pudding flavor really comes through.
- Vanilla wafers, crushed into fine crumbs
- Cream cheese, softened (full fat makes the creamiest truffles)
- Instant banana pudding mix (the dry powder, not prepared pudding)
- Milk (just a splash to help the mix blend smoothly)
- White chocolate or vanilla candy melts for coating
- Optional add-ins: banana chips (crushed), a pinch of salt, or a tiny drop of banana extract
If you love pudding desserts as much as I do, you might also like this cozy, high protein spin for everyday snacking: protein pudding recipe. It is a totally different vibe, but it scratches the same creamy dessert itch.
Best Ingredients & Substitutions (Vanilla Wafers, Cream Cheese, Chocolate Options)
Let us talk swaps, because sometimes the store is out of things or you are working around allergies.
Vanilla wafers: The classic choice is a Nilla style wafer. If you cannot find them, graham crackers work, but the flavor changes a little. Shortbread cookies also taste amazing and feel a bit more buttery.
Cream cheese: Full fat blocks are best. Whipped cream cheese can work, but it makes the mixture softer, so you will need extra chilling time. Dairy free cream cheese works too, but choose one that is thick and tangy, not the watery kind.
Banana pudding mix: Instant is easiest. If you only have vanilla pudding mix, add a small splash of banana extract or fold in very finely mashed ripe banana, but keep it small or you will make the filling too wet.
Chocolate coating: White chocolate gives the prettiest Easter look. Vanilla candy melts are easier than real chocolate, especially if you are not in the mood to temper anything. You can also do milk chocolate for a banana split vibe.
If you want another truffle flavor for your dessert table, this one is bright and fun: orange chocolate truffles recipe. I like mixing two truffle flavors so everyone finds something they like.
Kitchen Tools & Equipment for Perfect Truffle Balls
You do not need much, but the right basics make everything smoother and less sticky.
Here is what I use:
Food processor or a zip top bag and rolling pin (for crushing wafers)
Mixing bowl and sturdy spoon or hand mixer
Small cookie scoop (optional but helps keep sizes even)
Baking sheet with parchment paper
Microwave safe bowl for melting the coating
Fork or dipping tool for coating the truffles
Also, clear some fridge space. Chilling is what makes these easy to roll and coat without losing your mind.
How to Make Banana Pudding Easter Truffles Step-by-Step
This is the part where it starts feeling like a little kitchen craft project. I will keep it super straightforward.
Step 1: Crush the wafers. Pulse vanilla wafers into fine crumbs. If you do not have a food processor, toss them in a bag and smash them with a rolling pin until they look like sand.
Step 2: Mix the filling. In a bowl, stir together softened cream cheese, instant banana pudding mix, and a splash of milk. Then add the wafer crumbs and mix until it looks like thick cookie dough. If it feels too sticky, chill it for 20 to 30 minutes.
Step 3: Scoop and roll. Scoop into small balls and roll between your palms. Place on a parchment lined baking sheet.
Step 4: Chill again. Refrigerate for at least 1 hour, or freeze for about 15 minutes. Cold truffles are easier to dip.
Step 5: Coat in chocolate. Melt your white chocolate or candy melts. Dip each truffle, tap off the extra coating, then put it back on parchment to set.
Step 6: Decorate. Add sprinkles right away before the coating hardens.
Quick side note, if you are a pudding person in general, I have been obsessed with learning other styles too. This guide is really fun to read when you want a totally different dessert project: how to make Japanese pudding purin a step-by-step guide.
Pro Tips for Smooth, Creamy, Perfectly Coated Truffles
These tips are the difference between “cute little truffles” and “why is everything sliding off my fork.”
Soften the cream cheese fully before mixing. Cold cream cheese makes lumps, and you will fight the mixture the whole time.
Chill in stages. Chill after mixing, and again after rolling. You want the centers firm before dipping.
Do not overheat the coating. Melt slowly, stir often, and stop when it is mostly melted. Residual heat finishes the job.
Tap off extra coating. Too much coating pools at the bottom and makes “feet” on the truffles.
Add sprinkles fast. Once the coating sets, sprinkles will just bounce right off like tiny mistakes.
Decorating Ideas: Easter Sprinkles, Pastel Chocolate & Festive Designs
This is where Banana Pudding Easter Truffles really earn their keep on an Easter table. You can make them look like you spent hours, even if you did not.
Easy decorating ideas:
Roll some in pastel sanding sugar for a sparkly look.
Drizzle with pink, yellow, or lavender candy melts.
Top with a mini wafer piece so people instantly get the flavor.
Use bunny or egg sprinkles for an obvious Easter vibe.
If you want to get extra cute, you can also turn them into themed characters. These are more wintery, but the technique works the same way: snowmen truffles Christmas.
Easy Recipe Variations: White Chocolate, Gluten-Free, Mini & Holiday Versions
Once you make these once, it is hard not to start messing around with flavors and sizes.
White chocolate deluxe: Add a tiny splash of vanilla extract to the filling and coat with white chocolate. It tastes like a bakery treat.
Gluten free: Use gluten free vanilla cookies. The rest is naturally gluten free, just double check labels on pudding mix and candy melts.
Mini truffles: Use a smaller scoop and make bite sized ones. They are perfect for kids and dessert boards.
Other holidays: Swap sprinkles for the season. Pastels for Easter, red and green for Christmas, orange and black for Halloween. The base recipe stays the same.
Make-Ahead Tips for Parties, Holidays & Dessert Tables
This is one reason I love Banana Pudding Easter Truffles. They are basically built for make ahead life.
You can make the mixture a day ahead and keep it covered in the fridge. The next day, roll and dip.
You can also roll the balls and refrigerate them overnight, then dip the next morning.
If you are making a big dessert spread, I like pairing these with something breakfasty like muffins. These are great if you also have ripe bananas sitting around: sourdough banana muffins in 30 minutes.
How to Serve Banana Pudding Truffles for Easter & Special Occasions
Serving is easy, but a few small details make them look extra nice.
Put them in mini cupcake liners so hands stay clean.
Stack them on a tiered stand for that bakery display look.
Add a little bowl of extra crushed wafers on the side as a garnish option.
They are perfect after an Easter brunch, and they also work for baby showers, spring birthdays, and potlucks.
Storage Guide: How to Store, Freeze & Keep Truffles Fresh Longer
Because of the cream cheese, you will want to store these chilled.
Fridge: Store in an airtight container for up to 5 days. I like to separate layers with parchment so they do not stick.
Freezer: Freeze in a freezer safe container for up to 2 months. Thaw overnight in the fridge so the coating stays pretty.
Room temperature: They can sit out for a couple of hours at a party, but after that I put them back in the fridge. If your house is warm, they will soften faster.
Common Mistakes to Avoid When Making No-Bake Dessert Truffles
I have made all of these mistakes so you do not have to.
Making the mixture too wet: Go easy on milk and any fresh banana. Too much liquid makes rolling messy.
Skipping chill time: Warm filling + warm hands = sticky situation. Chill more than you think you need.
Overheating the coating: If the coating is thick or grainy, it was probably overheated. Melt low and slow.
Not crushing wafers enough: Big chunks make the truffles fall apart. Fine crumbs hold everything together.
Dipping warm centers: If the centers are not cold, they can melt slightly and crack the coating.
Nutrition Info, Portion Size & Dietary Adjustments
These are a treat, not a health food, and that is totally fine for a holiday dessert. For portion size, I usually aim for 1 inch balls, which gives you a nice two bite truffle.
Nutrition will vary based on your coating and cookie brand, but in general these are higher in sugar and fat because of the wafers, cream cheese, and chocolate coating.
Easy adjustments: Make them smaller for lighter portions, use reduced sugar pudding mix if you can find it, and try a thinner coating drizzle instead of a full dip if you want to cut back a bit. For dairy free, use dairy free cream cheese and dairy free candy melts.
Common Questions
Can I make Banana Pudding Easter Truffles without a food processor?
Yes. Put the wafers in a zip top bag and crush them with a rolling pin until very fine.
Why are my truffles too sticky to roll?
The mixture is probably warm or a bit wet. Chill it longer, and if needed mix in a couple more spoonfuls of wafer crumbs.
Do I have to use candy melts, or can I use real white chocolate?
You can use real white chocolate, but melt it gently. Candy melts are easier and set more reliably.
Can I freeze Banana Pudding Easter Truffles after dipping?
Yes. Freeze them in a single layer first, then stack with parchment. Thaw in the fridge for the best texture.
How far ahead can I make them for Easter?
I like making them 1 to 3 days ahead. They stay fresh and the flavor actually gets a little better after chilling.
A Sweet Little Easter Treat You Will Make Again
If you need a dessert that looks festive but feels easy, Banana Pudding Easter Truffles are the answer. You get that creamy banana pudding flavor, a cookie crunch, and a pretty pastel shell all in one bite. Make them ahead, decorate them with whatever sprinkles you love, and you have a party ready treat with almost no stress. If you want to compare another fun version, check out Banana Pudding Truffles – Take Two Tapas and see how other home cooks put their own spin on it. Now go grab those sprinkles and have fun with it, you are going to love how cute these turn out.
Print
Banana Pudding Easter Truffles
- Total Time: 1 hour 30 minutes
- Yield: 24 pieces
Description
These No-Bake Banana Pudding Easter Truffles are a fun and easy dessert that combines the creamy flavor of banana pudding with a crunchy vanilla wafer crust, all wrapped in a colorful chocolate coating.
Ingredients
Base Ingredients
- 2 cups Vanilla wafers, crushed into fine crumbs (Can substitute with graham crackers or shortbread cookies.)
- 8 oz Cream cheese, softened (Full fat for creaminess; dairy-free option available.)
- 1 pkg Instant banana pudding mix (Use dry powder, not prepared.)
- 2 tbsp Milk (Just a splash to help the mix blend smoothly.)
- 12 oz White chocolate or vanilla candy melts for coating (Can use milk chocolate for a different flavor.)
Optional Add-Ins
- 1/2 cup Banana chips, crushed (For added crunch.)
- a pinch Salt (Enhances sweetness.)
- 1 drop Banana extract (Optional for enhanced banana flavor.)
Instructions
Preparation
- Crush the wafers into fine crumbs using a food processor or a zip top bag and rolling pin.
- In a mixing bowl, stir together the softened cream cheese, instant banana pudding mix, and milk until well combined.
- Add the wafer crumbs to the cream cheese mixture and mix until it resembles thick cookie dough. If sticky, chill for 20-30 minutes.
Shaping the Truffles
- Scoop the mixture into small balls, rolling them between your palms, and place them on a parchment-lined baking sheet.
- Chill the truffles in the refrigerator for at least 1 hour or freeze for about 15 minutes.
Coating and Decorating
- Melt the white chocolate or candy melts in a microwave-safe bowl, stirring until smooth.
- Dip each truffle in the melted chocolate, tapping off the excess, then return to the parchment to set.
- Sprinkle with decorations before the chocolate hardens.
Notes
For the best results, chill at multiple stages, do not overheat the chocolate, and add decorations quickly. These truffles can be stored in an airtight container in the fridge for up to 5 days or frozen for up to 2 months.
- Prep Time: 30 minutes
- Category: Dessert, Sweet Treat
- Cuisine: American, Easter
Related posts:
 Sakura Mochi: A Japanese Dessert You Can Easily Make at Home
 Crumbl Chocolate Chip Cookie Recipe You’ll Want to Make Again
 Spooktacular Witch’s Brooms Recipe for Halloween Fun
 Small Batch Apple Pumpkin Streusel Muffins
 Crumbl Christmas Sugar Cookies Easy Recipe
 Deliciously Simple Candied Orange Slices

 Main Dishes
 Drinks & Wellness