Baby Chick Cheese Balls are my go to trick for those moments when you want something festive and cute, but you also do not want to spend your whole day in the kitchen. Maybe you have an Easter get together coming up, or your kid just announced they need a themed snack for school tomorrow.
I have been there, standing in front of the fridge hoping inspiration will appear. These little cheese balls always save me because they are simple, they travel well, and people actually get excited when they see them. Plus, they taste like a creamy cheddar dream with a little crunch from the coating.
Ingredients for Cream Cheese & Cheddar Chick Cheese Balls
This recipe is all about a creamy base that is easy to shape, then a bright coating that makes them look like tiny fluffy chicks. Here is what I use most often.
- Cream cheese, softened. This is your rich, smooth base.
- Sharp cheddar cheese, freshly shredded if you can. It melts into the mix better and tastes stronger.
- Garlic powder and onion powder for that snacky flavor.
- Salt and black pepper, just enough to wake everything up.
- A tiny splash of lemon juice or a pinch of paprika, optional but nice for balance.
- Finely shredded cheddar or colored cheese for the outside, or you can use crushed crackers for a different look.
- Little pieces for the face, like sliced black olives for eyes and a small triangle of orange bell pepper or carrot for the beak.
If you love cheesy appetizers in general, you would probably also like these fried chicken buns with cheese for a party day when you want something warm and filling too.
Supplies Needed to Decorate Easter Chick Cheese Balls
You do not need fancy tools, but a few simple things make the decorating part way easier and less messy.
Here is what I pull out:
A small cookie scoop or tablespoon measure, so the balls are the same size. Matching sizes makes them look more polished on a platter.
Disposable gloves, optional but super helpful. Your hands stay clean and the cheese mixture does not stick as much.
A couple small bowls, one for the coating and one for the facial pieces.
Toothpicks for placing eyes and beaks without squishing the cheese balls.
A parchment lined tray that fits in your fridge.
I like setting up a little assembly line. It feels almost like a craft project, which is honestly part of the fun with Baby Chick Cheese Balls.
How to Make the Cheese Ball Mixture Step by Step
This is the part where you want the mixture to be flavorful but also firm enough to shape. Softened cream cheese makes it easy, but you do not want it melting warm.
Step 1: In a medium bowl, mix the softened cream cheese with shredded cheddar until it looks mostly smooth. I use a spoon or a hand mixer on low if I am feeling lazy.
Step 2: Add garlic powder, onion powder, a pinch of salt, and black pepper. Taste it right now. This is the best moment to adjust because once it is chilled, it is harder to mix in extra seasoning.
Step 3: Cover the bowl and chill for about 20 to 30 minutes. This little rest is the secret to making the shaping part less sticky.
Small side note: if you are planning a whole Easter spread, I like pairing these with a cozy bowl of something like chicken mac and cheese soup when the weather is still chilly. It is comfort food next to cute party food, which is a combination I will always defend.
How to Shape and Chill Mini Cheese Balls Easily
Shaping is where people sometimes get frustrated, but it is honestly simple if you do two things: keep it cold and keep your hands slightly damp.
Scoop out portions using your cookie scoop or a tablespoon. Roll each scoop gently between your palms. If it starts sticking, rinse your hands with cool water and pat them lightly so they are damp, not dripping.
Place the balls on a parchment lined tray. Chill them again for at least 30 minutes. If you have the time, 1 hour is even better. Chilling is what helps Baby Chick Cheese Balls hold their shape when you add the coating and the little faces.
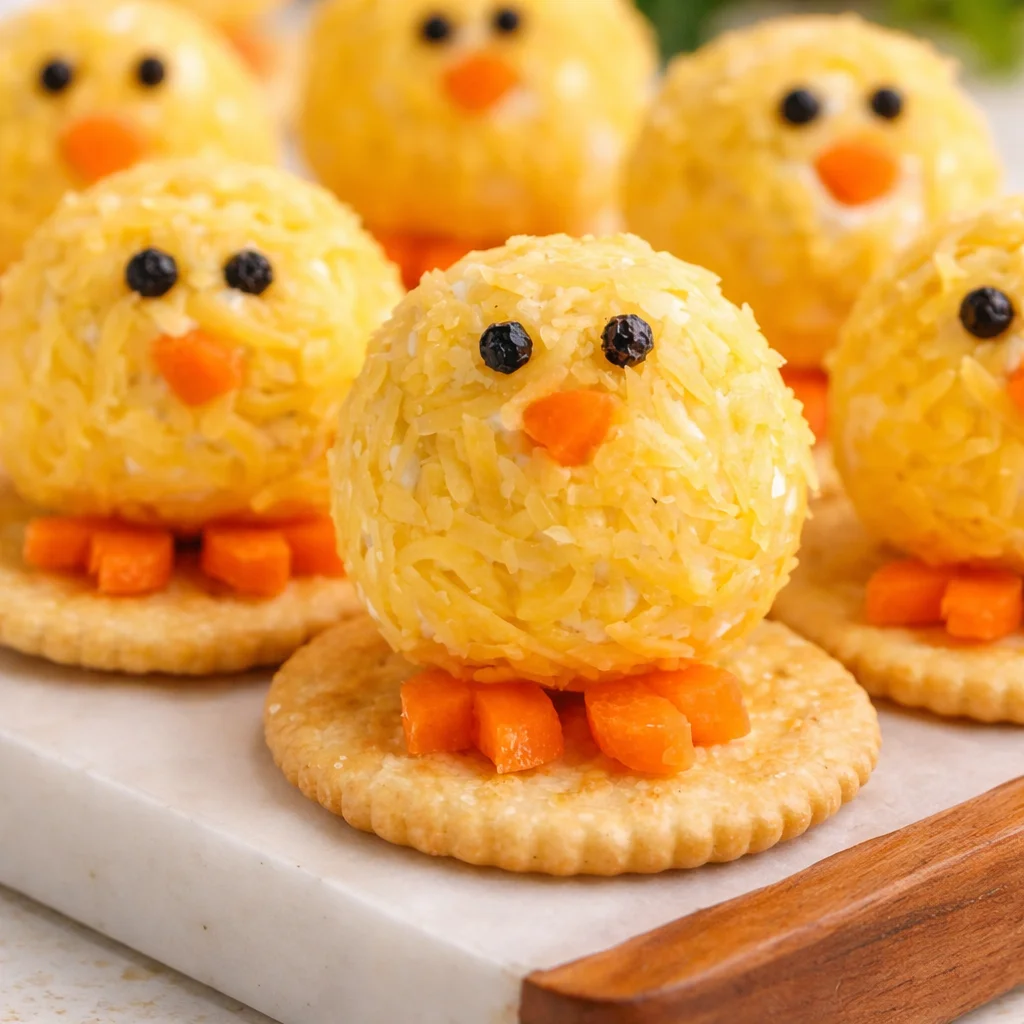
How to Decorate Cute Baby Chick Cheese Balls
This is the part that makes everyone smile. And yes, you can keep it simple. They do not have to look like a professional food stylist made them. They just need to be adorable and recognizable.
Roll each chilled cheese ball in your coating. Finely shredded cheddar gives the classic yellow chick look. Press gently so it sticks.
For the eyes, I use tiny pieces of black olive. For the beak, a little triangle of orange bell pepper or a thin slice of carrot works great. Use a toothpick to poke a spot, then press each piece in lightly. Try not to push too deep or the face pieces disappear.
If you want little “wings,” press two small pieces of shredded cheese on the sides, or use thin cracker bits. This is optional, but it is cute.
Once decorated, return them to the fridge until serving time. Baby Chick Cheese Balls look best when they are cold and firm on the tray.
Pro Tips for Perfect Texture and Flavor
Here are my real life tips from making these more times than I can count:
Use sharp cheddar. Mild cheddar can taste bland once it is mixed with cream cheese.
Chill twice. Chill after mixing and chill after shaping. It makes everything easier.
Salt carefully. Some cheddar is saltier than others. Taste before adding more.
Shred your own cheese if you can. Pre shredded cheese has a coating that can make the texture a little grainy.
If the mixture feels too soft, add a bit more shredded cheddar and chill again. If it feels too firm, let it sit on the counter for 5 minutes before rolling.
Easy Variations and Flavor Swaps
Once you have the basic idea, you can play around with the flavors without ruining the cute chick vibe.
Add a spoonful of ranch seasoning for a tangy snack vibe.
Mix in chopped chives for a fresh, oniony bite.
Swap cheddar for a blend of cheddar and pepper jack if you want a little heat.
For a more protein packed party plate, I sometimes serve these alongside something like cottage cheese chicken parm so there is a hearty main option too.
Make-Ahead Tips for Easter Entertaining
If you are hosting, make ahead food is basically your best friend. You can make the cheese mixture up to 2 days in advance. Keep it covered tightly in the fridge.
You can also shape the balls the day before, then decorate them the morning of your event. I think they look freshest that way. If you decorate too early, the coating can soften a bit from fridge moisture, especially if your shredded cheese is very fine.
If you need a full make ahead menu, I like having a warm option you can reheat like baked chicken tenders plus these Baby Chick Cheese Balls as the fun cold appetizer.
How to Store Leftover Cheese Balls Properly
If you have leftovers, store them in an airtight container in the fridge. I like placing a piece of parchment between layers so the faces do not get smushed.
They keep well for about 3 to 4 days. After that, the texture can get a little weepy and the coating is not as pretty.
Do not freeze them. Cream cheese based mixtures tend to get crumbly and watery after thawing, and the decorations will look sad.
Serving Ideas for Easter Appetizers and Party Platters
This is where you can really make them shine with almost no extra work. I like to serve Baby Chick Cheese Balls cold with crunchy things around them so guests can grab and go.
- Buttery crackers and pretzel thins
- Cucumber rounds for a fresher bite
- Mini bell pepper halves as little scoops
- Celery sticks for that classic party snack feel
- Grapes or strawberries on the platter for color
Arrange the chicks in the middle and pile the dippers around them like a little snack garden. If you have kids coming, add a small bowl of extra crackers because they will absolutely double dip if you let them.
Common Mistakes to Avoid When Making Cheese Balls
I have made every mistake at least once, so here are the big ones to skip:
Skipping the chilling time. Warm cheese mixture is sticky and hard to roll.
Using wet decorations. If your olive pieces are dripping, they slide right off. Pat them dry first.
Over mixing with a strong mixer. It can make the mixture too soft. Mix just until combined.
Making them too big. Smaller is cuter and easier to eat in one or two bites.
Over salting. Always taste before adding extra salt, since cheese already brings plenty.
Kid-Friendly Easter Snack and Party Ideas
Kids love these because they look like little characters, and honestly, adults do too. If you are planning an Easter snack table, here are a few easy ideas that pair well:
Make a “build your own cracker” station with crackers, the chick cheese balls, and small bowls of toppings like chopped cucumbers and mini pepper pieces.
Serve them in cupcake liners so each kid gets their own little chick snack cup.
Do a mix of cute and filling by adding fruit skewers and a simple veggie tray. It keeps the sugar level from going totally wild.
If your kids like helping, let them place the eyes and beaks. It is the perfect level of kitchen task where they feel important but nothing is actually dangerous.
Common Questions
Can I make Baby Chick Cheese Balls without cheddar?
Yes. You can use Colby, Monterey Jack, or a cheddar blend. Just choose something that still tastes good cold.
What if my cheese mixture is too sticky to roll?
Chill it longer, then roll with slightly damp hands. If it is still sticky, mix in a bit more shredded cheese and chill again.
How far ahead can I decorate them?
For the best look, decorate the same day. If you must decorate early, do it the night before and store them in a single layer so the faces stay neat.
What can I use for the eyes besides olives?
Try peppercorns, tiny bits of seaweed snacks, or even black sesame seeds pressed in gently.
Can I make them spicy for adults?
Totally. Add a pinch of cayenne or a spoonful of minced jalapeno. You can even do half mild and half spicy so everyone is happy.
A sweet little Easter snack worth making
If you want a fun, reliable appetizer that gets real reactions, Baby Chick Cheese Balls are it. They are creamy, easy to prep, and they make any Easter platter look like you tried really hard, even if you made them in an hour. If you want another cute version for inspiration, check out Baby Chick Mini Cheese Balls – Wishes and Dishes because it is always fun to see different decorating ideas. Make a batch, snap a quick photo, then watch them disappear faster than you expected. You have to try them at least once.
Print
Baby Chick Cheese Balls
- Total Time: 1 hour
- Yield: 12 pieces
Description
Festive and adorable cheese balls that are perfect for Easter gatherings or themed snacks. Creamy cheddar flavor with a cute presentation.
Ingredients
Cheese Mixture
- 8 oz Cream cheese, softened (Your rich, smooth base.)
- 2 cup Sharp cheddar cheese, freshly shredded (For better melting and flavor.)
- 1 tsp Garlic powder (For flavor.)
- 1 tsp Onion powder (For flavor.)
- 1 pinch Salt (To taste.)
- 1 pinch Black pepper (To taste.)
- 1 tbsp Lemon juice (Optional for balance.)
Coating & Decoration
- 2 cup Finely shredded cheddar or colored cheese (For the outside coating.)
- 1 small Sliced black olives (For eyes.)
- 1 small Orange bell pepper or carrot (For beak.)
Instructions
Preparation
- In a medium bowl, mix the softened cream cheese with the shredded cheddar until smooth.
- Add garlic powder, onion powder, a pinch of salt, and black pepper. Adjust seasoning to taste.
- Cover the bowl and chill for 20 to 30 minutes.
Shaping
- Scoop out portions using a cookie scoop or tablespoon and roll gently between your palms.
- If they are sticky, rinse your hands with cool water and keep them slightly damp.
- Place the shaped balls on a parchment-lined tray and chill for at least 30 minutes.
Decorating
- Roll each chilled cheese ball in the finely shredded cheddar or the coating of your choice.
- Press in pieces of black olive for eyes and orange bell pepper or carrot for the beak using a toothpick.
- Add shredded cheese or cracker bits for optional wings.
- Return them to the fridge until serving.
Notes
To keep leftovers fresh, store in an airtight container with parchment paper between layers. These cheese balls last 3 to 4 days in the fridge. Avoid freezing.
- Prep Time: 30 minutes
- Category: Appetizer, Snack
- Cuisine: American, Party


 Main Dishes
 Drinks & Wellness