
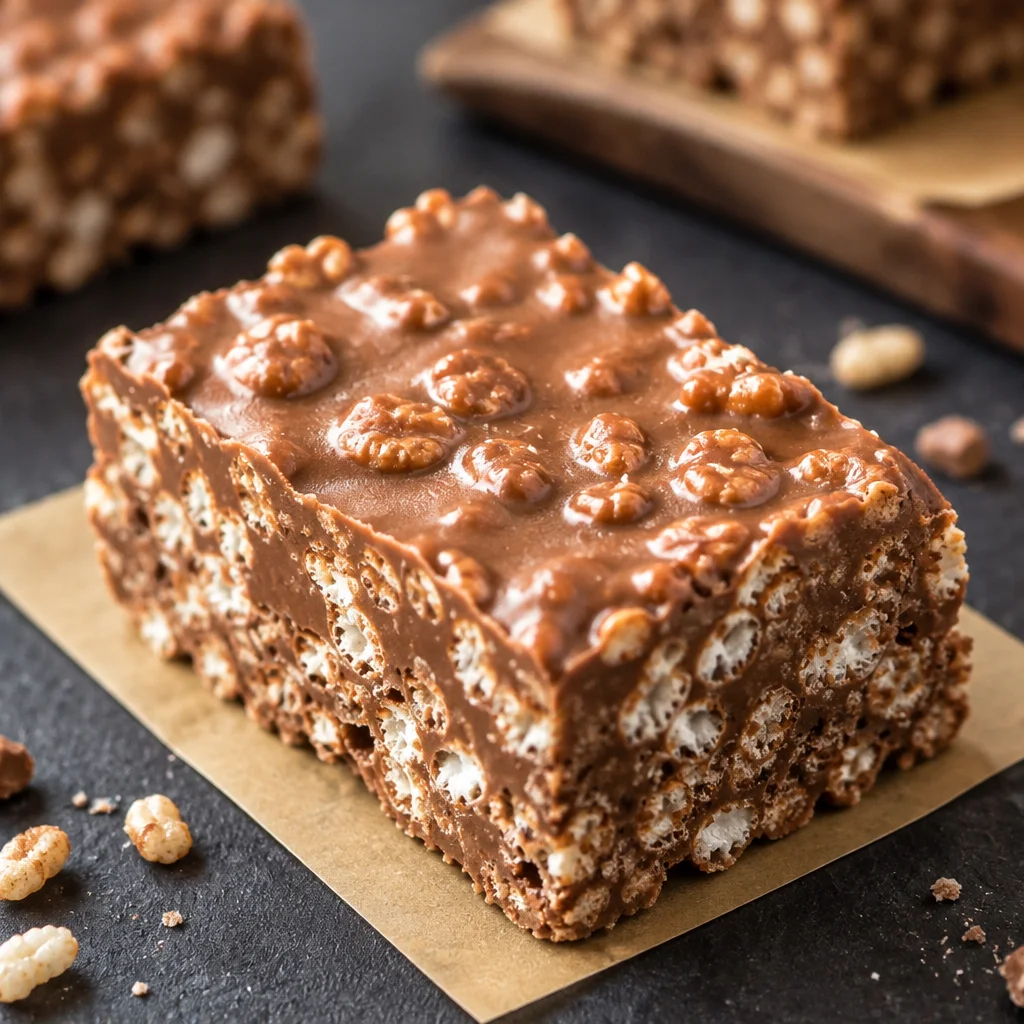
homemade crunch bars are my go to fix for those nights when I want something sweet and chocolatey but I do not want to bake a whole cake or wash a mountain of dishes. You know that feeling when you keep opening the pantry, hoping a treat will magically appear? Yep, that is usually when I make these. They are crunchy, a little salty, and they hit that candy bar vibe in a very homemade way. The best part is you can tweak them for your house, like extra peanut butter or extra crisp. Let me walk you through exactly how I make them so yours cut clean and crunch loudly.
What Are Homemade Chocolate Crunch Bars?
These are simple no bake bars made by coating crispy rice cereal in a melted chocolate and peanut butter mixture, then pressing everything into a pan and chilling until firm. Think of them like the easiest candy bar you can make at home without special tools.
I started making them because I wanted something like a store bought crunch bar, but I wanted more flavor and less mystery ingredients. Plus, when I am already making savory dinner and want something sweet after, this recipe is fast. Sometimes I pair them with something cozy like Homemade Cinnamon Swirl Banana Bread on a weekend and it feels like a full on treat day.
Also, they are a great make ahead snack for lunchboxes and road trips. Once you nail the texture, they are honestly hard to stop eating. I have to hide them behind the oats or they disappear.
Why Crispy Rice and Peanut Butter Make a Better Crunch Bar
Crispy rice cereal brings that light, airy crunch without being heavy. Peanut butter does the cozy work, adding richness, a little salt, and that creamy glue that helps everything stick together.
Here is what I notice when I test different versions:
Crispy rice gives you clean crunch, not hard crunch that hurts your teeth.
Peanut butter balances chocolate so it does not taste flat or overly sweet.
The combo also keeps the bars from feeling greasy if you use the right ratio. If you have ever made chocolate cereal treats that felt oily, it is usually too much fat and not enough structure from cereal.
The Five Ingredients and What Each One Does
This is the part I love because it is so simple. Here are my core five ingredients for homemade crunch bars, and what each one is doing for you.
- Chocolate chips: the main flavor and the coating that sets up firm in the fridge.
- Peanut butter: adds creaminess, helps the chocolate mixture stay smooth, adds salt and depth.
- Crispy rice cereal: brings the crunch and volume so the bars are not just solid chocolate.
- Butter: makes the melt silky and helps the bars cut without cracking too much.
- Honey or maple syrup: a small amount helps the mixture bind and adds a gentle sweetness.
If you want a dessert to bring to a potluck, these are so easy to scale. And if you are in a “snack board” phase, toss these next to fruit and maybe something fun like strawberry crunch cheesecake tacos for a dessert spread that makes people happy.
Choosing Chocolate Chips and Crispy Rice Cereal
Use chocolate chips you actually like eating straight from the bag. I usually go for semi sweet because it keeps the bars from being too sugary, but milk chocolate works if you want a more classic candy bar taste.
Some quick tips:
Semi sweet chips give the best balance with peanut butter.
Dark chocolate chips are great if you like a less sweet bite.
Mini chips melt faster and more evenly.
For the cereal, name brand crispy rice tends to stay crunchier longer, but store brand is fine. The biggest thing is freshness. If your cereal is a little stale, the bars will taste stale too. If I am not sure, I pour a little in a bowl and listen. If it does not sound crisp, I open a new box.
Peanut Butter Alternatives and Nut-Free Options
If you cannot do peanut butter, you still have options and you can absolutely make homemade crunch bars that work for allergies.
My swaps:
Sunflower seed butter is the best nut free option and tastes great with chocolate.
Almond butter is smoother and a little sweeter than peanut butter.
Tahini is more bold and slightly bitter in a good way, especially with dark chocolate.
One note: natural nut butters that separate a lot can make the mix looser. If yours is very drippy, stir it super well and consider using a bit less butter in the recipe to keep the bars firm.
If you are baking for a school event, I would go with sunflower seed butter and clearly label it. That keeps things safer and still super tasty.
Equipment and the Best Pan Size
You do not need much. That is another reason I make these when I am tired.
Here is what I grab:
8 by 8 inch pan for thicker bars, which is my favorite.
9 by 13 inch pan if you want thinner bars for a crowd.
Parchment paper makes your life easier. I line the pan so I can lift the whole slab out and cut on a board. If you do not have parchment, grease the pan lightly, but the edges can be annoying to release.
Also, a silicone spatula is perfect for folding the cereal in without crushing it. A wooden spoon works too, just be gentle.
How to Melt the Chocolate Mixture Without Scorching
Scorched chocolate is the fastest way to ruin the mood. The good news is it is easy to avoid if you go slow.
I use one of two methods:
Stovetop: Melt butter, then add chocolate chips and peanut butter on low heat. Stir constantly. The moment it looks mostly melted, take it off the heat and keep stirring until smooth.
Microwave: Microwave in 20 to 30 second bursts, stirring every time. Stop when there are still a few small lumps and stir until smooth.
If it looks thick or grainy, it might be overheated. Add a tiny bit more peanut butter and stir like crazy. It often smooths out.
How to Coat the Cereal and Press the Bars Into the Pan
This part is weirdly satisfying. Pour your crispy rice cereal into a big bowl first. Then pour the melted chocolate mixture over the top.
Fold gently until every piece is coated. Take your time. If you stir too hard, you will crush the cereal and lose crunch.
Then scrape it into the lined pan and press it down. I use the bottom of a measuring cup to press evenly. Press firmly but do not smash it into a solid brick. You want it packed enough to slice, but still airy.
If you like snacky savory things too, these bars are fun alongside something cheesy like homemade cheesy breadsticks on a game night. Sweet and salty always wins.
How Long to Chill Before Cutting
I chill for 1 to 2 hours in the fridge. If I am in a hurry, 30 to 40 minutes in the freezer works, but set a timer so you do not forget them.
For the cleanest slices, I lift the slab out and let it sit at room temp for about 5 minutes. Then I use a big sharp knife. If the chocolate is super cold, it can crack a little. That short rest helps.
Tips for a Crisp Bite and Smooth Chocolate Coating
Here is what makes homemade crunch bars feel like they came from a candy shop, but still homemade in a good way.
Use fresh cereal for real crunch.
Do not overheat the chocolate or it can set up dull and stiff.
Stir gently so the cereal stays puffed and crisp.
Press evenly so the bars do not crumble when you cut.
And my personal tip: add a tiny pinch of salt even if your peanut butter is salted. It wakes up the chocolate flavor.
Troubleshooting Soft, Crumbly, or Soggy Bars
If your bars are not perfect on the first try, do not stress. This recipe is forgiving.
Too soft: They likely need more chill time, or your ratio had too much butter or syrup. Chill longer first. If they are still soft, next time reduce butter slightly.
Crumbly: Usually not pressed enough, or not enough binder. Press more firmly, or add an extra spoonful of peanut butter next time.
Soggy or stale tasting: That is almost always old cereal. Fresh box fixes it.
Chocolate seized: Water got into it or it overheated. Go low and slow, and keep bowls dry.
I made these for my kid’s class party with sunflower seed butter and they were the first dessert gone. A few parents asked for the recipe, and nobody even guessed they were nut free.
Vegan, Dairy-Free, Gluten-Free, and Lower-Sugar Options
You can adjust these without losing the fun.
Vegan: Use dairy free chocolate chips, swap butter for coconut oil, and use maple syrup instead of honey.
Dairy free: Same idea, dairy free chips and coconut oil or a plant based butter.
Gluten free: Most crispy rice cereals are gluten free, but check the label because some brands have sneaky additives.
Lower sugar: Use dark chocolate, skip the honey or maple syrup, and rely on peanut butter for flavor. The bars will be a bit less glossy but still good.
If you love snacky bars with veggies too, you might also like carrot and zucchini bars with citrus cream cheese frosting for a totally different vibe.
Fun Flavor Mix-Ins and Serving Ideas
This is where you can make them your own. Keep mix ins small so slicing stays easy.
Ideas I actually use:
Chopped pretzels for extra salty crunch.
Mini marshmallows for a soft chewy bite.
Toasted coconut for a sweet nutty feel.
Crushed freeze dried strawberries for a fruity punch.
Sprinkles if you are making them for a birthday.
Serving wise, I like a small square after dinner with coffee. Or I cut them into skinny rectangles for lunchboxes. If you are making a full spread for friends, something savory and filling like butter chicken flatbread plus these bars for dessert is a pretty great plan.
How to Store, Pack, and Freeze Crunch Bars
These store really well, which is dangerous because it means there is always a treat waiting.
Room temp: 2 to 3 days in an airtight container if your kitchen is cool. If it is warm, the chocolate can soften.
Fridge: Up to 10 days. I separate layers with parchment so they do not stick.
Freezer: Up to 2 months. Wrap individual pieces and freeze in a bag. Let them sit out 10 minutes before eating so you do not crack a tooth.
For packing in lunches, I like them chilled so they hold their shape. If you pack them at room temp on a hot day, throw in an ice pack.
Frequently Asked Questions About Homemade Crunch Bars
Can I make homemade crunch bars without peanut butter?
Yes. Use sunflower seed butter for nut free, or almond butter for a milder flavor. The texture stays very similar.
Why did my chocolate look dull on top?
Usually it is from overheating the chocolate. Melt slower next time, and stop heating while there are still a few unmelted chips so residual heat finishes the job.
How do I cut them without cracking?
Let the slab sit 5 minutes after chilling, then use a large sharp knife. Wipe the knife between cuts for cleaner edges.
Can I use puffed rice instead of crispy rice cereal?
You can, but it tends to soften faster. Crispy rice cereal holds crunch longer because it is toasted and sturdier.
Do I really need the syrup?
Not always. It helps with binding and gives a slightly softer bite. If you want less sugar, you can reduce it or skip it and add a touch more peanut butter.
A Sweet Little Wrap Up Before You Go
If you want a simple treat with big payoff, homemade crunch bars are the answer. Keep your cereal fresh, melt the chocolate gently, and chill long enough so they slice clean. Once you have the base version down, you can play with mix ins and dietary swaps without stress. For more inspiration, I have bookmarked Homemade Crunch Bars – Detoxinista and also this super simple 3 Ingredient Homemade Crunch Bars (Gluten Free) – Beaming Baker when I want to compare variations. Go make a batch, stash a few in the freezer, and thank yourself later.
Print
Homemade Chocolate Crunch Bars
- Total Time: 25 minutes
- Yield: 16 bars 1x
Description
Easy no-bake bars made with crispy rice cereal, chocolate, and peanut butter for a sweet, crunchy treat.
Ingredients
Main Ingredients
- 2 cups chocolate chips (Use semi-sweet for a balanced flavor.)
- 1 cup peanut butter (Can substitute with sunflower seed butter for nut-free.)
- 4 cups crispy rice cereal (Ensure freshness for the best texture.)
- 4 tablespoons butter (Makes the melt silky.)
- 1/4 cup honey or maple syrup (Helps the mixture bind and adds sweetness.)
Instructions
Preparation
- Prepare an 8×8 inch pan by lining it with parchment paper.
- Melt the butter in a saucepan on low heat, then add chocolate chips and peanut butter. Stir constantly until mostly melted, then remove from heat and continue stirring until smooth.
- In a large bowl, pour the crispy rice cereal and then add the melted chocolate mixture over it.
- Gently fold the cereal until evenly coated.
- Transfer the mixture into the lined pan and press down firmly but gently, ensuring it remains airy.
Chilling
- Chill in the fridge for 1-2 hours or in the freezer for 30-40 minutes.
- Once firm, lift from the pan, let sit for about 5 minutes, then cut into squares.
Notes
Store at room temperature for 2-3 days or in the fridge for up to 10 days. Wrap individual bars for freezer storage up to 2 months. Experiment with mix-ins like mini marshmallows or chopped pretzels.
- Prep Time: 15 minutes
- Cook Time: 10 minutes
- Category: Dessert, Snack
- Cuisine: American
Nutrition
- Calories: 120
- Sugar: 5
- Sodium: 50
- Fat: 7
- Saturated Fat: 3
- Carbohydrates: 14
- Fiber: 1
- Protein: 3











 Appetizers & Sides
 Main Dishes
 Drinks & Wellness
 Desserts & Baking