
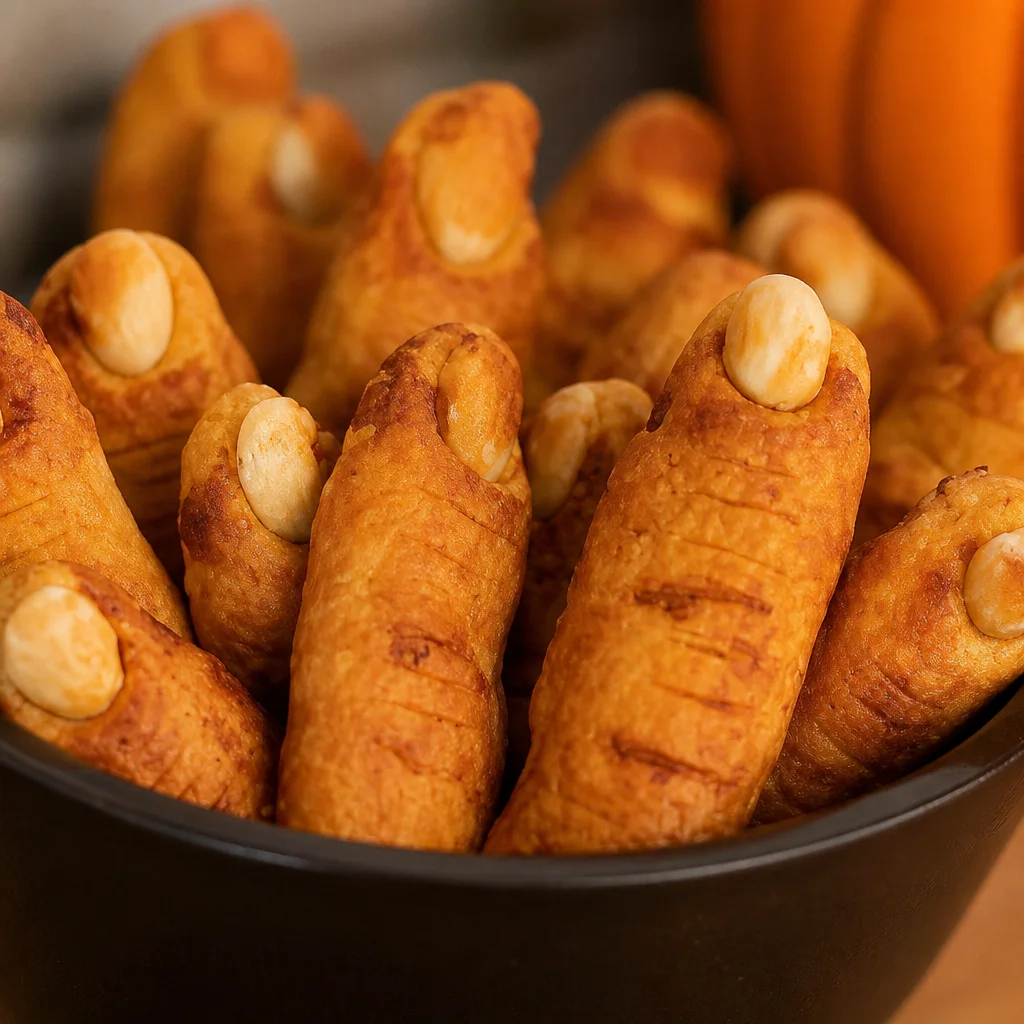
Witches’ Fingers Cookies are my go to move when Halloween is creeping up and I need something fun that looks like I tried way harder than I actually did. You know that moment when you remember the class party or the neighborhood movie night is tomorrow, and you still have nothing to bring? Yep, this is for that moment. These cookies are simple, a little spooky, and honestly kind of hilarious once you line them up on a tray. They taste like a buttery almond cookie, but the look gets all the screams. Let me walk you through my favorite way to make them without stress.
Why You’ll Love These Easy Halloween Treats
I love a Halloween recipe that checks three boxes: easy, cute, and actually tasty. These fingers hit all three. You can make the dough in one bowl, the shaping is forgiving, and kids and adults both get a kick out of the creepy vibe.
Also, they are a conversation starter. People always pick one up, stare at it, and then laugh before taking a bite. That is exactly the energy I want at a Halloween party.
If you like playful cookies in general, you might also like these flower sugar cookies for a totally different vibe on a different day. But for October, I am all in on fingers.
Ingredients for Witches’ Fingers Cookies
Here is what you need. Nothing fancy, and you probably have most of it already. I like using almond extract because it gives that classic “bakery cookie” smell when they bake.
- Unsalted butter, softened
- Granulated sugar
- 1 large egg
- Vanilla extract
- Almond extract (highly recommended)
- All purpose flour
- Baking powder
- Salt
- Whole almonds for fingernails
- Red jam, strawberry preserves, or red decorating gel for “blood”
- Optional: green food coloring or cocoa powder for different looks
Little note from my kitchen: if your almonds are slippery or dusty, wipe them with a dry paper towel. It helps them stick better when you press them into the dough.
How to Make Witches’ Fingers Halloween Cookies
This is a straightforward cookie dough, just with a creepy shaping step. I chill the dough because it makes the fingers easier to roll and keeps them from spreading too much.
Basic steps:
1) Cream the butter and sugar until it looks smooth and a bit fluffy.
2) Mix in the egg, vanilla, and almond extract.
3) Add flour, baking powder, and salt, then mix until a soft dough forms.
4) Chill the dough for about 20 to 30 minutes. If your kitchen is warm, go closer to 45 minutes.
5) Roll, shape, add almonds, then bake at 350 F until set and lightly golden on the bottoms, usually 10 to 12 minutes.
While we are chatting seasonal cookies, if you ever need something sweet for December, I bookmark these Christmas sugar cookies every year because they are a total classic.
How to Shape Realistic Witch Finger Cookies
This is the fun part, and it is way easier than it looks. Grab a small chunk of dough and roll it into a log that is about the length of your finger. I aim for around 3 to 4 inches.
Now, make it look like a finger:
Pinch slightly in the middle for a knuckle area, then pinch again closer to the tip. You do not need perfection. In fact, slightly uneven fingers look creepier.
If the dough starts sticking to your hands, rub a tiny bit of flour on your palms. Not a lot, just enough to make rolling easy.
How to Make the Almond Fingernails Look Spooky
Almonds are the easiest “nails” because they already have that nail shape. Press one almond into the tip of each cookie before baking. Press firmly, but not so hard that the finger flattens.
After baking, I like to lift the almond slightly, add a tiny dab of jam or red gel underneath, then press it back down. That gives you the gross little “bloody cuticle” look that people love to hate.
If you are skipping the blood effect, you can still add a dab of jam as “glue” so the almonds do not pop off later.
Tips for Making Perfect Witch Finger Cookies
I have made these enough times to learn a few things the hard way. Here is what actually helps.
My best tips:
Chill the dough. It keeps the fingers from spreading into weird blobs.
Keep the fingers a similar thickness so they bake evenly.
Use parchment paper. It helps prevent over browning on the bottoms.
Do not overbake. Pull them when the tops look set and the bottoms are just lightly golden.
If you want more “wrinkles,” use a toothpick to lightly draw lines around the knuckles before baking.
And if you want a cookie project that is easier for non Halloween days, these basil lime sugar cookies are surprisingly refreshing and different in a good way.
Common Mistakes to Avoid When Baking Halloween Finger Cookies
Most issues come down to dough temperature or finger size. Here is what to watch for.
Mistake 1: Warm dough
Warm dough spreads fast, and fingers turn into cartoon hands. Chill it again if it feels soft.
Mistake 2: Fingers too thick
They can stay doughy inside. Roll them slimmer than you think, because they puff a little.
Mistake 3: Almonds falling off
Press them in firmly, and after baking use jam or gel as edible glue.
Mistake 4: Overbaking
They should not be crunchy. These are better slightly soft with a tender bite.
Easy Variations for Witches’ Fingers Treats
Once you nail the basic Witches’ Fingers Cookies, you can play around. I do this when I want a big platter with different “styles” but I do not want to make multiple doughs.
Try these easy switches:
Chocolate fingers: swap 1 quarter cup flour for cocoa powder.
Spice fingers: add cinnamon and a tiny pinch of cloves.
Nut free: use pumpkin seeds or mini chocolate chips as nails. It is not as realistic, but it is safer for allergy situations.
Extra almond: add a little almond paste if you have it, just reduce the sugar slightly so it stays balanced.
How to Make Green, Bloody, or Extra-Creepy Witch Fingers
This is where you can lean into the gross factor, or keep it cute and simple.
Green fingers: add a few drops of green food coloring to the dough when you mix in the egg. Start small, because the color deepens a little as it bakes.
Bloody fingers: use thick strawberry jam, raspberry jam, or red gel. Add it under the almond nail after baking. If you add jam before baking, it can melt and spread more than you want.
Extra creepy: press in a few sliced almonds along the knuckle area to look like bumpy joints, or dust the cooled cookies with a tiny bit of cocoa to look “dirty.”
When I serve Witches’ Fingers Cookies, I usually do half “bloody” and half plain, because some people love the gore and some people are like, no thanks.
How to Serve Witches’ Fingers for Halloween
Serving is half the fun. These cookies look best when you commit to the bit.
- Arrange them in rows on a black platter so they look like a creepy collection
- Serve with a little bowl of red jam on the side like “dip”
- Put them in treat bags tied with orange ribbon for party favors
- Add a label card that says Witches’ Fingers Cookies so people know it is intentional
If you are building a cute seasonal cookie table beyond Halloween, these Easter birds nest cookies are a sweet springtime contrast to the spooky stuff.
Halloween Party and Treat Table Ideas
If you are doing a party spread, I like mixing textures and colors so the table looks full without needing a million recipes. Pair Witches’ Fingers Cookies with something chocolatey, something salty, and something fruity.
Easy ideas:
Popcorn in orange and black cups.
Mini chocolate cupcakes with candy eyes.
Grapes and clementines for a quick “healthy” option.
A big punch bowl with floating gummy worms.
And if you want a quick styling trick, scatter plastic spiders around the platters. It makes everything look planned, even if you baked in a hurry.
How to Store and Freeze Witches’ Fingers Cookies
These store really well, which is great if you like baking ahead. I usually make them the day before Halloween because the flavor gets even better overnight.
To store: keep cooled cookies in an airtight container at room temperature for up to 4 or 5 days. If you used a lot of jam, place parchment between layers so they do not stick.
To freeze baked cookies: freeze on a tray first, then transfer to a freezer bag or container. They keep for about 2 months. Thaw at room temp.
To freeze the dough: shape the fingers, freeze them on a tray, then store frozen. When ready to bake, add 1 to 2 extra minutes to the bake time and add the jam after baking.
Common Questions
Can I make Witches’ Fingers Cookies without almond extract?
Yes. Use more vanilla, or even a little lemon zest. Almond just gives that classic “finger cookie” flavor.
Why did my fingers spread too much?
The dough was likely too warm or your butter was overly soft. Chill the dough longer, and make sure your baking sheet is not warm when you start.
Can I make these ahead for a party?
Totally. Bake them 1 to 2 days ahead, then add the jam under the nails the day of so it stays bright and fresh looking.
What can I use instead of almonds for the nails?
Pumpkin seeds, sunflower seeds, or even candy nails work. For allergies, I usually go with pumpkin seeds.
How do I keep the almond nails from falling off?
Press them in firmly before baking, then after baking add a tiny dab of jam or gel underneath as glue.
A Spooky Batch You Can Totally Pull Off
If you make one Halloween cookie this year, let it be Witches’ Fingers Cookies because they are easy, funny, and they always get a reaction. Once you do one tray, you will get faster at shaping and the second tray will look even better. If you want more inspiration, I also like reading different takes like Witch Finger Cookies (without food coloring!) – Texanerin Baking for a more natural vibe, or Creepy Witch Finger Cookies – Simply So Good when I want to lean extra spooky. Bake a batch, put on a Halloween movie, and have fun with the mess. You have totally got this.
Print
Witches’ Fingers Cookies
- Total Time: 42 minutes
- Yield: 24 cookies 1x
Description
Spooky and fun, these buttery almond cookies are perfect for Halloween gatherings, with a creepy shape that adds charm to any party.
Ingredients
Cookies
- 1 cup Unsalted butter, softened
- 1 cup Granulated sugar
- 1 large Egg
- 1 teaspoon Vanilla extract
- 1 teaspoon Almond extract (Highly recommended)
- 2.5 cups All-purpose flour
- 1 teaspoon Baking powder
- 1/2 teaspoon Salt
- 24 pieces Whole almonds (For fingernails)
- 1/4 cup Red jam, strawberry preserves, or red decorating gel (For ‘blood’)
Optional Variations
- a few drops Green food coloring (For green cookies)
- 1/4 cup Cocoa powder (For chocolate fingers)
Instructions
Preparation
- Cream the butter and sugar until smooth and fluffy.
- Mix in the egg, vanilla, and almond extract.
- Add flour, baking powder, and salt, then mix until a soft dough forms.
- Chill the dough for 20 to 45 minutes.
Shaping and Baking
- Preheat your oven to 350°F (175°C).
- Roll small pieces of dough into logs about 3 to 4 inches long.
- Pinch the dough in the middle for knuckles and at the tip.
- Press an almond firmly into the tip of each finger.
- Bake for 10 to 12 minutes, until set and lightly golden on the bottoms.
Finishing Touches
- After baking, lift the almond slightly and add a dab of jam underneath for a ‘bloody cuticle’ look.
Notes
Chill the dough to avoid spreading. Use parchment paper to prevent over-bronwing, and do not overbake.
- Prep Time: 30 minutes
- Cook Time: 12 minutes
- Category: Dessert, Snack
- Cuisine: American, Halloween
Nutrition
- Calories: 150
- Sugar: 8
- Sodium: 50
- Fat: 7
- Saturated Fat: 4
- Carbohydrates: 20
- Protein: 2

Related posts:
 Sakura Mochi: A Japanese Dessert You Can Easily Make at Home
 Deliciously Simple Candied Orange Slices
 Decadent Hot Cross Bun Recipe
 Irresistibly Super Moist Chocolate Chip Banana Bread Recipe
 Crispy Air Fryer Churro Bites- Sweet & Simple
 Vegan Gluten-Free Lemon Sandwich Cookies with Lemon Curd (Easy Healthy Recipe)





 Appetizers & Sides
 Main Dishes
 Drinks & Wellness
 Desserts & Baking