
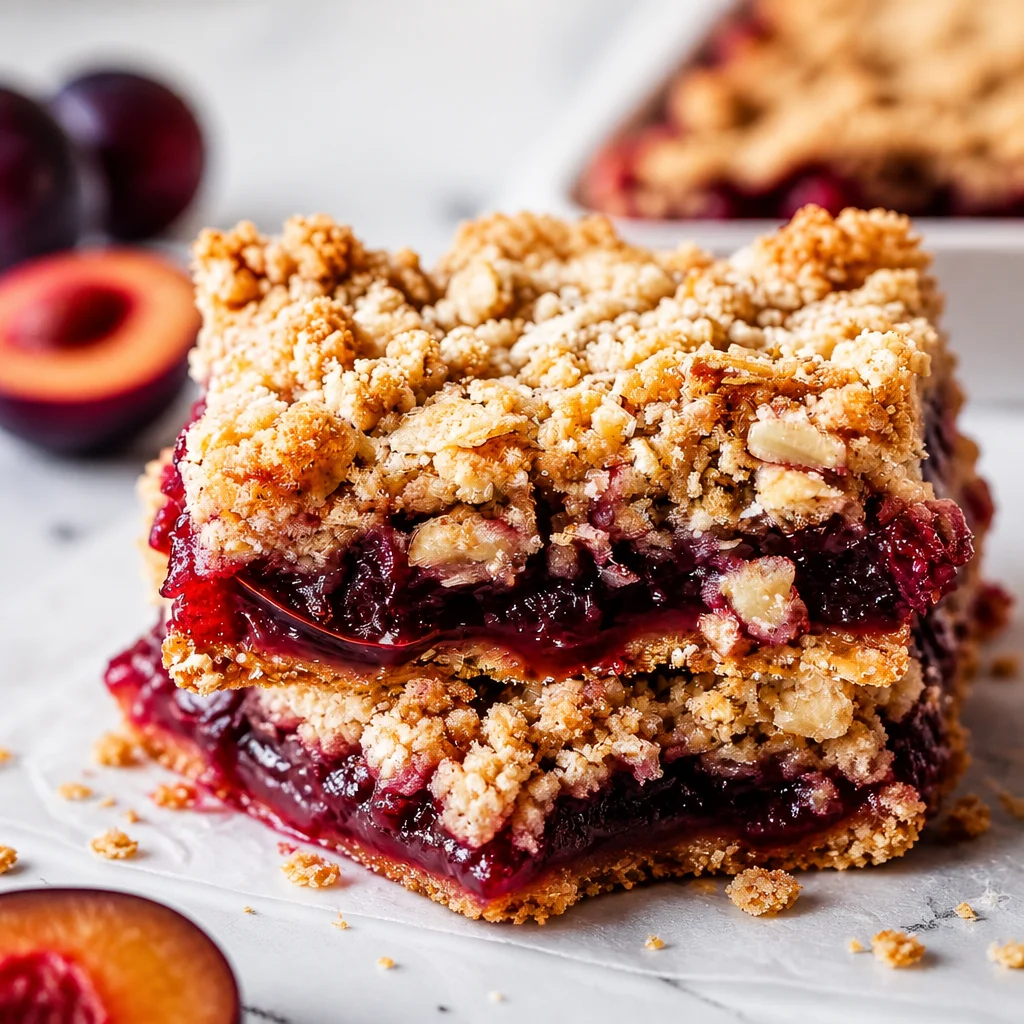
Plum Crumble Bars with Oat Crumble are my go to move when I want a cozy dessert but I do not want to fuss with a pie crust. You know those weeks when you have fruit on the counter getting softer by the hour and you need a plan fast? This is that plan. These bars are buttery, jammy, and a little crunchy on top, which is basically my favorite combo. I have made them for casual weekends, last minute guests, and once just because I needed something sweet with my coffee. Let’s make a pan together and I will tell you all my little shortcuts along the way.
Why You’ll Love These Homemade Plum Crumble Bars
First, they taste like a bakery treat but the method is honestly simple. You are making one dough that becomes both the base and the topping, so you do not have to juggle multiple mixtures. The plum layer turns glossy and thick as it bakes, and it plays so nicely with the **oat crumble** on top.
Second, these are great for real life. They slice clean once cooled, which makes them easy to pack, share, or stash in the fridge for late night snacking. If you are into dessert bars in general, you might also like my other snacky bakes like these carrot and zucchini bars with dreamy citrus cream cheese frosting. Different vibe, same comforting bar energy.
Third, this is one of those forgiving recipes. If your plums are super sweet, you can reduce sugar. If they are tart, you can add a touch more. You are in control, and it still comes out lovely.
Ingredients for Plum Crumble Bars
Here is what I typically use. Nothing fancy, just solid pantry basics plus fresh plums. This is also where you can set yourself up for success by using cold butter and real oats.
- Fresh plums, pitted and chopped
- Granulated sugar (for the filling and a little for the crumble)
- Brown sugar (for that caramel cozy flavor)
- Lemon juice (brightens the plum flavor)
- Cornstarch (thickens the filling so it sets into bars)
- All purpose flour
- Old fashioned oats (not instant if you can help it)
- Cold unsalted butter, cubed
- Salt
- Vanilla extract (optional but so good)
- Cinnamon (optional, but I usually add a pinch)
One quick note: if your plums are extra juicy, do not skip the cornstarch. It is the difference between neat slices and delicious chaos.
How to Choose the Best Fresh Plums
For Homemade Plum Crumble Bars, I like plums that are ripe but not collapsing. If they are too firm, the filling can taste a little flat. If they are too mushy, you will get lots of liquid and the bars can take longer to set.
Here is what I look for at the store:
Gentle give when you press them, like a ripe peach but firmer. A sweet fruity smell near the stem. Smooth skin without deep wrinkles. Also, do not stress about the variety. Black plums, red plums, or those speckled ones all work. If you have a mix, even better. It adds a little flavor depth.
How to Make the Plum Filling
This part is quick and it makes your kitchen smell amazing. Chop your plums into small bite size pieces. I do not peel them. The skins melt down and add pretty color, plus peeling is just not my idea of a good time.
In a bowl, toss the chopped plums with sugar, lemon juice, cornstarch, and a tiny pinch of salt. If you want a warmer flavor, add a small pinch of cinnamon or a drop of vanilla. Let it sit while you make the crumble. That resting time helps the fruit release some juice and lets the cornstarch start dissolving so it thickens nicely in the oven.
How to Make the Buttery Oat Crumble
This is the cozy part. In a large bowl, mix flour, oats, brown sugar, a little granulated sugar, and salt. Add the cold butter cubes, then use your fingers or a pastry cutter to work the butter in until you get pea sized bits and some sandy crumbs too. You want a mix of textures for the best top crust.
When I say cold butter, I really mean it. Cold butter equals a more crumbly, crisp topping. If your kitchen is warm, you can pop the bowl in the fridge for 10 minutes before you assemble.
How to Assemble Plum Crumble Bars
Heat your oven to 350 F and line an 8×8 pan with parchment paper. Leave a little overhang so you can lift the bars out later. Grease lightly if you want extra insurance.
Press about two thirds of the crumble mixture into the bottom of the pan. Press it firmly so it holds together after baking. Then spoon the plum filling over the base and spread it out evenly. Finally, sprinkle the remaining crumble over the top. Do not pack the top layer down. You want those craggy bits to get golden.
This is also a good moment to think about dinner because these bars are a treat, and I like to balance life with something savory first. If you need an easy bowl meal, this burger bowl with sweet potato is simple and super satisfying.
How to Bake Plum Crumble Bars
Bake for about 40 to 50 minutes, until the top is golden brown and you can see the filling bubbling in a few spots. Bubbling is a good sign because it means the cornstarch is activating and thickening the fruit layer.
Now the hard part: let them cool. I know, I know. But if you cut too soon, the filling will be runny. I cool them at room temp for at least 1 hour, then I chill for another hour if I have time. Cold bars slice like a dream.
Expert Tips for Perfect Plum Crumble Bars
I have made these enough times to learn what actually matters. Here are my best real life tips, the ones that save a batch.
Tip 1: Use parchment paper. It makes lifting and slicing so much easier.
Tip 2: Taste a piece of plum before you mix the filling. If it is super tart, add an extra tablespoon of sugar. If it is super sweet, pull sugar back a bit.
Tip 3: Press the bottom crust firmly. Loose crust equals crumbly bars that fall apart.
Tip 4: Cool completely before slicing. If you need speed, chill in the fridge.
Tip 5: If your plums are very juicy, add an extra teaspoon of cornstarch.
Plum Crumble Bars Variations and Substitutions
Homemade Plum Crumble Bars are flexible, which is part of why I bake them so often. Here are a few easy swaps that work well:
Use nectarines or peaches if you are short on plums. Mix plums with berries for a more tangy filling. Add chopped pecans or walnuts to the crumble for extra crunch. Swap cinnamon for cardamom if you want a slightly fancy flavor without extra effort. You can also add a pinch of ginger, which makes the plum filling taste brighter.
If you are planning a potluck spread, I love pairing these bars with comfort food. Something like corn casserole with cream cheese is always a crowd pleaser, then you bring the bars out once everyone is happy and full.
How to Make Gluten-Free or Vegan Plum Crumble Bars
You can absolutely adapt Plum Crumble Bars with Oat Crumble if you need gluten free or vegan. I have done both, and while the texture changes a little, the vibe stays the same.
Gluten free: Use a 1 to 1 gluten free flour blend and make sure your oats are certified gluten free. Press the bottom layer firmly because gluten free crusts can be a bit more delicate.
Vegan: Swap the butter for a solid plant based butter. Coconut oil can work too, but it melts faster and can make the crumble a bit more oily, so I prefer vegan butter sticks. Also check your sugars if you are strict vegan.
You might need to bake 3 to 5 minutes longer with these swaps, just keep an eye on that golden top.
What to Serve With Plum Crumble Bars
This is where you can make it feel like a full moment, even if it is just you and a fork at the counter.
- Vanilla ice cream, classic and melty
- Greek yogurt with a drizzle of honey for a breakfasty twist
- Whipped cream and a pinch of cinnamon
- Hot coffee or iced latte, depending on the day
- Black tea with lemon if you like something light
If you are serving these after a casual dinner, something hearty like black beans and rice with sausage makes dessert feel extra earned.
How to Store and Freeze Plum Crumble Bars
Once sliced, I store these bars in an airtight container. They keep well at room temp for about 1 day, but I prefer the fridge for up to 5 days. Cold bars are firmer, and honestly I love the texture straight from the fridge.
To freeze, place sliced bars on a tray and freeze until solid, then wrap each bar in parchment paper and store in a freezer bag. They keep well for about 2 months. Thaw in the fridge overnight or on the counter for an hour. If you want them warm, a quick toaster oven heat up works, just do it gently so the filling does not bubble everywhere.
Common Questions
Can I use frozen plums?
Yes. Thaw them first and drain off some liquid. You may need an extra teaspoon of cornstarch since frozen fruit tends to be wetter.
Why are my bars runny?
Usually it is one of two things: not enough cornstarch, or you sliced before they fully cooled. Chill them and they will set up more.
Do I have to peel the plums?
Nope. The skins soften a lot during baking and they add color. If you really hate skins, you can peel, but I never bother.
Can I double the recipe?
Yes. Use a 9×13 pan and add a bit more baking time, usually 10 to 15 minutes. Look for a golden top and bubbling filling.
How do I get clean slices?
Cool completely, then chill. Use a sharp knife and wipe it between cuts. It makes a big difference.
A Sweet Little Final Note Before You Bake
If you have plums sitting around and you want something cozy, these Homemade Plum Crumble Bars are such a satisfying bake. You get that buttery base, jammy fruit, and crisp topping without any complicated steps, and Plum Crumble Bars with Oat Crumble are the kind of treat that feels right for both lazy weekends and busy weekdays. If you want to compare approaches, I have bookmarked this helpful Plum Bars Recipe with Crumble Topping – An Edible Mosaic™ and this fun twist on flavor from Cardamom Plum Crumble Bars – The View from Great Island. Now grab those plums, let your kitchen smell amazing, and promise me you will let the bars cool before you slice, even if it is hard.
Print
Plum Crumble Bars
- Total Time: 1 hour 10 minutes
- Yield: 9 bars 1x
Description
These Plum Crumble Bars feature a buttery oat crumble topping with a jammy plum filling, perfect for a cozy dessert that slices cleanly for sharing.
Ingredients
For the Plum Filling
- 4 cups Fresh plums, pitted and chopped (Choose ripe but firm plums.)
- 1 cup Granulated sugar (Adjust based on sweetness of plums.)
- 1 tablespoon Lemon juice (Brightens the flavor.)
- 2 tablespoons Cornstarch (Thickens the filling.)
- pinch Salt (Enhances flavor.)
- 1 teaspoon Cinnamon (optional) (Adds warmth, adjust to taste.)
- 1 teaspoon Vanilla extract (optional) (For additional flavor.)
For the Oat Crumble
- 1 cup All purpose flour
- 1 cup Old fashioned oats (Do not use instant oats.)
- 3/4 cup Brown sugar (For a caramel flavor.)
- 1/4 cup Granulated sugar
- 1/4 teaspoon Salt
- 1/2 cup Cold unsalted butter, cubed (Use cold for a crumbly topping.)
Instructions
Make the Plum Filling
- Chop plums into small bite-sized pieces. Do not peel them.
- Toss chopped plums with sugar, lemon juice, cornstarch, and salt in a bowl.
- Let the mixture sit to allow juices to be released and the cornstarch to dissolve.
Prepare the Oat Crumble
- In a large bowl, mix together flour, oats, brown sugar, granulated sugar, and salt.
- Add the cold butter and use fingers or a pastry cutter to create a mixture with pea-sized bits.
- Chill in the refrigerator for 10 minutes if the kitchen is warm.
Assemble the Bars
- Preheat oven to 350°F (175°C) and line an 8×8 pan with parchment paper.
- Press about two-thirds of the crumble mixture into the bottom of the pan.
- Spread the plum filling evenly over the base.
- Sprinkle the remaining crumble over the top without packing it down.
Bake the Bars
- Bake for 40 to 50 minutes until the top is golden brown and filling is bubbling.
- Allow to cool for at least 1 hour at room temperature.
- Chill in the fridge for another hour if time allows before slicing.
Notes
Use parchment paper for easy lifting and slicing. Adjust sugar based on plum sweetness. Ensure the bottom crust is pressed firmly to avoid crumbly bars.
- Prep Time: 20 minutes
- Cook Time: 50 minutes
- Category: Dessert, Snack
- Cuisine: American
Nutrition
- Calories: 240
- Sugar: 14
- Sodium: 150
- Fat: 10
- Saturated Fat: 6
- Carbohydrates: 36
- Fiber: 2
- Protein: 3

Related posts:
 Deliciously Simple Candied Orange Slices
 Decadent Hot Cross Bun Recipe
 Irresistibly Super Moist Chocolate Chip Banana Bread Recipe
 Crispy Air Fryer Churro Bites- Sweet & Simple
 Vegan Gluten-Free Lemon Sandwich Cookies with Lemon Curd (Easy Healthy Recipe)
 Monkey Bread with Biscuits and Cinnamon Sugar





 Appetizers & Sides
 Main Dishes
 Drinks & Wellness
 Desserts & Baking