
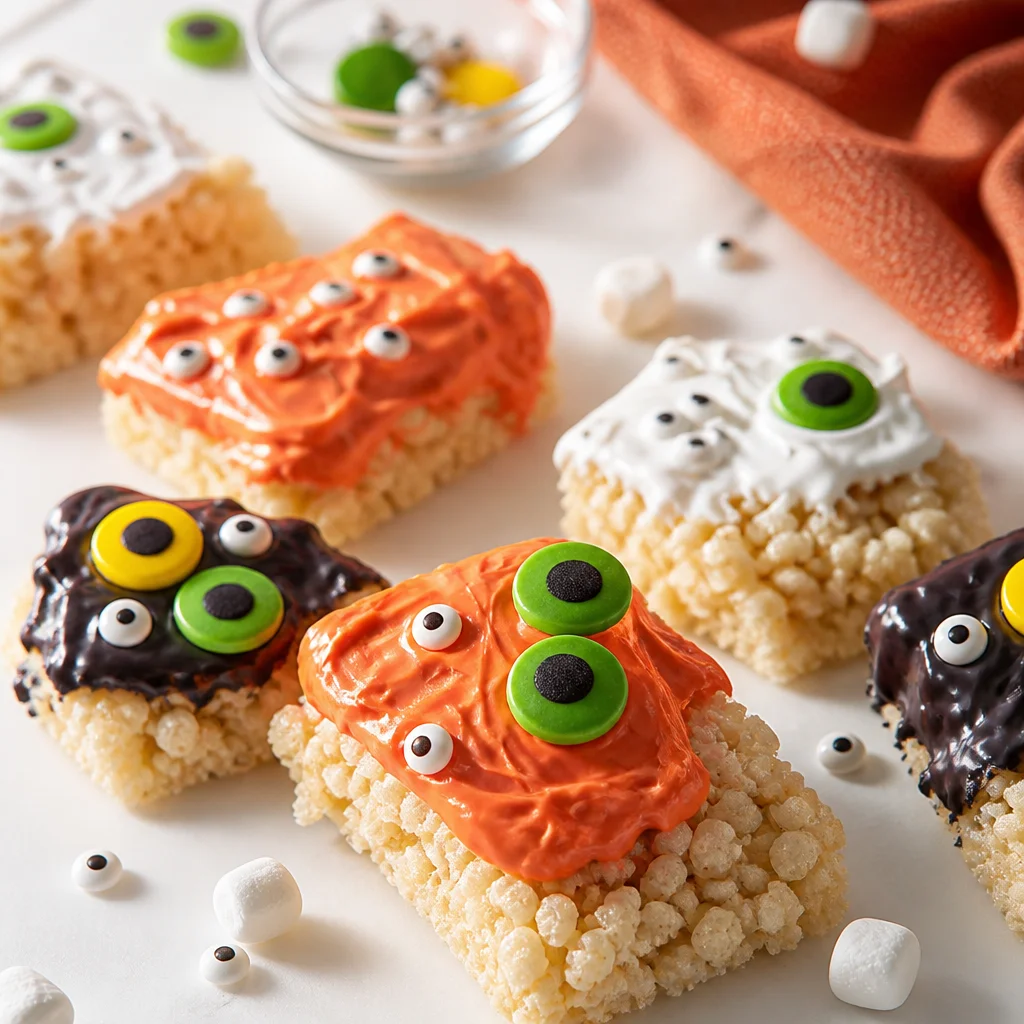
Halloween Rice Krispie are my go to solution when I want something cute for October but I do not want to turn my kitchen into a disaster zone. You know that feeling when you need a fun treat for a class party or a last minute Halloween hangout, and suddenly everything on Pinterest looks like it takes three hours. These little monster squares save the day. They are quick, forgiving, and you can make them look fancy even if you are not the artsy type. Plus they taste like pure childhood in the best way.
Why You’ll Love These Halloween Rice Krispie Treat Monsters
I love recipes that let you be a little messy and still end up with something adorable. That is exactly why these Halloween Rice Krispie Treat Monsters are such a win. The base is the classic gooey treat, and the monster vibe comes from color, eyes, and silly little candy details.
Here is what makes them worth it:
Fast: You can realistically pull these off in under an hour, including decorating.
No oven: If your oven is already packed with dinner or you just do not feel like baking, this is perfect.
Custom: One batch can become a whole monster family. Different colors, different faces, different moods.
Party friendly: They travel well and do not need forks, plates, or anything fancy.
If you are into themed treats, you might also like these Frankenstein Halloween Rice Krispie Treats. They are the same fun energy, just more specific character vibes.
Ingredients for Monster Rice Krispie Treats
You only need a handful of basics, and then the rest is the fun decorating stuff. I keep it simple and grab what looks cute at the store.
- Rice cereal (classic crispy kind)
- Mini marshmallows or a bag of regular marshmallows
- Butter
- Vanilla extract (optional but nice)
- Food coloring (gel works best for bold monster colors)
- Candy melts or white chocolate for coating and drizzling
- Candy eyes (small and big, if you can)
- Extra candies like mini marshmallows, sprinkles, candy corn, sour belts, or chocolate chips for mouths and horns
Quick tip: if you want a thicker treat that holds decorations better, use a slightly smaller pan so the squares are taller.
How to Make Rice Krispie Treat Monsters Step by Step
This part is basically the cozy, familiar process. The key is not rushing the melting step. Low heat keeps everything soft instead of turning it into a stiff brick later.
1) Butter your pan and set it aside. I like lining it with parchment too, because lifting the whole slab out is so satisfying.
2) Melt butter in a big pot on low heat.
3) Add marshmallows and stir until smooth. Then add vanilla if you are using it.
4) Add food coloring. Start with a little, stir, then add more until it looks bright. Monster colors should be loud, in my opinion.
5) Pour in the cereal and stir until every piece is coated.
6) Press into the pan gently. I use buttered hands or a buttered spatula. Do not smash it down too hard or it gets dense.
Let it cool for about 20 to 30 minutes before cutting. Warm treats are delicious, but decorating warm treats can get slippery fast.
How to Melt and Coat the Monster Treats
If you want that super cute dipped look, coating is the move. It also gives you a smooth surface for eyes and candy mouths to stick.
I melt candy melts in a microwave safe bowl in short bursts, about 20 seconds at a time, stirring between each. If it is too thick, add a tiny bit of coconut oil or shortening to loosen it.
Then dip each square halfway, or drizzle the coating over the top like monster slime. Set the treats on parchment so they do not stick. Give them about 10 minutes to set before you start adding the faces.
And yes, you can totally skip coating if you are short on time. The faces will still stick if you press them in gently.
How to Decorate Rice Krispie Treat Monsters with Candy Eyes
This is the best part. Decorating is where your Halloween Rice Krispie Treat Monsters go from basic squares to something people actually talk about.
My method is simple:
First, decide the vibe. One eye monsters are funny. Three eyes are chaotic. Two big eyes are classic cute.
Second, use a little melted candy as glue. Dot it where you want the eyes, then press them on. If the treats are still a little tacky, sometimes you do not even need the extra glue.
Third, make a mouth. A mini chocolate chip turned sideways is an easy smile. A little piece of sour belt makes a goofy grin. Sprinkles can become teeth if you are feeling extra.
Do not overthink it. The slightly lopsided ones are always the ones people love most.
Best Tips for Making Perfect Monster Rice Krispie Treats
I have made enough batches to learn a few things the hard way, so here are my best practical tips.
Use low heat when melting marshmallows. High heat makes them tough and your treats end up dry.
Do not over press the mixture into the pan. Gentle pressing keeps them soft and chewy.
Cut with a buttered knife for cleaner edges. It makes a big difference.
Let them cool before decorating so the candy eyes do not slide right off.
Keep decorations light if you are packing them for school. Big heavy candy can pop off in a container.
If you are doing a whole Halloween spread, I also love balancing sweets with something savory on the table. Even something like black beans and rice with sausage can be a cozy party food that is easy to keep warm.
Fun Colors and Monster Designs for Halloween Treats
My favorite thing about this recipe is that one batch can turn into totally different monsters just based on color and toppings. Here are some crowd pleasing ideas:
Green goo monster: neon green with a drizzle of darker green on top.
Purple night monster: purple base with white chocolate drizzle and big eyes.
Classic orange: orange treats with candy corn “horns” on top.
White mummy monster: plain treats with white drizzle wrapped across like bandages and two eyes peeking out.
Black cat monster: add black gel color carefully, then use triangle sprinkles for ears.
Honestly, if your colors come out a little weird, it still works. Monsters are allowed to look odd.
Easy Variations for Halloween Rice Krispie Treats
Once you have the base down, you can tweak it a bunch of ways. I do this when I want to make the same treat feel new.
Chocolate base: stir in a couple tablespoons of cocoa powder with the marshmallows.
Peanut butter swirl: melt a little peanut butter and swirl it in right before pressing into the pan.
Sprinkle overload: mix Halloween sprinkles into the cereal right at the end.
Different cereal: try cocoa rice cereal or a mixed cereal blend for a fun twist.
And if you are in a full spooky dessert mood, you should check out these spooky rice krispies brains too. They are creepy in the best way and honestly easier than they look.
How to Make Rice Krispie Treat Monsters with Kids
This is one of my favorite kitchen activities with kids because it is mostly stirring and decorating, and you can control the hot parts. I usually handle the melting marshmallows, then let them take over once the mixture is in the pan and cooled.
A few sanity saving ideas:
Set up a little decorating station with small bowls of eyes, sprinkles, and candy bits.
Give each kid a tray or a piece of parchment so they have their own space.
Let them make their own monsters without correcting them. The wild designs are the whole point.
If you want less sugar chaos, stick to eyes and a couple candy choices, not twelve. Trust me on that one.
How to Serve Monster Rice Krispie Treats for Halloween Parties
Serving is easy, but a few small touches make them feel extra festive. I like putting them on a big tray with a little fake spider ring or two nearby, just for vibes. If you are sending them to school, wrap them individually so they stay fresh and do not get sticky.
Here are a few simple serving ideas:
Monster tray: group by color so it looks like a rainbow of creatures.
Grab and go baggies: clear treat bags tied with orange or black ribbon.
Pop style: add a lollipop stick into each square, then drizzle and decorate.
These Halloween Rice Krispie Treat Monsters also look adorable next to a big bowl of popcorn or a cooler of juice boxes for kids.
Halloween Party, School, and Birthday Treat Ideas
I know these are Halloween themed, but honestly, monster treats work for so many occasions. A monster birthday party is basically guaranteed to make kids laugh, and you can match the colors to any theme.
For school parties, I like doing friendlier faces, like big round eyes and a smile. For teen parties or adult gatherings, you can make them a little spookier with darker colors and jagged candy teeth.
Also, if you are building out a party menu, having one easy warm dish can be a lifesaver. I have made 30 minute garlic turmeric rice for casual get togethers and it disappears fast. It is not Halloween themed, but it is cozy and easy, and that counts.
How to Store and Make Rice Krispie Treat Monsters Ahead
You can absolutely make these ahead, which is great when life is busy. I usually make the treats the day before, then decorate the day of. That way the base stays fresh and the candy eyes look crisp.
Storage basics:
Keep them in an airtight container at room temperature.
Layer parchment between layers so faces do not get smushed.
They are best within 2 days, but they will still be fine up to 3 days if sealed well.
Avoid the fridge if you can. The cold can make them feel hard. If your house is super warm, a cool pantry is better than the refrigerator.
More Easy Halloween Treat Recipes
If you are putting together a whole little Halloween snack lineup, you have options. I like mixing one super simple treat with one that looks more detailed, even if it is secretly easy.
Some ideas to pair with Halloween Rice Krispie Treat Monsters:
Chocolate dipped pretzel “bones”
Mini cupcakes with candy eyes
Popcorn mix with candy corn and chocolate
Apple slices with caramel dip for something fruity
As long as you have one fun centerpiece treat on the table, people feel like you went all out, even if you did not.
Common Questions
Can I make these without food coloring?
Yes. Keep them classic and use decorations to sell the monster look, like eyes, sprinkles, and drizzles.
Why are my treats hard instead of chewy?
Usually it is from overheating the marshmallows or pressing the mixture too firmly into the pan. Low heat and gentle hands help a lot.
What candy works best for mouths?
Chocolate chips, mini M and M candies, or small pieces of sour belt are the easiest. Even a simple icing smile works.
Can I freeze monster Rice Krispie treats?
I do not love freezing them because the texture changes. If you have to, wrap tightly and thaw at room temp, but they are best fresh.
How many treats does one batch make?
In a standard 9 by 13 pan, you will usually get 12 to 18 squares depending on how big you cut them.
A Sweet Halloween Plan You Can Actually Pull Off
If you need a festive treat that feels fun and doable, these Halloween Rice Krispie Treat Monsters really hit the spot. Make the base, pick a few monster colors, then go wild with eyes and goofy faces. You do not need perfect decorating skills, just a little time and a playful mood. For even more inspiration, I like browsing recipes like Easy Halloween Rice Krispie Treats – Crazy for Crust and Frankenstein Halloween Rice Krispie Treats – The Simple, Sweet Life when I want new ideas. Now go make a tray of monsters and do not be surprised if you keep “taste testing” them while you decorate.
Print
Halloween Rice Krispie Treat Monsters
- Total Time: 40 minutes
- Yield: 12 squares 1x
Description
These adorable Halloween Rice Krispie Treat Monsters are quick to make and perfect for parties, combining gooey rice krispie treats with fun colors and decorations.
Ingredients
Base Ingredients
- 4 cups Rice cereal (Classic crispy kind)
- 10 oz Mini marshmallows (Or a bag of regular marshmallows)
- 3 Tbsp Butter (Unsalted preferred)
- 1 tsp Vanilla extract (Optional but nice)
Decoration Ingredients
- 1 oz Food coloring (Gel works best for bold colors)
- 10 oz Candy melts or white chocolate (For coating and drizzling)
- 1 cup Candy eyes (Small and big sizes if available)
- 1 cup Extra candies (Like mini marshmallows, sprinkles, candy corn, sour belts, or chocolate chips)
Instructions
Preparation
- Butter your pan and line it with parchment paper to facilitate easy lifting.
- Melt the butter in a big pot over low heat.
- Add marshmallows and stir until smooth, then mix in the vanilla extract if using.
- Stir in the food coloring until you achieve your desired monster color.
- Add the rice cereal and stir until every piece is coated.
- Gently press the mixture into the prepared pan.
Cooling and Decorating
- Let the treats cool for 20 to 30 minutes before cutting.
- Melt candy melts in a microwave-safe bowl in short bursts, stirring in between. If too thick, add a tiny bit of coconut oil or shortening.
- Dip each square halfway or drizzle the melted coating over the top.
- Let the coating set for about 10 minutes before decorating.
- Use melted candy as glue to attach candy eyes and other decorations.
Notes
Use low heat to melt marshmallows for a soft treat. Do not over-press the mixture into the pan to maintain softness. Decorate with a light touch if transporting.
- Prep Time: 30 minutes
- Cook Time: 10 minutes
- Category: Dessert, Snack
- Cuisine: American
Nutrition
- Calories: 180
- Sugar: 12
- Sodium: 100
- Fat: 6
- Saturated Fat: 4
- Carbohydrates: 30
- Protein: 1









 Appetizers & Sides
 Main Dishes
 Drinks & Wellness
 Desserts & Baking