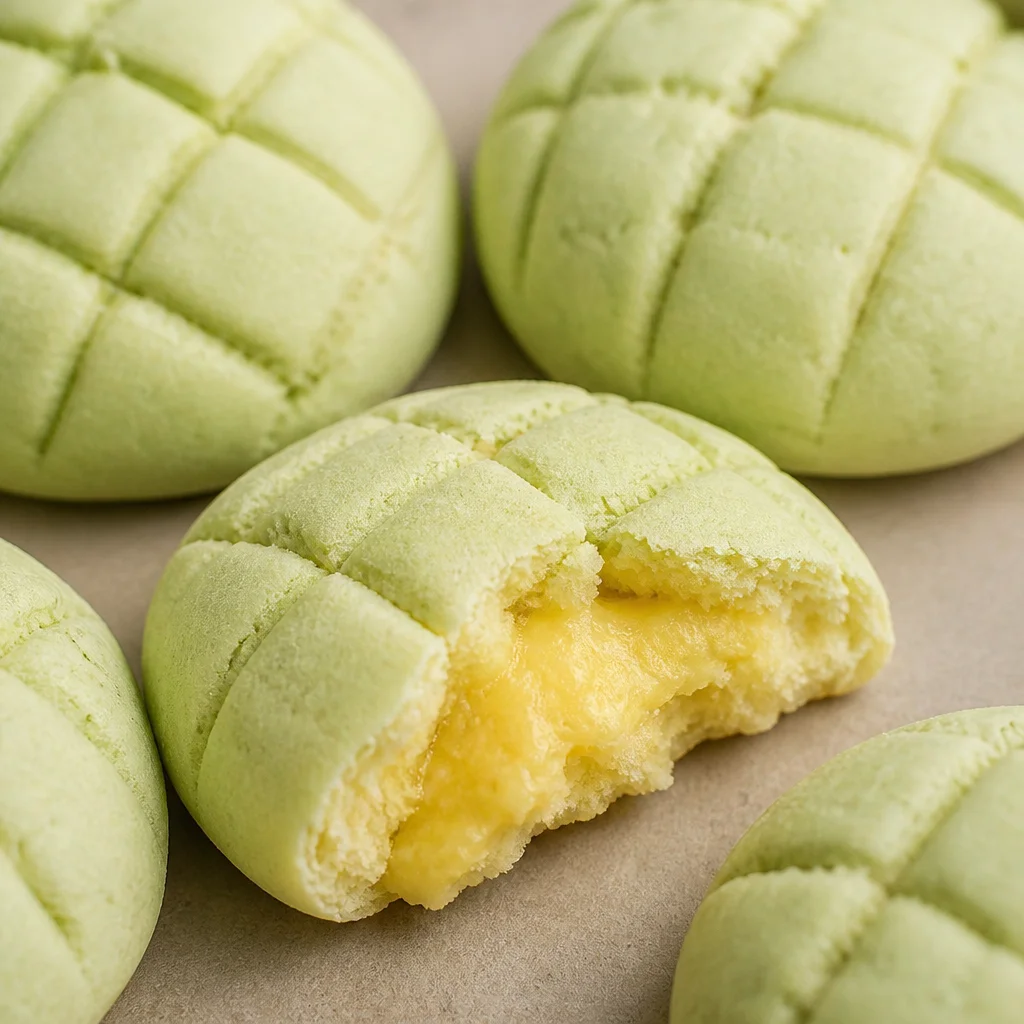
Japanese Honeydew Bread is one of those treats I crave when I want something cozy but still a little special. You know that feeling when you walk past a bakery and the sweet, warm smell hits you, and suddenly you need a fluffy bun right now? That is exactly the vibe we are making at home today, with a soft bread base, a creamy honeydew filling, and that classic crunchy top. I started baking this when I could not find a good melon pan near me, and honestly, making it yourself is half the fun. Do not worry if you are not a bread expert, I will keep it simple and walk you through it. By the end, you will have bakery style buns that look impressive but feel totally doable.
Key Ingredients for Honeydew Melon Bread and Japanese Sweet Bread Dough
The magic here is the contrast: soft fluffy bread with a sweet cookie crust, plus a mellow honeydew custard that tastes like springtime. This recipe is basically Japanese sweet bread dough plus a cookie topping and filling.
Here is what you will need (I am keeping it practical and realistic):
- Bread flour: gives that stretchy, fluffy bite. All purpose works, but bread flour is better.
- Milk: warm, not hot. This keeps the crumb tender.
- Instant yeast: easy and reliable.
- Sugar: just enough sweetness in the dough.
- Egg: richness and better structure.
- Butter: softens everything and makes it smell like a bakery.
- Honeydew: fresh blended honeydew or honeydew puree. You can also use honeydew flavoring carefully if honeydew is not in season.
- Cornstarch: to thicken the custard filling.
- Vanilla and a pinch of salt: small things that make the flavor pop.
If you love exploring Japanese sweets, you might also like this roundup of traditional Japanese desserts you must try. It is a fun way to plan your next baking weekend.
Essential Baking Tools and Equipment for Homemade Melon Pan Recipe
You do not need fancy gear, but a few basics make this much easier. Here is what I actually use at home:
Must-haves:
Mixing bowl, measuring cups, kitchen scale if you have one, whisk, saucepan for custard, baking sheet, and parchment paper.
Nice to have:
A stand mixer (your arms will thank you), a thermometer to check milk temperature, and a wire rack for cooling.
I also like having a small cookie scoop for portioning the topping dough, because the buns look more uniform and cute.
Step-by-Step Guide to Making Soft Japanese Milk Bread Dough from Scratch
This is the part that scares people, but it is honestly just a few simple steps. The goal is smooth dough that feels soft and slightly tacky, not dry.
1) Mix the base
In a bowl, combine warm milk, sugar, and yeast. Let it sit for about 5 minutes until it looks a bit foamy. Add egg, then add bread flour and salt. Mix until you get a shaggy dough.
2) Knead and add butter
Knead for about 8 to 12 minutes. Once it starts looking smoother, knead in softened butter a little at a time. The dough should become stretchy and elastic. If it is super sticky, add a tiny bit more flour, but go slow.
3) First rise
Place dough in a lightly greased bowl, cover, and let rise until doubled. In a warm kitchen this can take about 60 to 90 minutes.
This dough is the base for Japanese Honeydew Bread, and once you get comfortable with it, you will want to use it for other things too. I sometimes compare it to quick bread projects like this 2 ingredient cottage cheese flatbread when I need something fast, but for fluffy bakery buns, this dough is worth it.
How to Prepare Honeydew Custard Filling for Honeydew Bread Recipe
Honeydew custard is the dreamy part. It is lightly sweet and creamy, and it makes the bread feel extra special.
Easy honeydew custard method:
Blend honeydew into a smooth puree. In a saucepan, whisk together milk, sugar, cornstarch, and egg yolk (or whole egg if you prefer it simpler). Warm it on low heat, whisking constantly. When it thickens to a pudding texture, whisk in honeydew puree and a splash of vanilla. Keep cooking for another minute so it is stable.
Now the important part: cool it fully. I press plastic wrap directly onto the surface so it does not form a skin. When it is cold, it is much easier to fill the buns without a messy situation.
If your honeydew is not very sweet, add a little more sugar. If it tastes watery, simmer a touch longer to thicken.
Making the Signature Crunchy Cookie Crust Topping for Melon Pan
The topping is basically a soft cookie dough that bakes into that classic crackly crust. This is what makes melon pan recognizable even when there is no melon flavor involved. For this version, we are going honeydew inside, crunchy cookie outside.
Simple cookie topping:
Cream softened butter with sugar until fluffy. Add egg (or just yolk for richer topping). Mix in flour and a little baking powder. Add a tiny pinch of salt and vanilla. Chill it for 20 to 30 minutes so it is easier to handle.
Some people roll the outside in sugar before baking for extra crunch. I do it when I want that bakery sparkle.
How to Shape Japanese Honeydew Bread for the Classic Crisscross Pattern
This is the fun part where it starts looking like the real deal.
1) Divide the dough
After the first rise, gently punch down the dough. Divide into 8 pieces for medium buns (or 10 for smaller ones). Shape each into a tight ball.
2) Fill with honeydew custard
Flatten one dough ball, add a spoonful of chilled custard in the center, then pinch the seam closed really well. Place seam-side down.
3) Wrap with cookie topping
Flatten a portion of cookie dough into a thin circle. Drape it over the bun and smooth it gently. You want it to cover most of the bun, like a little hat.
4) Make the crisscross
Using a knife or dough scraper, lightly score the surface in a crisscross pattern. Do not cut too deep, just shallow lines.
This shaping is what makes Japanese Honeydew Bread look like it came from a shop window instead of your kitchen counter.
Proofing Techniques for Fluffy and Soft Japanese Bakery-Style Bread
Proofing is just letting the dough rest and rise, but it matters a lot for texture.
My easy proofing tips:
Keep the buns covered so they do not dry out. If your kitchen is cold, place the tray in your oven with the oven turned off and a mug of hot water on the bottom rack. Check after about 35 to 55 minutes. You want them slightly puffy, not doubled like the first rise, because the cookie topping can crack too much if they overproof.
When you gently press the side of a bun, it should slowly spring back. That is your sign you are ready to bake.
Baking Instructions for Golden Brown Melon Pan with Perfect Texture
Time to bake. Your house is about to smell incredible.
Preheat oven to 350 F or 175 C. Bake for about 15 to 18 minutes, depending on size. You want the tops lightly golden and the bottoms cooked through.
Quick doneness check:
The buns should feel light for their size, and the cookie top should look set, not wet. Let them cool for at least 10 minutes before biting in, because the custard can be hot and sneaky.
Matcha, Chocolate, and Seasonal Variations of Japanese Melon Bread
Once you make this once, you will start dreaming up variations. Here are a few easy ones:
Matcha: add 1 to 2 teaspoons matcha to the cookie topping dough. It tastes amazing with honeydew custard.
Chocolate: swap a little flour in the topping for cocoa powder, or add chocolate chips inside with the custard.
Seasonal fruit: try strawberry custard in spring or mango in summer. The same method works.
If you are doing special baking seasons, it is also fun to browse ideas like these Christmas bread recipes and borrow flavors like cinnamon or orange zest for your topping.
Expert Tips for Perfect Fluffy Japanese Honeydew Custard Bread Every Time
This is the section I wish I had the first time I tried making melon pan at home.
My best tips:
Use chilled custard for filling, seal the dough seam tightly, and do not rush the first rise. If the dough feels dry, add a teaspoon of milk while kneading. If it feels too sticky, lightly oil your hands instead of dumping in lots of flour.
Also, do not skip the chill time for the cookie topping. Warm topping dough is hard to shape and it tears more easily.
This is the fourth time I am saying it because it matters, Japanese Honeydew Bread is all about that texture contrast. Soft inside, crisp outside, creamy center.
Common Mistakes to Avoid When Making Japanese Sweet Bread at Home
I have made all these mistakes so you do not have to.
Common slip-ups:
Overheating the milk (it can weaken the yeast), adding too much flour (dense buns), overproofing (the cookie top can split in big ugly cracks), and filling with warm custard (it leaks).
One more thing: scoring too deeply can make the topping fall apart. Gentle lines are enough.
Serving Ideas and Pairings for Honeydew Melon Pan Dessert Bread
This bread is great on its own, but I love serving it in little cozy ways.
- With iced matcha latte or jasmine tea
- With fresh honeydew cubes on the side for extra fruity vibes
- Warm with a small scoop of vanilla ice cream if you want a dessert moment
- For brunch, pair with scrambled eggs and fruit so it feels like a full plate
If you are experimenting with different bread styles for your household, you might find it interesting to compare with niche options like these carnivore bread recipes. Totally different approach, but it is fun to see how many ways bread can exist.
How to Store, Freeze, and Reheat Japanese Bakery Bread Properly
Fresh is best, but you can absolutely store these.
Room temp: Keep in an airtight container for up to 2 days. The cookie top softens a bit, but it is still tasty.
Fridge: I do not love refrigerating sweet bread because it can dry out, but it is okay for 2 to 3 days if your filling feels delicate. Just rewarm before eating.
Freezer: Freeze buns individually wrapped, then placed in a freezer bag. They keep well for about 1 month.
Reheat: Warm in a 300 F oven for 8 to 10 minutes from room temp, or about 12 to 15 minutes from frozen. If the top is getting too dark, loosely cover with foil.
Common Questions
1) Does melon pan always taste like melon?
Nope. Classic melon pan is named for the look, not the flavor. In this Japanese Honeydew Bread version, the honeydew flavor comes from the custard filling.
2) Can I make the dough the night before?
Yes. After kneading, let it start rising for 20 to 30 minutes, then cover and refrigerate overnight. Bring back to room temp before shaping.
3) My cookie topping cracked a lot. What happened?
Usually overproofing, topping was too dry, or you scored too deep. Next time, proof a bit less and keep the topping thickness even.
4) Can I skip the custard filling?
Totally. You will still get a classic style bun with crunchy top and fluffy bread. But the filling is what makes it feel extra bakery-like.
5) What if I cannot find ripe honeydew?
Use frozen honeydew if you can find it, or use a small amount of honeydew extract plus extra vanilla. Taste and adjust slowly so it does not get too perfume-y.
A Sweet Little Baking Project Worth Doing
If you try this at home, do not stress about perfection. The goal is a tray of warm, soft buns with that crunchy top and a creamy center, and you will get there even if your crisscross is a little wonky the first time. If you want more inspiration, I loved reading Japanese Honeydew Bread – Cherry on My Sundae and comparing notes with Japanese Melon Bread – Chopstick Chronicles because it helped me understand the different styles. Bake a batch, share one with someone you like, and keep one for yourself with a cup of tea. Japanese Honeydew Bread is one of those recipes that makes an ordinary day feel a little more special.
Japanese Honeydew Bread
- Total Time: 1 hour 18 minutes
- Yield: 8 buns
Description
A cozy treat featuring soft bread with a creamy honeydew filling and a crunchy cookie top, perfect for those bakery cravings at home.
Ingredients
Bread Dough
- 3 cups Bread flour (For a stretchy, fluffy texture.)
- 1 cup Warm milk (Not hot to keep the crumb tender.)
- 2 teaspoons Instant yeast (Easy and reliable.)
- 3 tablespoons Sugar (Adds sweetness to the dough.)
- 1 Egg (For richness and better structure.)
- 3 tablespoons Butter (Softened to enrich the dough.)
- 1 pinch Salt (Enhances flavor.)
Honeydew Custard Filling
- 1 cup Honeydew puree (Fresh blended or store-bought.)
- 1 cup Milk (For the custard base.)
- 2 tablespoons Sugar (For sweetness.)
- 2 tablespoons Cornstarch (To thicken the custard.)
- 1 whole Egg (Can use just the yolk for richness.)
- 1 teaspoon Vanilla extract (To enhance flavor.)
Cookie Topping
- 5 tablespoons Butter (Softened for easier mixing.)
- 1/2 cup Sugar (For the topping sweetness.)
- 1 large Egg (Adds richness.)
- 1 cup All-purpose flour (Base for the cookie topping.)
- 1 teaspoon Baking powder (To help the topping rise.)
- 1 pinch Salt (Enhances flavor.)
- 1 teaspoon Vanilla extract (Adds flavor.)
Instructions
Prepare Dough
- Mix warm milk, sugar, and yeast in a bowl. Let sit for 5 minutes until foamy.
- Add an egg, then mix in bread flour and salt to form a shaggy dough.
- Knead the dough for 8 to 12 minutes, adding softened butter gradually until stretchy and elastic.
- Place dough in a greased bowl, cover, and let rise until doubled, about 60 to 90 minutes.
Make Honeydew Custard
- Blend honeydew into a smooth puree.
- In a saucepan, whisk together milk, sugar, cornstarch, and egg. Heat on low, whisking until thickened.
- Whisk in honeydew puree and vanilla, then cool fully before using.
Make Cookie Topping
- Cream softened butter and sugar until fluffy. Add the egg, then mix in flour and baking powder.
- Chill the dough for 20 to 30 minutes, then shape.
Shape and Fill Buns
- After the first rise, punch the dough down and divide into 8 pieces. Shape into balls.
- Flatten each ball, add honeydew custard in the center, and seal well.
- Flatten cookie topping dough into a thin circle and drape over the bun. Score lightly in a crisscross pattern.
Bake the Buns
- Preheat oven to 350°F (175°C). Bake for 15 to 18 minutes until golden.
- Let cool for 10 minutes before serving.
Notes
Enjoy with iced matcha latte or pair with fresh honeydew. Store buns in an airtight container for up to 2 days.
- Prep Time: 30 minutes
- Cook Time: 18 minutes
- Category: Dessert, Snack
- Cuisine: Japanese
Related posts:
 Deliciously Simple Candied Orange Slices
 Decadent Hot Cross Bun Recipe
 Irresistibly Super Moist Chocolate Chip Banana Bread Recipe
 Crispy Air Fryer Churro Bites- Sweet & Simple
 Glazed Strawberry Bread Recipe (Moist & Easy Strawberry Loaf Cake)
 Chocolate Strawberry Yogurt Clusters (Viral TikTok Frozen Yogurt Bites Recipe)

 Main Dishes
 Drinks & Wellness