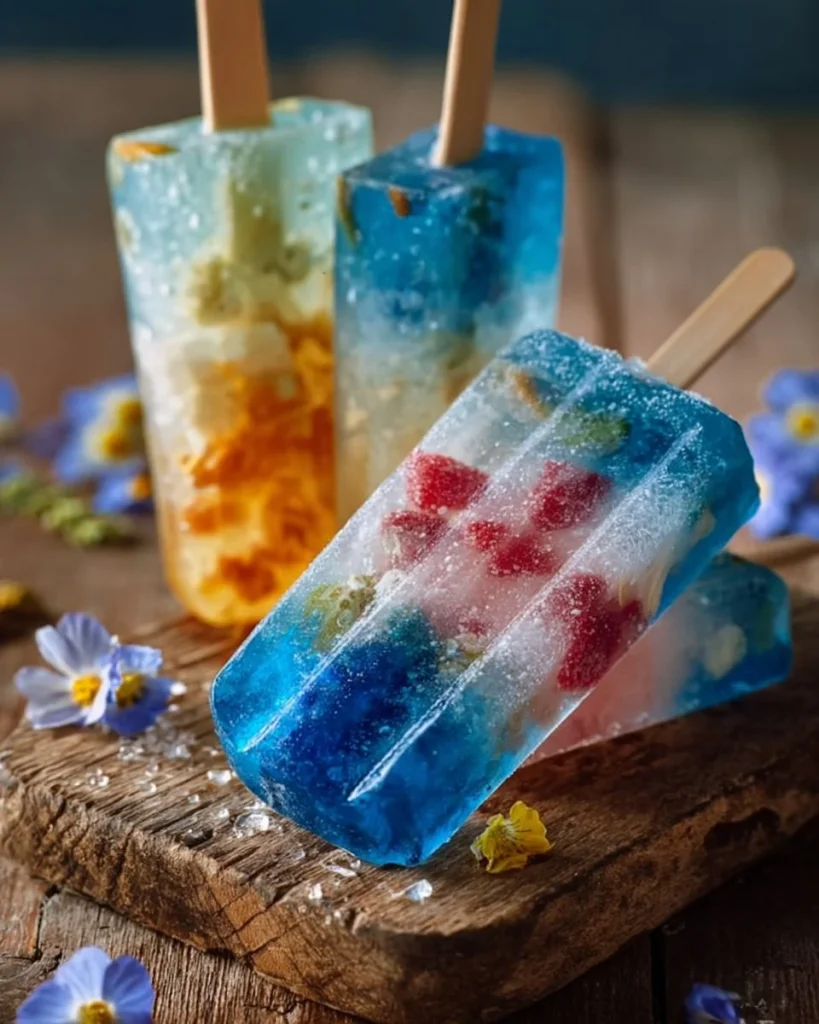
I started making these for my kids on a very hot day and they loved them right away. Edible Aquarium Popsicles make snack time fun and very easy.
They take minutes to assemble. Then you forget them in the freezer until it is time to enjoy. Simple, colorful, and a little bit silly. Perfect for warm afternoons.
Why you’ll love this treat
You do not need much to make something that looks special. A blue sports drink gives a bright ocean color. Gummy fish float in there like tiny swimming toys. Kids smile. Adults do too.
They feel like a party, but they are mostly just cold and refreshing. No baking. No fuss. And yes, they are a great way to use gummy candy you already have. I learned this the hard way when the gummy fish sat in the pantry and begged for attention.
How to make them the right way
Fill molds halfway first. That keeps the gummy fish from clumping at the bottom. Freeze that layer a bit if you want them to stay where you place them. Then finish with more drink or plain water.
Don’t rush the final freeze. Give them time. If you take them out too soon, the sticks will wobble. If you want clearer ice, use cold, filtered water for the top layer. It makes the blue look a little brighter.
Ingredients you’ll need to make this recipe
- Blue sports drink
- Gummy fish
- Popsicle molds
- Water (optional, to dilute the sports drink)
Use whatever brand of sports drink you like. I keep it simple and let the candy be the star. If the sports drink seems very sweet, add a splash of water. It will make the flavor lighter and more refreshing.
Step-by-step directions
- Pour blue sports drink into popsicle molds, filling them halfway.
- Add gummy fish into each mold.
- Top off with more blue sports drink or water if desired.
- Insert sticks and freeze for at least 4-6 hours or until solid.
- To remove, run warm water over the outside of the molds for a few seconds. Enjoy!
Follow that order and you’ll save yourself a sticky mess. If you add the gummy fish after filling the mold all the way, they tend to float. They still work, but placement matters if you want that little fish to sit in the middle.
How to serve them for the best results
Take popsicles from the freezer and set them on a small plate or napkin. They melt fast on hot days, so have napkins ready. For little hands, I use short sticks. They hold better and are easier for kids.
If you are serving outside, keep a shallow tub of ice nearby to set extras in while you hand them out. This keeps them cold without refreezing. Kids love watching the gummy fish bob as the popsicle slowly melts. It is half the fun.
How to store and reheat
Store them in the freezer in their molds until ready to eat. If you remove extras, wrap each popsicle in plastic wrap or place them in a sealed freezer bag. They keep for up to two weeks. Any longer and the texture starts to suffer.
There is no reheating. This is a cold treat. If a popsicle softens too much, pop it back in the freezer for a while. Do not refreeze after it has melted completely and been out of the freezer a long time.
Helpful tips to make the best popsicles
Use good molds. Cheap molds can leak or let air freeze in odd spots. I have a set that makes clean popsicles and they come out easily.
If you want the gummy fish to stay where you put them, freeze the first half layer for about 30 minutes until it set a little. Then add the candy and top it off. It is an easy trick and it looks nicer.
Trim long gummy tails if you need them to sit flat. I do this sometimes. It takes ten seconds and makes a better presentation. And yes, this part matters.
Serve right from the freezer. They look best that way. If you are making them for a party, time them so they finish a little before guests arrive. They will be firm and perfect.
Easy variations to try
Swap the blue drink for clear lemon lime soda for a lighter flavor. It still looks like water. Or try a pale fruit punch for a different color.
Use different gummy shapes. Tiny gummy sharks are great if you can find them. Fruit slices work too if you like a fruitier chew.
Mix two colors in the same mold for a layered look. Freeze the first layer then add another color. It takes more time, but the result feels special. Most days though, the simple blue version is my go-to.
Frequently asked questions about this recipe
Q: Can I use fresh fruit instead of gummy fish?
A: Yes. Small berries or sliced grapes work. They change the look and add natural flavor. The gummy fish are mostly for fun.
Q: Will the candy sink to the bottom?
A: It can, especially if you fill the mold completely before adding candy. Freeze halfway first or add candy to the semi-frozen layer so they stay put.
Q: Can I make these without a sports drink?
A: Sure. Use blue fruit juice, diluted juice, or tinted water. Just be mindful of sweetness. I sometimes add water to tone down strong flavors.
Q: How long do they need to freeze?
A: At least 4 to 6 hours. Overnight is easiest. If your freezer runs warm, give them a bit more time.
Q: Are these safe for small children?
A: They are fine for most kids, but supervise young children with whole gummies and popsicle sticks. Cut gummies small for toddlers.
Q: Can I use wooden sticks or plastic sticks?
A: Either one works. Wooden sticks are classic and cheap. Plastic sticks can be reusable and tidy.
Q: Will the gummies change texture when frozen?
A: They get a bit firmer but stay chewy. Some brands get very hard; if that bothers you, try a softer gummy.
Conclusion
I like these on busy afternoons. They are cheerful, fast, and kids ask for them again and again. No special skills. Just a little patience while they freeze.
If you want more pretty popsicle ideas, check this playful mushroom spin on frozen treats at Found Treasure: Santa Cruz Fungi Popsicles. And for a floral option, see this lovely edible flower popsicle idea at Lovely and refreshing edible flower popsicles.
Enjoy making these. They are silly. They are simple. And they cool you off.
Print
Edible Aquarium Popsicles
- Total Time: 6 hours
- Yield: 6 popsicles
Description
Colorful and refreshing popsicles that feature gummy fish bobbing in a bright blue sports drink, perfect for hot summer days.
Ingredients
Popsicle Ingredients
- 2 cups Blue sports drink (Use any brand you prefer.)
- 1 cup Gummy fish (For a fun addition; consider trimming gummy tails if needed.)
- optional Water (To dilute the sports drink if desired.)
- as needed units Popsicle molds (Good quality molds are recommended.)
Instructions
Preparation
- Pour blue sports drink into popsicle molds, filling them halfway.
- Add gummy fish into each mold.
- Top off with more blue sports drink or water if desired.
- Insert sticks and freeze for at least 4-6 hours or until solid.
- To remove popsicles, run warm water over the outside of the molds for a few seconds and enjoy.
Notes
Using cold, filtered water for the top layer can make the blue color brighter. Serve right from the freezer for best results.
- Prep Time: 10 minutes
- Category: Dessert, Snack
- Cuisine: American
Related posts:
 Strawberry Crunch Cheesecake Tacos
 Strawberry Kiss Cookies: Cute Valentine’s Day Cookies Everyone Loves
 Crack Chicken Sliders on Hawaiian Rolls – Easy Game Day Sandwiches
 Crispy Buffalo Wings Recipe, Easy Homemade Wings with Classic Buffalo Sauce
 Honey Curry Roasted Cauliflower
 Moist Rhubarb Cake with Butter Sauce

 Main Dishes
 Drinks & Wellness