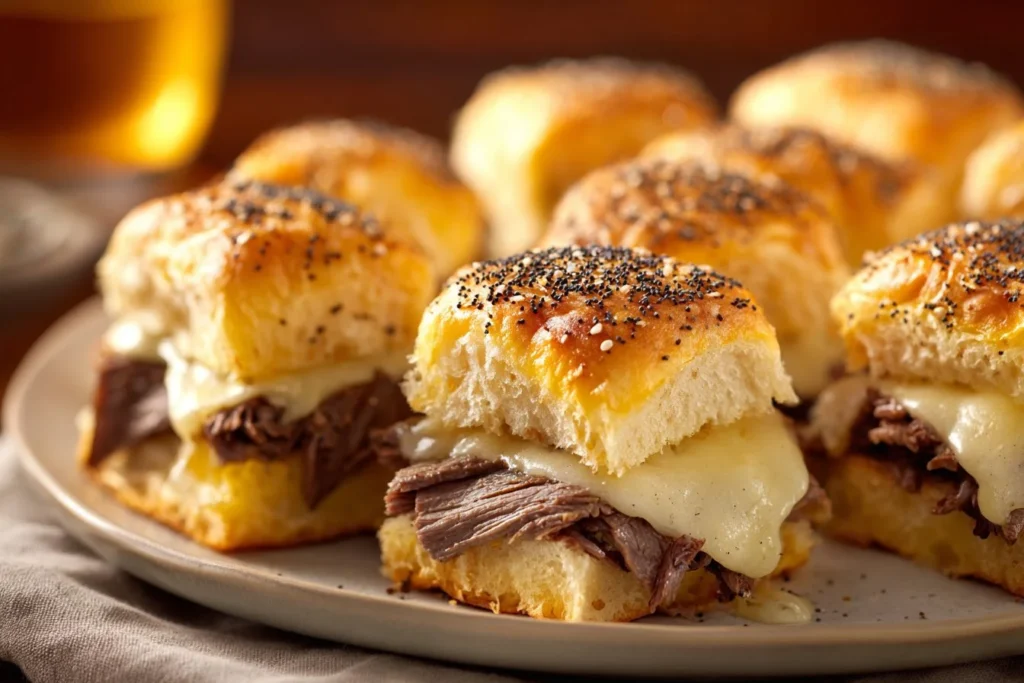
The light was weirdly good that afternoon. So I pulled a bag of Hawaiian rolls from the pantry and some deli meat from the fridge. Roast Beef Sliders felt right soft, shiny rolls, thin ribbons of beef, a little melted cheese peeking out. It’s the kind of thing that looks like a hug.
If you like cozy, crowd-pleasing food that doesn’t fuss, this one fits. And if you’re collecting easy sandwich ideas, you might enjoy this little twist compared to a slow braise think simple and quick, not long and fussy. I often pair this with a pot of something warming; try my beef stew in a crock pot when company stays late.
How the Recipe Roast Beef Sliders Unfolds
This is calm work. Lay out your rolls. Layer the meat. Brush butter. Bake. That’s it. No special tools. No weird timing.
Most days I make this when I want food that feels soft and a bit indulgent, but also easy enough to throw together between errands. You’ll get a warm pull-apart loaf that’s shiny on top and soft inside. The edges get a little crisp. The cheese melts and tucks the beef in. It’s plain and exactly what it promises.
If you want a sturdier sandwich, add more meat. If you want something tangy, keep horseradish nearby. I learned the hard way that too much horseradish will steal the show. So, a small bowl on the side lets people play.
Also, if you like spicy sliders, I’ve riffed on these before with a buffalo twist over at my take on buffalo chicken sliders. Not the same, but they share the idea: small, comfy sandwiches that feel like a snack and a meal.
Ingredients to Have Ready
- deli-sliced roast beef
- Hawaiian sweet rolls
- cheese (optional)
- horseradish sauce (optional)
- butter
- garlic powder
- onion powder
Keep things simple. The list reads like a corner-store run. You don’t need fancy roast; good deli slices work perfectly. The rolls bring that sweet, pillowy base. Butter, garlic powder, and onion powder make the top sing. Cheese is your choice Swiss, provolone, cheddar, whatever melts cleanly.
Bringing Roast Beef Sliders Together With Easy Steps
- Preheat the oven to 350°F (175°C).
- Cut the Hawaiian rolls in half horizontally without separating them.
- Place the bottom half of the rolls on a baking sheet.
- Layer the roast beef and cheese (if using) on the bottom half.
- In a small bowl, mix melted butter with garlic powder and onion powder, then brush it over the top half of the rolls.
- Place the top half of the rolls on the sliders.
- Bake in the preheated oven for about 15-20 minutes or until the cheese is melted and the sliders are heated through.
- Serve warm with horseradish sauce on the side.
That list covers the whole thing. No frenetic chopping. No babysitting. Just a small bowl and a brush. If you want the tops shinier, brush again right after they come out. If you like a crisper edge, bake for a few extra minutes watch them.
Serving Ideas That Feel Natural and Flexible
Serve them straight from the pan. Let people pull apart their own. They’re great with a simple green salad. Or a bowl of chips. Or a quick slaw.
If you’re aiming for a heartier spread, add pickles and coleslaw on the side. I sometimes set out mustard, ketchup, and the horseradish sauce and call it a build-your-own station. Guests like that. Kids like dipping. Adults like the small condiments that make the sliders feel slightly grown-up.
For an autumn evening, pair with roasted root vegetables. For casual game day, put out a platter of raw veggie sticks and a creamy dip. If you want to lean into the cozy vibe, set the oven to low to keep them warm between batches.
And if you’re planning bigger crowds, you can place the whole tray in a shallow chafing dish or a warm oven to keep the tops soft while people graze. If you bake a second tray, they stack cleanly on a large wooden board.
I sometimes compare quick slider nights to slow dinners I do on the weekend. If that appeals, try this alongside a roast from the slow cooker like my crock pot chuck roast. Different pace. Same comfort.
Keeping Leftovers for Later
Let cool a little before packing. Use an airtight container. They keep in the fridge up to 3 days.
To reheat, unwrap a single slider and warm in a skillet over medium-low heat until the cheese softens. Or pop a stack back into a 300°F oven for 8–12 minutes. Microwave works in a pinch. It gets soft fast, so I suggest short bursts.
If you want to stretch leftover meat into something else, think soups or hashes. Leftover slices can go into a pot with vegetables and broth to make something cozy. I sometimes turn leftovers into a quick stew, see how I do a different take with my crockpot beef and vegetable soup for ideas.
Pack sliders in single layers with parchment if you stack them. That keeps the tops pretty.
Small Details That Matter and Tips That Help
Brush both the top and the inside edge where the top meets the bottom. That little bit of butter there makes the crumb shine and keeps the bread from drying.
Don’t skimp on the roll quality. A soft roll tears apart and gives a nice mouthfeel. Hawaiian rolls bring sweetness; grab the kind you like.
If you use very thin deli beef, fold it. Thin slices can slide out. The folds trap pockets of heat and make each bite feel dense and well-filled. I learned this the slow way, by over-stuffing then dropping half a slider on the floor. It hurt.
Cheese choice matters. Go for something that melts smooth. Avoid crumbly cheeses unless you want texture, not melt.
If you’re making these ahead, assemble them but don’t brush the top until right before baking. The butter keeps the top from going soggy if it sits a little while.
Prep Tips That Help
Line your baking sheet with foil for easy cleanup. It just makes life nicer later.
Lay everything out on the counter so you can move quickly: rolls, beef, cheese, bowl of butter. Work like an assembly line. It’s faster and it looks nice when you slide the tray into the oven.
If you’re making lots, bake two trays at once and rotate them halfway through for even browning.
If you have children or friends who like to help, hand them a brush and let them butter the top. They feel useful and the sliders get done.
Easy Variations You Can Try
- Swap the roast beef for ham and turn this into a quick ham-and-cheese slider. Simple swap.
- Add caramelized onions under the cheese for sweetness and depth. Worth the extra ten minutes.
- Spread a little mustard or a smear of mayo under the beef for an extra layer.
- Make them spicy: mix a pinch of cayenne into the butter or serve with a sriracha mayo on the side.
Keep it small. These are tiny things. Little tweaks make big differences.
Choosing the Right Pan or Dish
A rimmed baking sheet works best. It’s flat, so the heat hugs the bread and melts the cheese evenly. Dark pans brown faster. If you like browner edges, use one. Light pans give gentler heating.
If you want a more domestic look, bake in a shallow ceramic dish. It holds heat differently and makes the tray feel more homey. For a crispier bottom, an unlined sheet pan does the job.
Think about how it will look when you bring it to the table. A shallow pan means people can pull apart without a fight.
Questions That Come Up
Q: Can I use different rolls?
A: Yes. Any soft roll works. Avoid dense buns; you want pillowy bread.
Q: How much roast beef per slider?
A: There’s no hard rule. I usually fold two thin slices per slider, more if you want a meatier bite.
Q: Do I have to use horseradish sauce?
A: No. It’s optional. But it gives a sharp contrast to the sweet rolls. A small bowl on the side is enough.
Q: Can I assemble ahead of time?
A: Assemble, cover lightly, and refrigerate for a few hours. Brush with butter right before baking.
Q: Can I freeze these?
A: You can freeze assembled sliders before baking. Wrap tightly and freeze up to a month. Bake from frozen, adding a few extra minutes.
Q: What’s the best way to reheat a tray?
A: Low oven (300°F) for 10–15 minutes keeps them soft without drying.
Q: Any vegetarian swap ideas?
A: Use a thick slice of grilled mushroom or a plant-based deli slice and follow the same steps. It’s not the same, but it works.
A Thought Before You Go
There’s a small joy in these kinds of meals. They’re quick, comforting, and honest. The top is glossy, the inside is soft, and people reach in with bare hands. That matters.
Bake them when the light is soft. Serve them when your phone is quiet. It changes the feel of the whole evening.
For a straightforward, reliable take on sliders that looks good and feels cozy, I like this classic approach and sometimes look to other versions for inspiration this Roast Beef Sliders Recipe – Foodal is a helpful reference if you want another clear method to compare.

Roast Beef Sliders
- Total Time: 30 minutes
- Yield: 12 sliders
Description
Quick and comforting roast beef sliders baked with buttery garlic and onion topped Hawaiian rolls. Perfect for a crowd or casual meal.
Ingredients
For the sliders
- 1 package Hawaiian sweet rolls (Use soft, pillowy rolls.)
- 1 pound deli-sliced roast beef (Good quality deli slices work best.)
- 4 slices cheese (Optional; use Swiss, provolone, or cheddar.)
- 1 tablespoon horseradish sauce (Optional; serve on the side for tangy flavor.)
For the topping
- 4 tablespoons butter (Melted; for brushing on rolls.)
- 1 teaspoon garlic powder
- 1 teaspoon onion powder
Instructions
Preparation
- Preheat the oven to 350°F (175°C).
- Cut the Hawaiian rolls in half horizontally without separating them.
- Place the bottom half of the rolls on a baking sheet.
- Layer the roast beef and cheese (if using) on the bottom half.
- In a small bowl, mix melted butter with garlic powder and onion powder, then brush it over the top half of the rolls.
- Place the top half of the rolls on the sliders.
- Bake in the preheated oven for about 15-20 minutes or until the cheese is melted and the sliders are heated through.
- Serve warm with horseradish sauce on the side.
Notes
For shinier tops, brush again right after they come out. If you want crisper edges, bake a few extra minutes. Store leftovers in an airtight container for up to 3 days.
- Prep Time: 10 minutes
- Cook Time: 20 minutes
- Category: Appetizer, Snack
- Cuisine: American
Related posts:
 The best Healthy snack! Frozen Grapes
 Strawberry Crunch Cheesecake Tacos
 Tennessee Onions (Cheesy Baked Onion Side Dish)
 Strawberry Kiss Cookies: Cute Valentine’s Day Cookies Everyone Loves
 Taco Cups: Easy Crispy Appetizers for Parties and Game Day
 Mint Chocolate Chip Protein Balls: Easy No-Bake Energy Bites

 Main Dishes
 Drinks & Wellness