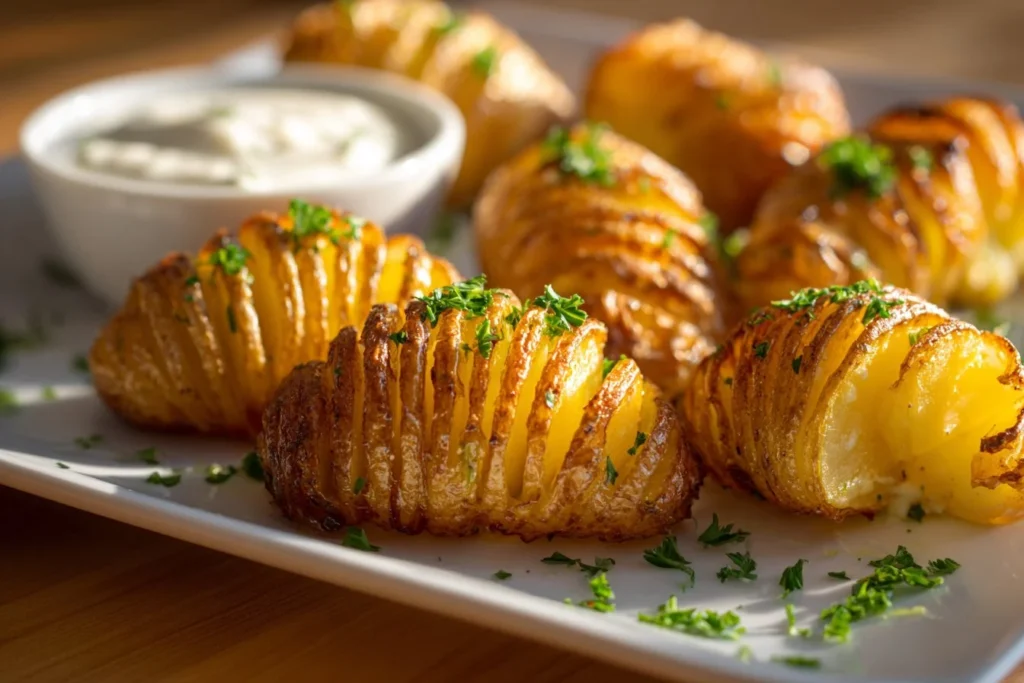
These crisp, fanned potatoes feel fancy but actually sit right at home on a weeknight table. Hasselback Potatoes give you that lovely contrast tender inside, lacy crisp edges on the outside. I like them because they look special and they barely ask for any extra work.
If you like cozy potato sides, you might also enjoy a sweet take like candied sweet potatoes. They’re different, but they pair well with the same kind of relaxed meal.
why make Hasselback Potatoes
You don’t need a lot of ingredients. Just a few things that most kitchens already have. The bake time does the heavy lifting. Put them in the oven and get a few other dishes ready. That quiet window feels like a gift.
They also sit well beside roast chicken, pork chops, or a simple salad. And they please picky eaters. Even kids call them “fun potatoes.” I learned that the first time I slid a tray out of the oven and watched the edges puff and brown. Worth it.
how to make them: A Quick Overview
You’ll shave tiny slices across each potato so it opens like a fan. Then butter goes in between the slices and over the top. The oven roasts the slices open and makes the edges crisp. That’s it.
If you want a different texture for a holiday table, try a creamy version like creamy scalloped potatoes another time. But for this, keep it simple and let the butter do the work.
List Of Ingredients To Make Hasselback Potatoes
- russet potatoes
- melted butter
- salt
- pepper
Directions And Clear Instructions To Make This Recipe
- Preheat your oven to 425°F (220°C).
- Wash and dry the russet potatoes.
- Using a sharp knife, make thin slices across the top of each potato, ensuring not to cut all the way through.
- Place the sliced potatoes on a baking sheet.
- Brush melted butter over the potatoes, making sure to get some in between the slices.
- Season with salt and pepper.
- Bake in the preheated oven for about 45-55 minutes, or until the potatoes are tender and crispy on the edges.
- Serve hot as a side dish.
how to serve them
Serve hot, straight from the oven. No fuss. A spoonful of sour cream or a sprinkle of chopped chives makes them feel a bit special. Or keep it simple: extra butter, a pinch more salt, and call it good.
They go well with roasted meats, a simple green salad, or even a big bowl of steamed veggies. If you want to keep things casual, let people help themselves right off the baking sheet. I do that a lot. It’s messier, yes, but more fun.
how to store them Properly
Cool them to room temperature first. Then wrap in foil or put in an airtight container. They keep well in the fridge for 3 to 4 days. Reheat in a 375°F oven for 10–15 minutes so the edges crisp up again. The microwave makes them soft, so avoid it unless you don’t mind losing the crisp.
If you stacked them while warm, they might steam and get soggy. I learned that the hard way. So give them space or a quick re-crisp in the oven.
Pro Tips to make them
Use a sharp knife. This helps make nice, even slices without smashing the potato. I rest chopsticks or wooden spoons on either side of a potato as a guard so my cuts don’t go all the way through. Works every time.
Brush butter thoroughly. Get some of it between the slices. That’s where the magic happens. And yes, more butter means better edges , not a scandal, just truth.
Turn them once halfway through baking for even color if your oven runs unevenly. If you want a crunchier top, add a small sprinkle of coarse salt in the last 10 minutes.
If you’re serving these with meat, try pairing them with a slow-cooked beef and potato combo like garlic butter beef bites and potatoes. It’s a hearty match.
Variation You Might Like
You can slide thin slices of garlic between a few slits before baking. Or grate a little sharp cheddar over them in the last 5 minutes so it melts and browns. Both are small changes. Both are delicious.
For a lighter note, brush with olive oil instead of butter. It won’t be as rich, but it still crisps.
FAQs
Q: Can I use other potatoes?
A: Yes. Yukons or red potatoes work. They won’t fan quite the same as russets, but they taste great. The thinner-skinned ones need a bit less time.
Q: How do I stop the slices from cutting all the way through?
A: Set the potato on two chopsticks or the handles of wooden spoons and cut across. The sticks act as a guard. Works like a charm.
Q: Do I need to peel them?
A: No. The skin crisps nicely and holds the slices together. I usually leave it on.
Q: Can I prepare them ahead?
A: You can slice them and store in cold water in the fridge for a few hours. Pat dry before buttering and baking. Don’t soak them overnight or they’ll get waterlogged.
Q: How do I make them extra crispy?
A: Use melted butter and give the oven time. Also, don’t overcrowd the baking sheet. Air needs to circulate. A final blast of high heat for 5 minutes helps, too.
Q: Are they good for parties?
A: Yes. They look special and serve well family-style. Just plan on baking in batches if you have a lot of guests.
Conclusion
If you want more step-by-step tips from a trusted source, this Hasselback Potatoes Recipe (So Buttery and Crispy!) | The Kitchn walks through the technique with photos. And for another solid home-cook take, see this Hasselback potatoes – RecipeTin Eats which has useful timing notes.
Thanks for cooking with me. Go crisp some edges.
Print
Hasselback Potatoes
- Total Time: 1 hour
- Yield: 4 servings
Description
Crispy, fanned potatoes that are tender inside with lacy, crisp edges, perfect as a side dish for any meal.
Ingredients
Main ingredients
- 4 pieces russet potatoes (Choose evenly sized potatoes for uniform cooking.)
- 1/2 cup melted butter (Butter for brushing; can replace with olive oil for a lighter version.)
- 1 teaspoon salt (Adjust to taste.)
- 1 teaspoon pepper (Adjust to taste.)
Instructions
Preparation
- Preheat your oven to 425°F (220°C).
- Wash and dry the russet potatoes.
- Using a sharp knife, make thin slices across the top of each potato, ensuring not to cut all the way through.
- Place the sliced potatoes on a baking sheet.
- Brush melted butter over the potatoes, making sure to get some in between the slices.
- Season with salt and pepper.
Baking
- Bake in the preheated oven for about 45-55 minutes, or until the potatoes are tender and crispy on the edges.
Serving
- Serve hot, straight from the oven. Optionally, top with a spoonful of sour cream or a sprinkle of chopped chives.
Notes
Cool the potatoes to room temperature and store in the fridge for 3 to 4 days. Reheat for optimal crispness. For extra flavor, slide thin slices of garlic between the potato slits or add grated cheddar in the last few minutes of baking.
- Prep Time: 10 minutes
- Cook Time: 50 minutes
- Category: Side Dish
- Cuisine: American


 Main Dishes
 Drinks & Wellness