Fried Chicken Buns with Cheese are what I crave when I need a cozy pick-me-up that hits all the comfort food buttons. Maybe you have random leftovers staring at you or kids who want something fun and handheld for dinner. Maybe you want a meal that feels special without being fussy. These buns are soft, cheesy, crispy in the right places, and super satisfying. I make them when I want that magical mix of crunchy chicken and gooey cheese wrapped in pillowy dough. If that sounds like your kind of happiness, you’re in the right place.
Essential Ingredients for the Best Crispy Fried Chicken Buns
Good buns start with good basics. If you’re like me, you want a grocery list that’s simple and makes sense. Here’s what I keep on hand for that perfect bite: tender chicken, reliable yeast dough, and melty cheese that makes you proud of your cheese pull.
- Chicken: Boneless skinless thighs for juiciness or breasts for a leaner bite.
- Marinade: Buttermilk, a splash of soy sauce, garlic, and a little hot sauce for flavor and tenderness.
- Breading: All-purpose flour, cornstarch for extra crunch, salt, pepper, paprika, and a pinch of cayenne.
- Cheese: Low-moisture mozzarella for stretch, plus cheddar or Gouda for flavor.
- Dough: Flour, instant yeast, warm milk, a bit of sugar, salt, and butter or oil.
- Sauce: Sweet soy, a touch of rice vinegar, chili paste, and honey to balance.
- Oil: Neutral oil like canola or peanut for frying.
Keep the marinade salty-sweet, the breading well-seasoned, and the cheese generous. That combo is your guaranteed path to great texture and flavor.
Choosing the Right Chicken: Thighs vs. Breasts for Maximum Juiciness
People always ask if thighs or breasts are better. Thighs give you that tender, juicy bite even if you slightly overcook them. Breasts are lean, so they’re lighter and still delicious, but they need more attention so they don’t dry out.
If you want a crowd-pleaser, go with thighs. If you prefer a lighter filling, use breasts and watch your internal temp closely. Aim for 165°F at the center, then rest the chicken for a few minutes before stuffing the buns so the juices settle instead of leaking into the dough.
On a weeknight, I sometimes use this oven method when I want easy prep: season and bake like in this reliable guide for baked chicken thighs, then chop and toss with sauce before assembling. It saves frying for later and still tastes amazing inside a bun.
The Secret to the Perfect Pillowy Yeast Dough
Soft buns start with a dough that’s slightly tacky but not sticky. Warm milk helps with tenderness, while a bit of sugar feeds the yeast and adds a hint of sweetness that pairs really well with savory chicken. Knead until the dough is smooth and bouncy. If it tears easily, keep kneading.
Let it rise in a warm spot until doubled. I like to rub the bowl with a tiny bit of oil so it doesn’t stick. After the first rise, punch it down gently, divide into portions, and let them rest for 10 minutes. That short rest makes the dough easier to stretch without springing back.
Step-by-Step Guide: How to Make Fried Chicken Buns with Cheese
Here’s the flow I use every time. It keeps the mess down and the results consistent.
Prep the Dough
Mix warm milk, yeast, and sugar. Let it get foamy. Add flour, salt, and a bit of butter or oil. Knead until smooth. Let rise until doubled. Divide into 8 to 10 pieces and rest while you make the filling.
Make the Chicken
Marinate chicken in buttermilk, soy, garlic, and hot sauce for at least 30 minutes. Dredge in seasoned flour and cornstarch. Fry at 350°F until crispy and cooked through. Rest on a rack. Chop into small pieces and toss with your sweet soy chili sauce.
Assemble and Fry
Flatten each dough piece into a circle. Add chicken, then a small handful of mozzarella and cheddar. Bring the edges up and pinch tightly to seal. Fry seam side down until golden, turning as needed. Spoon off any excess oil on a rack after frying.
That’s basically it. Once you’ve done it once, it’s a surprisingly simple routine. These Fried Chicken Buns with Cheese become second nature and kind of addictive to make.
Mastering the Filling: Balancing Sweet Soy Sauce and Spicy Chili
The filling is where the magic happens. I like a base of sweet soy with a little honey for shine and a spoon of chili paste for heat. If you’re heat shy, start small and add more after tasting. The trick is to go a bit bolder than you think, since the dough and cheese mellow everything out.
A tiny splash of rice vinegar brightens the sauce, and a sprinkle of sesame seeds or green onion adds a nice finish. Keep the chunks of chicken fairly small so they nest well inside the bun without tearing the dough.
Tips for the Ultimate “Cheese Pull” (Best Cheeses to Use)
We all want that moment when you tear a bun and the cheese stretches like a dream. For stretch, low-moisture mozzarella is your MVP. For flavor, mix in cheddar, Gouda, or provolone. Keep the cheese cold until you add it, and pack it directly in the center of the filling so it stays insulated.
Don’t overfill. I know it’s tempting. Too much cheese will break the seal and leak. Aim for a tablespoon or two per bun, depending on size. That’s the sweet spot for a great pull without blowouts.
How to Properly Seal and Shape Your Buns to Prevent Leaking
Flatten the dough gently with your fingers, keeping the edge slightly thinner than the center. Add the filling, then pinch the seams together firmly. Rotate and pinch a second time just to be sure. I like to twist the very tip and tuck it underneath like a little knot.
Set the buns seam side down on parchment while you finish assembling. If a bun feels fragile, chill it for 10 minutes. Cold dough is easier to control and less likely to burst when it hits the oil.
Frying vs. Air Frying vs. Baking: Which Method is Best?
Each method works, but they deliver slightly different results. Traditional frying gives the deepest color and loudest crunch. Air frying is fast and cleaner, with a respectable crisp. Baking is the lightest and easiest for a crowd.
Air Frying: Quick and Clean
Brush buns with a little oil and cook at 375°F until golden, about 10 to 14 minutes depending on size. Flip once. If you love your air fryer like I do, check out these crispy-cheesy ideas for air fryer chicken mozzarella wraps for more cheesy inspiration.
Baking: Lighter but Still Tasty
Egg wash the buns, sprinkle with sesame seeds, and bake at 375°F for 15 to 20 minutes. They won’t be as crunchy as fried, but the dough turns a lovely golden color and the cheese melts beautifully. Great for family meals and meal prep.
Pro Tips for Achieving a Golden-Brown Crispy Exterior Every Time
Keep your oil at a steady 350°F. Too hot and they brown before the center warms through. Too cool and they absorb oil and turn greasy. Fry in batches to avoid crowding. Use a rack instead of paper towels after frying to keep the bottoms from steaming.
Season the buns right after they come out. A tiny pinch of salt on the outside at the end wakes everything up. Also, let the buns sit for 5 minutes so the cheese settles before serving. That wait is worth it.
Creative Recipe Variations: Spicy Buffalo, BBQ, or Korean-Style Filling
Once you’ve mastered the base, flavor adventures are easy. Toss the chicken with Buffalo sauce and a little ranch powder. Or go smoky with BBQ sauce and shredded sharp cheddar. For Korean-style, use gochujang, sesame oil, and a little brown sugar, then finish with scallions.
If you’re craving extra heat and a hint of sweet, this flavorful bang bang chicken twist makes a killer filling too. The sauce clings to the chicken and brings the right level of kick.
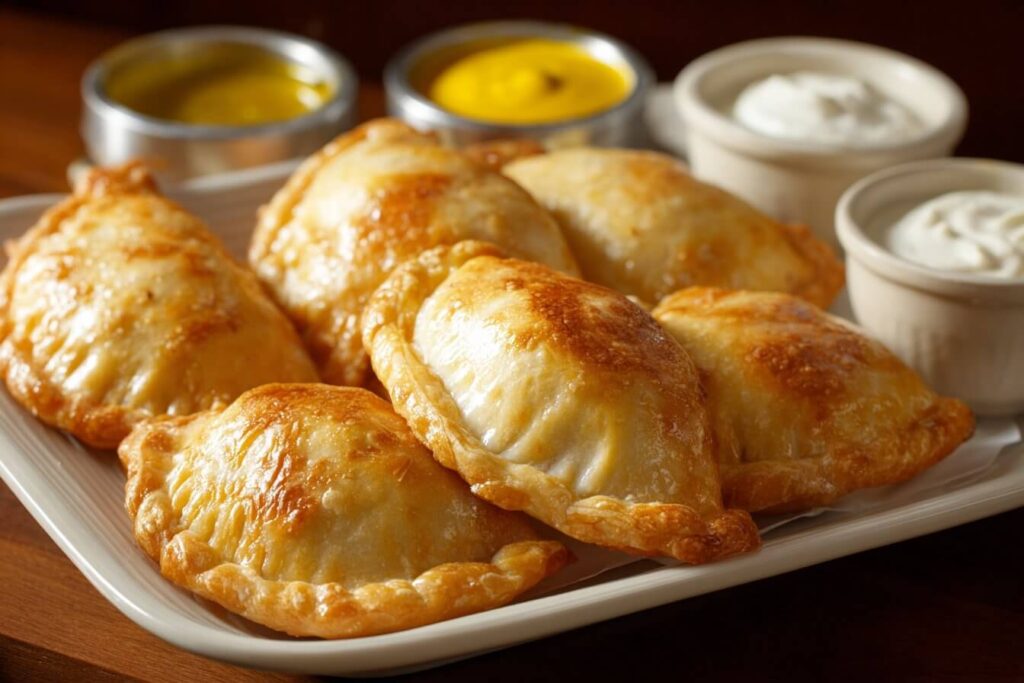
Serving Suggestions: Best Dipping Sauces and Side Dishes
I’m a dips person, so I serve at least two. My favorite lineup includes:
Spicy mayo with lime, honey mustard, and garlic soy with a little sesame oil. For sides, a crunchy slaw or sliced cucumbers with rice vinegar keeps things bright. If I want to stick with the cheesy vibe, these cheesy garlic chicken wraps make an amazing side-by-side option for a party platter.
Storage and Reheating Guide: How to Keep Buns Crispy the Next Day
Let buns cool completely, then store in an airtight container in the fridge for up to 3 days. Reheat in a 350°F oven or air fryer until the crust crisps and the center is hot. Microwaves soften the exterior, so I avoid them unless I’m in a rush.
To freeze, wrap each bun tightly, then bag them. Reheat from frozen in the oven or air fryer. The cheese still melts, and the dough holds up well. I love having a stash ready for busy nights.
Common Questions
Q: Can I make the dough ahead?
A: Yes. Make the dough, let it rise once, then refrigerate up to 24 hours. Bring to room temp before shaping.
Q: What oil is best for frying?
A: Use a neutral, high-heat oil like canola or peanut. They keep flavors clean and fry evenly.
Q: How do I prevent cheese leaks?
A: Don’t overfill, keep cheese in the center, and seal the seam twice. Chill filled buns briefly before frying if needed.
Q: Can I use rotisserie chicken?
A: Absolutely. Chop it small, warm it in sauce, then stuff. It’s a great shortcut and still tasty.
Q: What if I don’t want to deep fry?
A: Air fry or bake. You’ll still get a good crust and melty center with less oil.
A Cozy Final Bite You’ll Want to Make Again
These Fried Chicken Buns with Cheese hit that perfect balance of crunchy, saucy, and soft. Start with a pillowy dough, a bold but balanced filling, and a generous cheesy center. The rest is just practice and a bit of patience while they fry.
If you love a good handheld meal, this is your new go-to. For more cheesy comfort, try fun spins like these baked chicken tenders on the side or a bright salad for balance. And if the hot honey vibe is calling your name, take a peek at this mouthwatering Hot Honey Pimento Cheese Fried Chicken Sandwich by Carla Hall for more sweet heat ideas that pair perfectly with buns like these.
Give it a shot, trust your senses, and enjoy that first cheesy tear. Once you master these Fried Chicken Buns with Cheese, you’ll want them in the regular rotation. For another flavor path that’s bold and peppery, you might also enjoy this simple riff on black pepper chicken on a weeknight. Happy cooking, and may your cheese pulls be long and proud.
Print
Fried Chicken Buns with Cheese
- Total Time: 1 hour 30 minutes
- Yield: 8 buns
Description
Crispy and cheesy Fried Chicken Buns wrapped in pillowy dough, perfect for a cozy meal or fun handheld dinner.
Ingredients
For the Chicken
- 1 lb Boneless skinless chicken thighs or breasts (Thighs for juiciness, breasts for a leaner bite.)
- 1 cup Buttermilk (For marinating.)
- 1 tbsp Soy sauce (Add to the marinade.)
- 2 cloves Garlic (Minced, for marinade flavor.)
- 1 tbsp Hot sauce (For additional flavor.)
- 1 cup All-purpose flour (For breading.)
- 1/4 cup Cornstarch (For extra crunch.)
- 1 tsp Salt (To season the breading.)
- 1 tsp Black pepper (To season the breading.)
- 1 tsp Paprika (To season the breading.)
- 1/4 tsp Cayenne pepper (For a little heat.)
For the Buns
- 3 cups Flour (Base for the dough.)
- 2 tsp Instant yeast (For the dough rise.)
- 1 cup Warm milk (Helps with tenderness.)
- 1 tbsp Sugar (Feeds the yeast.)
- 1 tsp Salt (For flavor.)
- 2 tbsp Butter or oil (For the dough.)
For the Cheese
- 1 cup Low-moisture mozzarella (For stretch.)
- 1/2 cup Cheddar or Gouda (For flavor.)
For the Sauce
- 1/4 cup Sweet soy sauce (For a flavorful binding sauce.)
- 1 tbsp Rice vinegar (A touch for brightness.)
- 1 tbsp Chili paste (For heat.)
- 1 tbsp Honey (To balance the flavors.)
For Frying
- 2 cups Neutral oil (canola or peanut) (For frying the buns.)
Instructions
Prep the Dough
- Mix warm milk, yeast, and sugar. Let it get foamy.
- Add flour, salt, and butter or oil. Knead until smooth.
- Let dough rise until doubled in size.
- Divide into 8 to 10 pieces and rest while you make the filling.
Make the Chicken
- Marinate chicken in buttermilk, soy sauce, garlic, and hot sauce for at least 30 minutes.
- Dredge marinated chicken in seasoned flour and cornstarch.
- Fry at 350°F until crispy and cooked through, then let rest on a rack.
- Chop the chicken into small pieces and toss with sweet soy chili sauce.
Assemble and Fry
- Flatten each piece of dough into a circle.
- Add a portion of the chicken, followed by a handful of mozzarella and cheddar.
- Bring the edges up and pinch tightly to seal.
- Fry seam side down until golden, turning as needed.
- Spoon off any excess oil on a rack after frying.
Notes
Serve with dipping sauces like spicy mayo or honey mustard. Store leftovers in an airtight container for up to 3 days.
- Prep Time: 1 hour
- Cook Time: 30 minutes
- Category: Main Course, Snack
- Cuisine: American
Related posts:
 Sweet Potato Bowl Recipes 2025: 10 Viral Ideas to Try at Home
 Crockpot Sausage and Green Beans: Dump-and-Go Recipe
 Why This Crockpot Chicken Pot Pie Is the Easiest Comfort Food
 Cajun Potato Soup for Holidays and Cold Weather
 Delicious Shrimp and Corn Chowder That Will Warm Your Heart
 Crunchy Crispy Air Fryer Chicken & Mozzarella Wraps | Easy Air Fryer Recipe

 Main Dishes
 Drinks & Wellness